Hi,
It sounds like the brake master cylinder is bad. Is the fluid level full? Also, you indicated there are no leaks. If it is full and there are no leaks, what is likely happening is the brake fluid is bypassing the piston plungers in the master cylinder. It isn't uncommon. When the engine is off, you don't have the power assist, so you may not be pressing hard enough to cause it to hit the floor.
Take a look through this link first.
https://www.2carpros.com/articles/brake-pedal-goes-to-the-floor
Let me know your thoughts on the above link. If you feel I'm correct and the master cylinder is bad, here is a link that shows in general how one is replaced:
https://www.2carpros.com/articles/how-to-replace-a-brake-master-cylinder
Again, the only way the brake pedal would go to the floor is if there was a leak, excessive air in the system (which wouldn't have happened unless the system was opened) or the master cylinder is bypassing fluid.
Here are the specific directions for your vehicle. The attached pics correlate with the directions. When replacing it, you will need to remove the reservoir from the old master cylinder and reuse it on the new one. I will attach those directions as well. And, the new master cylinder will need what is called bench bleed first before the install. Those will be last.
________________________________________
2006 Buick Truck Rendezvous FWD V6-3.5L VIN L
Master Cylinder Replacement
Vehicle Brakes and Traction Control Hydraulic System Brake Master Cylinder Service and Repair Removal and Replacement Master Cylinder Replacement
MASTER CYLINDER REPLACEMENT
Master Cylinder Replacement
Removal procedure
Caution: Refer to Brake Fluid Irritant Caution in Service Precautions.
Notice: Refer to Brake Fluid Effects on Paint and Electrical Components Notice in Service Precautions.
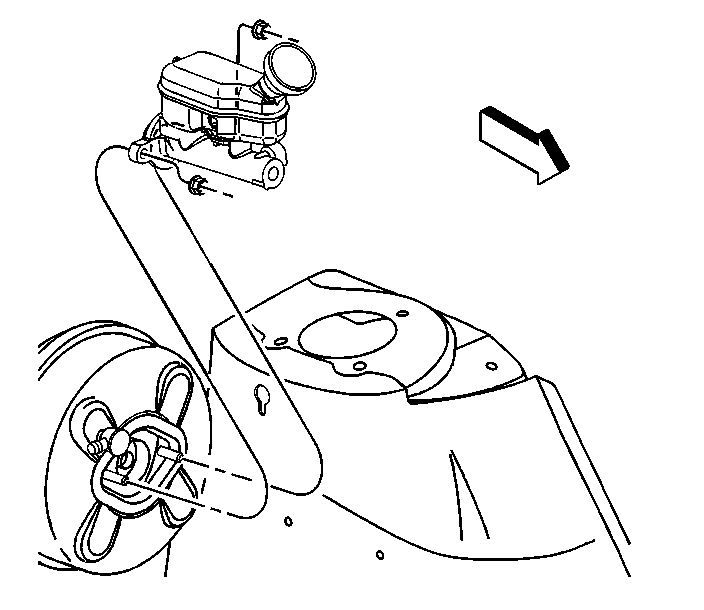
pic 1
1. Disconnect brake pipes from the master cylinder.
2. Disconnect fluid level sensor electrical connector.
3. Remove master cylinder mounting nuts.
4. Remove the master cylinder.
5. Drain the master cylinder reservoir of all brake fluid.
6. Remove the master cylinder reservoir.
Installation Procedure
pic 2
1. Install the master cylinder reservoir.
2. Bench bleed the master cylinder prior to installation.
3. Install the master cylinder.
Notice: Refer to Fastener Notice in Service Precautions.
4. Install the master cylinder mounting nuts.
Tighten the master cylinder mounting nuts to 25 Nm (18 ft. lbs.).
5. Connect the fluid level sensor electrical connector.
6. Connect the brake pipes to the master cylinder.
Tighten the master cylinder tube nuts to 15 Nm (11 ft. lbs.).
7. Fill the master cylinder reservoir with brake fluid.
8. Bleed the brake system.
_________________________________________________________
Reservoir Removal and Replacement.
2006 Buick Truck Rendezvous FWD V6-3.5L VIN L
Master Cylinder Reservoir Replacement
Vehicle Brakes and Traction Control Hydraulic System Brake Master Cylinder Service and Repair Removal and Replacement Master Cylinder Reservoir Replacement
MASTER CYLINDER RESERVOIR REPLACEMENT
Master Cylinder Reservoir Replacement
Removal Procedure
Caution: Refer to Brake Fluid Irritant Caution in Service Precautions.
Notice: Refer to Brake Fluid Effects on Paint and Electrical Components Notice in Service Precautions.
1. Remove the master cylinder.
Notice: Do not overtighten vise, or damage to the master cylinder will result.
2. Clamp the flange on the master cylinder body in a vise. Do not clamp the master cylinder body.
pic 3
3. Drive out the spring pins. Use a suitable punch. Do not damage the reservoir or the cylinder body when pushing out the pins.
pic 4
4. Remove the reservoir body (3) by pulling the body straight up and away from the cylinder body.
5. Remove the O-rings (4) from the grooves in the reservoir.
6. Inspect the reservoir for cracks or deformation. Replace the reservoir if necessary.
7. Clean the reservoir. Use clean denatured alcohol.
8. Dry the reservoir. Use non-lubricated compressed air.
Installation Procedure
pic 5
1. Lubricate the new O-rings and the reservoir-to-housing fittings. Use clean brake fluid.
2. Insert the O-rings (4) into the grooves in the reservoir. Ensure that the O-rings are properly seated.
3. Install the reservoir (3) to the master cylinder body. Use your hand in order to push the reservoir straight down into the body.
pic 6
4. Install the spring pins in order to retain the reservoir. Do not damage the reservoir or the cylinder body.
5. Install the master cylinder.
__________________________________________________________
Bench Bleeding
2006 Buick Truck Rendezvous FWD V6-3.5L VIN L
Master Cylinder Bench Bleeding
Vehicle Brakes and Traction Control Hydraulic System Brake Bleeding Service and Repair Procedures Master Cylinder Bench Bleeding
MASTER CYLINDER BENCH BLEEDING
Master Cylinder Bench Bleeding
Caution: Refer to Brake Fluid Irritant Caution in Service Precautions.
Notice: Refer to Brake Fluid Effects on Paint and Electrical Components Notice in Service Precautions.
Notice: When adding fluid to the brake master cylinder reservoir, use only Delco Supreme 11(R), GM P/N 12377967 (Canadian P/N 992667), or equivalent DOT-3 brake fluid from a clean, sealed brake fluid container. The use of any type of fluid other than the recommended type of brake fluid, may cause contamination which could result in damage to the internal rubber seals and/or rubber linings of hydraulic brake system components.
pic 7
1. Secure the mounting flange of the brake master cylinder in a bench vise so that the rear of the primary piston is accessible.
2. Remove the master cylinder reservoir cap and diaphragm.
3. Install suitable fittings to the master cylinder ports that match the type of flare seat required and also provide for hose attachment.
4. Install transparent hoses to the fittings installed to the master cylinder ports, then route the hoses into the master cylinder reservoir.
5. Fill the master cylinder reservoir to at least the half-way point with Delco Supreme 11(R), GM P/N 12377967 (Canadian P/N 992667), or equivalent DOT-3 brake fluid from a clean, sealed brake fluid container.
6. Ensure that the ends of the transparent hoses running into the master cylinder reservoir are fully submerged in the brake fluid.
7. Using a smooth, round-ended tool, depress and release the primary piston as far as it will travel, a depth of about 25 mm (1 inch), several times. Observe the flow of fluid coming from the ports. As air is bled from the primary and secondary pistons, the effort required to depress the primary piston will increase and the amount of travel will decrease.
8. Continue to depress and release the primary piston until fluid flows freely from the ports with no evidence of air bubbles.
9. Remove the transparent hoses from the master cylinder reservoir.
10. Install the master cylinder reservoir cap and diaphragm.
11. Remove the fittings with the transparent hoses from the master cylinder ports. Wrap the master cylinder with a clean shop cloth to prevent brake fluid spills.
12. Remove the master cylinder from the vise.
_________________________________________________
Let me know if this helps or if you have other questions. If you run into trouble, let me know.
Take care,
Joe
Images (Click to make bigger)
SPONSORED LINKS
Sunday, June 7th, 2020 AT 8:11 PM