Bolt head size that holds starter

Tiny
LUIS
  • MEMBER
  • 2000 CHEVROLET TAHOE
  • 5.7L
  • V8
  • 2WD
  • AUTOMATIC
  • 275,000 MILES
What size socket is used to remove the starter?
Monday, July 15th, 2019 AT 5:56 PM

11 Replies

Tiny
SCGRANTURISMO
  • MECHANIC
  • 4,897 POSTS
Hello,

Fastener or"Bolt" sizes do not go by the size of the head. They go by the width of the fastener(either (M)etric or Automotive Standard Excellence(ASE)(standard),length of the fastener, and pitch of the threads. A 15 MM socket should work for the mounting bolts. Please get back to us and let us know how it turns out.

This guide should help walk you through the steps.

https://www.2carpros.com/articles/how-to-replace-a-starter-motor

Thanks,
Alex
2CarPros
Was this
answer
helpful?
Yes
No
Monday, July 15th, 2019 AT 8:24 PM
Tiny
JACOBANDNICKOLAS
  • MECHANIC
  • 108,432 POSTS
The hex size isn't listed in the manual. However, I believe it is either 14mm or 15mm. Keep in mind, you will need to remove the wiring from the solenoid. Just make sure the battery is disconnected before you start. Check out the diagrams (Below). Please let us know if you need anything else to get the problem fixed.

Here is a link that explains how in general a starter is replaced:

https://www.2carpros.com/articles/how-to-replace-a-starter-motor

Here are the directions specific to removal and replacement of the starter for your vehicle. The attached pictures correlate with the directions.

REMOVAL PROCEDURE

CAUTION: Refer to Battery Disconnect Caution in Service Precautions.

1. Disconnect the battery negative cable.
2. Raise the vehicle and support with suitable safety stands.
3. Disconnect the battery positive cable and the wiring harness from the starter.
4. Remove the starter mounting bolts and washers (with the shims, if equipped).
5. Remove the starter.
6. Note the position of the snap-on shield and then remove the shield as necessary.

INSTALLATION PROCEDURE

NOTE: Refer to Fastener Notice in Service Precautions.
1. Install the starter mounting bolts and washers, through the starter to the engine.

Tighten
Tighten the starter mounting bolts to 45 N.m (33 lb ft).
2. Install the wiring harness and the battery positive cable to the starter.

Tighten
- Tighten the battery cable to the solenoid to 10 N.m (89 lb in).
- Tighten the ignition switch wires to the solenoid to 2 N.m (18 lb in).
3. Install the snap-on starter shield as necessary. Ensure that the shield is aligned properly.
4. Remove the stands and lower the vehicle.
5. Connect the battery negative cable.

Check out the diagrams (Below). Please let us know if you need anything else to get the problem fixed.
Was this
answer
helpful?
Yes
No
+3
Monday, July 15th, 2019 AT 8:57 PM
Tiny
LUIS
  • MEMBER
  • 6 POSTS
I ask becuase I need to replace the Camshaft Positioning Sensor.
The YouTube video I viewed explained the starter needed to be removed in order to access and replace the sensor.

Thank you fellas and God bless you.
Was this
answer
helpful?
Yes
No
Monday, July 15th, 2019 AT 9:14 PM
Tiny
JACOBANDNICKOLAS
  • MECHANIC
  • 108,432 POSTS
Welcome back: Check out the diagrams (Below). Please let us know if you need anything else to get the problem fixed.

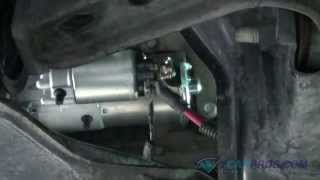
Do you mean the camshaft sensor or crankshaft position sensor? If it is the camshaft position sensor, you are at the wrong place on the engine. Behind the starter is the crankshaft position sensor. The camshaft position sensor on this vehicle is in the distributor.

Here are the directions for replacing the camshaft position sensor. The attached pictures correlate with the directions. Also, when you remove the distributor cap, make sure to make which spark plug wire goes to which tower on the distributor cap. They must be put back in the same place or ignition timing will not be correct. If possible, leave them connected and carefully move the distributor cap out of the way.

CAUTION: Refer to Battery Disconnect Caution in Service Precautions.

1. Disconnect the negative battery cable.
2. Disconnect the spark plug wires and ignition coil wire from the distributor.

3. Disconnect the Camshaft Position (CMP) sensor harness connector from the distributor.

4. Remove the distributor cap screws.

5. Remove the distributor cap.

6. Remove the rotor screws.
7. Remove the rotor.

8. Align the square slot in the reluctor wheel with the CMP sensor.

9. Remove the CMP sensor fasteners.
10. Remove the CMP sensor.

INSTALLATION PROCEDURE

IMPORTANT: Do not use the old cap screws, CMP sensor screws, or rotor screws. Use replacement screws that have been coated with a thread locking compound. Precoated replacement distributor cap and CMP sensor screws can be acquired using P/N 10475922 (pkg of 10 screws). Precoated replacement rotor screws can be acquired using P/N 10475924 (pkg of 10 screws).

1. Align the square slot in the reluctor wheel with the CMP sensor.
2. Insert the CMP sensor through the reluctor wheel slot.

NOTE: Refer to Fastener Notice in Service Precautions.

3. Install new CMP sensor mounting screws.

Tighten
Tighten the screws to 1.6-2.8 N.M (14-25 lb in.).

IMPORTANT: The locating tabs on the rotor are necessary for correct alignment of the rotor. If the tabs are missing or damaged, replace the rotor.

4. Install the rotor onto the reluctor wheel.
5. Install new rotor screws.

Tighten
Tighten the screws to 1.5-2.4 N.M (13-22 lb in.).

6. Install the distributor cap.
7. Install new distributor cap screws.

Tighten
Tighten the screws to 1.8-3.0 N.M (16-26 lb in.).

8. Connect the CMP sensor harness connector.

9. Connect the spark plug wires and ignition coil wire.
10. Connect the negative battery cable.

Check out the diagrams (Below). Please let us know if you need anything else to get the problem fixed.
Was this
answer
helpful?
Yes
No
+1
Monday, July 15th, 2019 AT 9:48 PM
Tiny
LUIS
  • MEMBER
  • 6 POSTS
P1345 Description Category: Engine Performance - The Crankshaft Position (CKP) Sensor and Camshaft Position (CMP) Sensor are mounted close to the end of the Crankshaft and near the end of the Camshaft respectively. They work in harmony to send electrical signals to the Power-train Control Module (PCM) which uses the information to control spark timing which is an integral part of the combustion process. In this instance, the electrical signals sent from the CKP and CMP Sensors are out of sync and the PCM has read this, turned on the Check Engine Light and set the trouble code. The engine may not start, start and stall or run but very poorly. Some of the reasons this code set could be a faulty Camshaft Position Sensor, faulty Crankshaft Position Sensor, the engine's mechanical condition could be poor or the sensors have worked their way loose in their brackets. Further diagnosis at a professional repair facility will be required to determine the actual cause of the problem.

This is what the Hum diagnostic gave me and the Tahoe doesn't start
Was this
answer
helpful?
Yes
No
Monday, July 15th, 2019 AT 9:54 PM
Tiny
JACOBANDNICKOLAS
  • MECHANIC
  • 108,432 POSTS
Welcome back:

I need you to check if there is spark to the plugs. Also, do you have a live data scanner? If you do, check to see if there is an RPM signal on the scanner when you crank the engine.

I added the second post because you said camshaft sensor. On this vehicle, it is located in the distributor and I didn't want you to remove the starter if that is what you wanted to replace.

Now, there are a few different things that can cause this code. A loose cam sensor, excessive play in the timing chain, if the distributor was removed and is a tooth off when it was reinstalled, loose rotor in the distributor or even a missing distributor hold down bolt.

If you let me know about the spark or if there is an RPM signal, I will be better able to direct you. Also, at 275,000 miles, it could be timing chain related.

Here is a link to help check for spark:

https://www.2carpros.com/articles/how-to-test-an-ignition-system

Let me know if you have questions or need help. I will watch for your reply.

One last thing, when the starter engages and the engine is cranking, does it sound normal other than it won't start?

Let me know.

Take care,
Joe

Was this
answer
helpful?
Yes
No
+1
Tuesday, July 16th, 2019 AT 7:45 PM
Tiny
LUIS
  • MEMBER
  • 6 POSTS
Is sounds like its trying to start but bogs down and stops.
Was this
answer
helpful?
Yes
No
Tuesday, July 16th, 2019 AT 8:17 PM
Tiny
JACOBANDNICKOLAS
  • MECHANIC
  • 108,432 POSTS
Welcome back:

Is it possible for you to record what it is doing on your cell phone and upload it? That way I can hear and see what is happening.

Let me know.

Joe
Was this
answer
helpful?
Yes
No
+1
Tuesday, July 16th, 2019 AT 8:31 PM
Tiny
LUIS
  • MEMBER
  • 6 POSTS
Thank you. Did it upload?
Was this
answer
helpful?
Yes
No
Tuesday, July 16th, 2019 AT 9:09 PM
Tiny
JACOBANDNICKOLAS
  • MECHANIC
  • 108,432 POSTS
Welcome back:

Yes it did upload. I have to be honest, it sounds like it could be a timing issue. Not being there makes it tough, but when it cranks, do you notice how the starter speeds and slows down? That is usually an indication of either a compression issue or timing.

I hate to ask this, but I think at this point, we need to check engine compression to see if there is a possible timing issue. Here is a link that shows how it's done. It will require a compression gauge, but most parts stores will lend that to you.

https://www.2carpros.com/articles/how-to-test-engine-compression

Please understand, I am listening to a recording. I hate to ask people to do things and then be wrong, but it doesn't sound right to me. Almost like it's out of time.

Before you do the compression test, please check for ignition spark as described in the link I attached above. Also, let me know if you have questions.

Also, try one other thing. See if it starts using starting fluid.

Take care,
Joe
Was this
answer
helpful?
Yes
No
+1
Tuesday, July 16th, 2019 AT 9:51 PM
Tiny
LUIS
  • MEMBER
  • 6 POSTS
Just to let you know. Within the last three months the Hum App pushed out other sensor issues. I have replaced the MAP, MAF, and the computer a few months ago.

Thank you for your knowledge.

Luis
Was this
answer
helpful?
Yes
No
Tuesday, July 16th, 2019 AT 10:28 PM

Please login or register to post a reply.

Sponsored links