
Need to replace your car's air conditioner compressor? We are a team of certified mechanics who have created this guide so you can save money and get the satisfaction of doing the job yourself, or to see what you are paying for when taking your car is for repairs. While this job might seem intimidating, it's not too bad once you get comfortable seeing it done first.
What Goes Wrong?
The compressor is basically a refrigerant pump with an internal seals that can go bad hindering the compressors performance. Additionally, external seals are used to help contain the system's refrigerant which can leak warranting replacement. External clutch style compressors (most popular) can fail and make noise when the system is switched on.
SPONSORED LINKS
Getting Started
When doing any a/c repair is a good idea to know how an air conditioner system works, so you may have a better understating of the system's operation. Before opening the system up you must check to see if any refrigerant is left inside before disassembly. Before work begins park the vehicle on a flat surface with the emergency brake on, engine off, while wearing protective eye wear and gloves. If the system is still under pressure the refrigerant must be vacuumed down - Video.
Tools and Supplies Needed:
- Replacement AC compressor
- Air conditioner gauge set
- Vacuum pump
- Tool set
- PAG oil
Disconnect the negative side of the battery to avoid electrical short when working.
Step 1: Serpentine Belt Removal
Unbolt and remove any tubing or hoses to gain access to the serpentine belt for removal. This tubing is used for emissions and air filter intake proposes and is usually easily removed by undoing minor bolts or screws. Next, the serpentine belt must be removed which drives the compressor except for hybrid and electric cars.
Step 2: Compressor Removal
Once the system is void of refrigerant the compressor removal can begin, To gain access to the compressor you may need to remove accessories such as an alternator, power steering pump or brackets.
SPONSORED LINKS
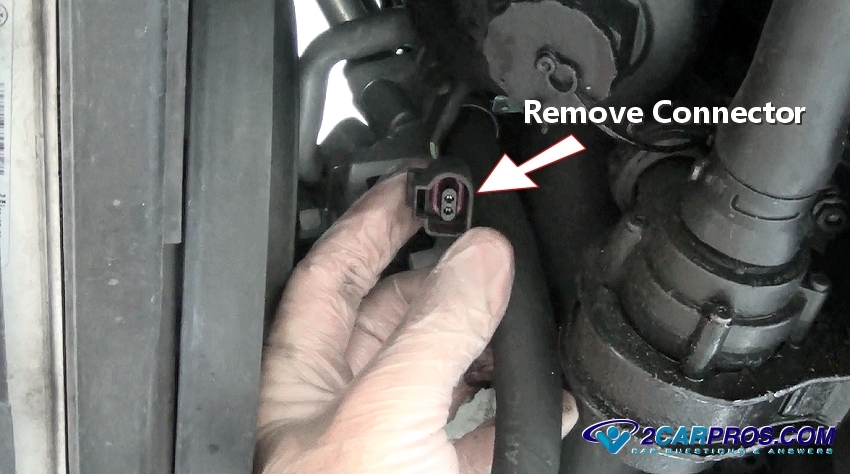
Locate the electrical connectors on the front or rear of the compressor and disconnect, use a small pick or screwdriver to release the connector safety. If this connector cannot be seen, or its too difficult to remove you can do so once the mounting bolts have been removed for the compressor.
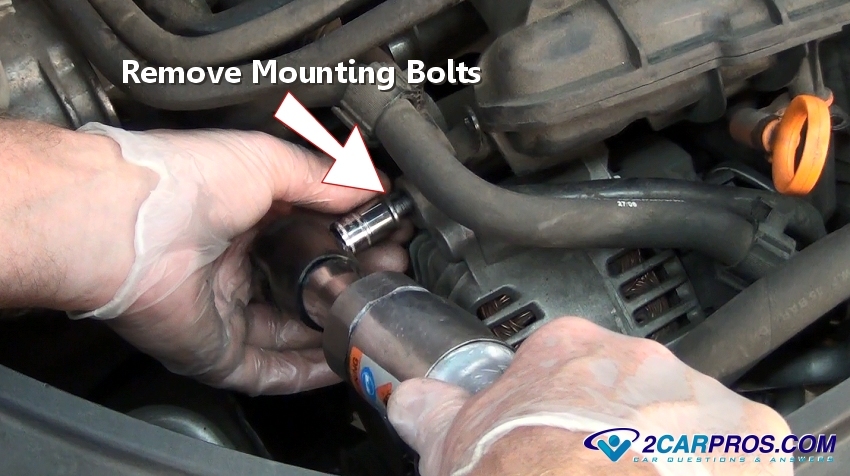
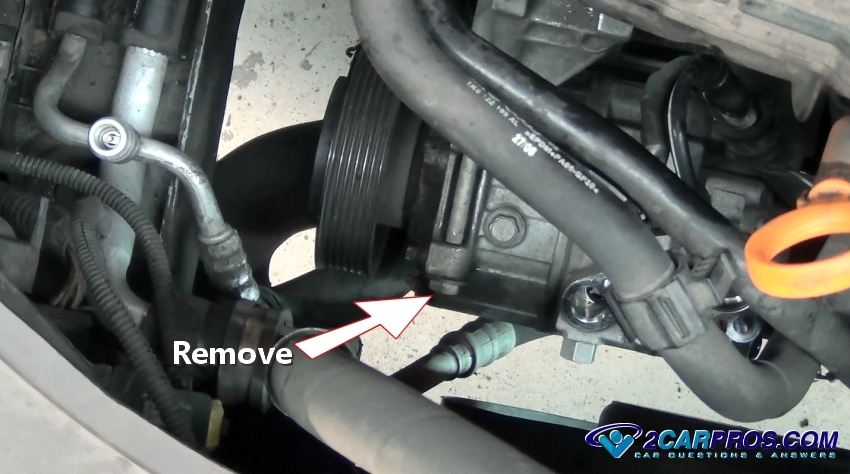
Locate and remove the high and low side refrigerant line mounting bolts or flare nuts depending on the manufacturer's design. Again, on some models this step may need to be performed after the mounting bolts have been removed and the compressor is loose.

SPONSORED LINKS
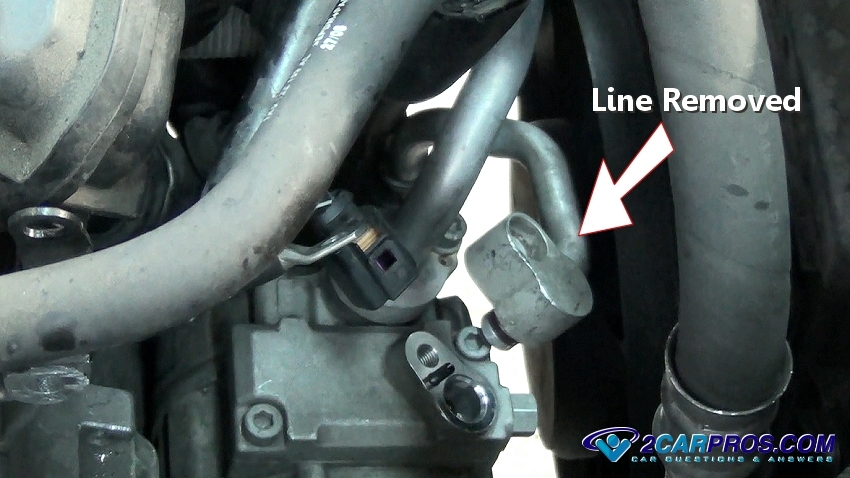
Firmly grasp and wiggle the bulkhead of the refrigerant lines to slowly pull upward to disconnect them from the compressor. There is an O ring seal which can make a tight fit, also a small amount of refrigerant (pressure) maybe released as well which is normal. Complete this step by removing both high and low side hoses.
Locate and remove lower and upper mounting bolts. These bolts can consist of long and short bolts which sometime can be obscure and difficult to get to, if so use a universal joint socket or small wrench to aid in the removal. Always leave at least one loose bolt connected to the bracket or block to hold the unit in place.

Grasp the unit while removing the last mounting bolt. The compressor is a little heavy and a bit awkward so be careful it doesn't fall and cause damage to the unit or yourself. Once completely loose remove it from the engine bay. This can sometimes take some finagling, or possibly even loosening the engine mounts while using a floor jack under the oil pan with a block of wood to help lift or lower it slightly. Other times the radiator or cooling fan shroud must be removed as well.
SPONSORED LINKS
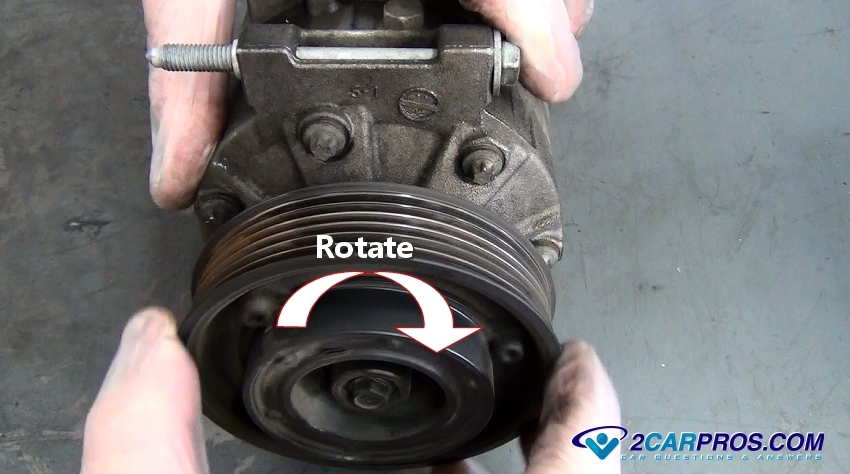
Step 3: Checking the Old Compressor for Damage
Once the old AC compressor has been removed, turn the pulley or clutch to determine its condition by checking for rough movement or grinding noises. If present, this sometimes can mean the system is contaminated with foreign metal or seal material debris from the failed unit which can plug the orifice tube or expansion valve. In these cases the system must be flushed by using an a/c system flush kit which can be purchase from Amazon or the local parts store.
If the system is completely plugged its best to replace the condenser and expansion valve or orifice tube, along with the receiver dryer or accumulator depending on the system design. Inspect for obvious contamination by looking inside the refrigerant lines or intake and exhaust ports for particles.
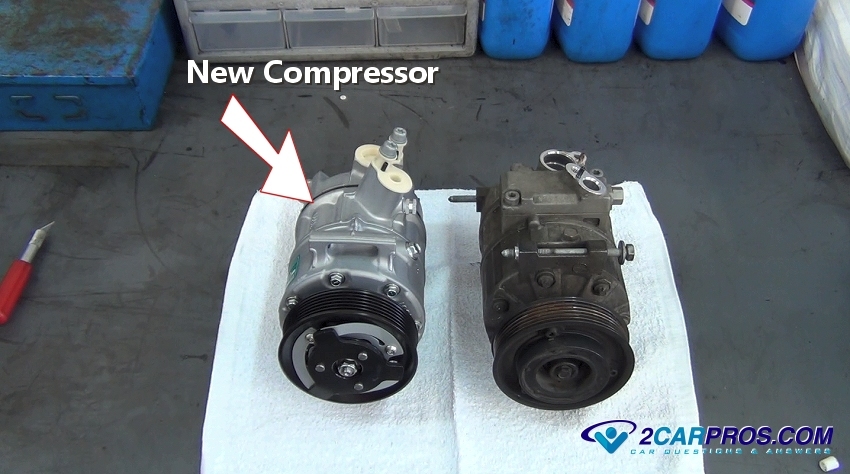
Step 4: Preparing the New Compressor
Compare the new compressor to the old unit to ensure a proper installation. Sometimes the replacement unit can look slightly different due to updates and slight design variations. One thing to look for is the configuration of the refrigerant ports on both the intake and exhaust sides. Also, check the belt pulley by counting the number of ribs which the belt must ride in, also the outside diameter of the pulley must be correct as well.
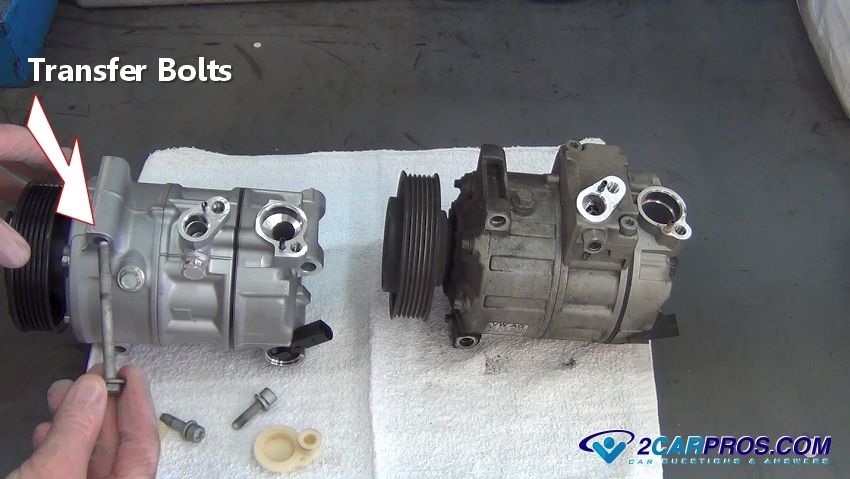
When installing the new compressor into the engine bay it's a good idea to transfer some of the mounting bolts from the old unit to the new one before lowering or raising it into the engine bay, this will help for an easier installation.
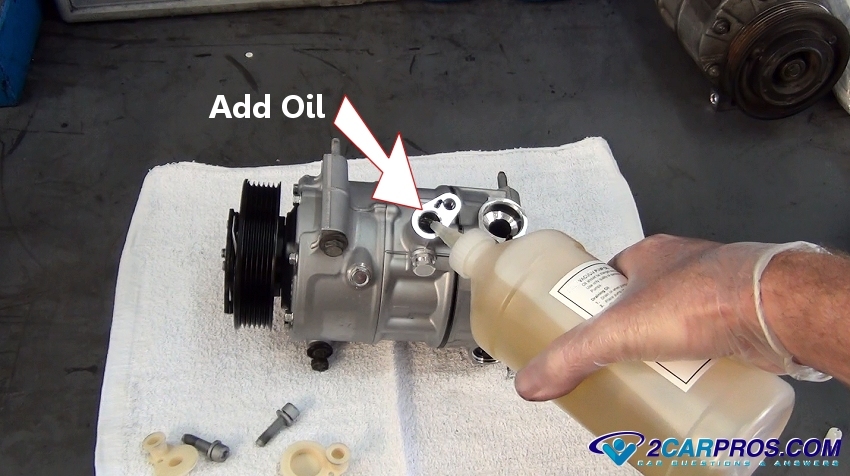
Though the system has PAG oil throughout its internal workings and is usually including in the new compressor, it's a good idea to drain the new compressor of and then add new oil to ensure proper lubrication before installation, then reinstall dust caps. Some units have the correct amount of oil already installed, be sure to read the installation tag which is supplied with the replacement unit.
SPONSORED LINKS
Step 5: Replacing O Ring Seals
O rings are used to seal the high and low side lines to the compressor housing. These sealing surfaces must be clean and free from dirt or damage to keep them from leaking. Use a small screwdriver or pick to carefully remove the old O ring seals from both the high and low side lines without scoring the sealing surfaces.
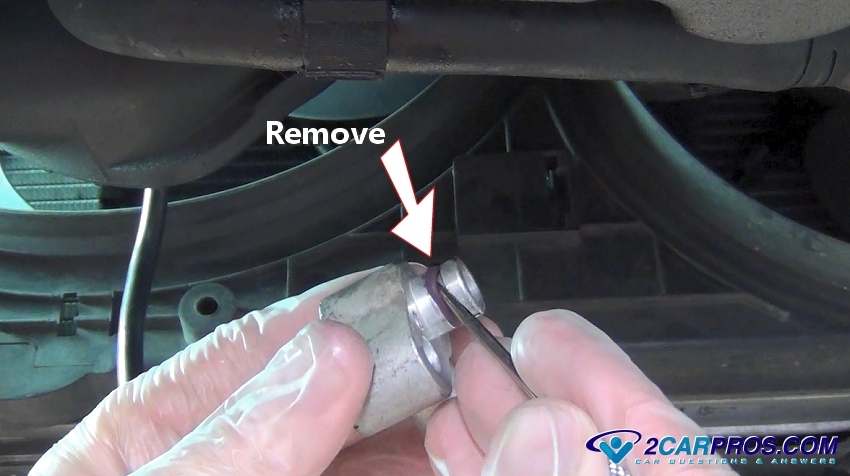
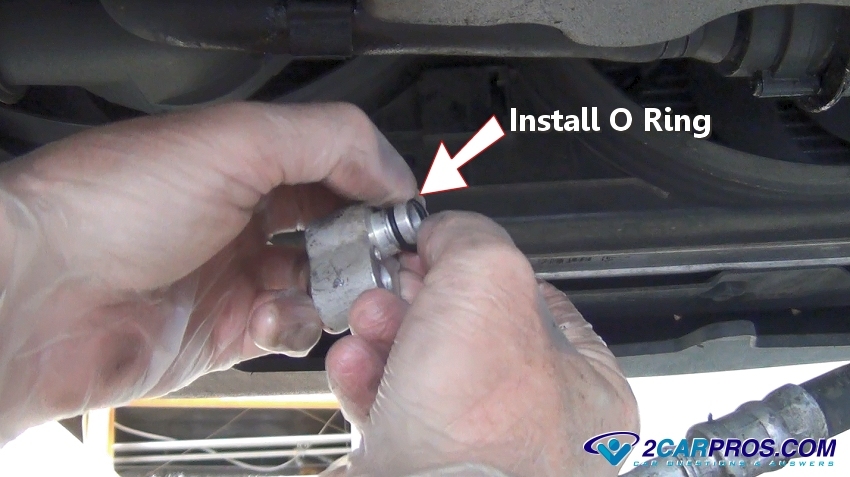
Match the old O rings to the new ones to ensure a proper seal. Keep an eye on the O ring thickness because some rings can be smaller in diameter then others. It's a good idea not to reuse the old seals because they become flattened over time due to pressure and heat and may leak which would cause the job to be redone.

Apply a thin layer of PAG oil over the O rings to help the installation without damaging or cutting the new seal, repeat this process for each line.
SPONSORED LINKS
Step 6: Installing the New Compressor
Clear any hoses or lines while gently lowering the new unit into the engine bay. Hand thread in the mounting bolts which will hold the unit into its mounts or engine block.
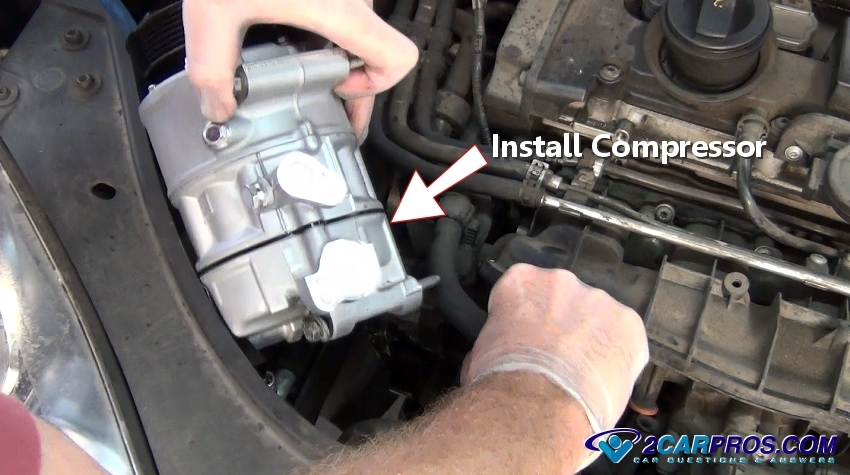
Once all mounting bolts have been hand threaded in, use a wrench or socket to tighten the mounting bolts evenly and in a cross pattern. This will help to not distort the housing which can cause premature failure.

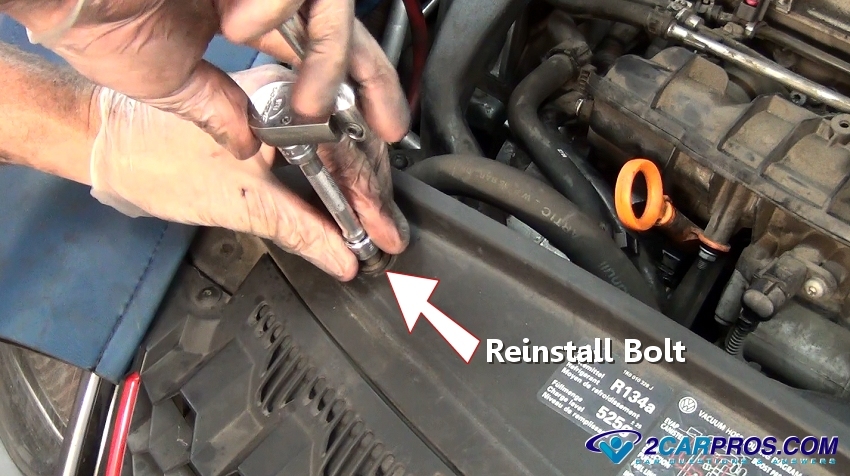
Remove the port dust covers and install both high and low side refrigerant lines with the mounting bolts and then tighten. These bolts don't need to be extremely tight just snug enough to not come loose and seal against the housing. Torque specs for the bolts can help.

SPONSORED LINKS
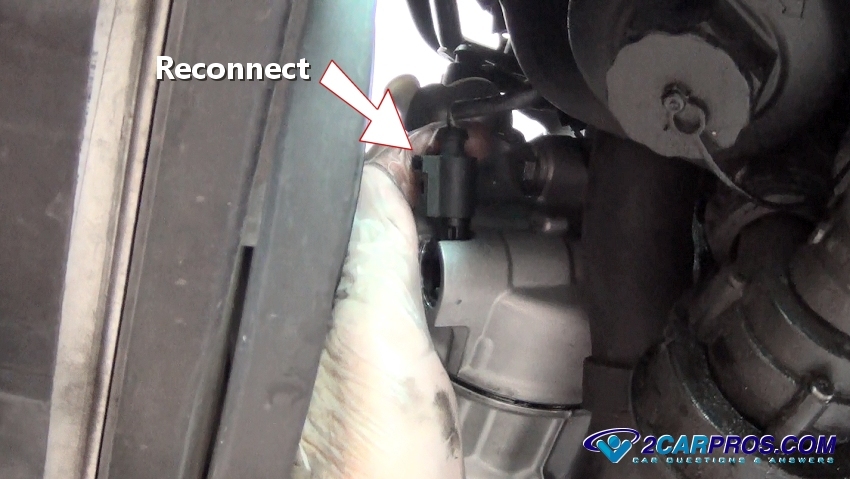
Make sure the electrical connector is clean before reconnecting it to the clutch coil or refrigerant control valve at the rear of the compressor housing.
Reinstall any accessories such as the alternator by gently lowering them into the engine bay while installing the mounting bolts and electrical connectors. At this time is it a good idea to replace the serpentine belt with a new one. Double check the alignment of the belt by inspecting the pulley of each accessory and drive pulley located on the engine crankshaft.

Step 7: Finish Reassembly
Reinstall any tubes or hoses removed in the replacement process, continue by tightening all bolts, screws, clips or brackets previously removed. Now the system is ready to have a vacuum down and recharge service performed. Never simply fill the system with refrigerant because there is moisture is present inside the system due to the normal atmosphere that entered once the system was opened. This can cause the compressor to fail prematurely and the AC system not to work as well as it should.
Helpful Tip
If the vehicle is used in colder weather and the AC system is not used much it's a good idea to turn the system on occasionally to help move the PAG oil around in the system which will lubricate the seals so the compressor will last longer.
SPONSORED LINKS
Watch the Video!
Please watch this video of the job being done to glean additional helpful information.
Credits
This guide knowledge base was created by the 2CarPros Team, and by Ken Lavacot: Automobile repair shop owner and certified master automobile technician of over 30 years. If you have question or need help please ask one of our experts we are happy to help. Please visit our 2CarPros YouTube Channel.

Article published 2024-04-15
SPONSORED LINKS
How to Find Low Side A/C Service Port

Air Conditioner Recharge - Simple
