A universal joint (u-joint) is used to connect a vehicle’s drive shaft to the differential on one side and the transmission on the other. Rear wheel drive vehicles have only one drive shaft that contains two or three u-joints. U-joints are very durable, but they can wear over time. The inside of the joint contains needle bearings packed with grease. As the grease dries out, the needle bearings become worn; thus, additional play is created. The most common symptoms of a bad u-joint is a clunk or squeak when placing the vehicle in gear from park or neutral, and a vibration while driving. Also, a common issue is a noticeable vibration or shudder under acceleration. Look for a rust like powder around the joint caps. This is a sign the joint has failed.
Park your car on level ground with the engine off and the emergency brake off. Block both sides of the front wheels. Always raise a car according to the manufacturer's recommended instructions and secure with jack stands. Also, we will be dealing with grease and gear oil so be sure to wear protective clothing, eyewear and gloves.
Tools and Supplies Needed to Complete this Job
1. Hydraulic floor jack
2. Jack stands
3. Wrench set
4. Bench Vice
5. Pliers
6. Socket set
7. Marker or chalk
8. Center punch
9. Electrical tape
10. Hammer
11. Shop towels
12. Replacement U joints
13. Grease Gun
Instructions
Step 1 - Place the vehicle on a firm, flat surface.
Step 2 - Using a hydraulic jack, lift the rear of the vehicle.
Step 3 - Place quality jack stands under the vehicle’s frame, rear axle, or manufacturer’s recommended location.
Step 4 - Place the vehicle’s weight on the jack stands. Never work under a vehicle being supported by only a hydraulic jack.
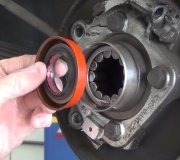
Step 5 - Next, using a marker or chalk, place a mark on where the u-joint is connected to the vehicle’s differential.
Step 6 - There are U-bolts that hold the universal joint to the vehicle. Remove the nuts from the U-bolts and remove the U-bolts.
Step 7 - Using a pry bar or screw driver, pry the u-joint forward and off its mount.
Step 8 - Next, inside the yoke (where the u-joint caps are pushed through the drive shaft) are retaining clips. They sit inside a grove which prevent the joint from coming off. Remove the retaining clips with pliers, or tap on them with a punch.
Step 9 - Next, and this can be awkward, place the u-joint in a vice. The driveshaft will still be connected.
Step 10 - Now you need two sockets. One has to be slightly smaller than the diameter of the u-joint cap and the other needs to be large enough that the end cap can fit inside it. Place the sockets on opposite sides of the u-joint and place the unit into the vice so that the smaller socket will push the u-joint end cap into the larger socket.
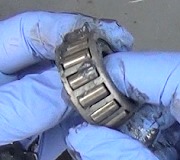
Step 11 - Tighten the vice until the end caps are removed from the u-joint. Remove the end caps and the old u-joint from the driveshaft.
Step 12 - Now, carefully remove two end caps from the new u-joint. Remember, there are needle bearings in the end caps. Make sure they do not fall in on each other. Otherwise, the end cap will not fit. We also recommend using electrical tape to hold the other end caps in place so they don’t come off while you are working on it.
Step 13 - Next, place the new u-joint into position on the driveshaft. Carefully, place one end cap into position and place so it starts onto the joint.
Step 14 - Place the opposite side end cap into position and place the assembly back into the vice and tighten the vice until the end caps are flush with the yoke.
Step 15 - Now, take the smaller socket and press the end caps fully into place so that the groves that the retaining clips are seen and the retaining clips can be reinstalled.
Step 16 - Reinstall the new retaining clips that came with the new universal joints.
Step 17 - If you are replacing both front and rear u-joints, repeat the process with the opposite end.
Step 18 - Once the joints are installed on the driveshaft, using your index marks that you made with a marker, align the drive shaft into the same position it was originally placed. Start by placing the front yoke into the transmission first, and then the rear. Replace the U-bolts.
Best Practices
- After the completion of the U joint replacement, check the joint to make sure it moves easily.
- Keep track of the cup needle bearings, sometimes one or more of the needles can laid down inside the cup. If this condition occurs it will make the joint hard to move. At this point the joint will need to be disassembled and repaired.
- After the driveshaft has been reinstalled service the joint by injecting grease until it starts to show up at the bearing cap seals.
Common Problems
- When replacing a U joint make sure the needle bearings do not lay down inside the bearing cup not allowing the bearing cap to be completely installed
- If a U joint is stiff or has rough spots during operation the U joint has gone bad and needs replacing
Credits
This guide knowledge base was created by the 2CarPros Team, and by Ken Lavacot: Automobile repair shop owner and certified master automobile technician of over 30 years. If you have question or need help please ask one of our experts we are happy to help. Please visit our 2CarPros YouTube Channel.

Article published 2024-06-07