Will not start after replacing head gaskets

Tiny
RONTIMMER
  • MEMBER
  • 1995 ISUZU RODEO
  • 3.2L
  • V6
  • 4WD
  • AUTOMATIC
  • 325,000 MILES
I just replaced the head gaskets on my vehicle and after getting it all back together it will not start. It cranks fine but it does not fire at all. I have spark and fuel rail is pressured up. I suspect the problem is with the injectors but I have not checked them yet. I wanted to see if anyone else has had this problem or a similar one and can provide me with some advice.

Thanks in advance,
Ron
Wednesday, April 4th, 2018 AT 9:05 PM

12 Replies

Tiny
STEVE W.
  • MECHANIC
  • 13,002 POSTS
Have you tried a bit of starting fluid to see if it will fire on that? That would at least confirm it will run and is in time. Have seen a few wrong timing marks on those belts.
What are your compression numbers?
Was this
answer
helpful?
Yes
No
+4
Thursday, April 5th, 2018 AT 7:46 PM
Tiny
RONTIMMER
  • MEMBER
  • 7 POSTS
I had more time to check stuff today and I was able to verify that I have spark and good fuel pressure. I also checked the ECM but there were no stored codes. The problem seems to be that I have no signal to the injectors, I put a noid light on the injector harness and no light. Any idea what would cause no signal if there are no fault codes? Any ideas are appreciated. I will check the compression and spray some starting fluid tomorrow. I thought about timing but when I had it apart I was pretty careful to get everything lined up correctly and checked it several times.
Was this
answer
helpful?
Yes
No
Thursday, April 5th, 2018 AT 8:40 PM
Tiny
STEVE W.
  • MECHANIC
  • 13,002 POSTS
Check that you have power to the injectors. One wire (red with green stripe) should be battery voltage with the key on. The other wire is grounded by the ECM as it fires the injectors. A shorted injector could pull the voltage down.

If no power check that the ECM relay in the fuse/relay box is activating and that the ECM fuse near it and fuse 8 (dash box) are both okay.
Was this
answer
helpful?
Yes
No
+1
Friday, April 6th, 2018 AT 1:27 PM
Tiny
RONTIMMER
  • MEMBER
  • 7 POSTS
I checked this today and both wires going to the injectors show battery voltage. I also took the time to double check the timing today and it is spot on. With both wires going to the injectors having battery voltage is this a sign of a short or problem with the ECM? I appreciate all of your help, you have bee incredible helpful.

Thanks,
Ron
Was this
answer
helpful?
Yes
No
Saturday, April 7th, 2018 AT 7:57 PM
Tiny
STEVE W.
  • MECHANIC
  • 13,002 POSTS
Was that with all of the injectors unplugged and then testing the wire connectors or using back probing with them connected?
Was this
answer
helpful?
Yes
No
+2
Sunday, April 8th, 2018 AT 9:08 AM
Tiny
RONTIMMER
  • MEMBER
  • 7 POSTS
I got these readings by disconnecting the connector from the number 1 injector and checking the voltage there. My next step is going to be to separate the top portion of the intake manifold so I can access all of the injectors and better diagnose the problem. It looks like a electrical problem in the injector circuit, could it be a bad ECM?
Was this
answer
helpful?
Yes
No
Sunday, April 8th, 2018 AT 2:59 PM
Tiny
STEVE W.
  • MECHANIC
  • 13,002 POSTS
The injectors on that rig are paired on the ground side and fired that way by the ECM. So what you saw would be normal as the voltage would go through the injector coil and out the "ground" wire then back to the one you were testing. However it did show that you have voltage at least.
The earlier noid light test is starting to point toward the ECM controlled grounds as being the problem but it could be fooled the same way because of the loop.

I would follow the harness back to a connector rather than pulling the intake. Then test there on the three ground control wires.
Was this
answer
helpful?
Yes
No
+2
Monday, April 9th, 2018 AT 12:35 AM
Tiny
RONTIMMER
  • MEMBER
  • 7 POSTS
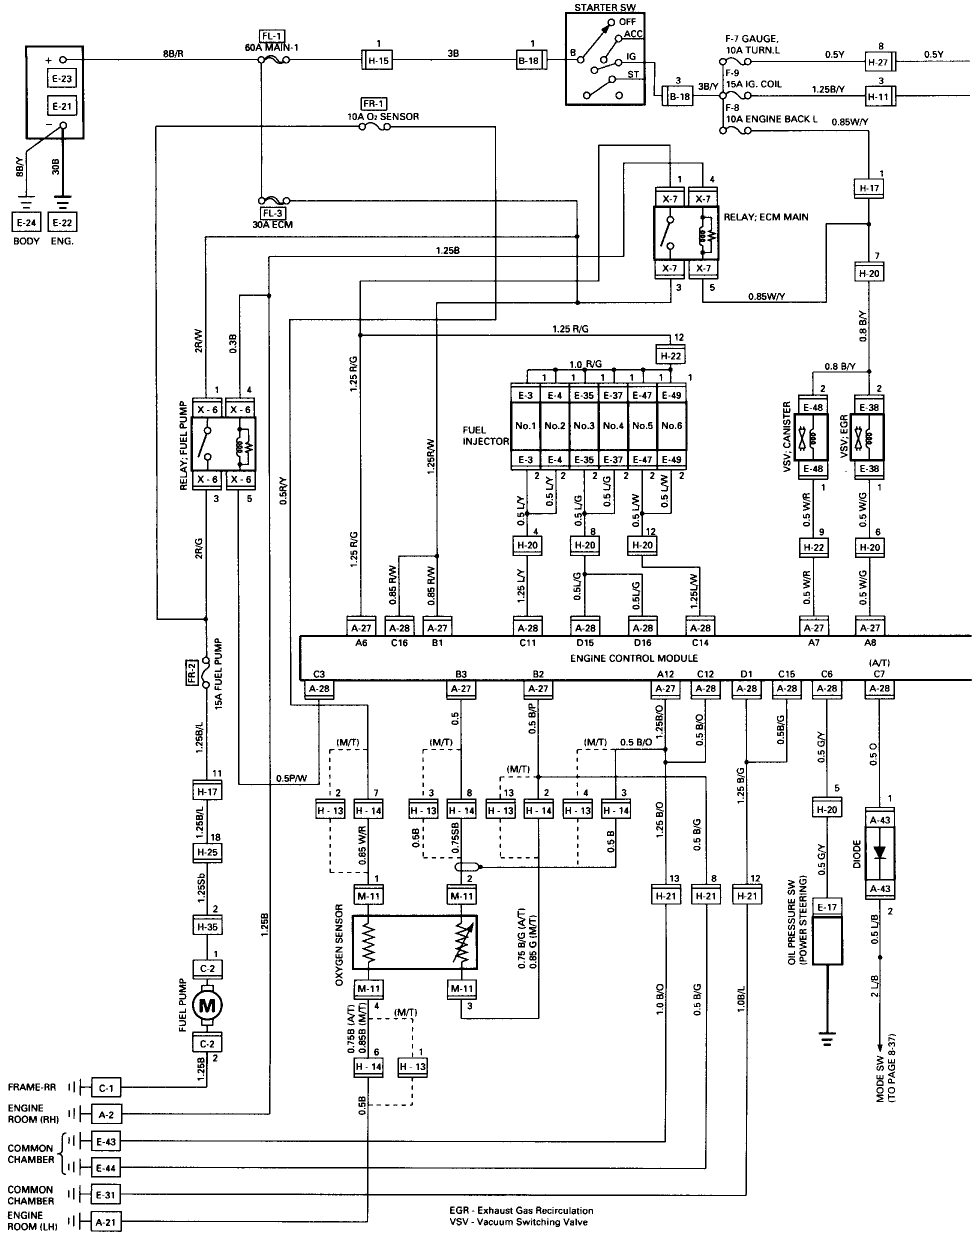
Last night I disconnected the battery and checked the Fuel Injectors circuit for continuity. Here is what I found:
1. With everything connected except for the Number 1 injector pigtail I had continuity from both sides of the pig tail to a ground on the motor.
2. When I disconnected the fuel injector circuit from the wiring harness I no longer had continuity from the pig tail to the motor, but I did have continuity to the plugs I had just disconnected.
3. I then plugged the circuit back into the wiring harness but pulled the plugs from the ECM, I still did not have continuity from the circuit to a ground.
4. I then plugged the ECM back in and checked for continuity between the plugs coming from the ECM and I had continuity from the Fuel injector hot wire to the ground on the motor.
My original goal with all of this was to see if I had a short somewhere in the harness but if I am correct this seems to suggest that there is a short in the ECM circuit that controls the fuel injectors allowing a constant ground to the frame/body of the vehicle for both the hot and ground side of the circuit. What are your opinions on this and do you know of a way to check the ECM to see if it is damaged?

Thanks,
Ron
Was this
answer
helpful?
Yes
No
Thursday, April 12th, 2018 AT 11:37 AM
Tiny
STEVE W.
  • MECHANIC
  • 13,002 POSTS
The way that engine is set up it has one wire (red/green) that feeds battery voltage to all the injectors as well as to the ECM and other components. With the key ON that wire should have 12 volts. The injectors are simply a coil of wire inside so if you feed 12 volts into one side it will simply feed through the other wires connected to them. With everything connected up you should be able to gently backprobe the ECM connector with the key on and find battery power at each of the 4 wire connections for the injectors, That would be pins 11 and 14 in connector C and pins 15 and 16 in connector D. If that checks OK, Shut off the key and the relay that supplies power to the injectors should open. The voltage on those pins should now be gone.

The next part of the test involves unplugging all the injectors from the harness. Now attach a test light to battery positive and have someone else crank the engine over. While it is cranking, put the test light probe into ECM control wire for each injector. The test light should pulse if the ECM is trying to fire the injector. If you get no pulse at any wire the ECM is not trying to fire the injectors. If the light comes on bright at any wire and doesn't flash the ECM is faulty.

The ECM won't try to fire the injectors if there is an issue with either the crankshaft or camshaft sensors so don't condemn the ECM before you test those.
Was this
answer
helpful?
Yes
No
+1
Thursday, April 12th, 2018 AT 2:18 PM
Tiny
RONTIMMER
  • MEMBER
  • 7 POSTS
I know the crankshaft position sensor is good because it is brand new and the 1995 SOHC V6 does not have a camshaft sensor. In order to access the injectors on the passenger's side I have to remove the intake plenum, which I will do tonight and follow the steps you outlined to double check. Thanks again for all the help this is the first time I have had to mess with electronic fuel injection, I grew up working on carbureted engines and have not messed with the engine on any of my newer cars.

Thanks again,
Ron
Was this
answer
helpful?
Yes
No
Thursday, April 12th, 2018 AT 2:47 PM
Tiny
RONTIMMER
  • MEMBER
  • 7 POSTS
I tried the test light last night and initially it flashed when we cranked the vehicle but then it stop and I couldn't get it to flash again. Even though the crankshaft position sensor is new could there be a problem with it or that circuit, what is the best way to check it?

Thanks,
Ron
Was this
answer
helpful?
Yes
No
Friday, April 13th, 2018 AT 9:10 AM
Tiny
STEVE W.
  • MECHANIC
  • 13,002 POSTS
If you still have the old one, plug it in and try it. The crank sensor on that feeds into the electronic ignition unit as well. It is possible it has a problem and isn't passing the signal through to the ECM to trigger the injectors.
To test the crank sensor wiring you can disconnect it at the ignition module (should be a 3 wire connector) The outer 2 (1&3) are the crank sensor feeds, the center is a grounded shield. Disconnect the other end at the sensor and jumper the two pins. Connect a continuity tester up (test light to batt, tip to one wire, other pin to ground should complete the circuit) You should show a good loop, then wiggle, bend and see if the light stays on through it all. If it does the wires are OK. Connect the grounded wire to the center pin and move things again, just in case the shield is damaged and grounding the signal.
Was this
answer
helpful?
Yes
No
+2
Friday, April 13th, 2018 AT 1:02 PM

Please login or register to post a reply.

Sponsored links