Welcome to 2CarPros.
Here are the directions, which I don't think you'll like, for removal of the vacuum booster servo unit. All attached pictures correlate with the directions.
__________________________________________
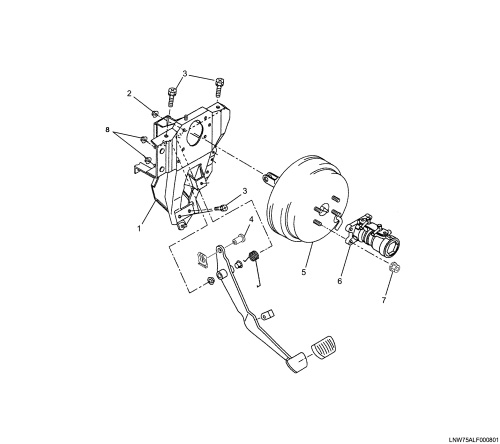
Pic 1
Legend
(1)Brake Pedal Bracket
(2)Servo Unit Mounting Nut
(3)Bracket Mounting Bolt (4 bolts)
(4)Clevis Pin
(5)Booster (Servo) Unit
(6)Master Cylinder
(7)Master Cylinder Mounting Nut (4 nuts)
(8)Bracket Mounting Nut (2 nuts)
Removal Procedure
1. Block the vehicle wheels and apply the parking brake.
2. Disconnect the Battery ground cable.
3. Remove steering column assembly.
a. Remove column cover (3 screws)
b. Disconnect electrical connectors (4 connectors and 2 harness clips)
c. Loosen lower steering column cover (4 screws and 2 clips)
d. Remove steering column slip joint mounting bolt (Mark position for reassembly.
e. Remove 7 column mounting bolts.
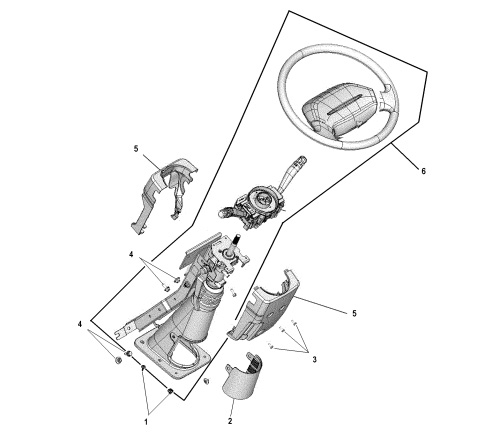
pic 2
Legend
(1)Lower cover mounting screws (4 screws)
(2)Lower cover access panel
(3)Upper cover mounting screw (3 screws)
(4)Steering column mounting bolts and nuts (4 bolts, 3 nuts)
(5)Upper cover
(6)Steering column assembly
4. Remove the Instrument panel assembly.
pic 3
Legend
(1)Lower cover
(2)Passenger side cover
(3)Center cover
(4)IP cluster bezel
(5)Instrument panel assembly
5. Four nuts retaining master cylinder to servo unit. Loosen the hydraulic lines from the lower retaining clip and slide the master cylinder forward for clearance.
6. Vacuum hose at servo unit.
7. Remove the Brake booster and pedal assembly.
a. 4 mounting bolts
b. 2 mounting nuts
8. Remove the Clevis pin.
9. Remove four servo unit mounting nuts at pedal bracket.
Inspection
Servo unit cannot be over hauled. If it is found faulty, replace its assembly with a new one.
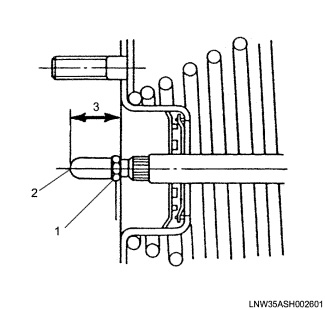
Push Rod Length Adjustment
- Apply 500 mm Hg (19.7 in Hg) of negative pressure to the servo unit.
- Use a scale to measure the push rod length (push to flange face clearance).
- Push Rod Length to 18.2 mm (0.717 in).
- If the push rod length is not equal to the specification, it must be adjusted.
- Loosen the lock nut.
- Turn the screw bolt in the appropriate direction to adjust the push rod length.
- Tighten the lock nut.
Tighten Lock nut to 14 N.m (122 lb in).
pic 4
Legend
(1)Lock Nut
(2)Screw Bolt
(3)Push Rod Length
Installation Procedure
1. Install the brake booster. Install the four booster unit mounting nuts to pedal bracket and tighten to 14 N.m (122 lb in)
2. Connect the booster unit clevis to brake pedal, and install clevis pin.
3. Install the Brake booster and pedal assembly and tighten to 42 N.m (32 lb ft)
4. Install the two Vacuum hose at the booster unit.
5. Install the Master cylinder assembly and tighten the four mounting nuts to 14 N.m (122 lb in).
a. Secure the hydraulic lines into the retaining clip.
6. Install the Instrument panel assembly and ventilation duct.
7. Steering column assembly from step 3 in reverse order.
a. Tighten the mounting nuts and bolts to 21 N.m (15 lb ft.)
b. Tighten the slip joint bolt to 39 N.m (29 lb ft.)
8. Install the battery ground cable.
9. Release the parking brake and remove the wheel blocks.
________________________________________________
I think they built the vehicle around the booster.
Take care and let me know if this helps.
Joe
Images (Click to enlarge)
Jun 4, 2019 at 9:23 PM