Turn signal not flashing?

Tiny
MOOSHMOOSH
  • MEMBER
  • 1997 DODGE RAM
  • V8
  • 2WD
  • AUTOMATIC
  • 170,000 MILES
Bulbs checked and round flasher units replaced under glovebox- lights work but rear bulb won't flash.
Monday, December 11th, 2023 AT 5:33 PM

19 Replies

Tiny
CARADIODOC
  • MECHANIC
  • 33,752 POSTS
I need some clarification to know where to start. Does this affect both rear bulbs or just on one side? What does the non-working bulb do; does it stay lit up bright or does it not turn on at all? Do the brake lights work properly on both sides, and what about the center high-mount brake light?

Do the hazard flashers work properly? You might want to start by checking that switch to be sure it isn't stuck midway between positions.

Let me know what you find with these clues.
Was this
answer
helpful?
Yes
No
Monday, December 11th, 2023 AT 6:11 PM
Tiny
MOOSHMOOSH
  • MEMBER
  • 9 POSTS
Hi, thank you for your reply.

All the bulbs are working but the right rear signal does not flash. Flashers under dash have been replaced and are good.
Was this
answer
helpful?
Yes
No
Tuesday, December 12th, 2023 AT 11:54 AM
Tiny
MOOSHMOOSH
  • MEMBER
  • 9 POSTS
Also, to add-on hazards all flash except right rear bulb also. It will light up but not flash. Also, the flashing arrow on the screen flashes but only half as bright as the left arrow.
Was this
answer
helpful?
Yes
No
Tuesday, December 12th, 2023 AT 11:59 AM
Tiny
CARADIODOC
  • MECHANIC
  • 33,752 POSTS
This is like going to your doctor and telling him you're in pain. You know there's going to be more questions.

I'm guessing the right rear signal / brake light stays on bright when the right turn signal is switched on. Is that correct? If so, what is the right front signal light doing at that time?

Does the right rear flash or stay on bright when the hazard flashers are turned on?

Did you check the position of the hazard light switch?

One more clue. Does the defect or symptom change in any way depending on whether the head lights are on or off?
Was this
answer
helpful?
Yes
No
Tuesday, December 12th, 2023 AT 12:03 PM
Tiny
CARADIODOC
  • MECHANIC
  • 33,752 POSTS
Dandy. We overlapped on our replies. Those observations help. Give me a minute to look at the diagrams.
Was this
answer
helpful?
Yes
No
Tuesday, December 12th, 2023 AT 12:04 PM
Tiny
CARADIODOC
  • MECHANIC
  • 33,752 POSTS
Here's some preliminary things to start with. First, check if there's a trailer wiring harness. If there is, inspect the wires to see if any are chewed up or frayed and are touching each other.

Next, turn all the other lights off, then use a helper or a stick between the driver's seat and brake pedal to hold the brake lights on. Check the two side / rear brake lights to be sure they're the same brightness. At the same time, check if the right turn indicator on the dash is lit up dimly. Check those two things again with the running / tail lights turned on.

If you find any of those observations, remove the left rear bulb from its socket, then do these tests again and see what the right rear bulb does.
Was this
answer
helpful?
Yes
No
Tuesday, December 12th, 2023 AT 12:17 PM
Tiny
MOOSHMOOSH
  • MEMBER
  • 9 POSTS
Hi, thank you. With only brakes applied: left brake light works but right bulb doesn't come on at all. However, with the running lights on, it does. Should I still try taking the left bulb out?
Was this
answer
helpful?
Yes
No
Tuesday, December 12th, 2023 AT 12:46 PM
Tiny
CARADIODOC
  • MECHANIC
  • 33,752 POSTS
Yes. Don't just take the socket out of the housing. You must actually pull the bulb out of its socket. Part of what you're describing can be caused by a broken ground wire on the right rear socket, but that should make the right rear bulb dim compared to the left one. The clue here is when you remove the left bulb, the right one will go out.

Be careful if you're removing the bulb while it's lit up as it will be very hot. Use a wadded-up rag in that case.
Was this
answer
helpful?
Yes
No
Tuesday, December 12th, 2023 AT 12:57 PM
Tiny
MOOSHMOOSH
  • MEMBER
  • 9 POSTS
Hello, thank you for your patience. I tested it with the left bulb unplugged, and nothing changed. The light bulb still lights up only when running lights are on.
Was this
answer
helpful?
Yes
No
Tuesday, December 12th, 2023 AT 1:20 PM
Tiny
CARADIODOC
  • MECHANIC
  • 33,752 POSTS
Okay. Leave that left bulb out for now. If I'm reading this right, the right rear bulb's smaller tail light filament lights up normally with the tail lights turned on, but the brighter filament doesn't light up when the brake pedal is pressed. If I have that right, go back to all the other lights off, then just turn on the right turn signal.

Is the right front signal light flashing normally, slowly, stays lit normal brightness, or stays off? What is the right rear one doing?

I realize this can be difficult, but if possible, look very closely at the right rear bulb and try to tell which filament is lit up. The shorter one is the bright one for the brake and signal. It's usually sticking up a little higher. The longer or thinner one is for the tail light.

Are you comfortable using a digital voltmeter?
Was this
answer
helpful?
Yes
No
Tuesday, December 12th, 2023 AT 1:33 PM
Tiny
MOOSHMOOSH
  • MEMBER
  • 9 POSTS
Hello, neurological issues flaring up will have to wait for tomorrow to try that and see which filament is lighting up. I can use a voltmeter, but there is a multimeter here already.
Was this
answer
helpful?
Yes
No
Tuesday, December 12th, 2023 AT 1:41 PM
Tiny
CARADIODOC
  • MECHANIC
  • 33,752 POSTS
Dandy. I have a feeling we're going to find a defective turn signal switch, but I don't have enough test results yet to feel comfortable in my diagnosis. Also, another trick I have in mind is to turn on the right turn signal, you said the indicator on the dash lights up but it's dim, then remove the turn signal flasher from its socket, and use a jumper wire to connect the two terminals in the socket. You can use a piece of wire, but a stretched-out paper clip works well too. With that jumper in place, does the dash indicator get full brightness?

You haven't mentioned yet if, during these tests, the right front bulb is flashing or not.

I'll be back tomorrow, closer to early evening.
Was this
answer
helpful?
Yes
No
Tuesday, December 12th, 2023 AT 1:56 PM
Tiny
MOOSHMOOSH
  • MEMBER
  • 9 POSTS
Thank you, the right front is working fine. The flashers are also brand new. I will look at filaments next.
Was this
answer
helpful?
Yes
No
Wednesday, December 13th, 2023 AT 8:23 AM
Tiny
CARADIODOC
  • MECHANIC
  • 33,752 POSTS
Let me know when you have more information or new observations, then we can continue.
Was this
answer
helpful?
Yes
No
Friday, December 15th, 2023 AT 11:45 PM
Tiny
MOOSHMOOSH
  • MEMBER
  • 9 POSTS
Hi, long time no see, and thanks again for answering my question. I replaced the bulb on the right with a brand new one, and now I have a turn signal, but no brake lights. Do you have any ideas about that?
Was this
answer
helpful?
Yes
No
Friday, December 29th, 2023 AT 11:03 AM
Tiny
CARADIODOC
  • MECHANIC
  • 33,752 POSTS
I assume you mean the right rear bulb. My fear is it's difficult to tell the difference between the two filaments in the new bulb.

When you have a right turn signal, is that on the front like before or on the rear. Do you mean the right rear signal is full brightness and flashing as it's supposed to? If so, what about the brightness of the indicator on the dash? Is that still dim or is it full brightness now?

Because this is so confusing when I can't see the bulbs, lets start with one function we know is not working and disregard everything else. For this story, leave the left rear bulb removed from its socket. Turn off the signals, hazard lights, tail lights, and the ignition switch. Turn on just the brake lights. Now check all the other lights. Everything in front should be off. Both turn indicators on the dash should be off. The center high mount and the right rear brake lights should be on.

If I'm following this correctly, the right rear one will not be on now as it should be. If that is what you find, we have a perfect starting point.

To add to the frustration, two different bulbs were used in the rear. The switchover occurred mid model year. If you have the older #1157 bulb with the round brass base and two contacts, remove the right rear bulb from the socket, then we need to take three voltage readings. A tricky part is your meter will have to have the black lead grounded to a paint-free point on the body. I use small jumper wires with little alligator clips on the ends so I don't have to hold onto the black meter lead. You might find a good ground on the striker for the tail gate. The edge of the bumper might work too. In the worst case, you'll have to run a wire from the negative battery cable and connect that to the black meter lead. Brakes are still applied. Now, measure the voltages on the two contacts in the socket. One must have 12 volts and the other must have 0 volts. As long as you're there, also measure on the socket's metal housing. That must have 0 volts too. Let me know what you find.

If you have the newer 3157 bulb with the flat plastic base and four wire terminals on the bulb, look at the back of the socket and you should see the designations, "MAJOR", "MINOR", and "GND". You can leave the bulb in the socket. Use the red meter probe to poke into the socket alongside each wire. You'll be poking it through a rubber weather seal. This can also be frustrating because if you get a voltage reading, you know the probe has made contact with the terminal. If the meter stays on 0 volts, we aren't sure if you really have 0 volts or the probe isn't in far enough. If you get the correct results that I'll describe shortly, we can trust the meter. If the results come up wrong, you'll need to remove the bulb from the socket, then take the readings on the four terminals in that socket.

Start by probing the "MAJOR" wire. That should be a brown wire with a pink tracer, or stripe. You should find 12 volts on that one. If you do, check on the other two wires and tell me what you find. If you find 0 volts on the MAJOR wire and on the terminal in the socket, that would agree with that bulb not lighting up, then we will have to work back until we find the cause. Again, let me know what you find for these voltages.
Was this
answer
helpful?
Yes
No
Friday, December 29th, 2023 AT 1:55 PM
Tiny
MOOSHMOOSH
  • MEMBER
  • 9 POSTS
I'm trying to use a multimeter and not even sure it works. I have a new switch; is there still a possibility it could be the switch before I return the new one?
Was this
answer
helpful?
Yes
No
Saturday, December 30th, 2023 AT 10:06 AM
Tiny
CARADIODOC
  • MECHANIC
  • 33,752 POSTS
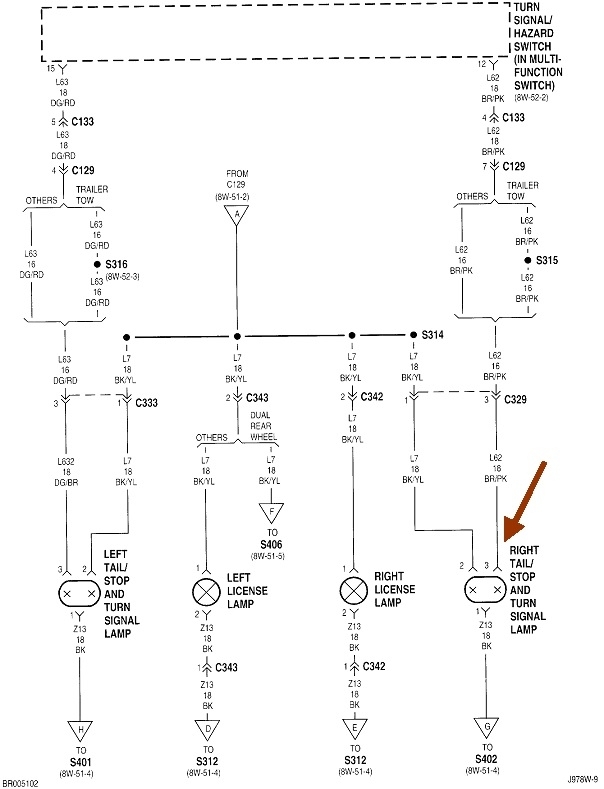
I'm leaning toward the signal switch, but there's too many conflicting observations or clues. That's why we need to concentrate on just one circuit, (the right rear signal / brake light), and disregard as many other variables as possible.

This article shows how to use a digital voltmeter:

https://www.2carpros.com/articles/how-to-use-a-voltmeter

They're using an "auto-ranging" meter in this article. That is an expensive feature you don't need. You can find a perfectly fine meter at Harbor Freight Tools for $7.00. Also look at Walmart or any hardware store. The photo below shows a common one. The black / negative probe plugs into the "Common" jack in the lower right corner. For almost all of the functions, the red / positive probe plugs into the middle jack, right above the black probe. For our use, turn the dial to the "20 Volt DC" scale, (blue arrow). That means it can measure any voltage from 0 to 19.99 volts, plus or minus. If you switch where the two probes are taking the measurement, the meter will not be damaged. The display will just include a minus sign. Also, if you were to measure something over 19.99 volts, the meter again will not be damaged. The display will either go blank, show a series of dashes, or show some other indication it's "over-range". If that happens, just switch the rotary knob to the next higher range. Your truck runs on a 12-volt electrical system which is standard for most vehicles, so the 20-volt range will be perfect.

There are some circuits with certain defects where a digital voltmeter can give inaccurate or misleading results. Without going into the details, it's those times where you can get more accurate results with a test light. There are new ones now that have tiny digital voltmeters built into their handles. Those are no different than the standard voltmeter. The test light we need is the old fashioned, standard test light with an incandescent bulb in the handle. Those require substantial current flow to light up. Often we can find 12 volts with the meter, but not enough current can get through to run the test light or the circuit.

If you have one of that old-style test light, you can use that first, instead of the voltmeter. We aren't concerned right now what the exact voltages are in the right rear socket. We just need to see if we have something or nothing. Here's a link to an article that shows how to use the test light:

https://www.2carpros.com/articles/how-to-use-a-test-light-circuit-tester

If you touch the probe of the test light to a test point and it lights up, you know the ground clip is making good contact. Same if you get a voltage reading on the meter. What's frustrating is when you get a whole bunch of 0-volt readings or the test light never lights up. Is that because there's really 0 volts at all those places, or is it because the ground connection for the test equipment is not making good contact? A quick, simple step we do is to touch the positive probe to a known good voltage source. For example, when we're working under the hood, I'll clip the ground lead right to the battery's negative cable clamp, then tap the positive probe to the battery's positive cable clamp. If the test light turns on full brightness or the meter shows 12 volts, I know the ground clip is making a solid contact. Now I can trust what the test equipment shows me.

The reason I brought that up is you aren't working near the battery and there is no really good ground point by the rear lights. I mentioned previously using the striker for the tail gate. That is a large peg that's bolted to the body sheet metal. The threads have to bite through any paint to make a good electrical connection. That's not what they were designed for, but it usually works. Likewise, you can use a chromed steel bumper. That is usually acceptable too unless the electrical connection is degraded due to excessive rust.
In the very worst situation, we often make a 20-foot-long jumper wire that can be connected to the battery's negative cable clamp, then strung all the way to the rear where we can connect the test light or voltmeter.

To add another point of confusion, if you do use both the meter and the test light, if you get conflicting results, tell me what you find with each one. Don't dismiss one as not working right and it's not important.

With the left rear bulb still out of its socket, and everything else turned off except the brake pedal is being held down, you should find 12 volts on one contact in the round socket, or on the "MAJOR" wire going into the socket if you have the bulb with the flat plastic base. No other wire or contact should have any voltage. That includes the round metal socket housing, if that's the style you have.

Let me know if I made this confusing enough, or what you find up to this point.
Was this
answer
helpful?
Yes
No
Saturday, December 30th, 2023 AT 5:35 PM
Tiny
CARADIODOC
  • MECHANIC
  • 33,752 POSTS
I have to add one more comment of value. Tell me which style of bulb you have. It's either a round metal base or a flat plastic one. If you have the round one with two contacts in the socket, look very closely at them to see if one has sunk down a little. If a less than perfect contact develops, that creates resistance. Current flowing through any resistance creates heat. When that gets bad enough, that heat can cause the plastic to melt where the contacts come through. When one contact sinks deep enough, it's spring pressure will not be sufficient to make a good connection to the bulb. I've already solved some of those by adding a drop of solder to the contact to build it up, but the permanent repair is to replace the socket.

Given the various clues and observations, I don't think a socket problem is the cause, but check it anyway as long as you're in there.
Was this
answer
helpful?
Yes
No
Saturday, December 30th, 2023 AT 5:43 PM

Please login or register to post a reply.

Sponsored links