Hi,
The manual doesn't break out only the tensioner. It provides the directions for chain and component replacement. Tensioner information is included. Here it is. The attached pics correlate with the directions.
_________________________________________________
2004 Toyota Corolla L4-1.8L (1ZZ-FE)
Procedures
Vehicle Engine, Cooling and Exhaust Engine Timing Components Timing Chain Service and Repair Procedures
PROCEDURES
Part 1 Of 3
pic 1
Part 2 Of 3
pic 2
Part 3 Of 3
pic 3
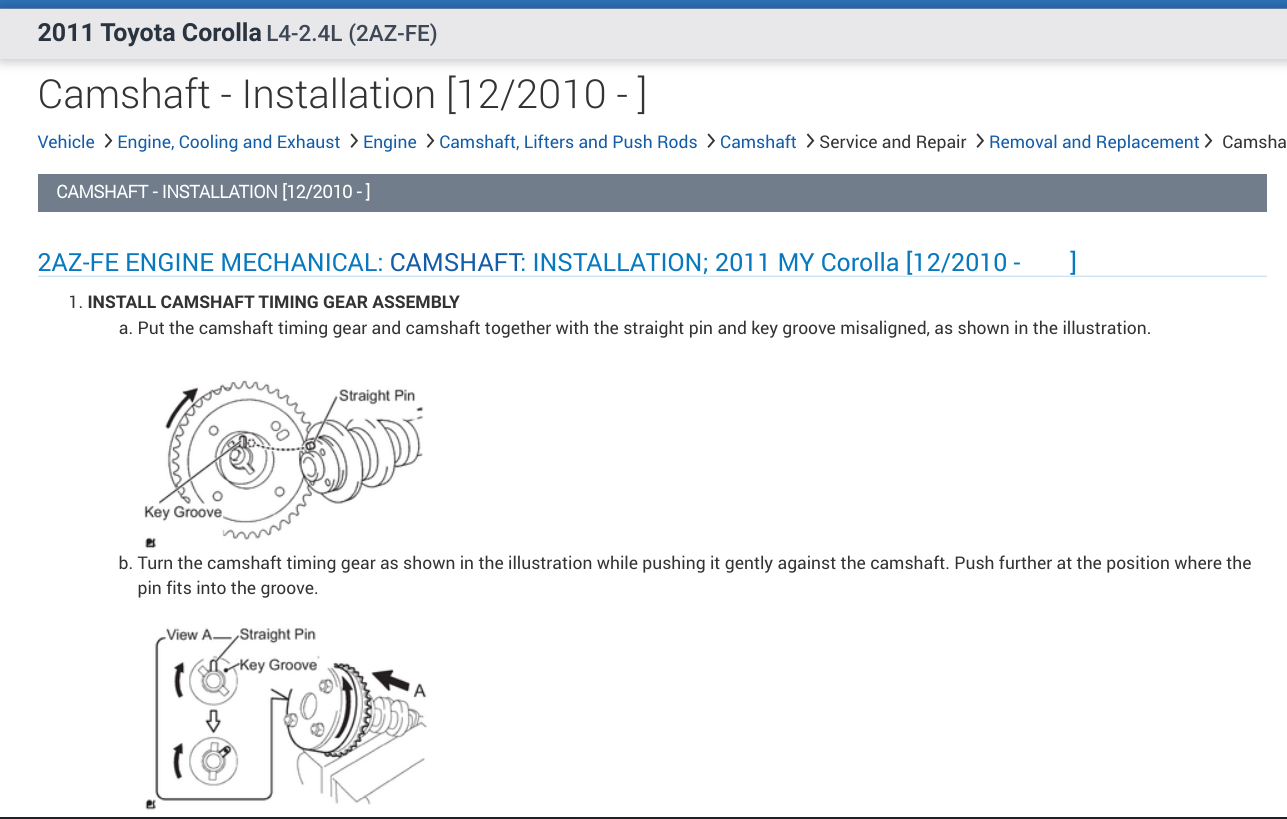
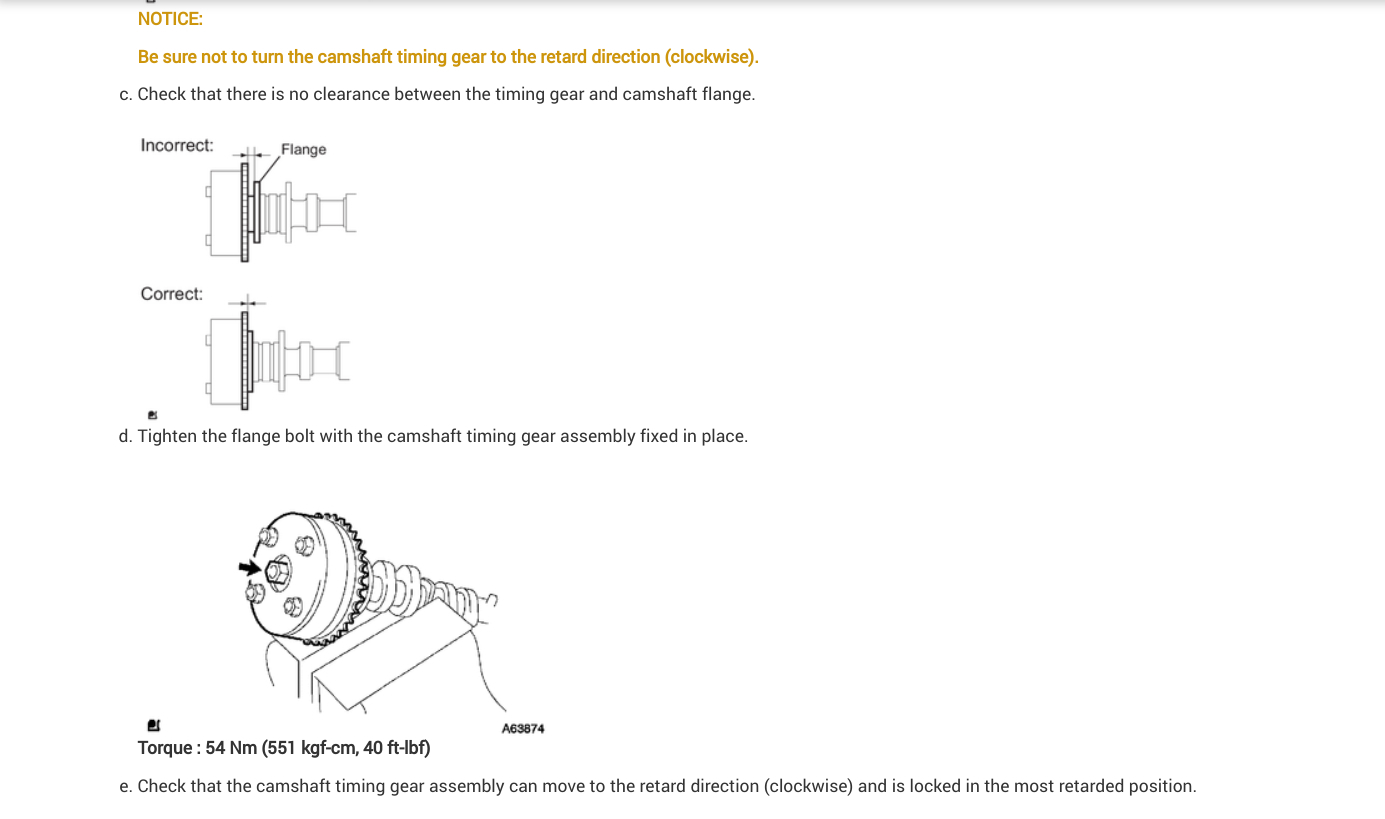
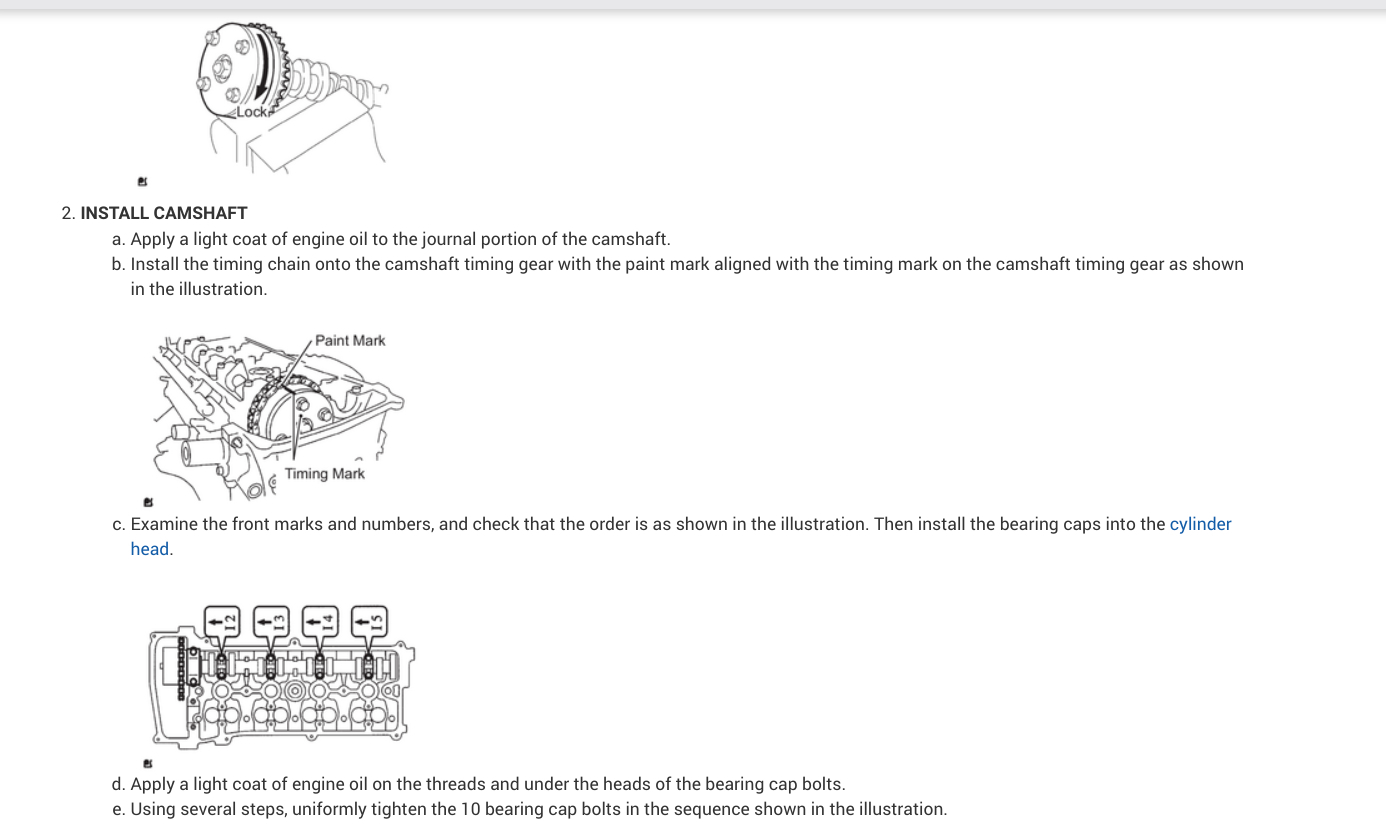
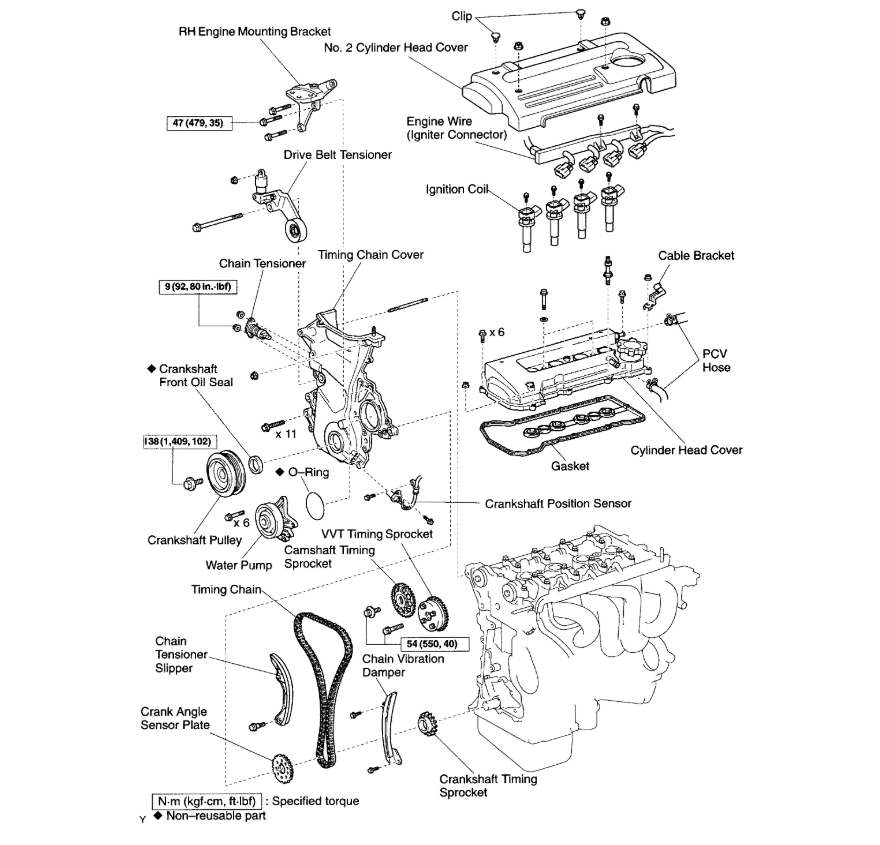
CHAIN SUB-ASSY
REPLACEMENT
1. REMOVE ENGINE UNDER COVER RH
2. DRAIN COOLANT
3. REMOVE FRONT WHEEL RH
pic 4
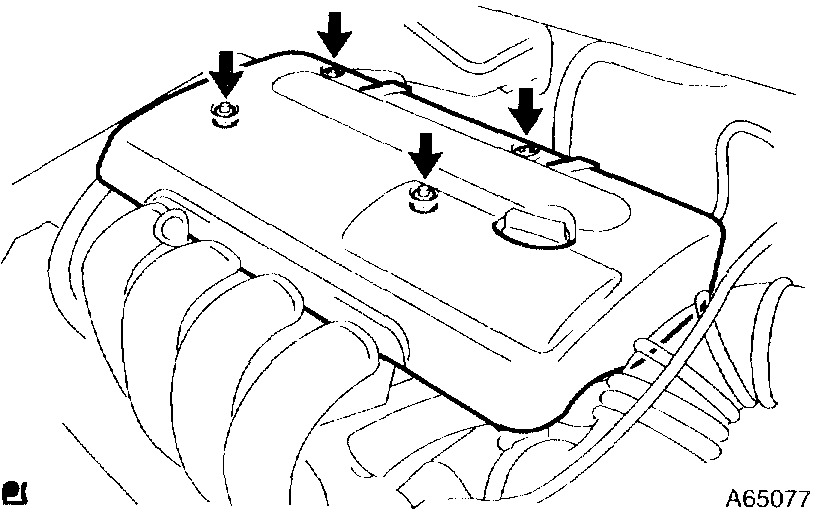
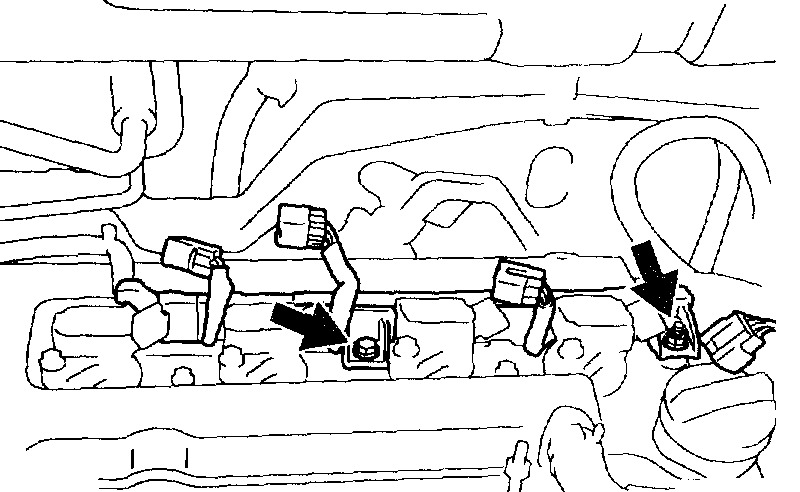
4. REMOVE CYLINDER HEAD COVER NO.2
a. Remove the 2 nuts, 2 clips and cylinder head cover.
Pic 5
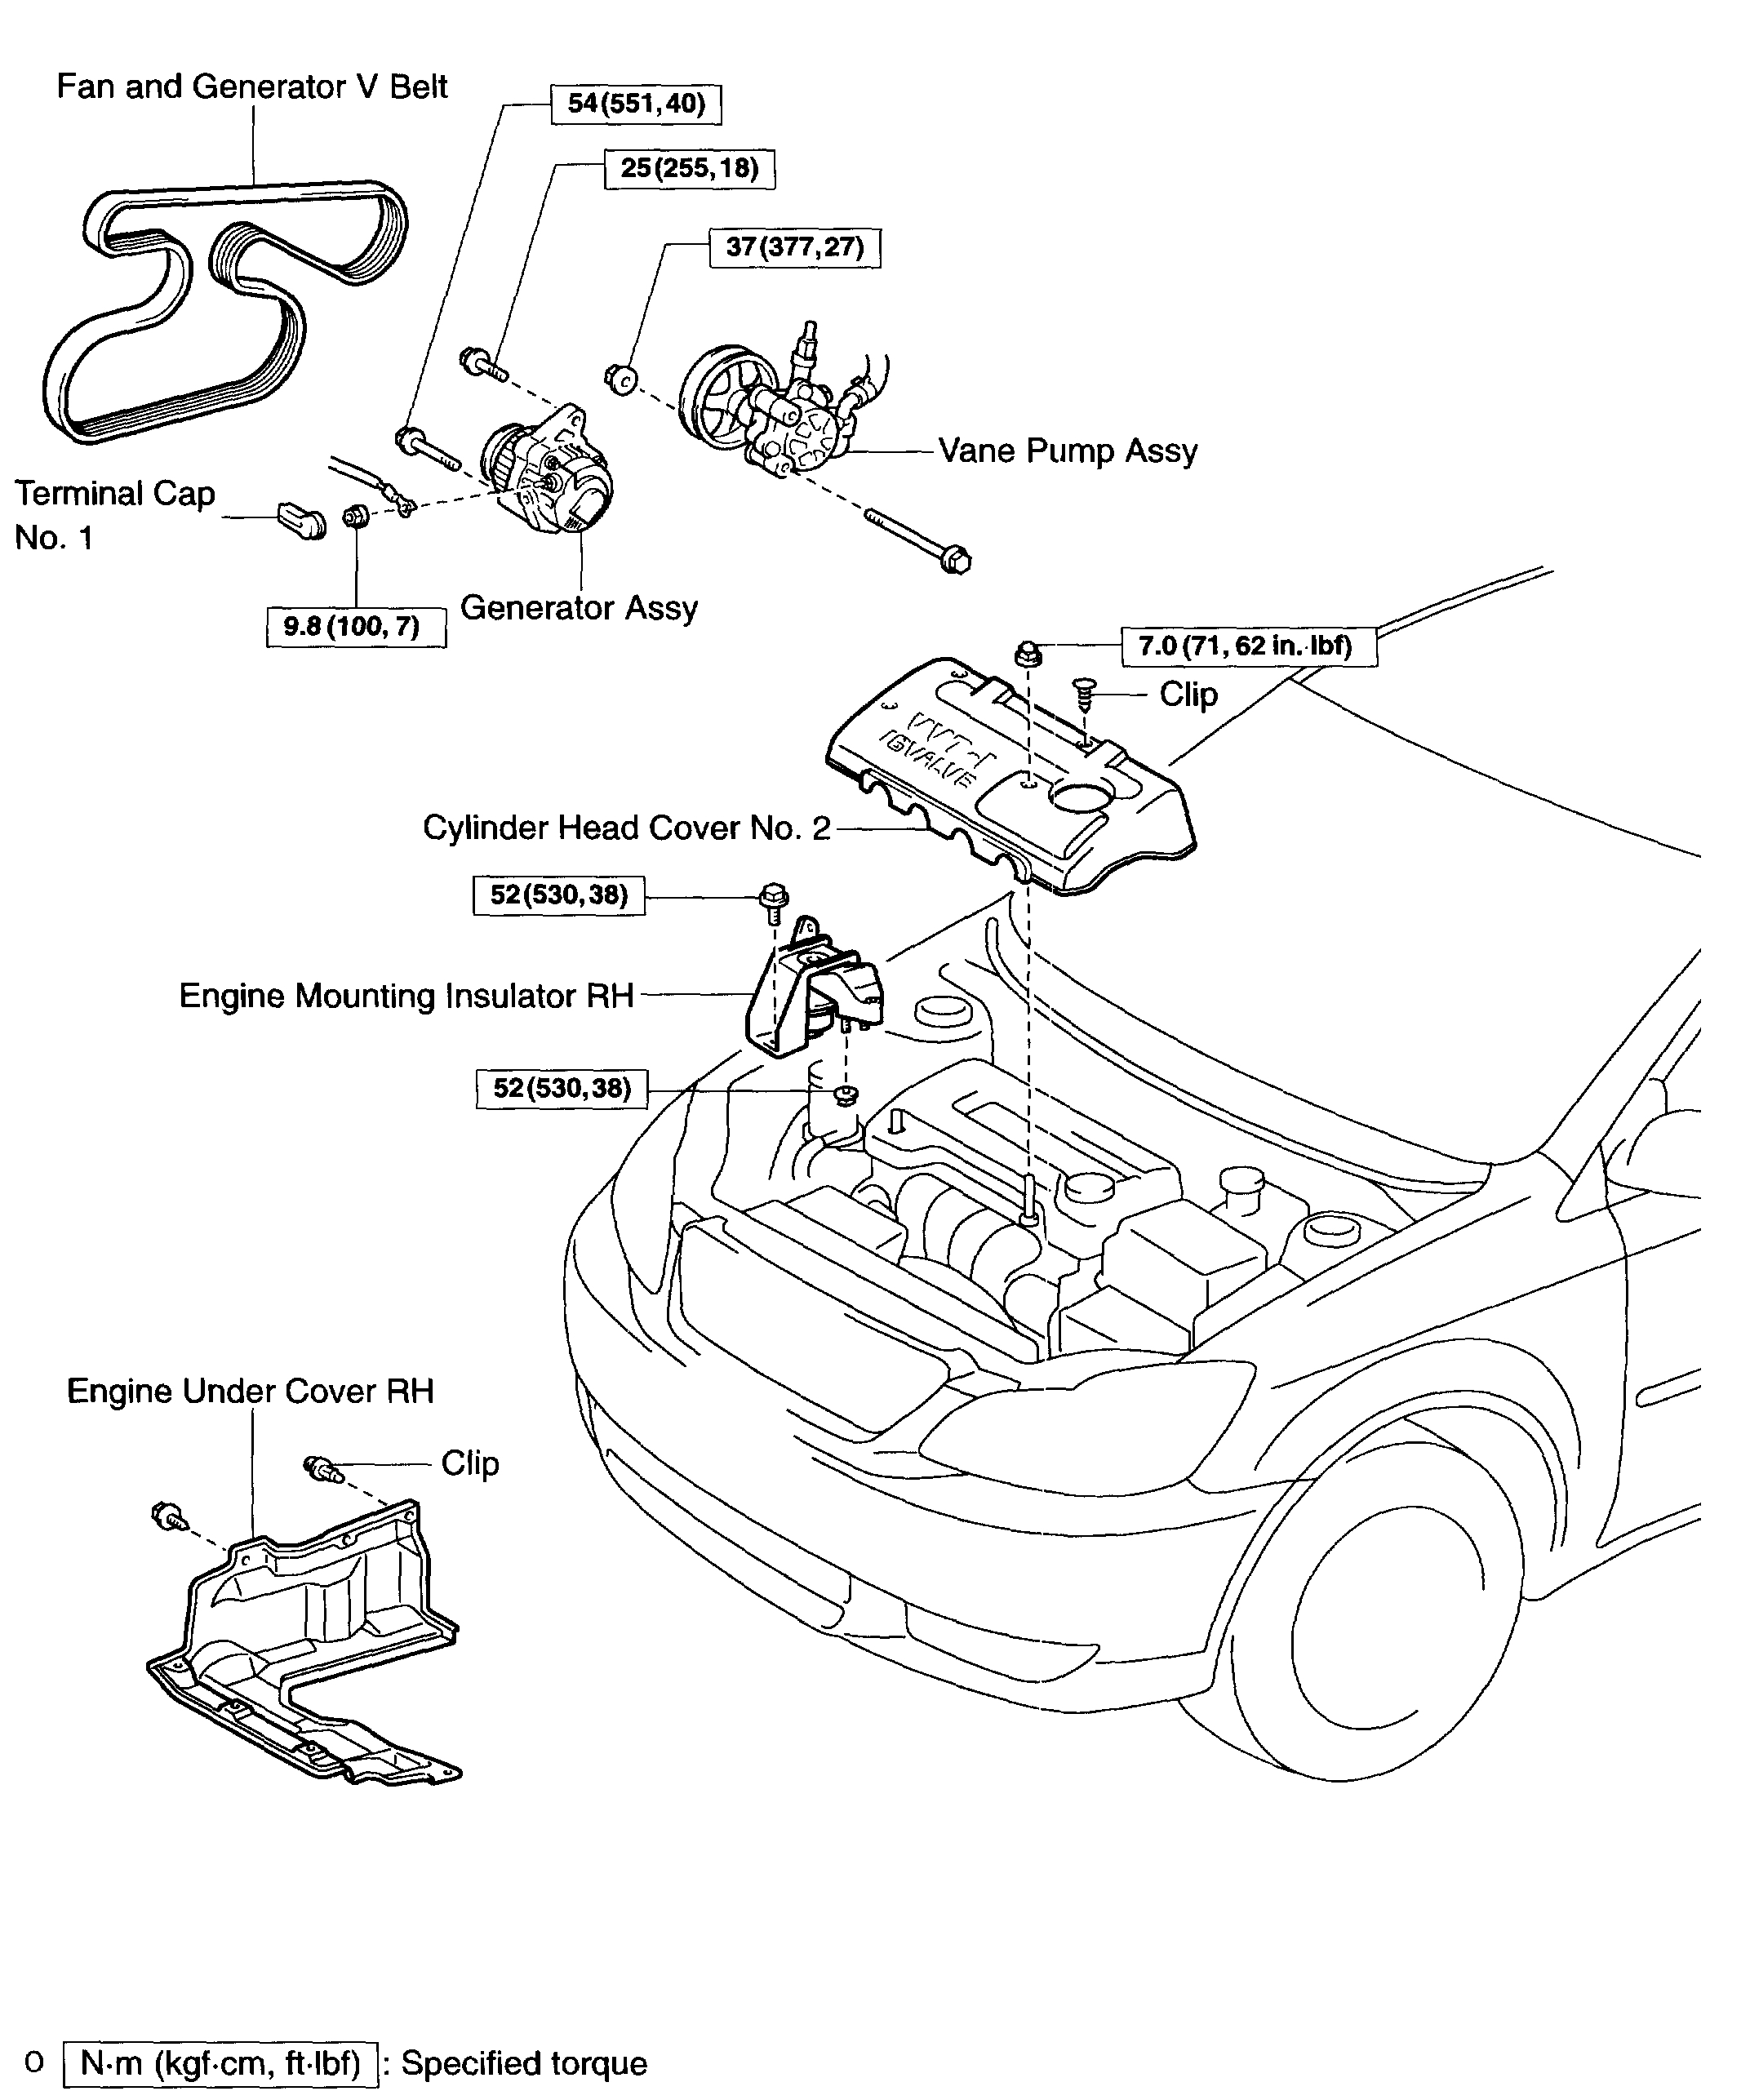
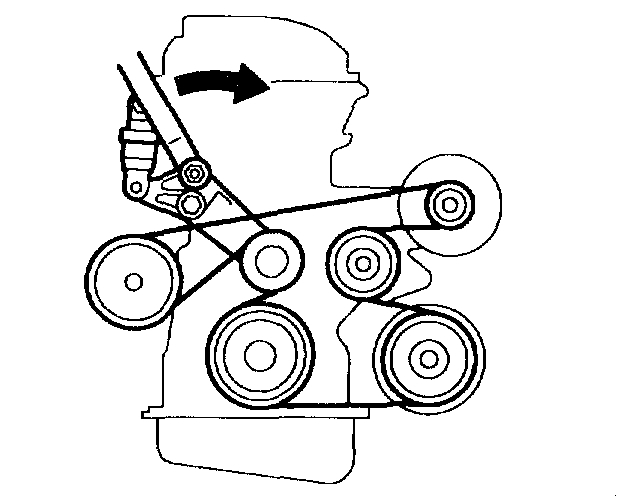
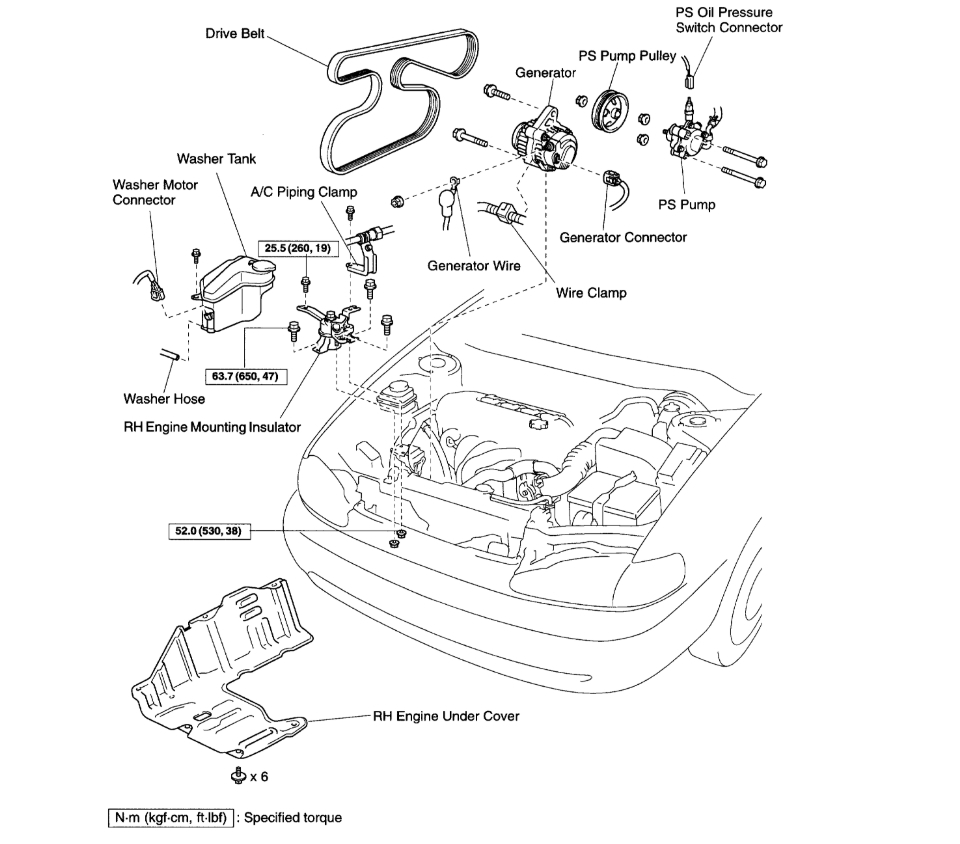
5. REMOVE FAN AND GENERATOR V BELT
a. Turn the V-ribbed belt tensioner slowly clockwise and loosen it. Then, remove the fan and generator V belt and put back the V-ribbed belt tensioner little by little and fix it quietly.
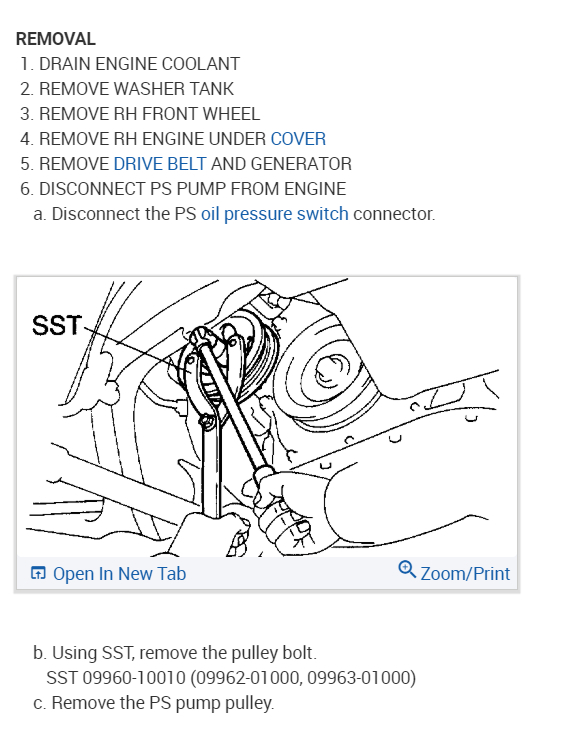
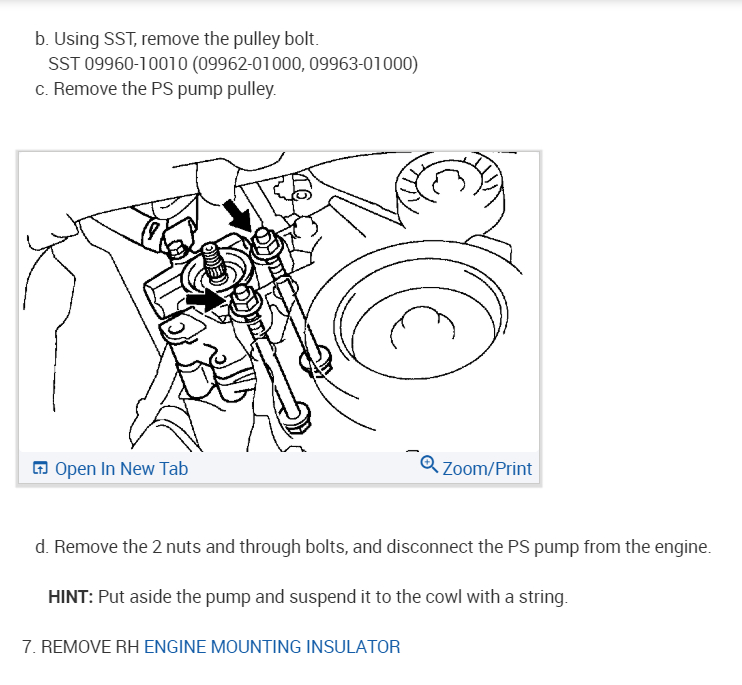
6. SEPARATE VANE PUMP ASSY
NOTICE: Do not disconnect the hose.
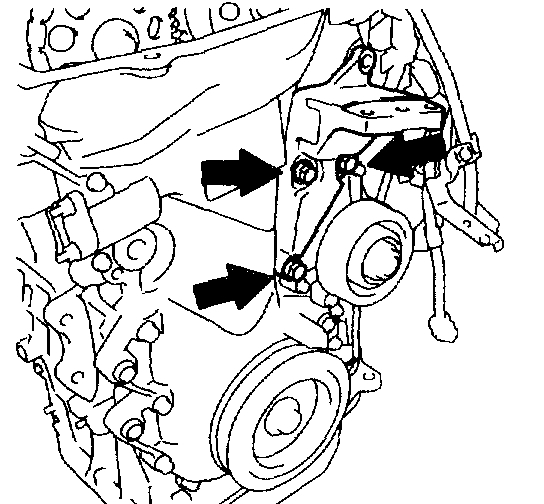
7. REMOVE GENERATOR ASSY
pic 6
pic 7
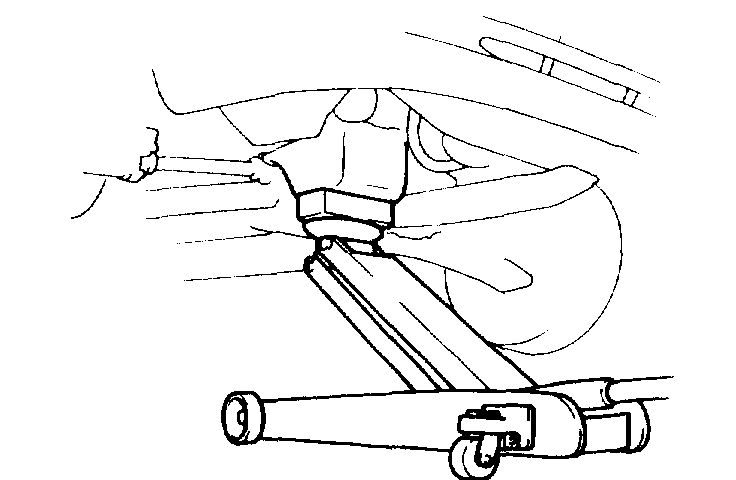
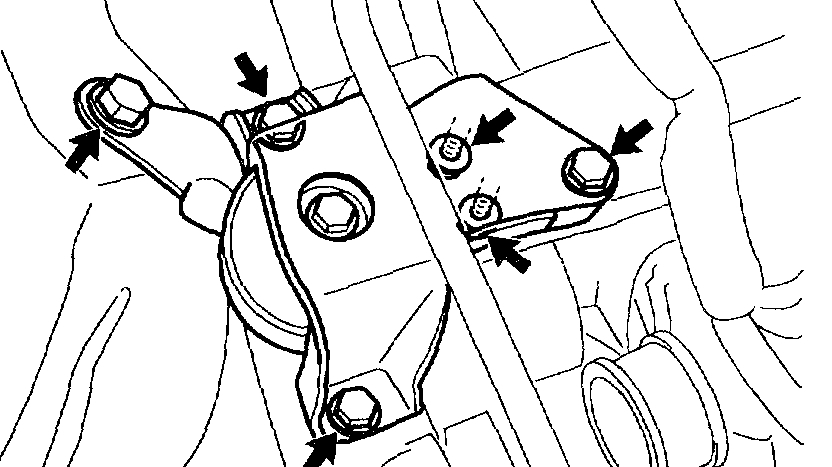
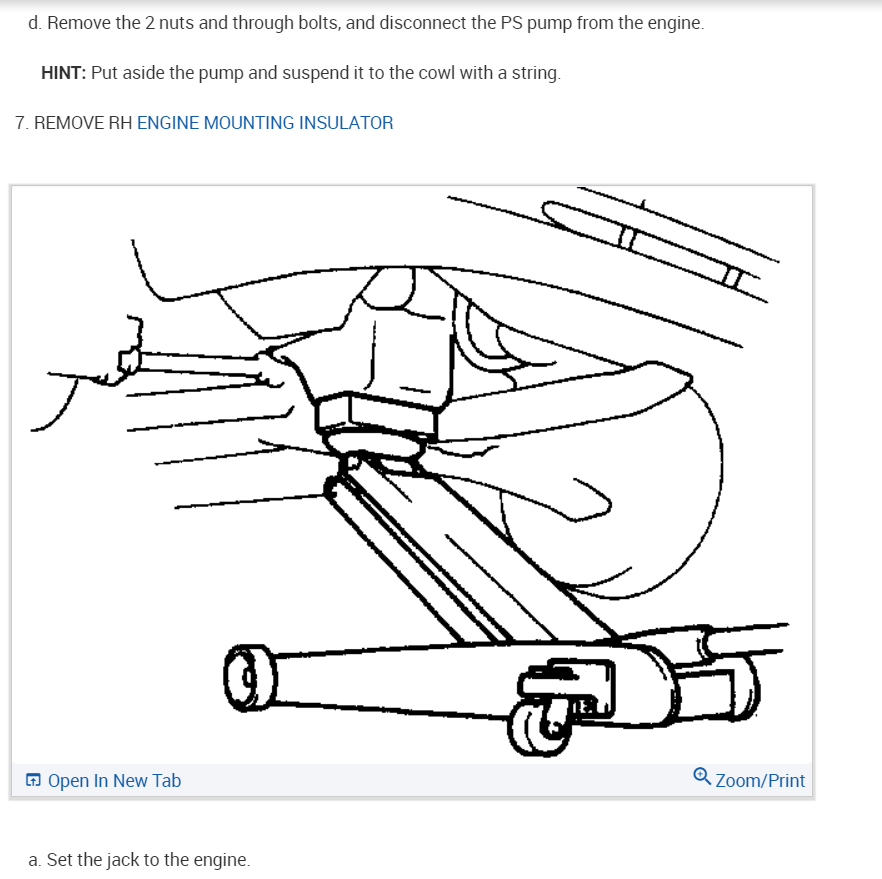
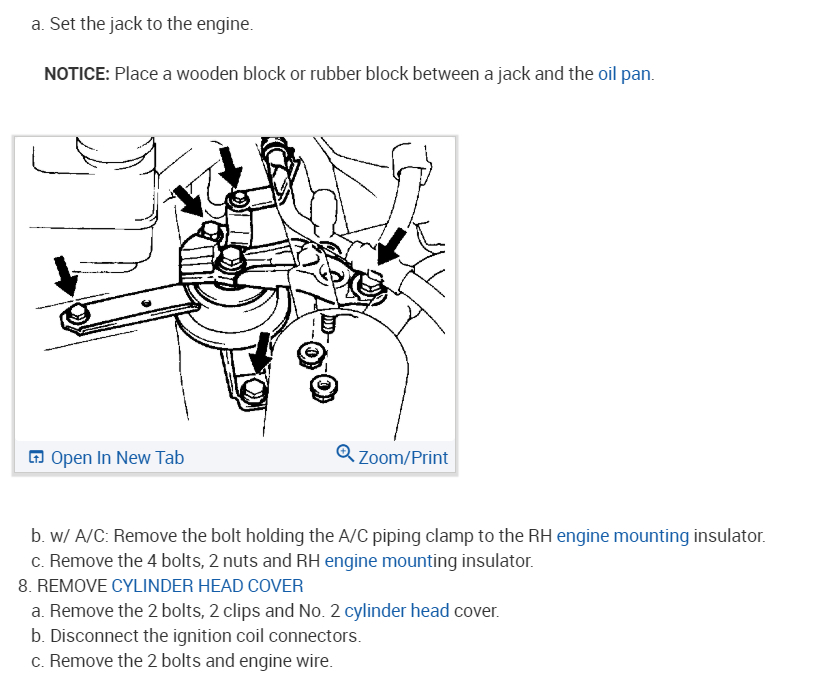
8. REMOVE ENGINE MOUNTING INSULATOR SUB-ASSY RH
a. Remove the PS oil pump reservoir and put it aside.
B. Place a wooden block between the jack and engine, and set the jack, then remove the 4 bolts, the 2 nuts and engine mounting insulator RH.
Pic 8
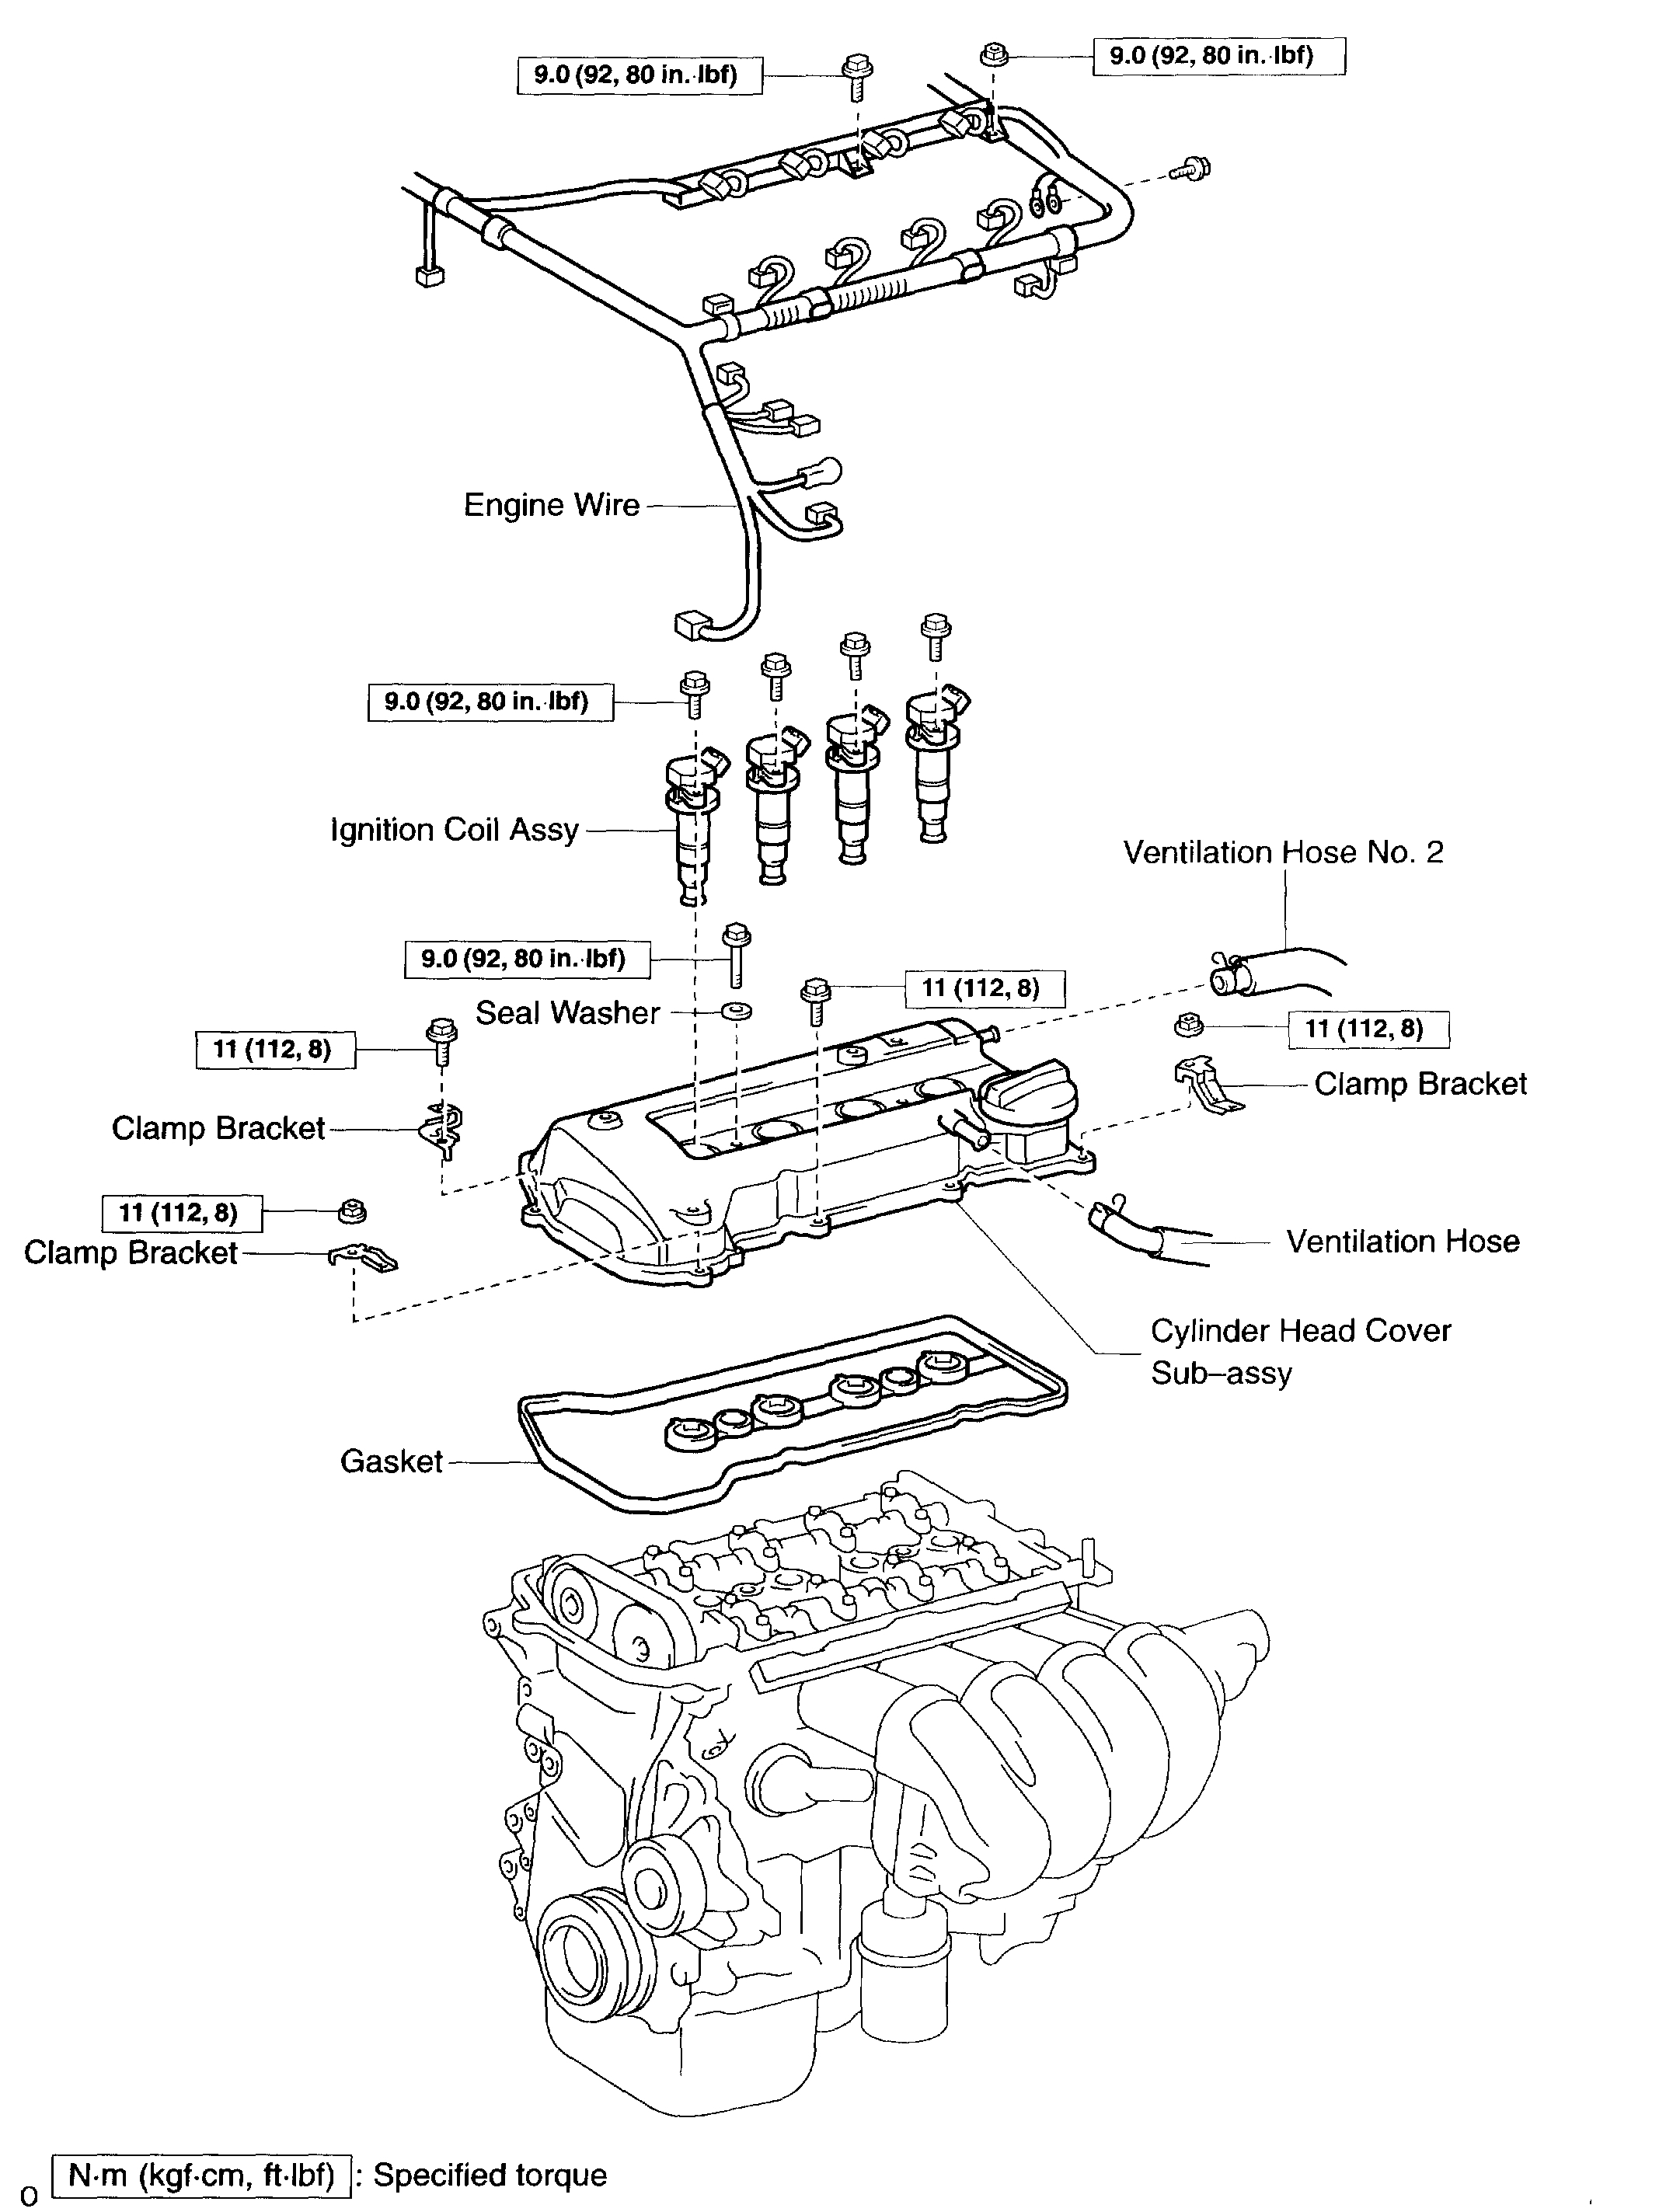
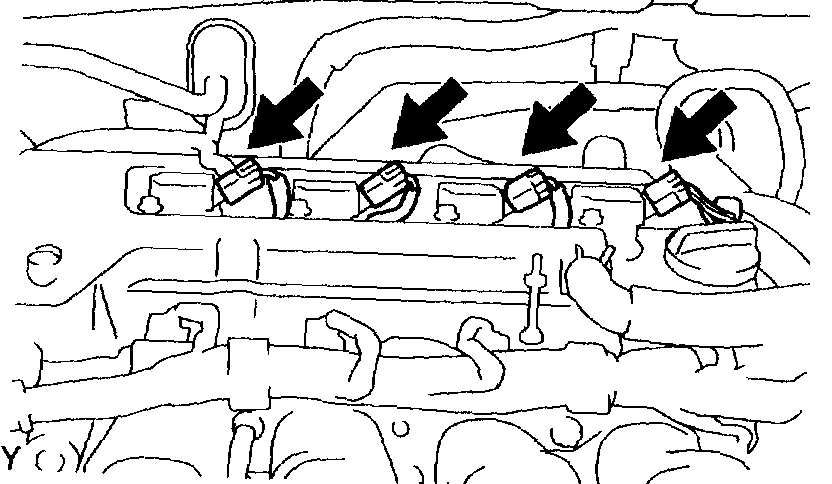
9. DISCONNECT ENGINE WIRE
a. Remove the 5 clamps from the 5 clamp brackets.
B. Disconnect the 4 ignition coil connectors.
Pic 9
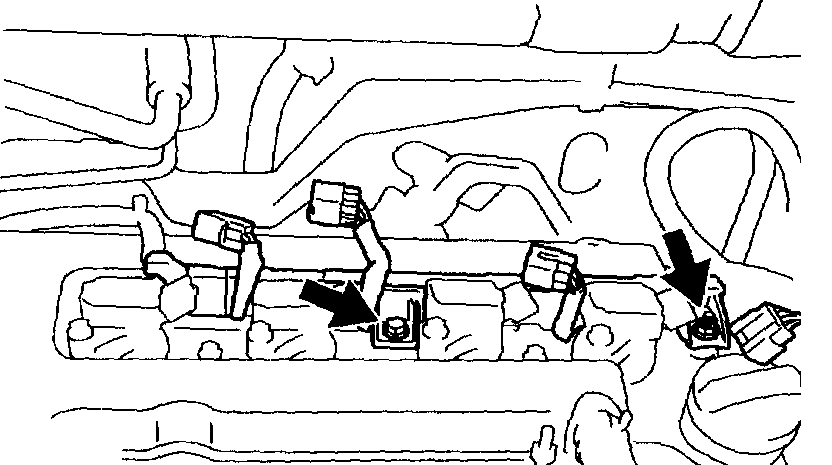
c. Remove the bolt and nut installing the engine wire.
Pic 10
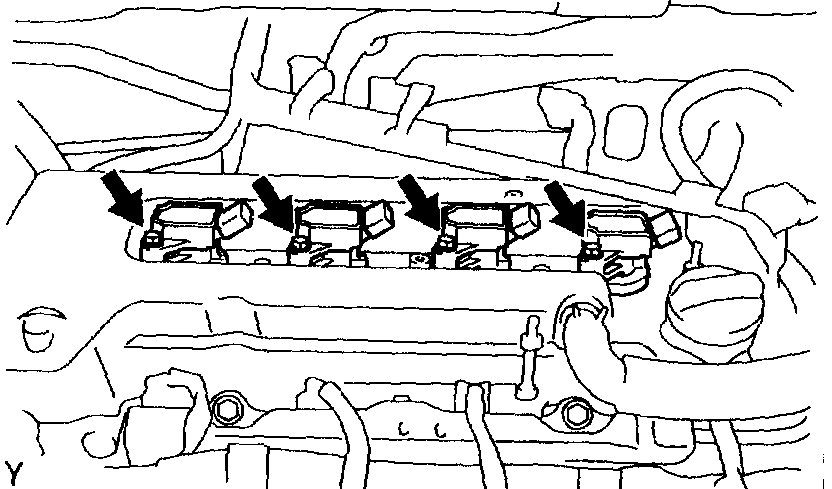
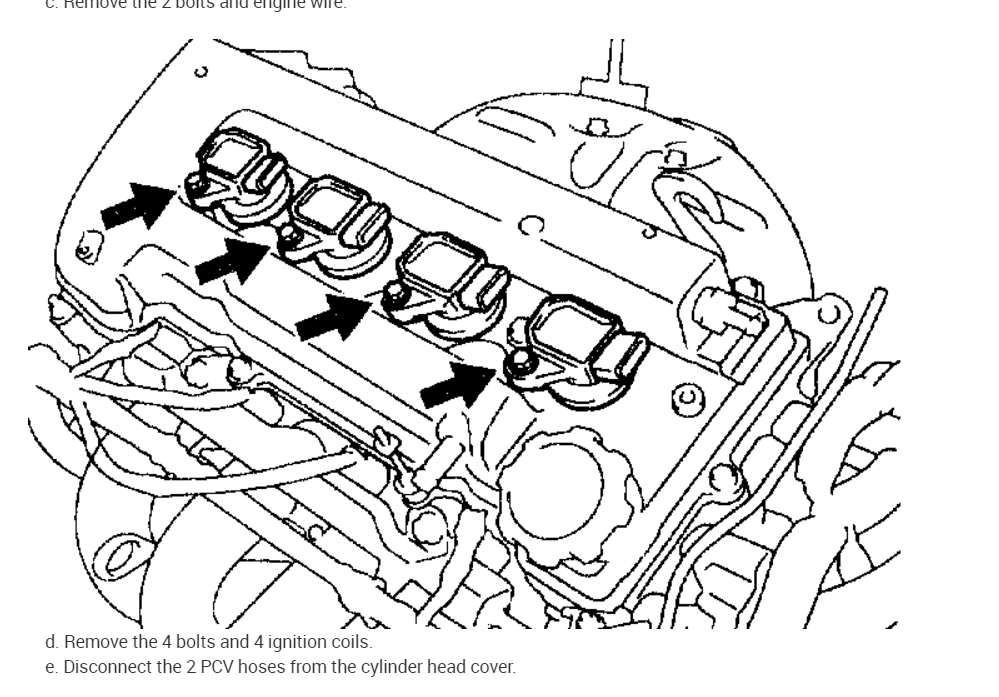
10. REMOVE IGNITION COIL ASSY
a. Remove the 4 bolts and 4 ignition coils.
Pic 11
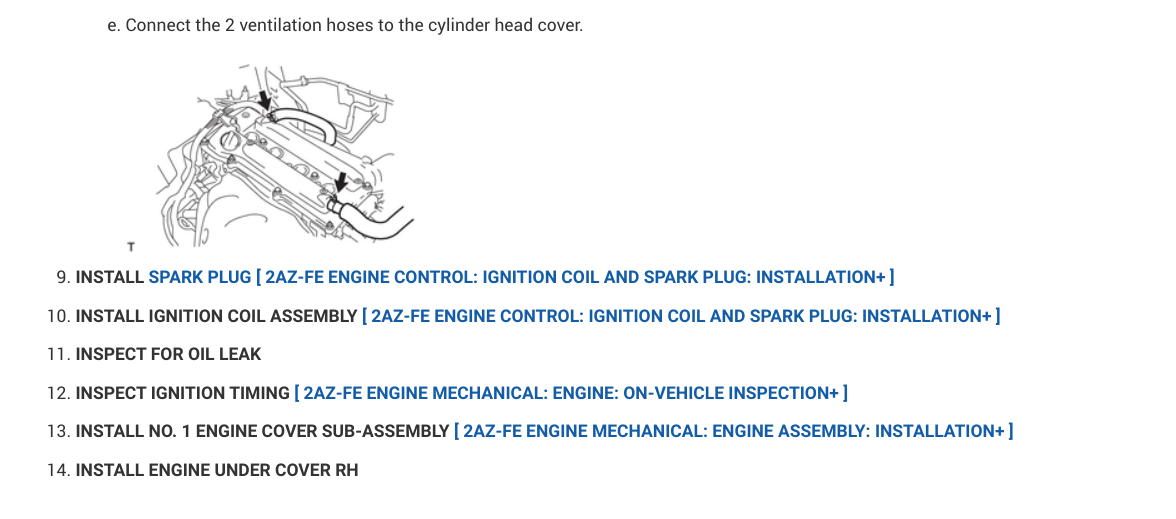
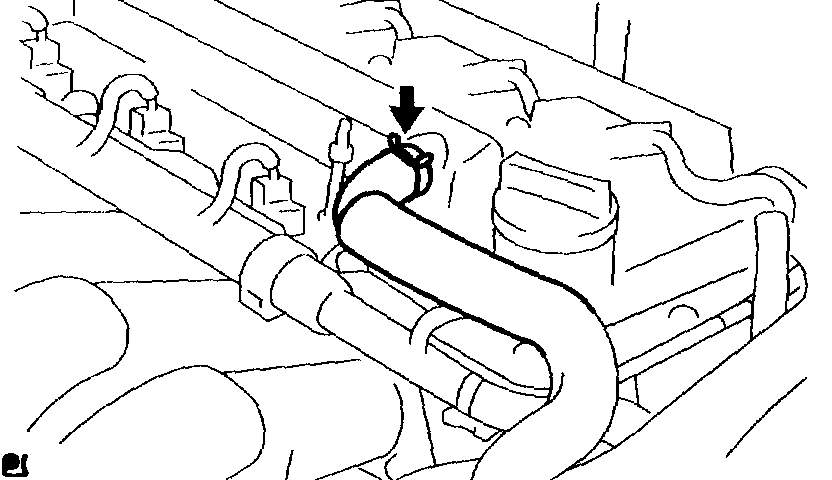
11. DISCONNECT VENTILATION HOSE
a. Disconnect the ventilation hose from the cylinder head cover.
Pic 12
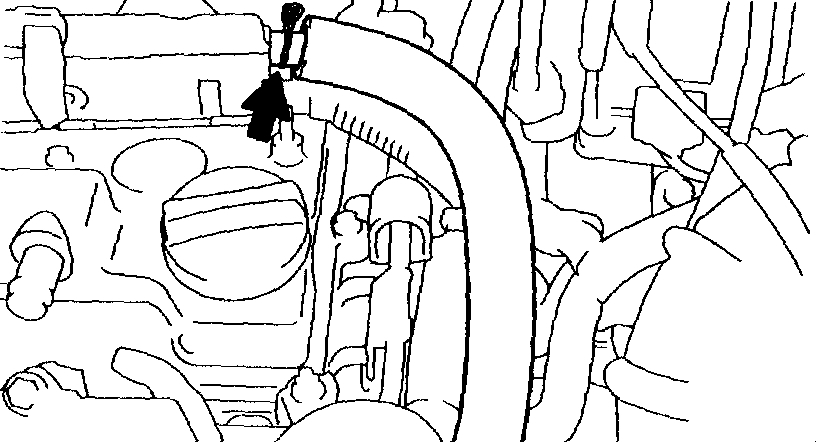
12. DISCONNECT VENTILATION HOSE NO.2
a. Disconnect the ventilation hose from the cylinder head cover.
Pic 13
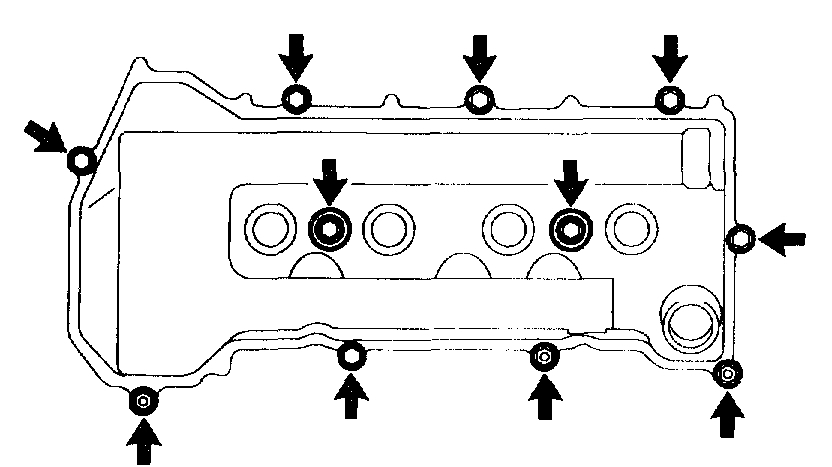
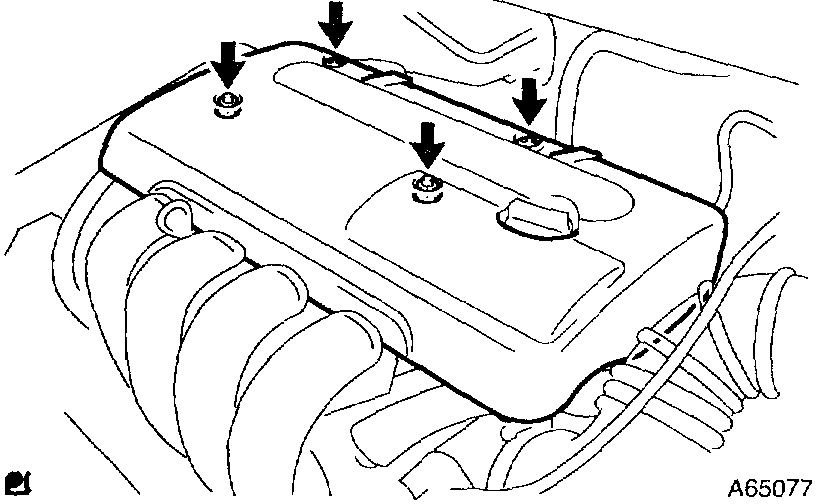
13. REMOVE CYLINDER HEAD COVER SUB-ASSY
a. Remove the 9 bolts, 2 seal washers, 2 nuts, 3 clamp brackets and cylinder head cover.
Pic 14
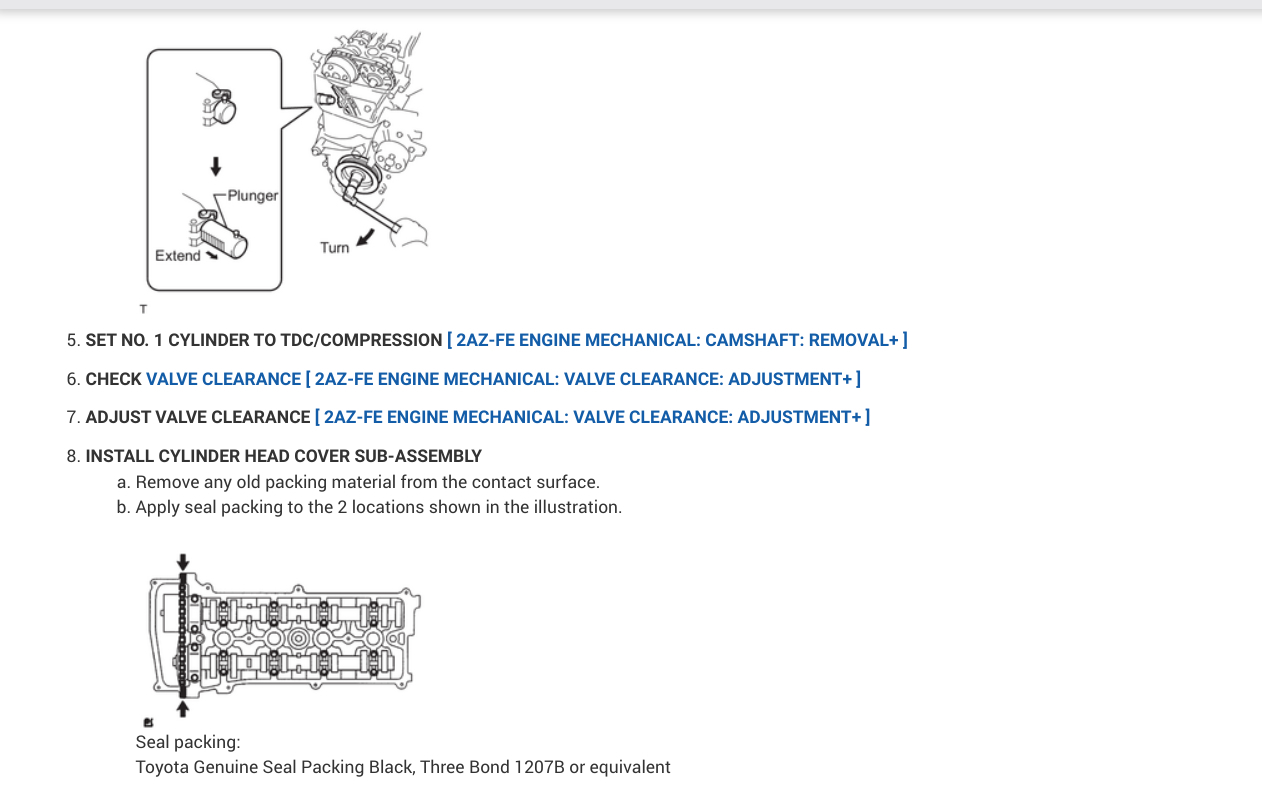
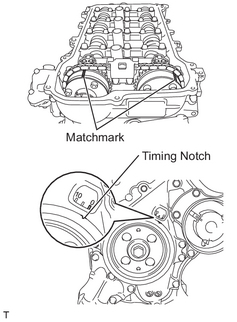
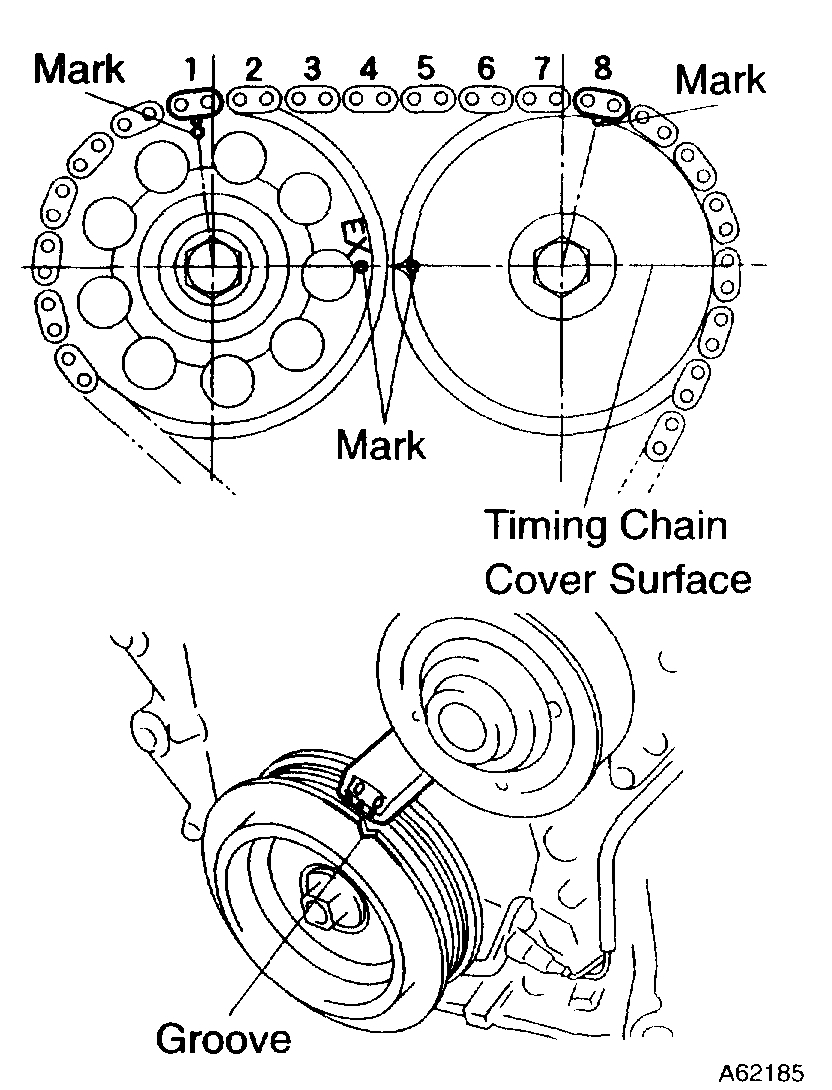
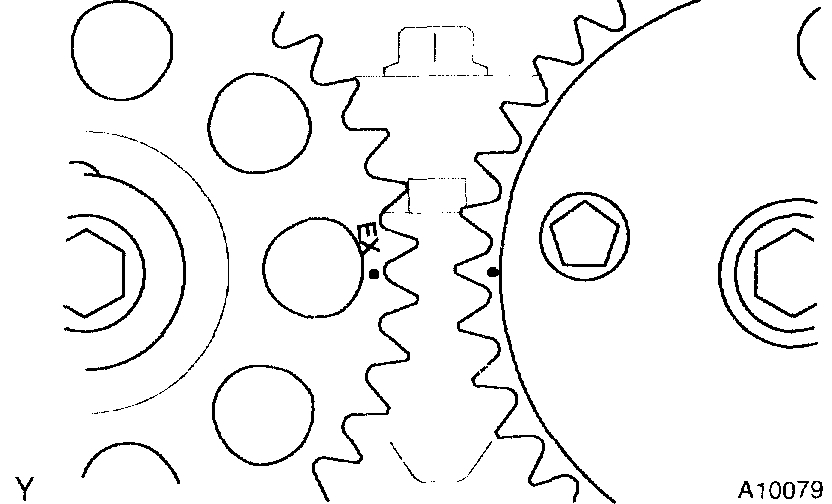
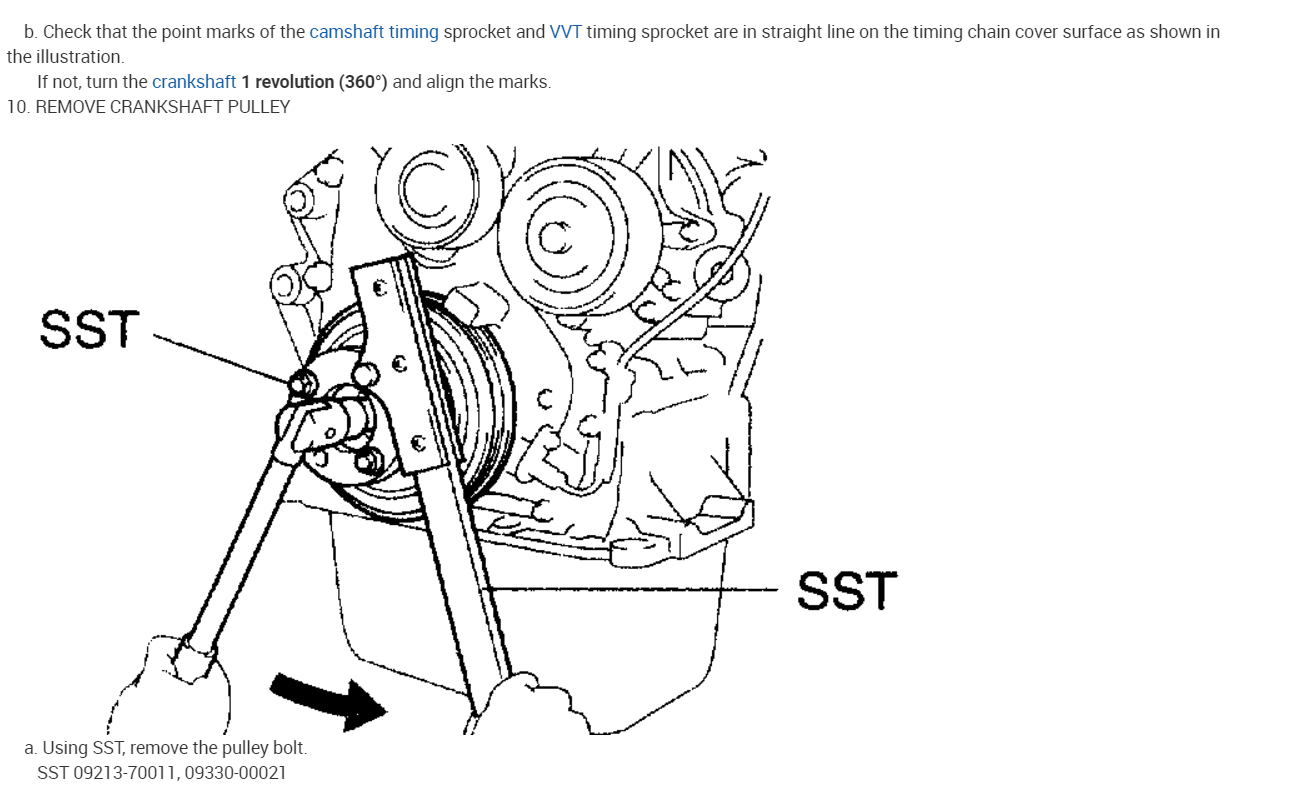
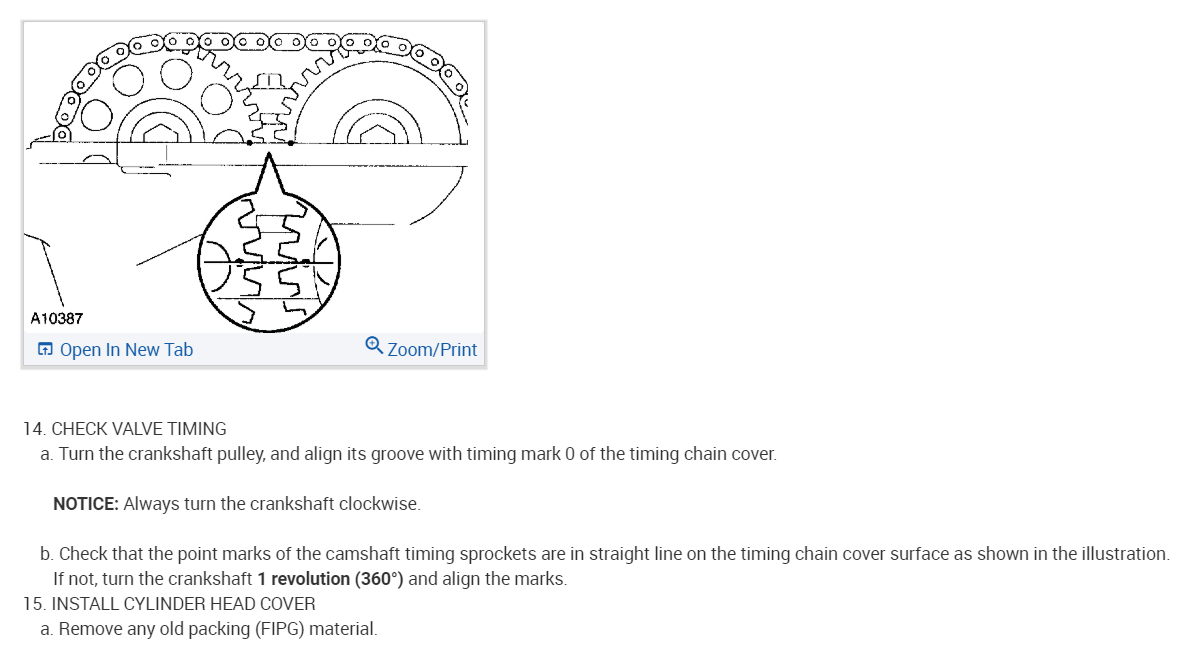
14. SET NO. 1 CYLINDER TO TDC/COMPRESSION
a. Turn the crankshaft pulley, and align its groove with timing mark "0" of the timing chain cover.
B. Check that the point marks of the camshaft timing sprocket and VVT timing sprocket are in straight line on the timing chain cover surface as shown in the illustration.
HINT: If not, turn the crankshaft 1 revolution (360°) and align the marks as above.
Pic 15
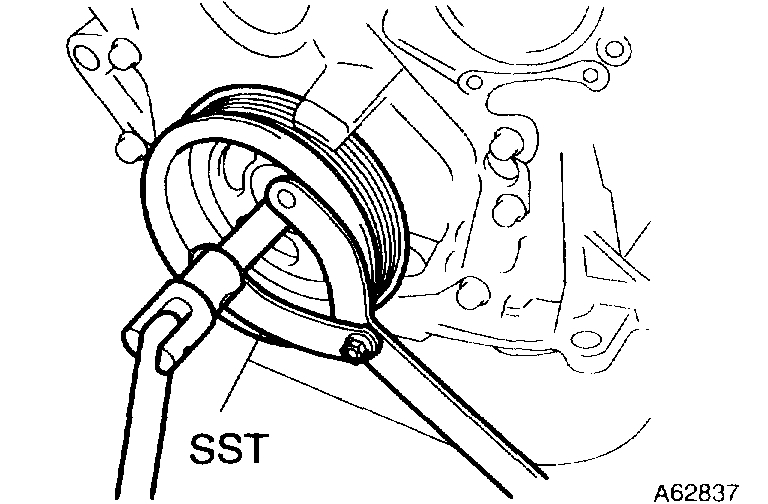
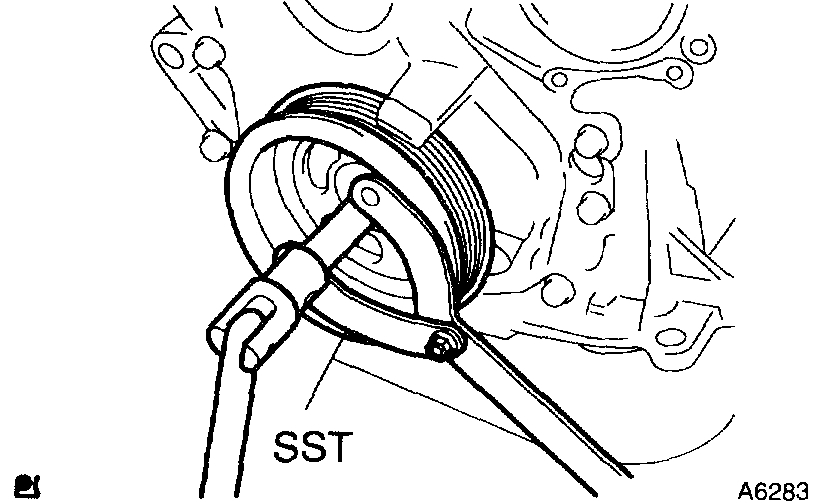
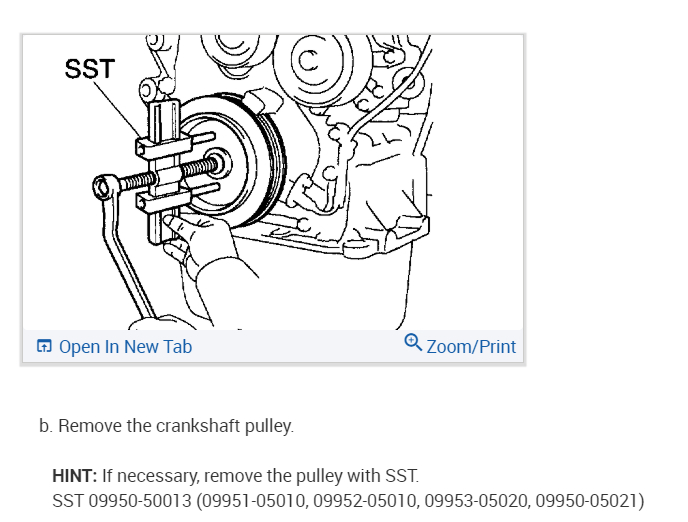
15. REMOVE CRANKSHAFT PULLEY
a. Using SST, remove the pulley bolt.
SST 09960-10010 (09962-01000, 09963-01000)
b. Remove the crankshaft pulley from the crankshaft.
Pic 16
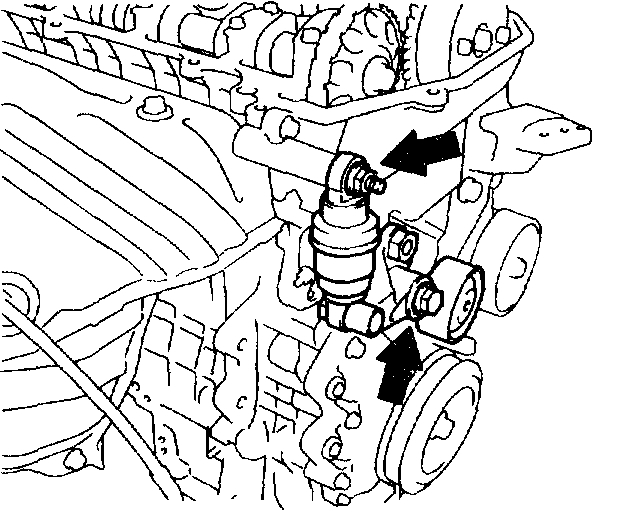
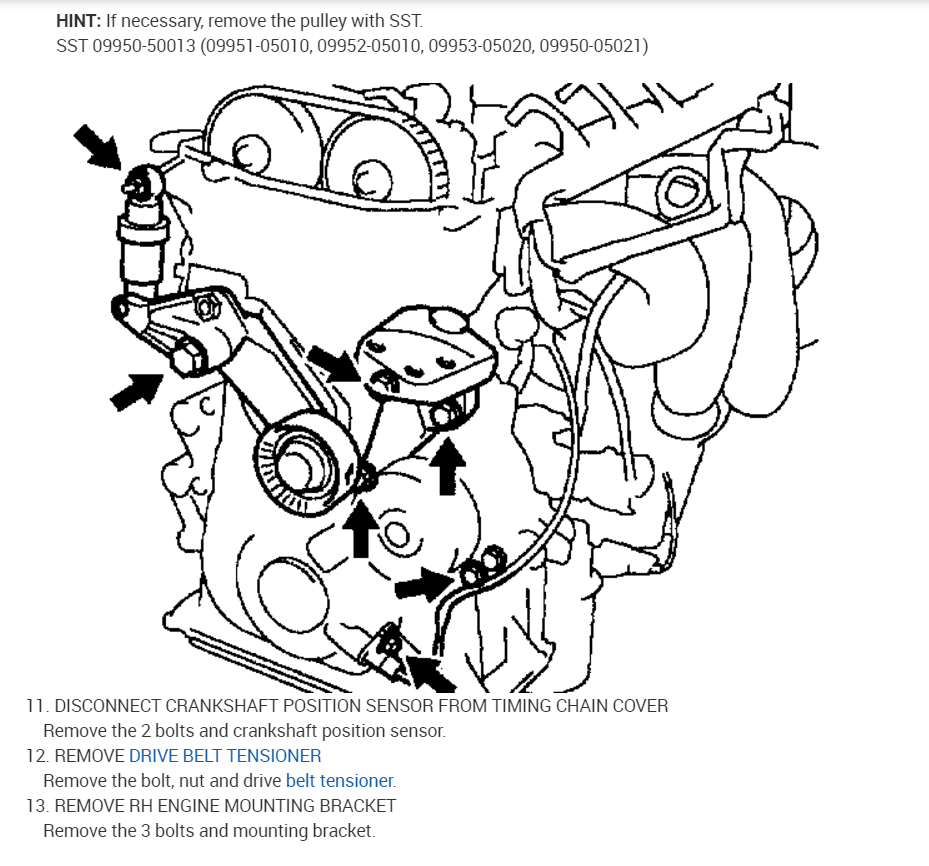
16. REMOVE V-RIBBED BELT TENSIONER ASSY
a. Remove the bolt, nut and V-ribbed belt tensioner.
HINT: Handle a jack up and down to remove the bolt.
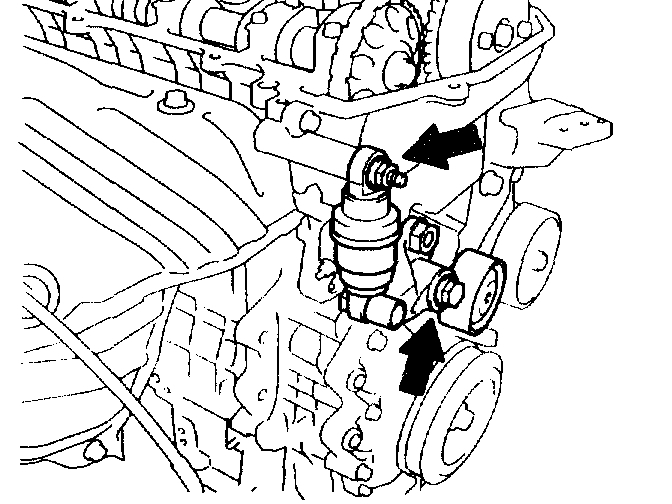
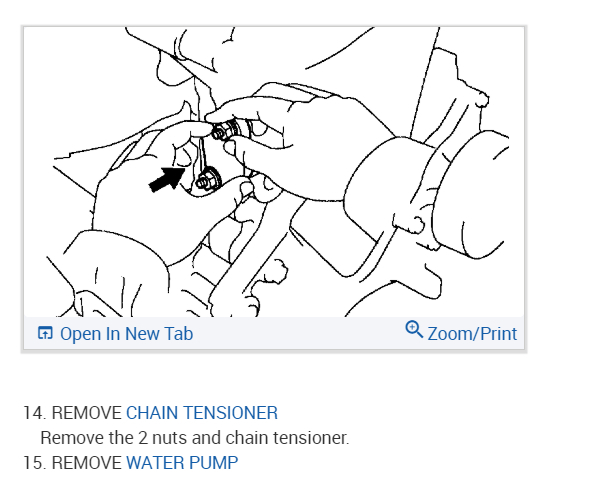
17. REMOVE WATER PUMP ASSY
pic 17
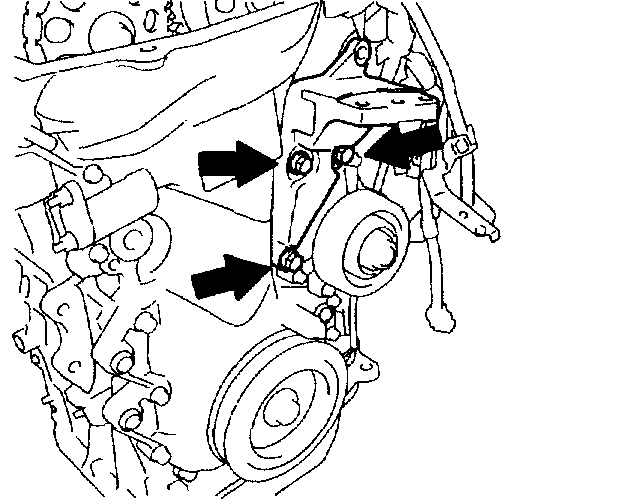
18. REMOVE TRANSVERSE ENGINE ENGINE MOUNTING BRACKET
a. Remove the 3 bolts and transverse engine engine mounting bracket.
Pic 18
19. REMOVE CRANK POSITION SENSOR
a. Remove the 2 bolts installing the crank position sensor.
Pic 19
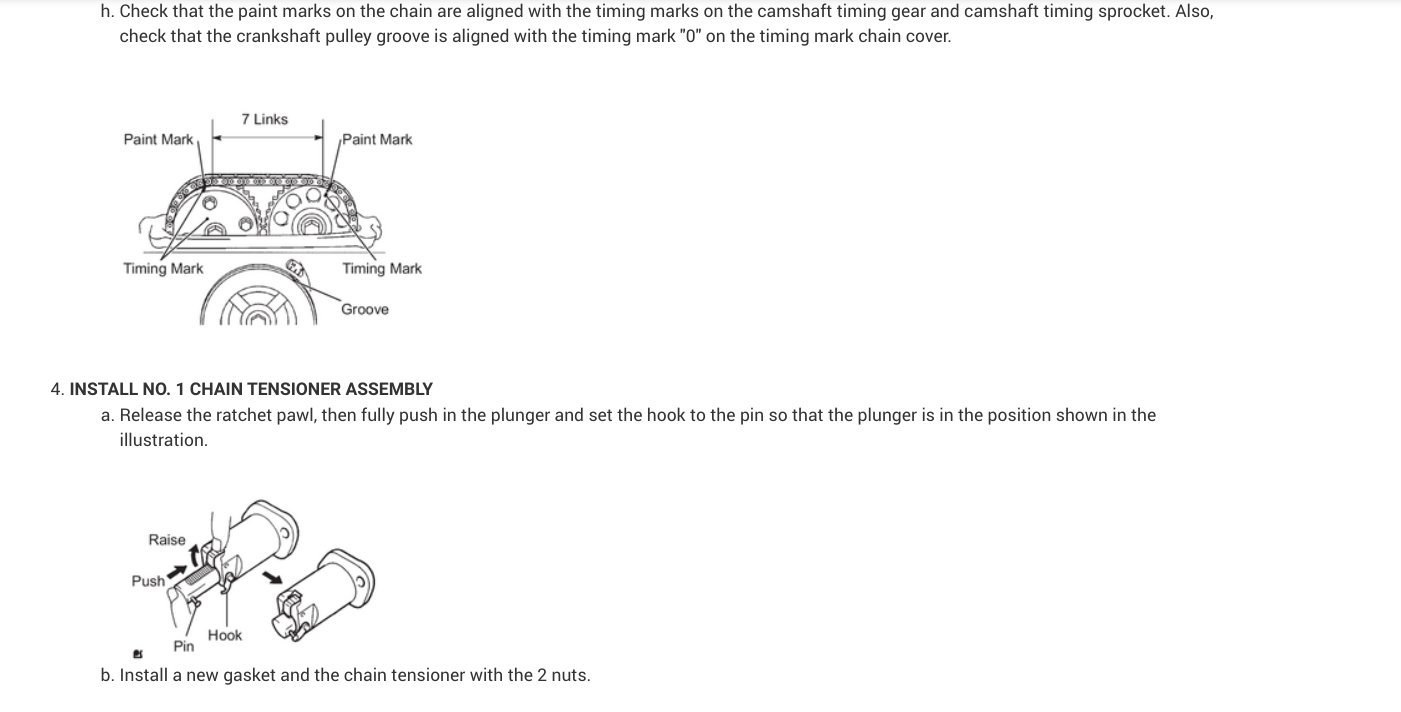
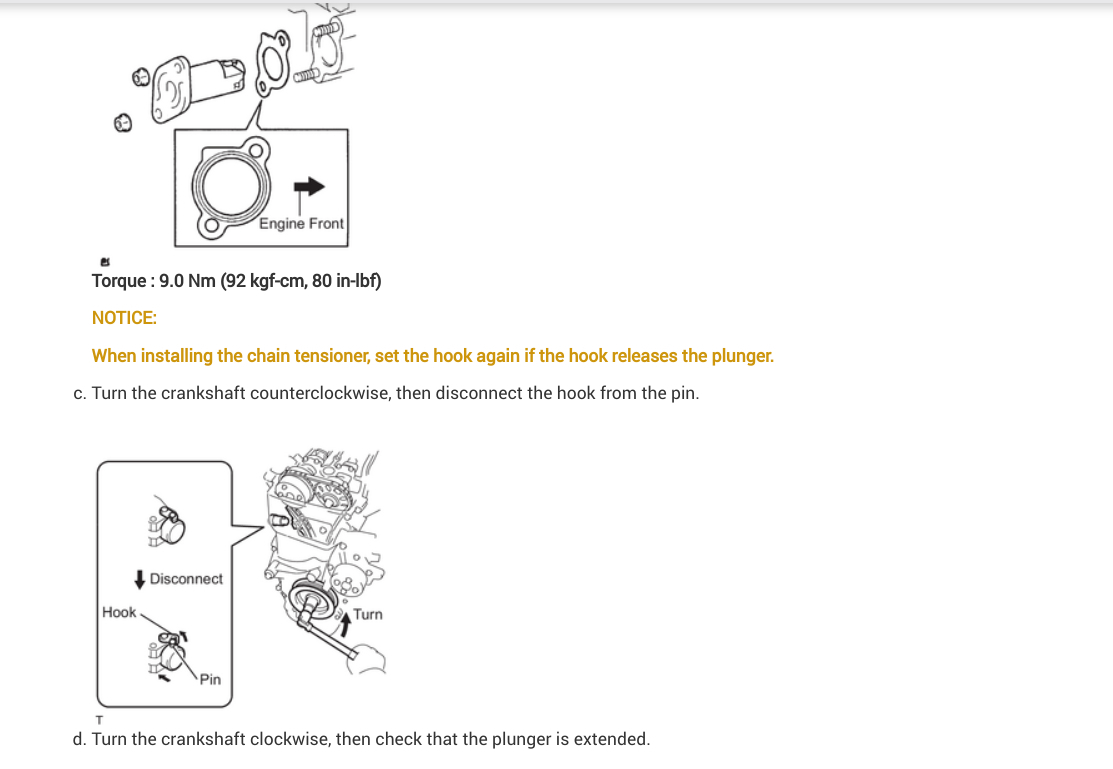
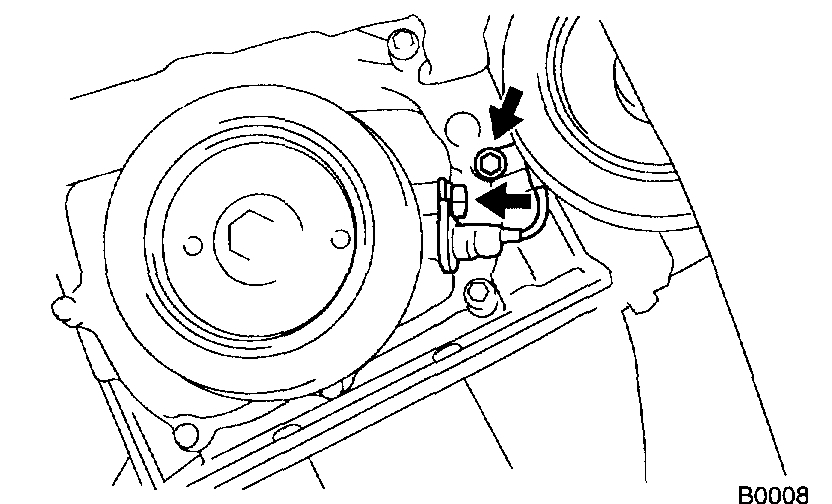
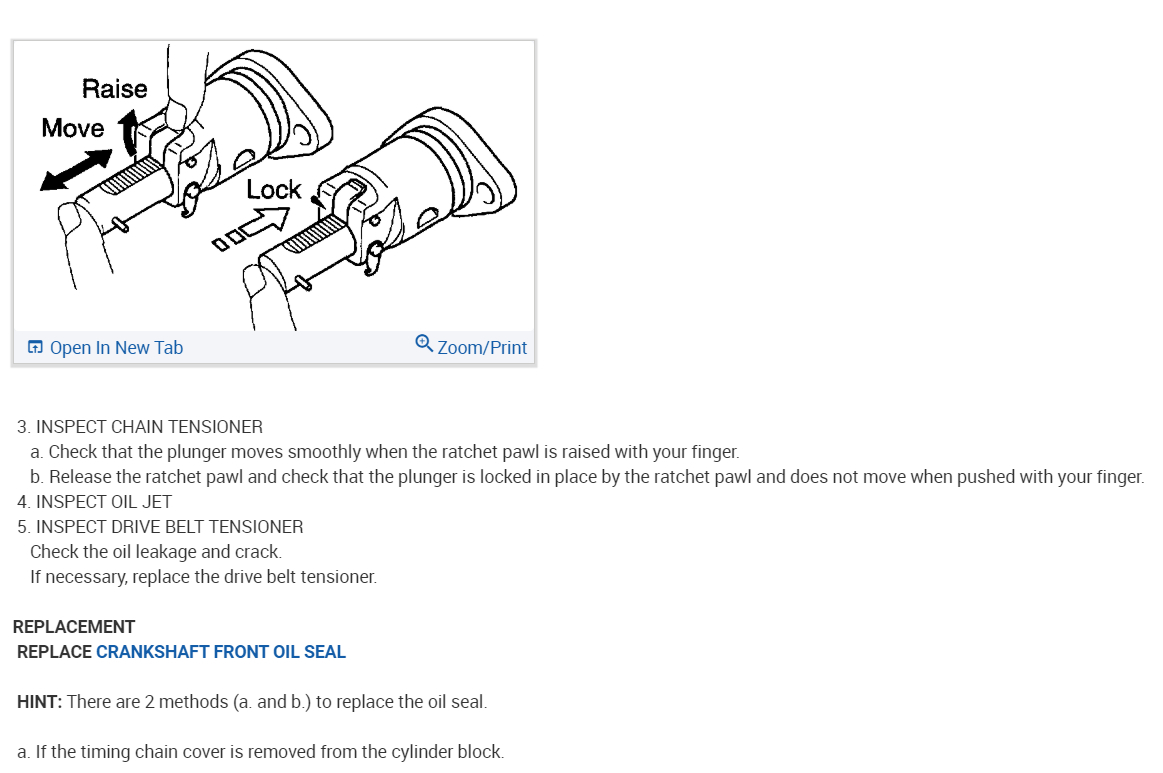
20. REMOVE CHAIN TENSIONER ASSY NO.1
a. Remove the 2 nuts and chain tensioner.
NOTICE: Be sure not to revolve the crankshaft without the chain tensioner.
Pic 20
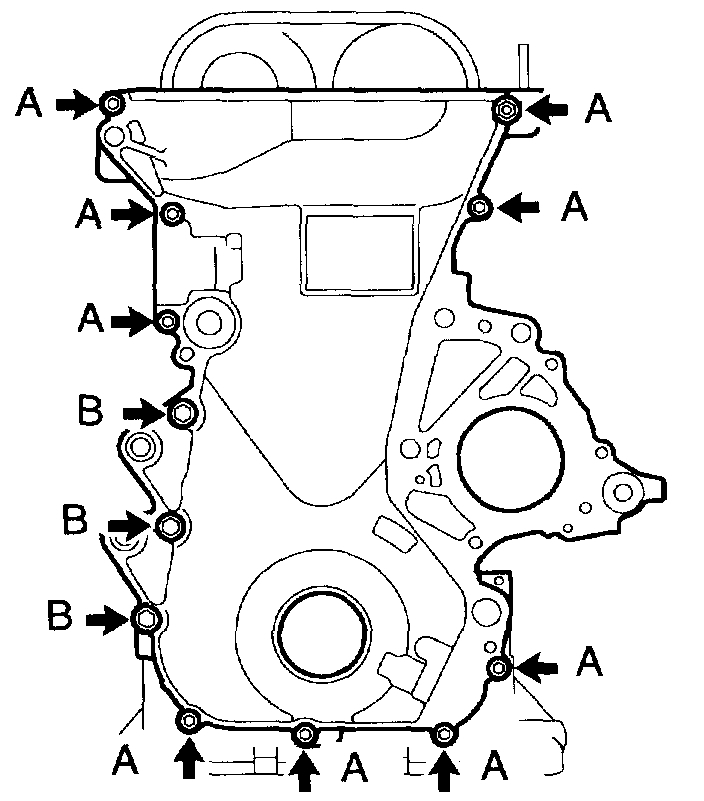
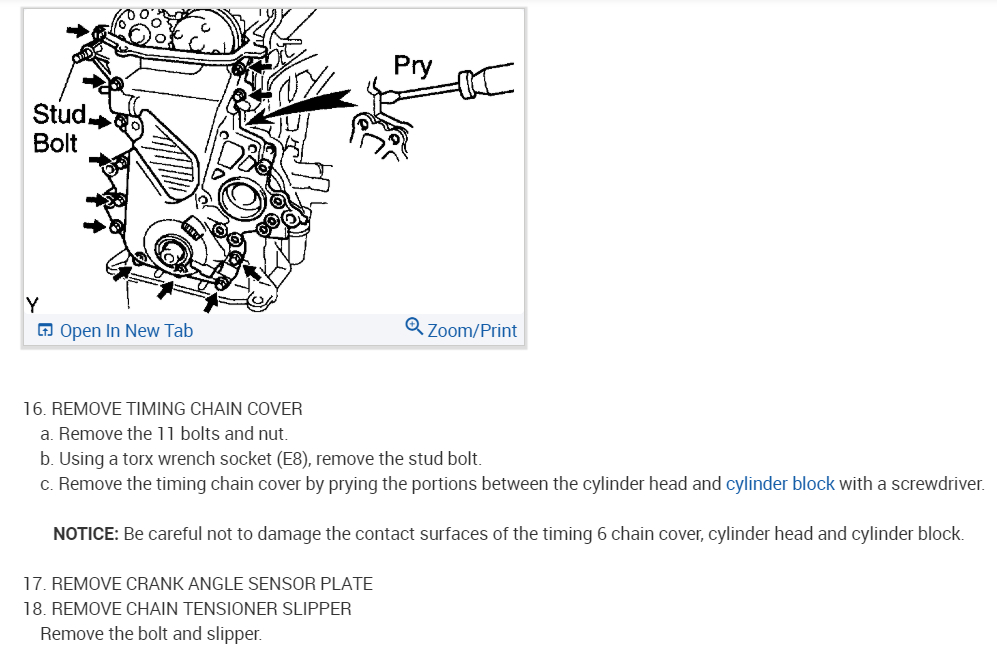
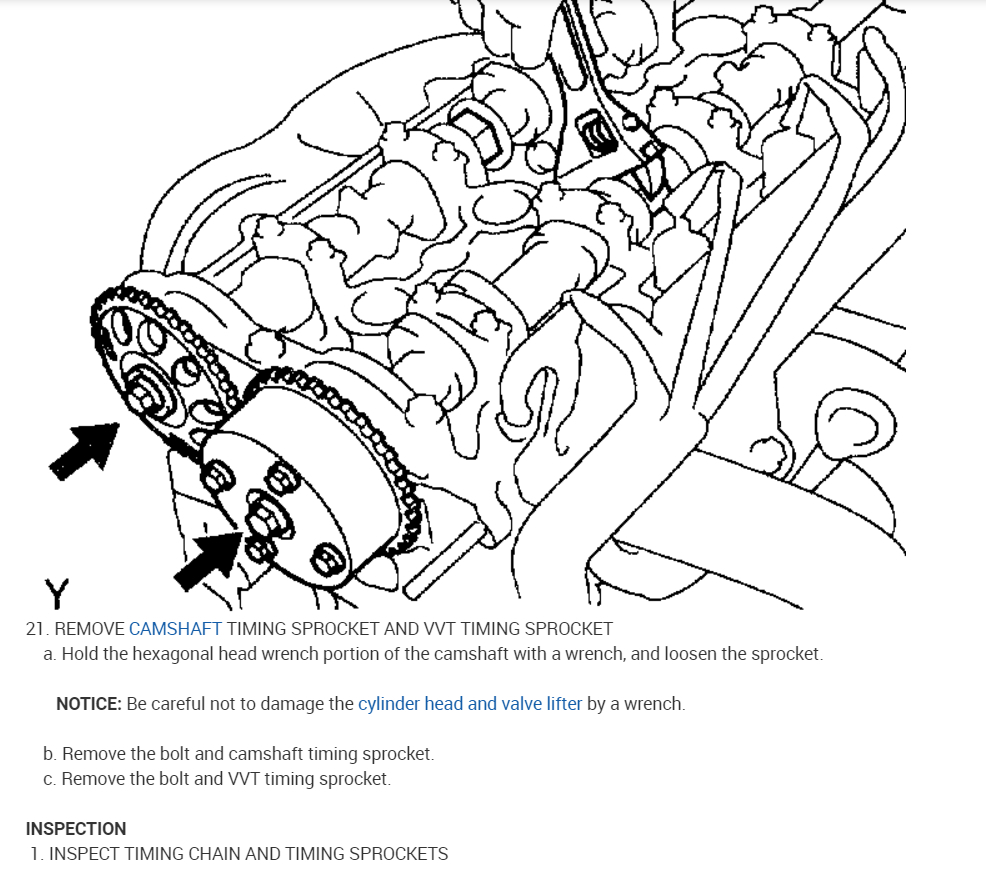
21. REMOVE TIMING CHAIN OR BELT COVER SUB-ASSY
a. Remove the 11 bolts and nuts.
B. Using a torx wrench socket (E8), remove the stud bolt.
C. Remove the timing chain cover by prying the portions between the cylinder head and cylinder block with a screwdriver.
NOTICE: Be careful not to damage the contact surfaces of the timing chain cover, cylinder head and cylinder block.
Pic 21
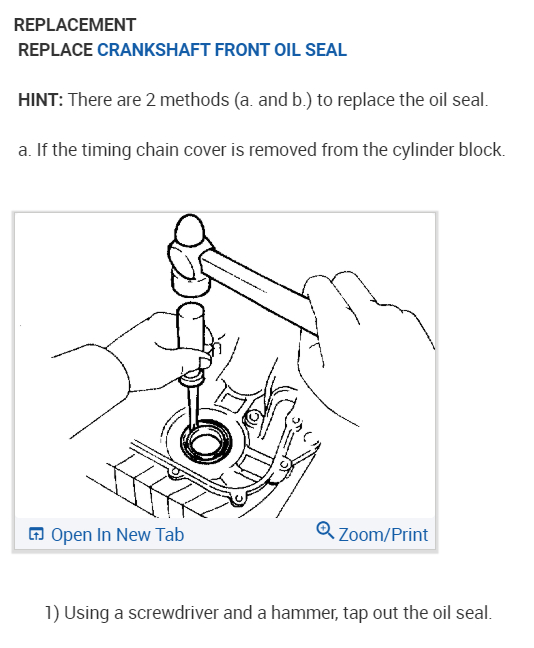
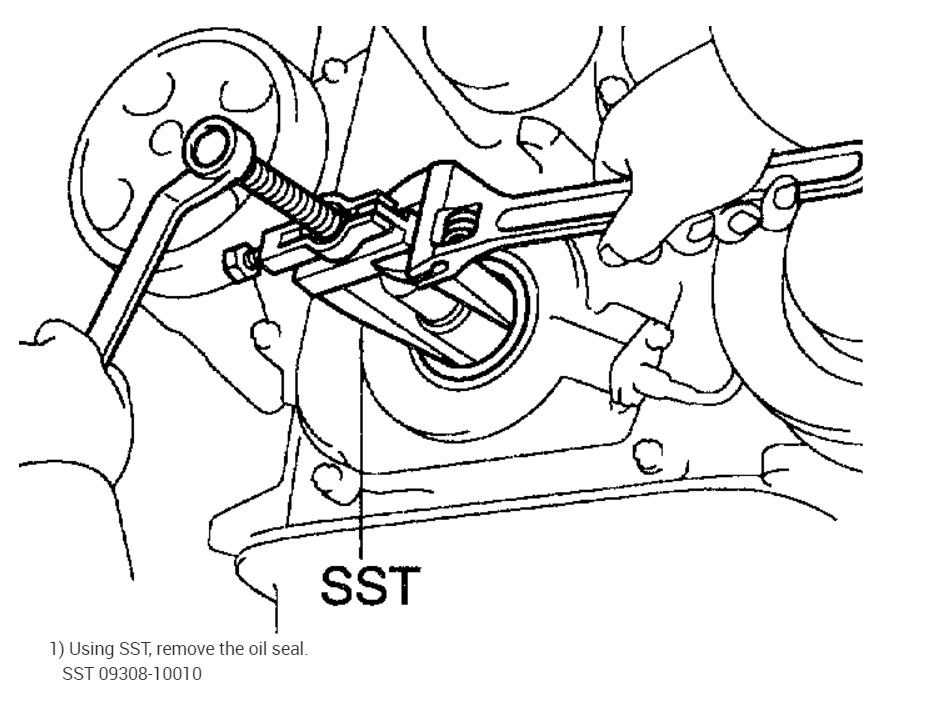
22. REMOVE TIMING GEAR COVER OIL SEAL
a. Using a screwdriver, remove the oil seal.
23. REMOVE CRANKSHAFT POSITION SENSOR PLATE NO.1
24. REMOVE CHAIN TENSIONER SLIPPER
a. Remove the bolt and chain tensioner slipper.
Pic 22
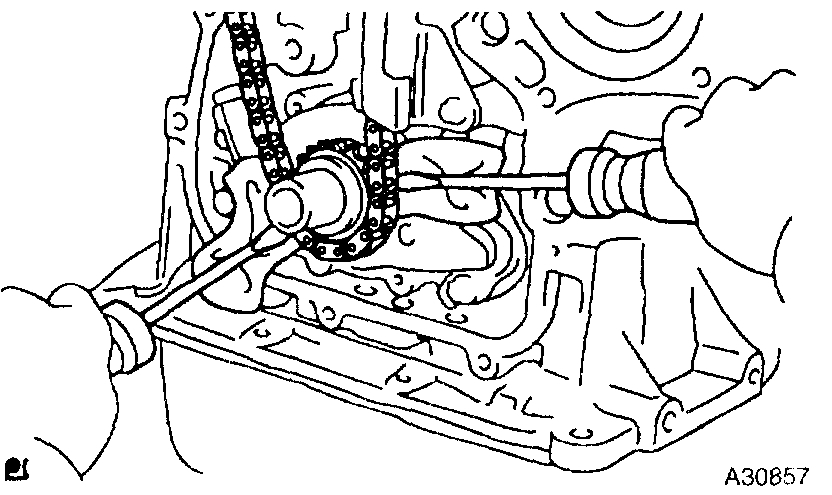
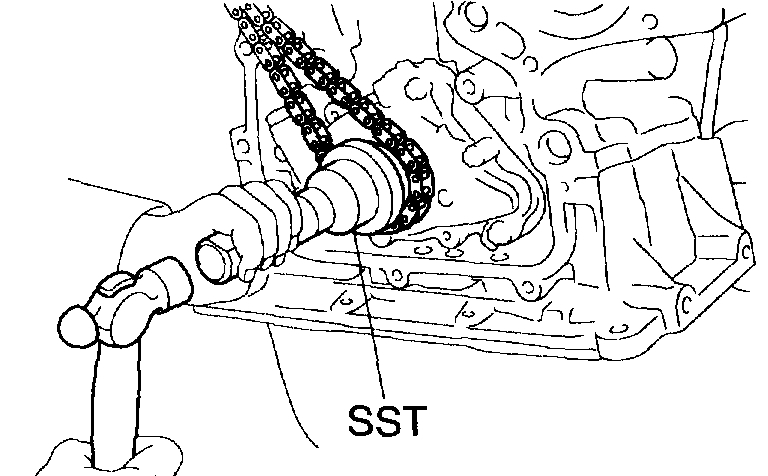
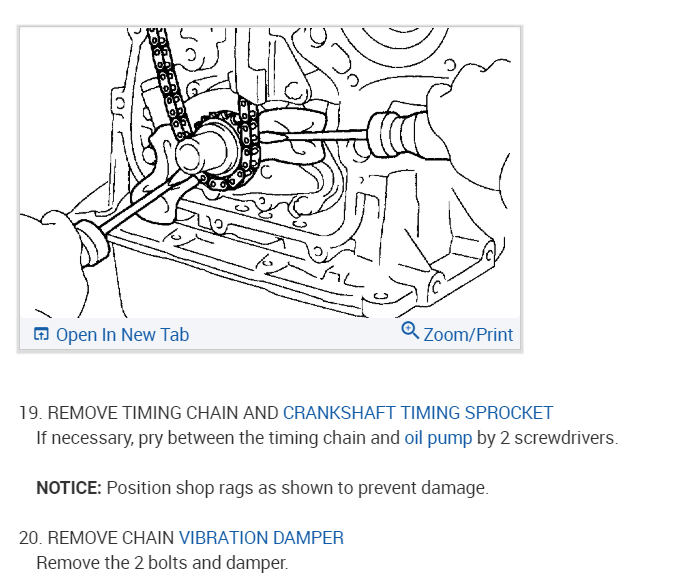
25. REMOVE CHAIN SUB-ASSY
a. Remove the timing chain with the crankshaft timing gear plying screwdrivers as shown in the illustration.
NOTICE: Put shop rag to protect the engine. In case of revolving the camshafts with the chain off the sprockets, turn the crankshaft 1/4 revolution for valves not to touch the pistons.
Pic 23
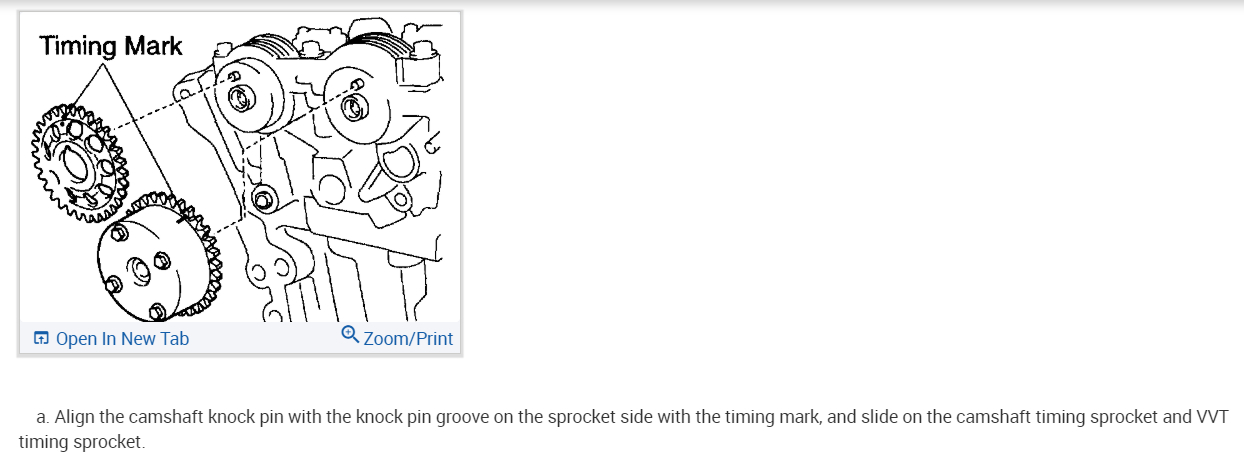
26. INSTALL CHAIN SUB-ASSY
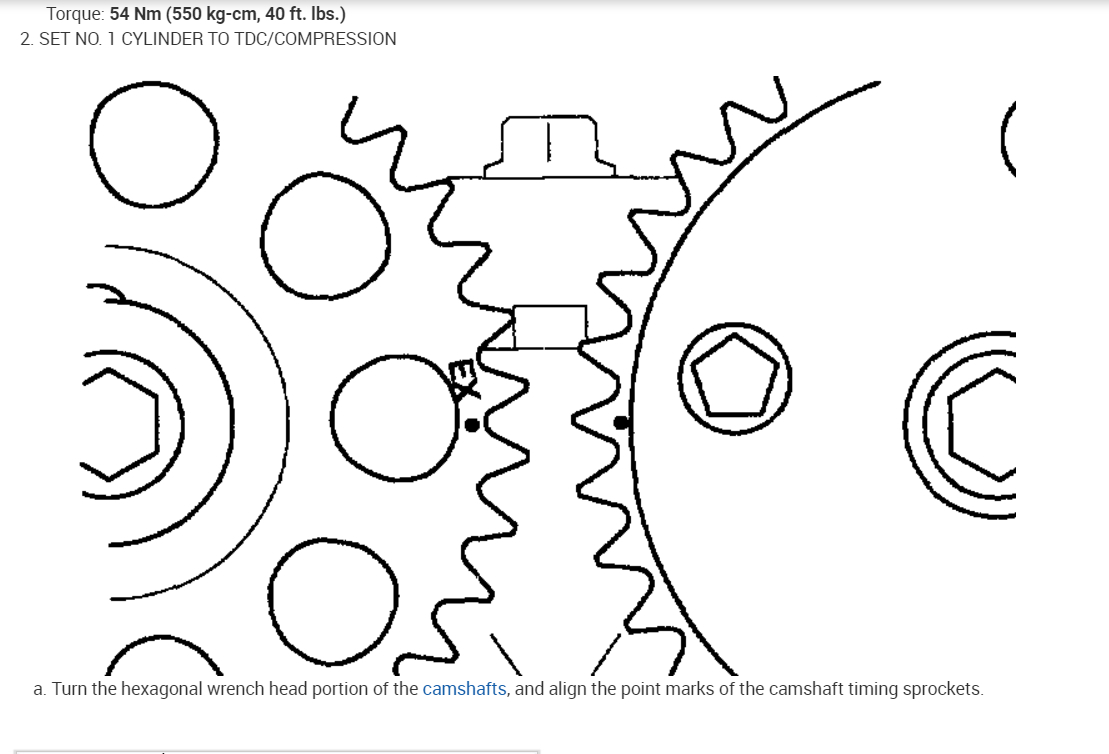
a. Set No. 1 cylinder to TDC/compression.
1. Turn the hexagonal wrench head portion of the camshafts, and align the point marks of the camshaft timing sprockets.
Pic 24
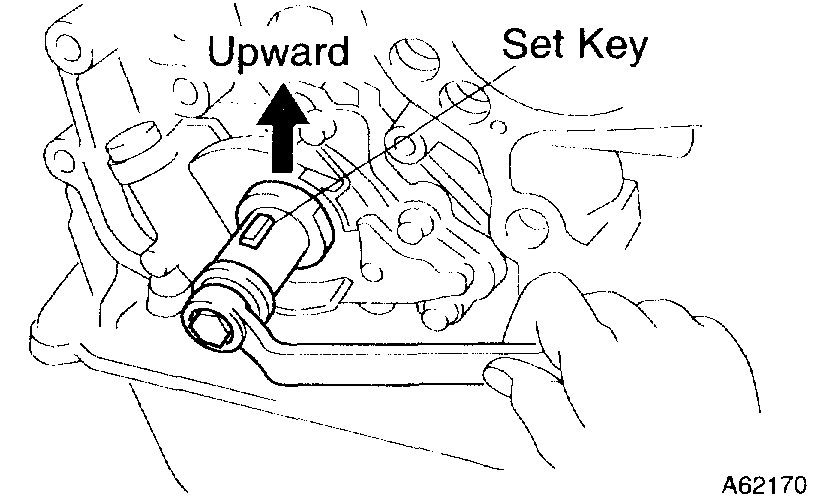
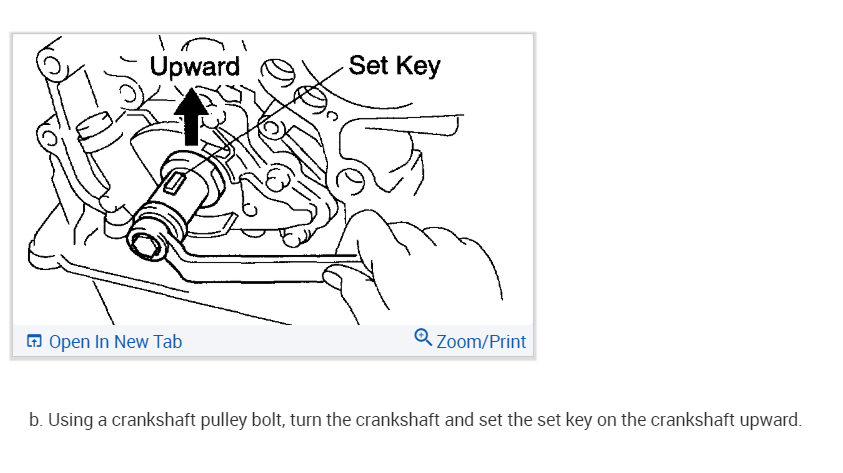
2. Using a crankshaft pulley bolt, turn the crankshaft and set the set key on the crankshaft upward.
Pic 25
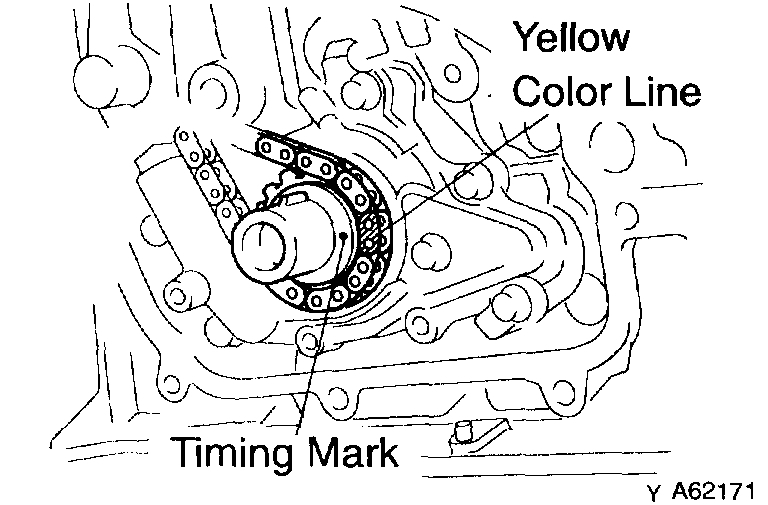
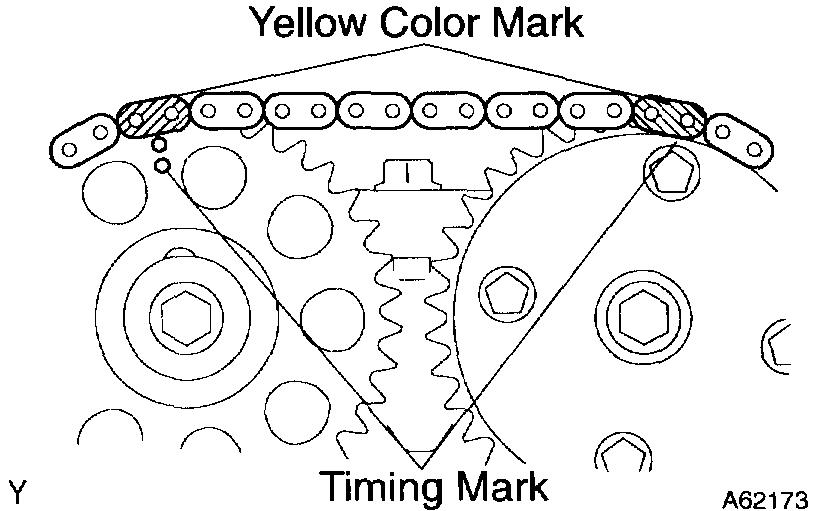
b. Install the timing chain on the crankshaft timing sprocket with the yellow color link aligned with the timing mark on the crankshaft timing sprocket.
HINT: Three yellow color links are on the chain.
Pic 26
c. Using SST, install the crankshaft timing sprocket.
SST 09223-22010
pic 27
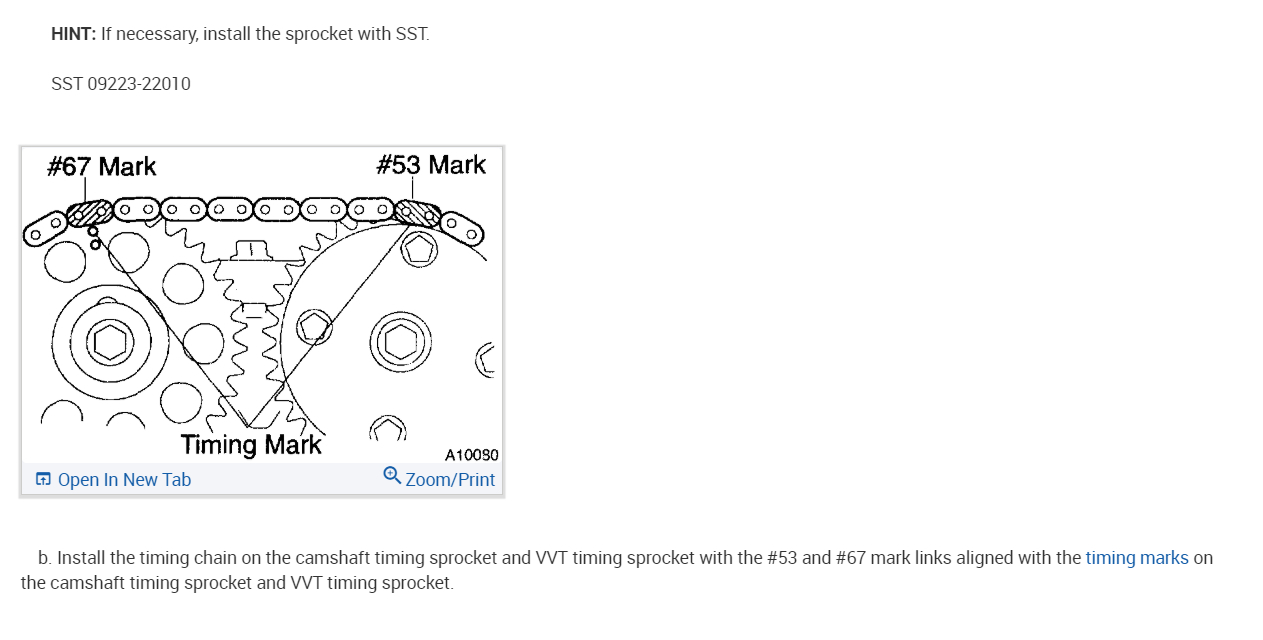
d. Install the timing chain on the camshaft timing sprockets with the yellow color links aligned with the timing marks on the camshaft timing sprockets.
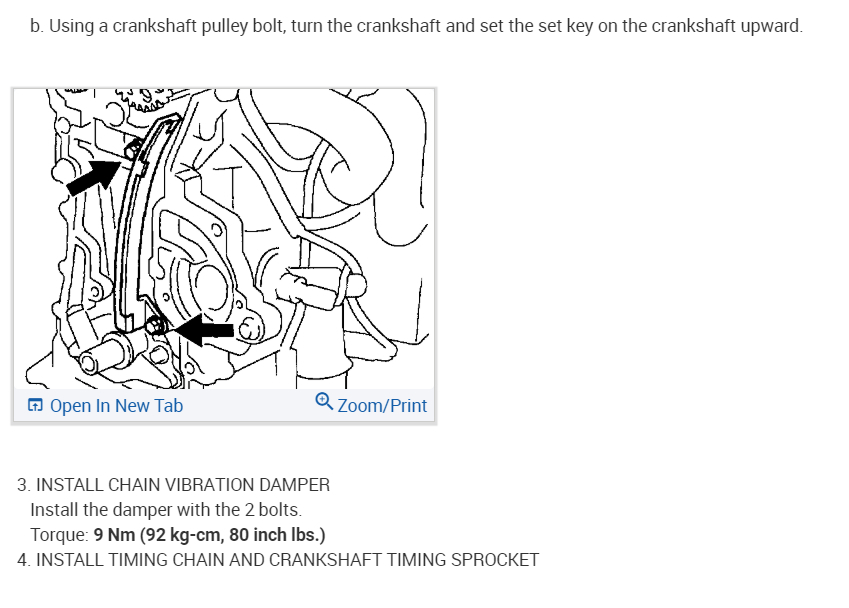
27. INSTALL CHAIN TENSIONER SLIPPER
a. Install the chain tensioner slipper with the bolt.
Torque: 19 Nm (194 kgf-cm, 14 ft. Lbs.)
pic 28
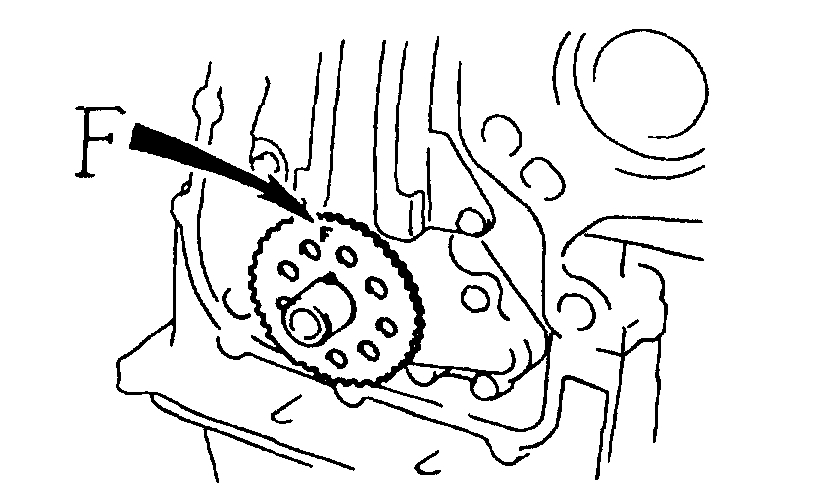
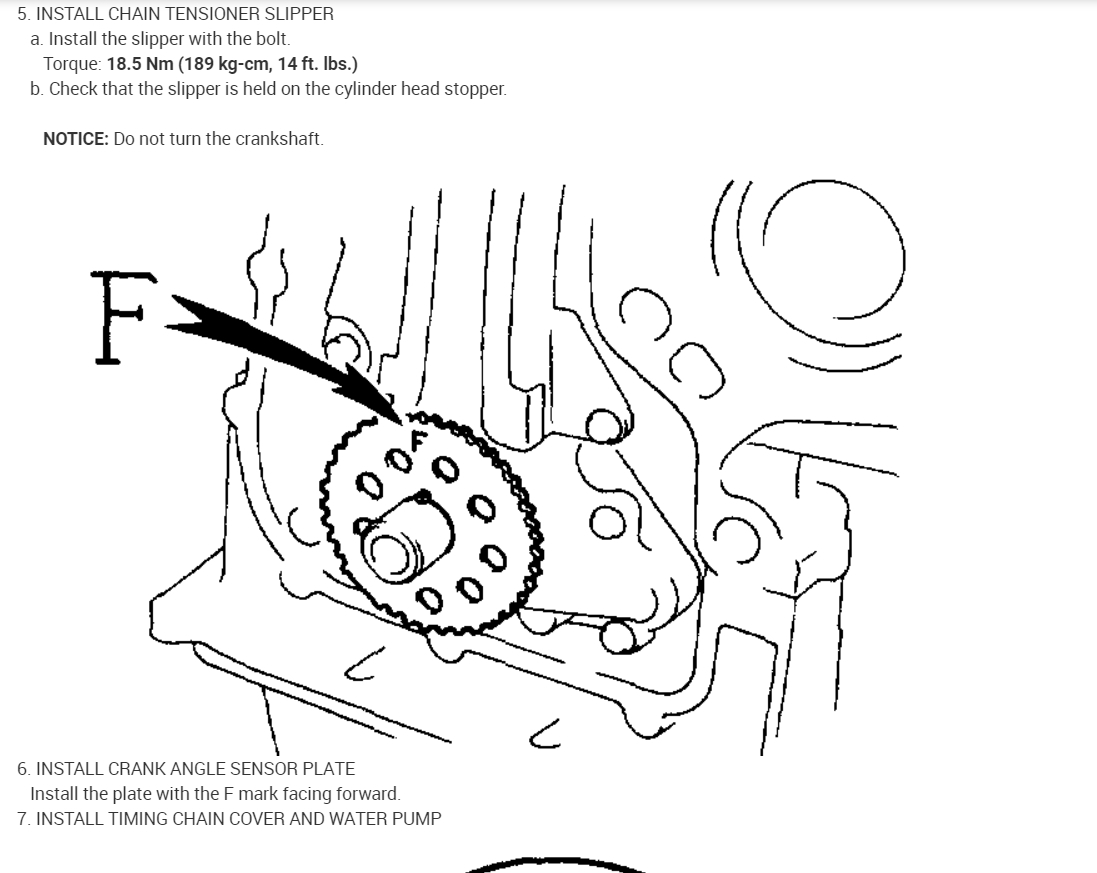
28. INSTALL CRANKSHAFT POSITION SENSOR PLATE NO.1
a. Install the plate with the "F" mark facing forward.
Pic 29
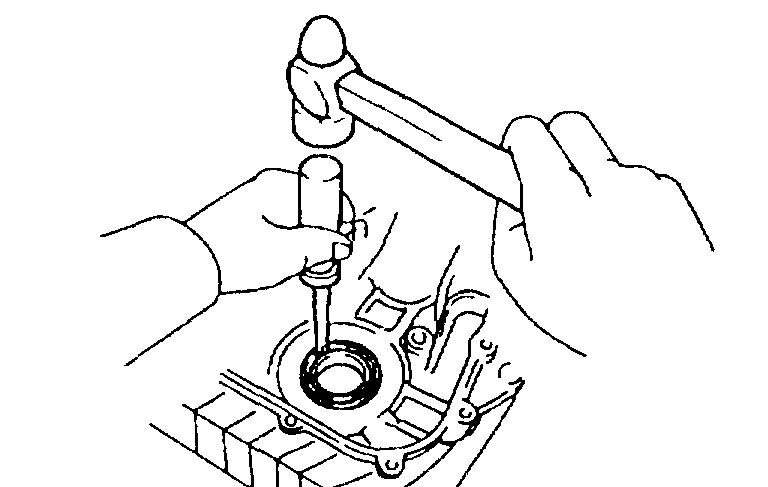
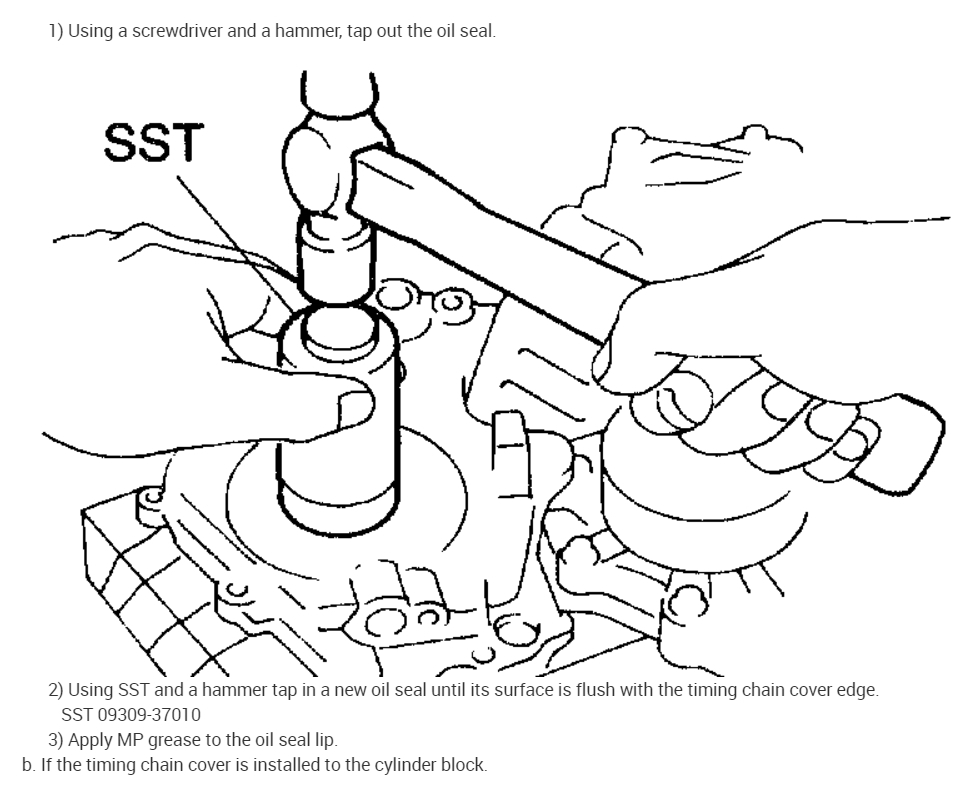
29. INSTALL TIMING GEAR COVER OIL SEAL
a. Apply MP grease to a new oil seal lip
b. Using SST, tap in the oil seal until its surface is flush with the timing chain cover edge.
SST 0922-22010
NOTICE: Keep the lip off foreign materials.
Pic 30
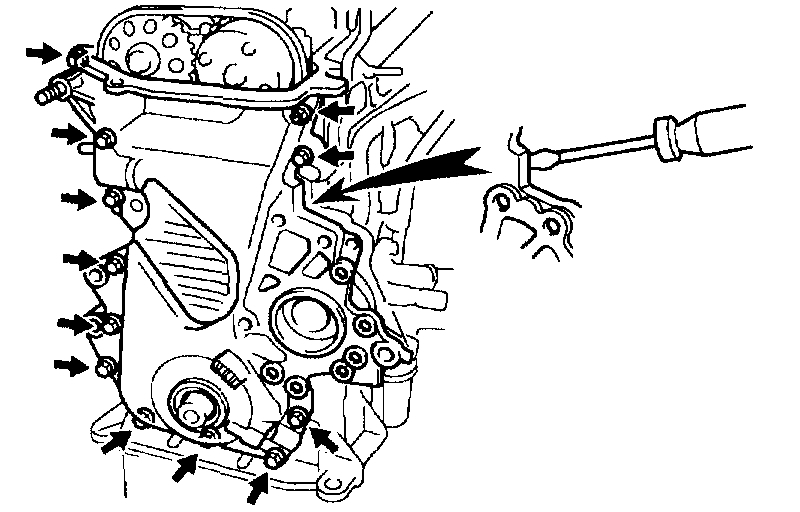
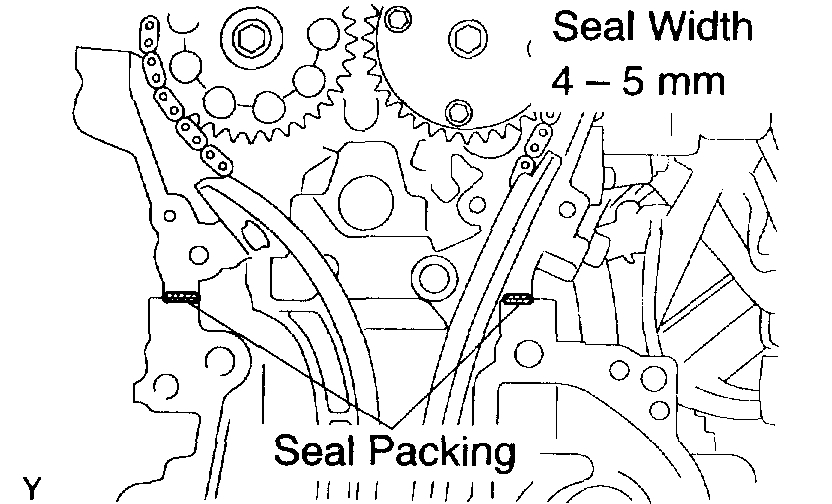
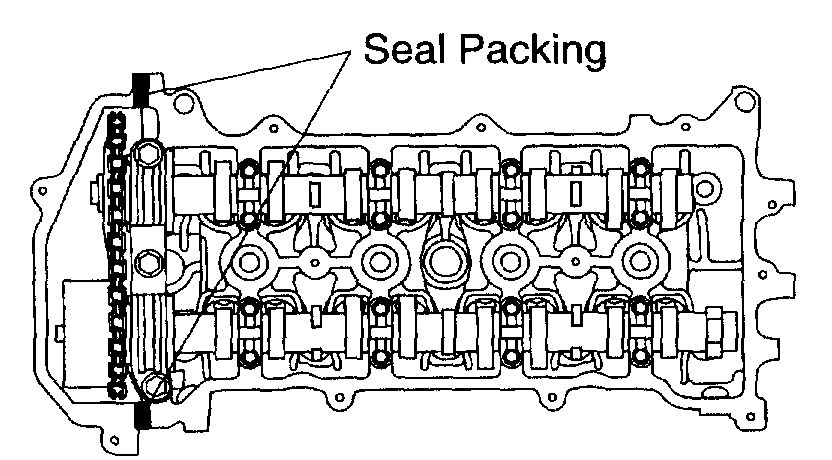
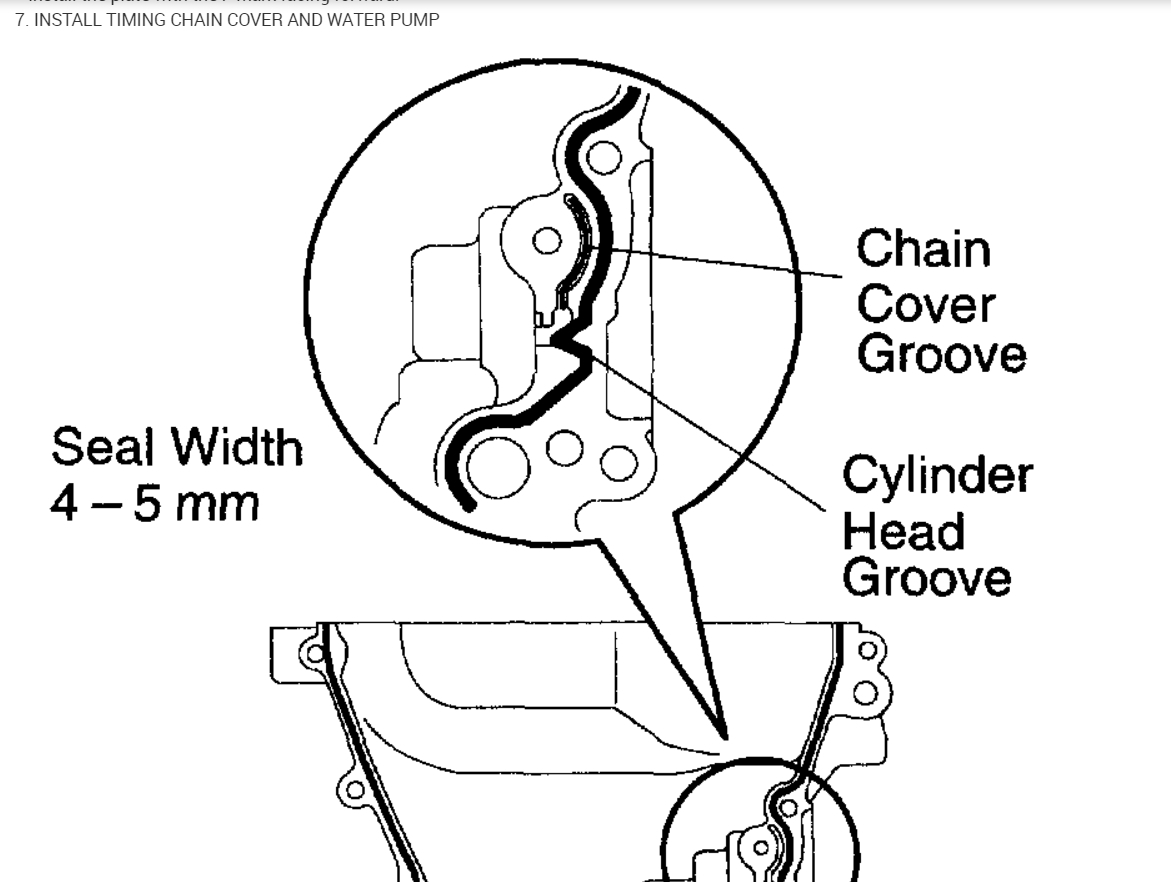
30. INSTALL TIMING CHAIN OR BELT COVER SUB-ASSY
a. Remove any old packing material from the contact surface.
B. Apply seal packing in the shape of bead Diameter 3.5 mm - 4.5 mm (0.1379 - 0.177 inch)) consequently as shown in the illustration
Seal packing:
Water pump part part No. 08826-00100 or equivalent
Other part part No. 08826-00080 or equivalent.
Pic 31
NOTICE:
Remove any oil from the contact surface.
Install the oil pan within 3 minutes after applying seal packing.
Do not put into engine oil within 2 hours after installing.
Pic 32
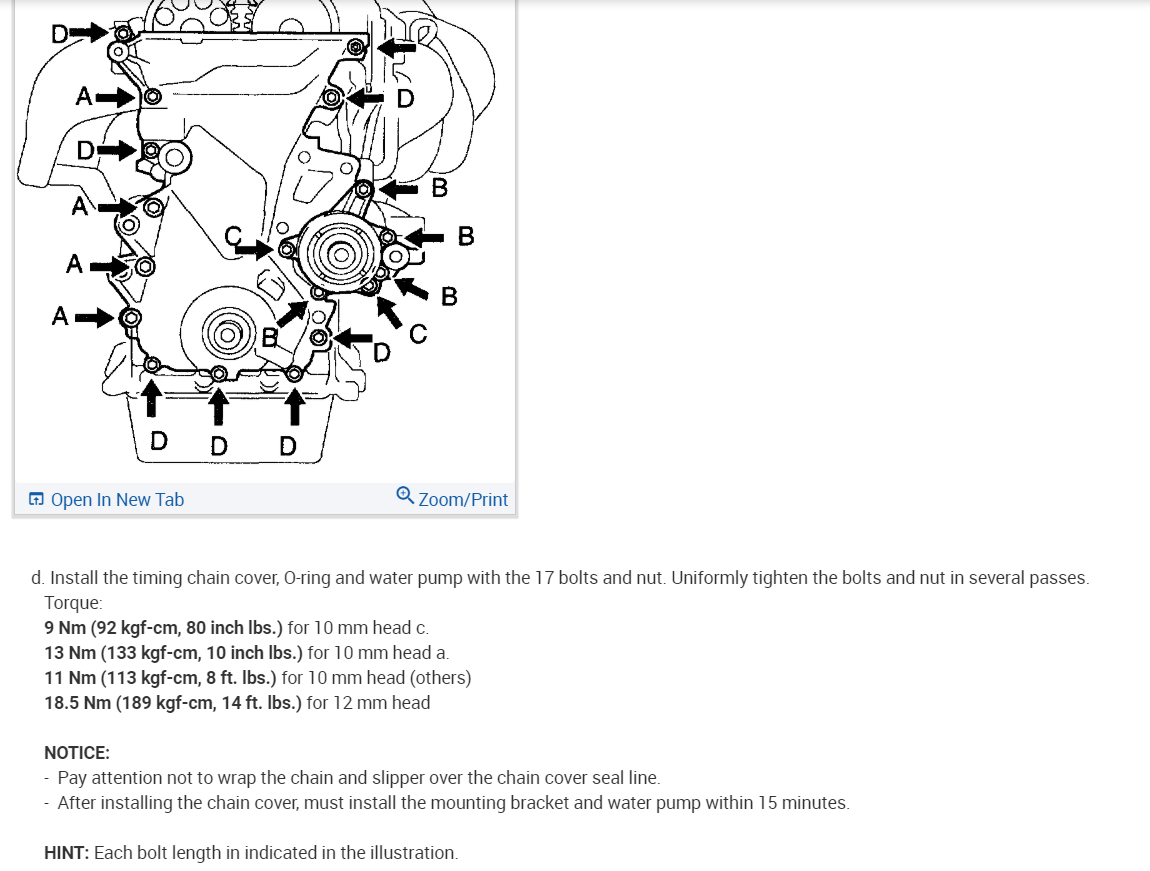
c. Install the timing chain cover with the 11 bolts and nut.
Torque:
A: 13 Nm (133 kgf-cm, 10 ft. Lbs.)
B: 19 Nm (194 kgf-cm, 14 ft. Lbs.)
d. Using a torx wrench socket (E8), install the stud bolt.
Torque: 9.5 Nm (97 kgf-cm, 84 inch lbs.)
pic 33
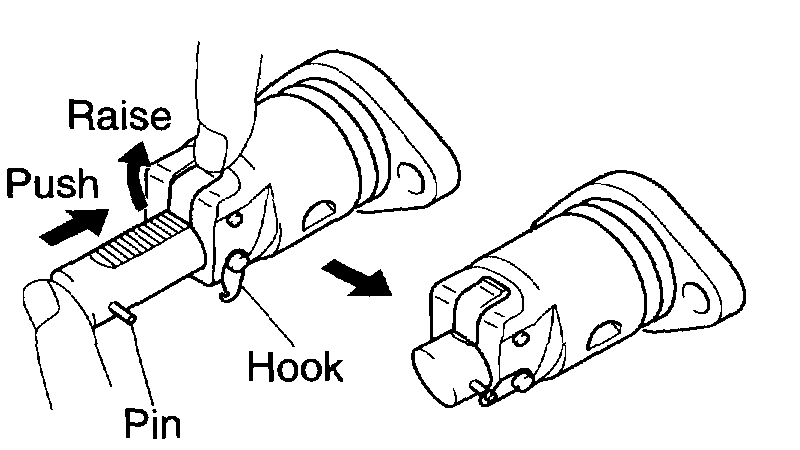
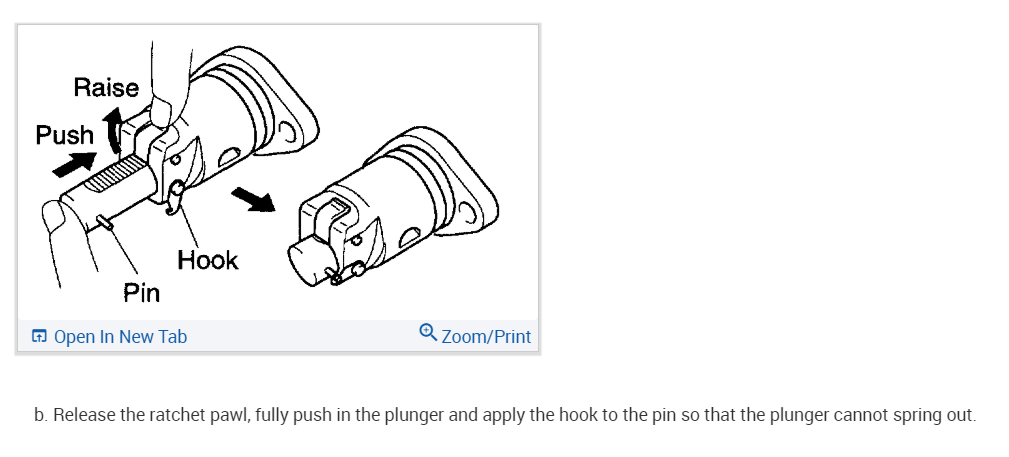
31. INSTALL CHAIN TENSIONER ASSY NO.1
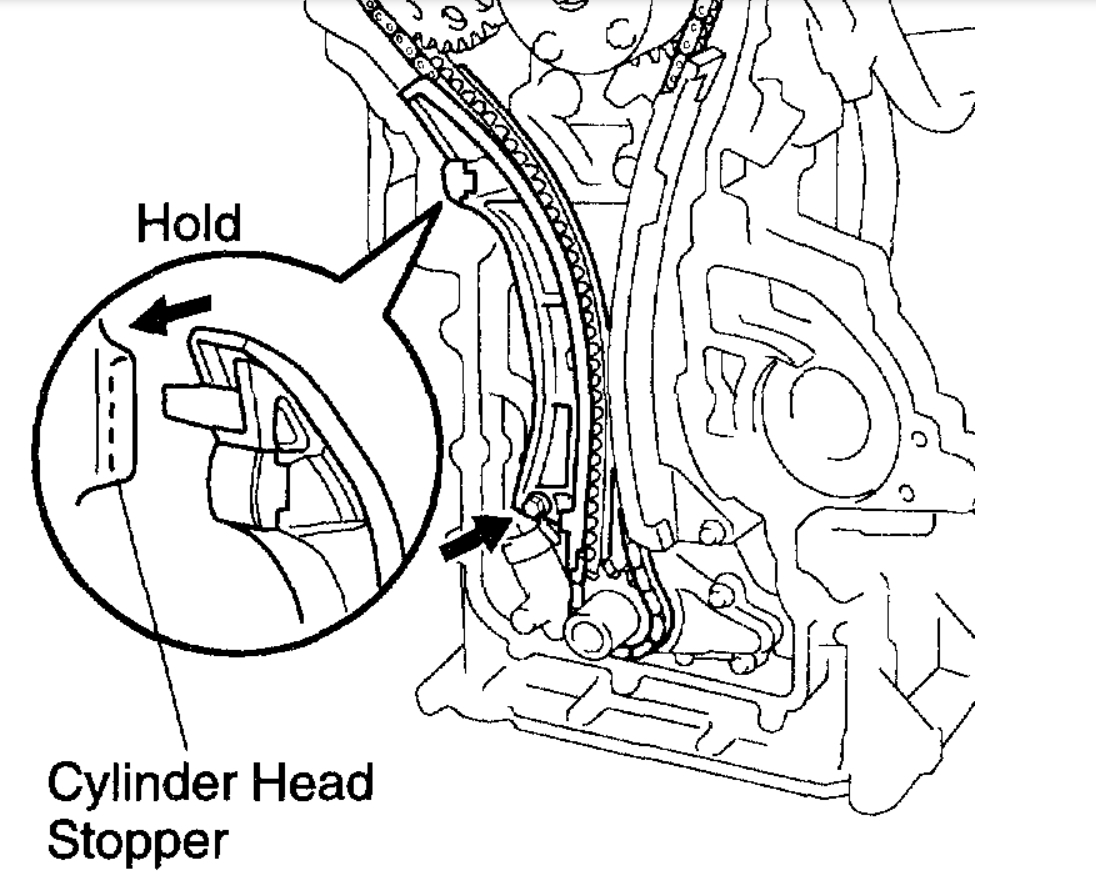
a. Check the O ring is clean, and set the hook as shown in the illustration
pic 34
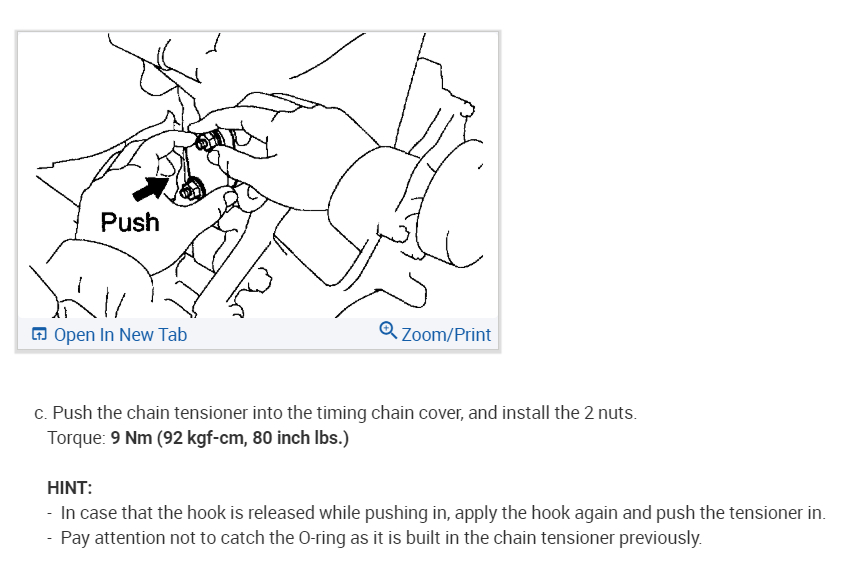
b. Apply engine oil to the chain tensioner and install it with 2 nuts.
Torque: 9.0 Nm (92 kgf-cm, 80 inch lbs.)
NOTICE: When installing the tensioner, set the hook again if the hook release the plunger.
Pic 35
32. INSTALL CRANK POSITION SENSOR
a. Install the crank position sensor with the 2 bolts.
Torque: 9.0 Nm (92 kgf-cm, 80 inch lbs.)
pic 36
33. INSTALL TRANSVERSE ENGINE ENGINE MOUNTING BRACKET
a. Install the transverse engine engine mounting bracket with the 3 bolts.
Torque: 47 Nm (479 kgf-cm, 35 ft. Lbs.)
34. INSTALL WATER PUMP ASSY
pic 37
35. INSTALL V-RIBBED BELT TENSIONER ASSY
a. Install the V-ribbed belt tensioner with the nut and bolt.
Torque:
Nut 29 Nm (296 kgf-cm, 21 ft. Lbs.)
Bolt 69 Nm (704 kgf-cm, 51 ft. Lbs.)
pic 38
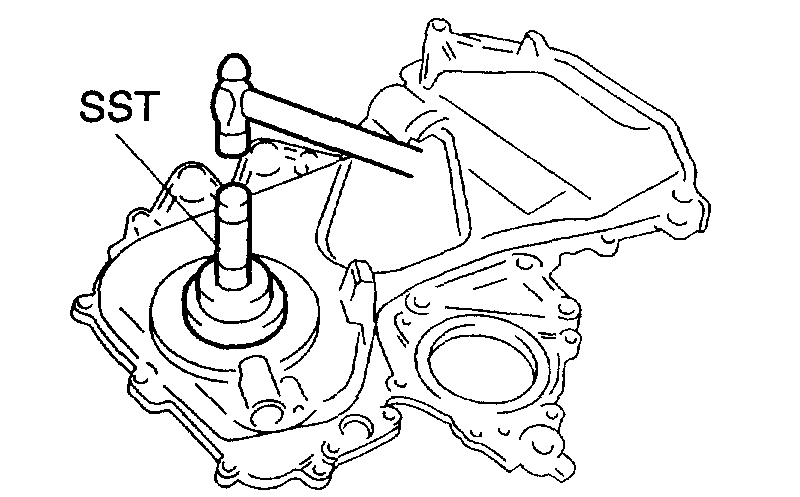
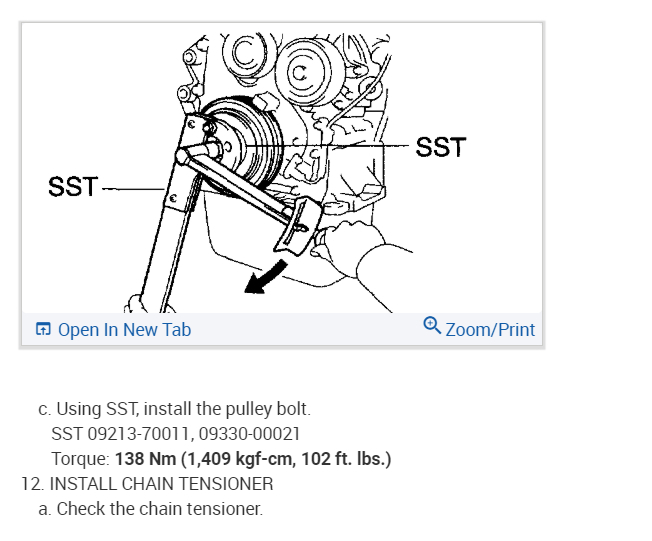
36. INSTALL CRANKSHAFT PULLEY
a. Align the pulley set key with the key groove of the pulley, and slide on the pulley.
B. Using SST, install the crankshaft pulley bolt.
SST 09960-10010 (09962-01000, 09963-01000)
Torque: 138 Nm (1,407 kgf-cm, 102 ft. Lbs.)
pic 39
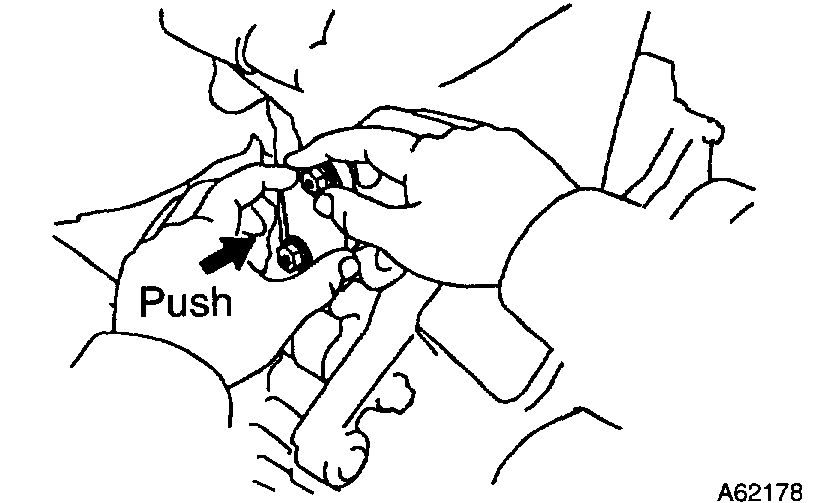
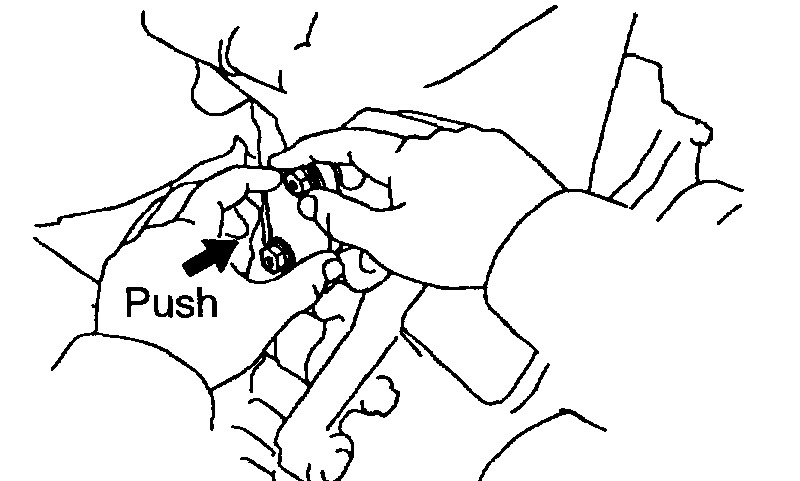
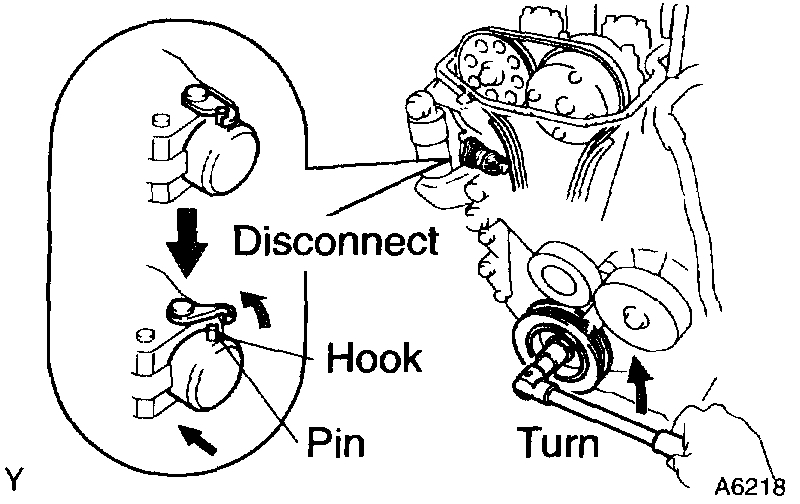
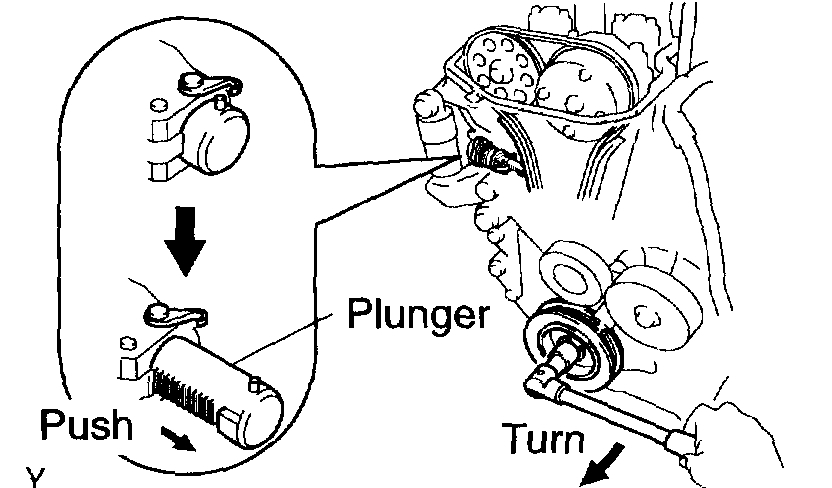
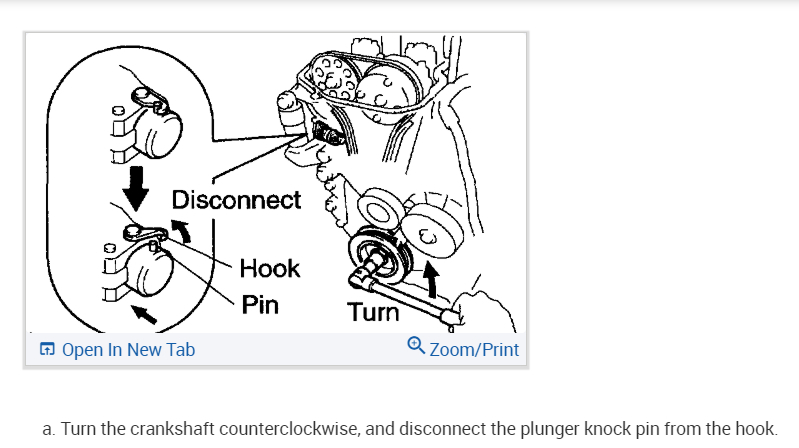
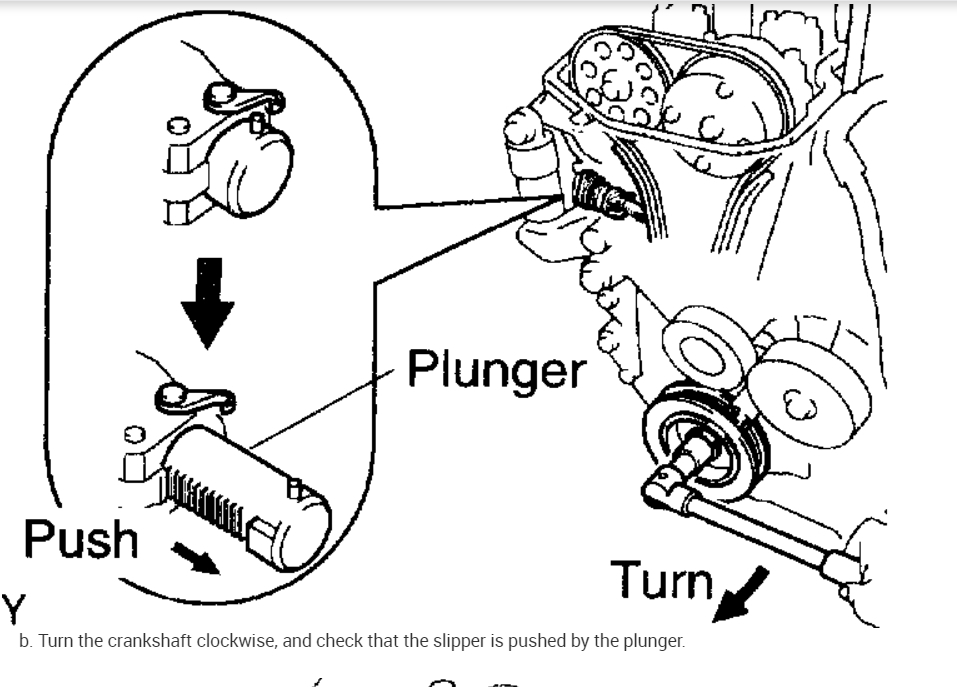
c. Turn the crankshaft counter clockwise, and disconnect the plunger knock pin form the hook.
Pic 40
d. Turn the crankshaft clockwise, and check that the slipper is pushed by the plunger.
HINT: If the plunger does not spring out, press the slipper into the chain tensioner with a screwdriver so that the hook is released from the knock pin and the plunger springs out.
Pic 41
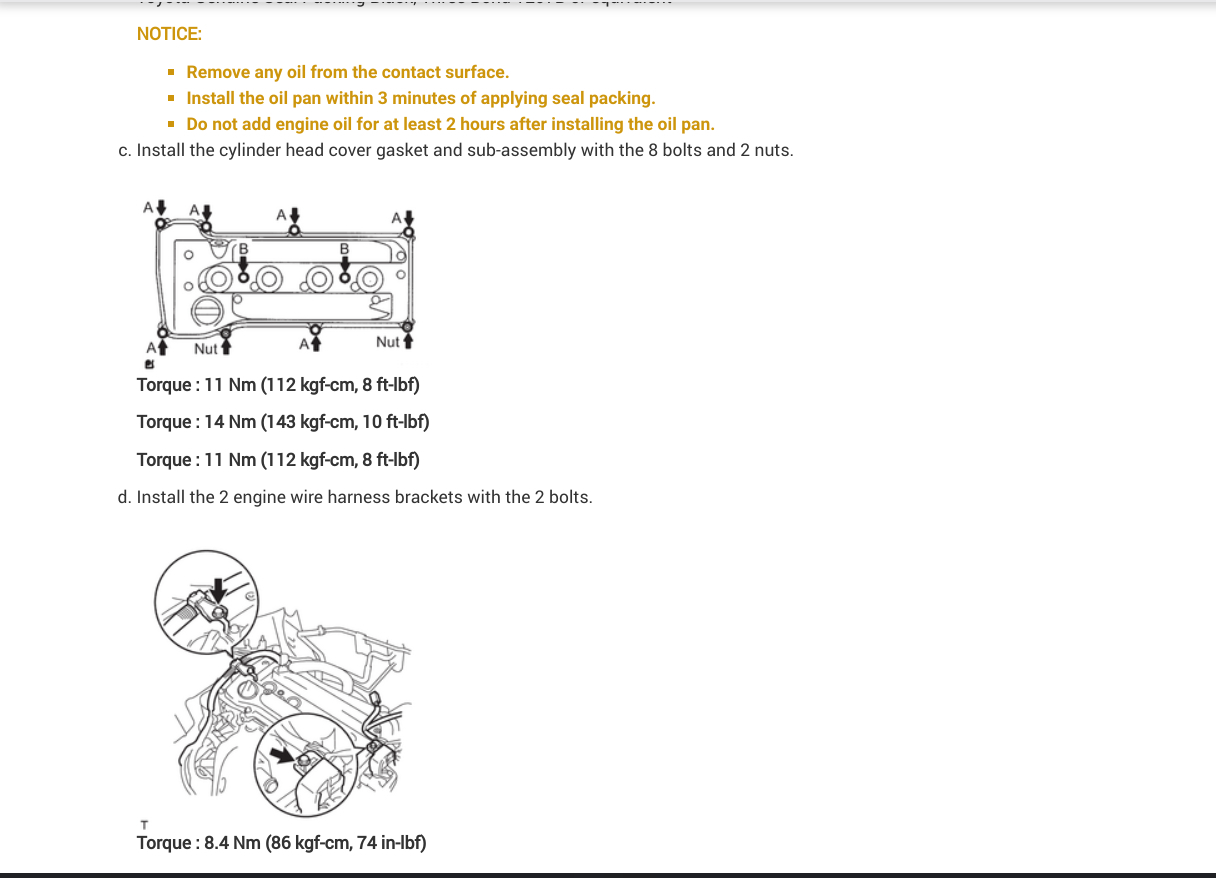
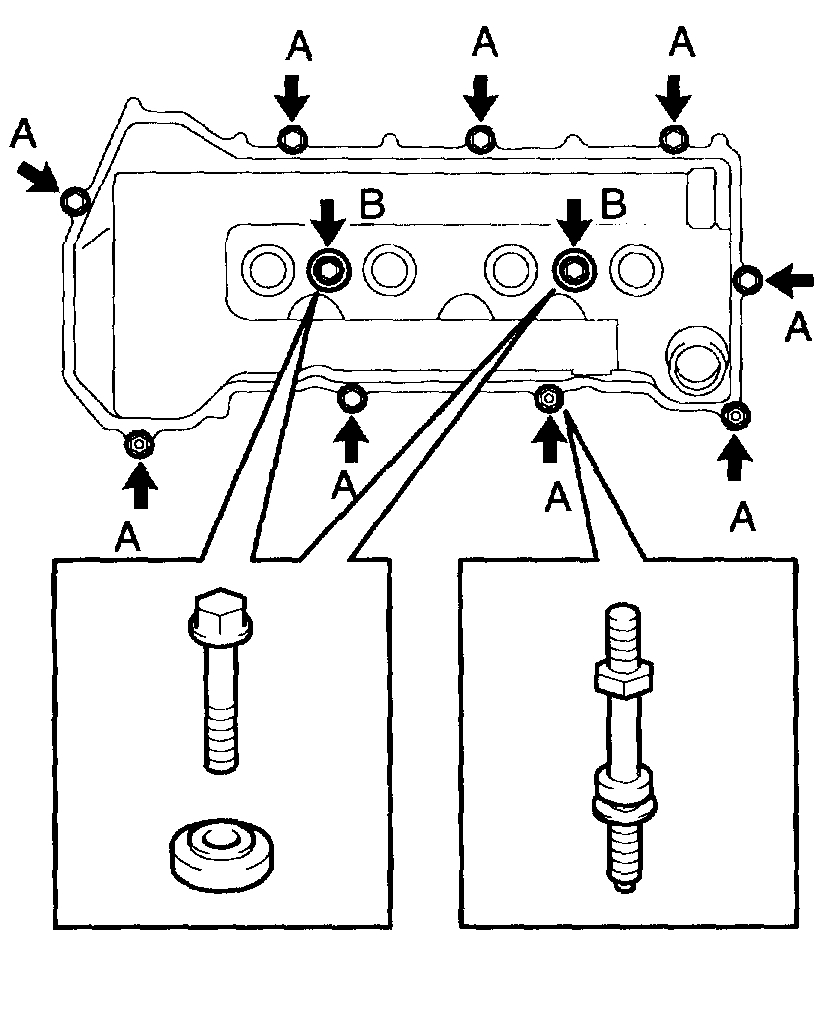
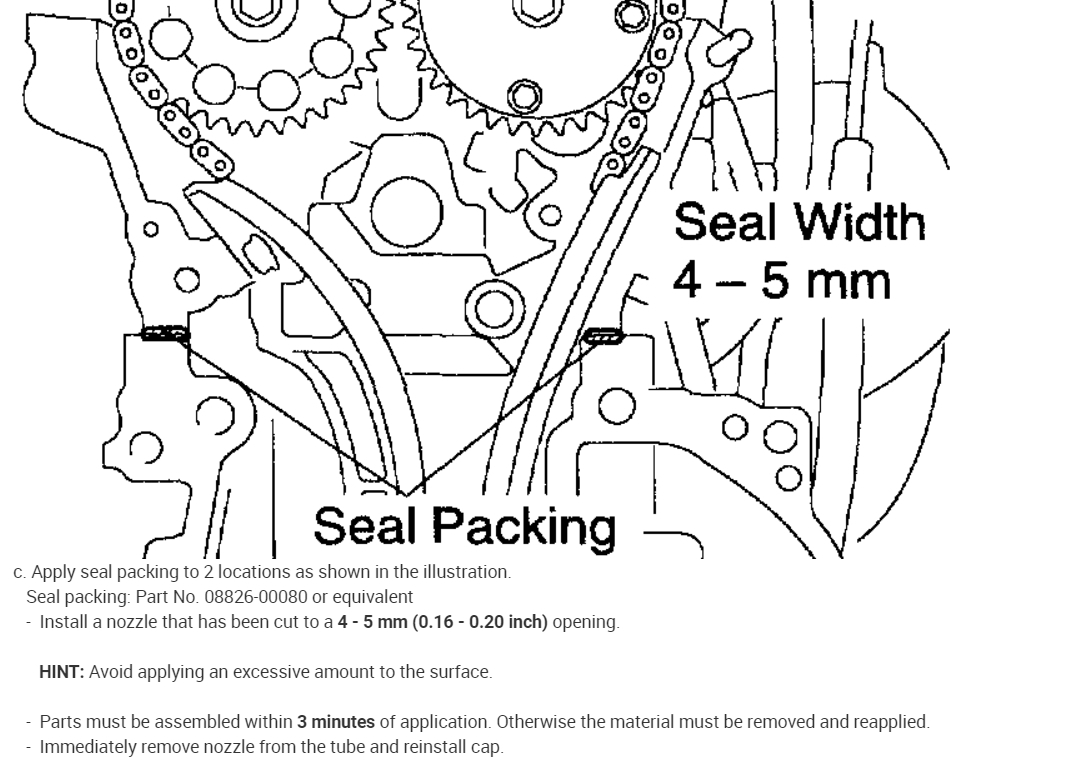
37. INSTALL CYLINDER HEAD COVER SUB-ASSY
a. Remove any old pacing (FIPG) material.
B. Apply seal packing to 2 locations as shown in the illustration.
Seal packing: Part No. 08826-00080 or equivalent
NOTICE:
Remove any oil from the contact surface.
Install the cylinder head cover within 3 minutes after applying seal packing.
Do not put into engine oil 2 hours after installing.
Pic 42
c. Install the cylinder head cover and 3 cable brackets with the 9 bolts, 2 seal washers and 2 nuts. Uniformly tighten the bolts and nuts, in the several passes.
Torque:
A 11 Nm (112 kgf-cm, 8 ft. Lbs.)
B 9.0 Nm (92 kgf-cm, 80 inch lbs.)
pic 43
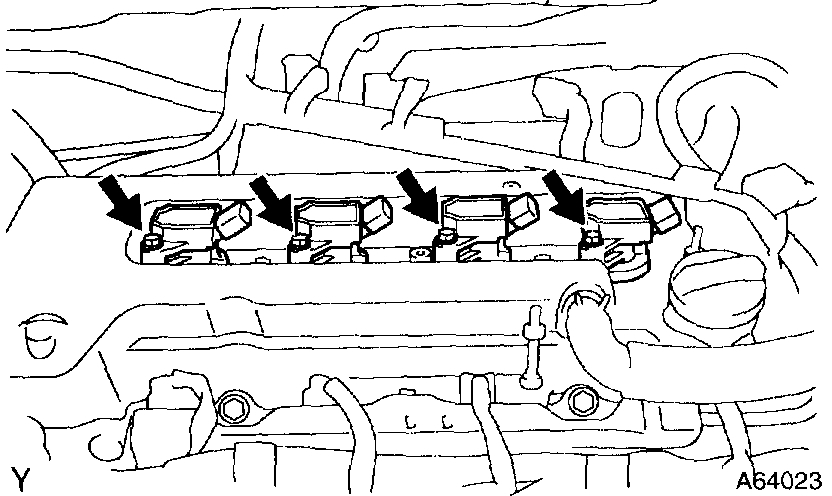
38. INSTALL IGNITION COIL ASSY
a. Install the 4 ignition coils with the 4 bolts.
Torque: 9.0 Nm (92 kgf-cm, 80 inch lbs.)
pic 44
39. INSTALL ENGINE WIRE
a. Install the engine wire with the bolt and nut.
Torque: 9.0 Nm (92 kgf-cm, 80 inch lbs.)
pic 45
40. INSTALL ENGINE MOUNTING INSULATOR SUB-ASSY RH
a. Install the engine mounting insulator with the 4 bolts and 2 nuts.
Torque: 52 Nm (530 kgf-cm, 38 ft. Lbs.)
41. INSTALL GENERATOR ASSY
42. INSTALL VANE PUMP ASSY
pic 46
43. INSTALL CYLINDER HEAD COVER NO.2
a. Install the cylinder head cover with the 2 nuts and 2 clips.
Torque: 7.0 Nm (71 kgf-cm, 62 inch lbs.)
44. INSTALL FRONT WHEEL RH
Torque: 103 Nm (1,050 kgf-cm, 76 ft. Lbs.)
45. ADD COOLANT
46. CHECK ENGINE COOLANT LEAK
47. CHECK ENGINE OIL LEAK
_______________________________________________________________________________________
Let me know if this helps or if you need additional information.
Take care,
Joe
Images (Click to make bigger)
SPONSORED LINKS
Tuesday, December 15th, 2020 AT 8:30 AM
(Merged)