GM Part No.: 10419497 Installation
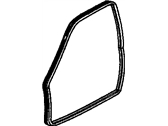
Weatherstrip Asm-Front & Rear Side Door
Part Description
WEATHERSTRIP, Door Weatherstrip
Applications:
Chevrolet Impala 2000-2005 6 Cyl 3.1L, 6 Cyl 3.4L, 6 Cyl 3.8L
IMPALA, LS, LT, POLICE CAR, SS
Chevrolet Lumina 2000-2001 6 Cyl 3.1L, 6 Cyl 3.4L, 6 Cyl 3.8L
IMPALA, LS, SS
Chevrolet Monte Carlo 2000-2007
6 Cyl 3.1L, 6 Cyl 3.4L, 6 Cyl 3.5L, 6 Cyl 3.5L Flex, 6 Cyl 3.8L, 6 Cyl 3.9L, 8 Cyl 5.3L
IMPALA, LS, LT, POLICE CAR, SS
My adventures replacing this part on a 2000 Impala LS.
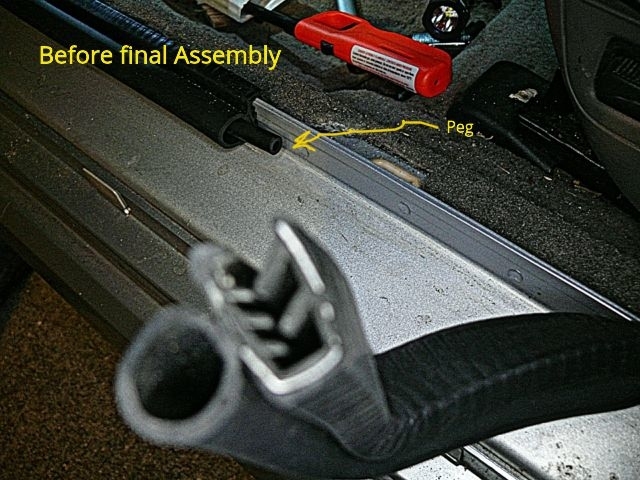
It comes as a continuous strip and the seam is installed at the bottom. When installing it, be sure to install the side with the PEG first. The weatherstrip will have to be cut in place after it's partially installed.
In anticipation of the install, I watched a youtube video which was basically “yank it out” and “stuff it back in”, Not in your life. I purchased some weatherstrip lube manufactured by www.pvr.com part #0075. It's used specifically to make weatherstripping slippery and make it easier to install.
It's a worthwhile product. Was it worthwhile for this project? Don't know. Probably. I didn't try to do it without it. I lubed the entire “U-channel”. I used some on the seat belt pieces of molding.
The next real problem was a problem that I had solved before. Undoing the seat belt pivot. I measured the nut and came up with 15mm and that size was not in my socket set. There is very little gripping height (about 1/8”) and a wrench verified the size, but it's not a good choice to remove the nut.
A good choice for a tool is a 1/2” drive 15mm 6-point socket and a long breaker bar, so that's what I used. And finished taking it off with a conventional ratchet. I didn't use a torque wrench on the nut when it was re-installed. The approximate feel was still there in my arm when I took it off. I had purchased 3/8 and 1/2” drive sockets. I'll probably go back and torque it.
The other thing I bought was an ABN-6211, an 11pc molding and fastener removal set of tools. www.autobodynow.com is the manufacturer. It was a very nice set. It made the removal and installation a lot easier.
So, you start by removing the seat belt pivot nut and remove the upper cover. The lower cover just needs the sides pulled away from the weatherstrip. You need access from the passenger door too. The other pieces of trim basically pull perpendicular to the trim. Clips were re-usable and stayed on the trim. Take note as to what pieces were removed first and install in the reverse order. I didn't.
Pull the old weatherstripping out.
Start at the bottom center with the end that has the PEG, Make it follow the bends tightly. A rubber mallot might have helped here. The center pillar area is a little tight because of clips. The trim removal tools helped here as well on the install.
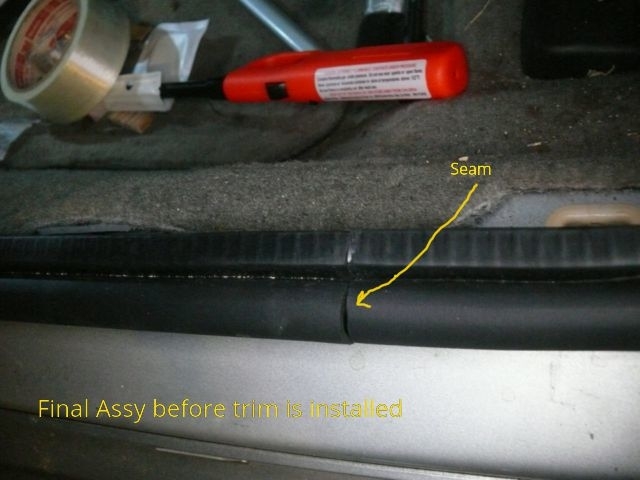
There was about 2.5 feet of extrusion left at the overlap. I decided to put the trim back in place. I re-installed all of the trim except the lower piece, I figured if I made a corner too loose, I could still fix them before the final cut and seam splice was made. That was a good idea.
Now, might be a good time to clean the trim. I used “Superclean”,
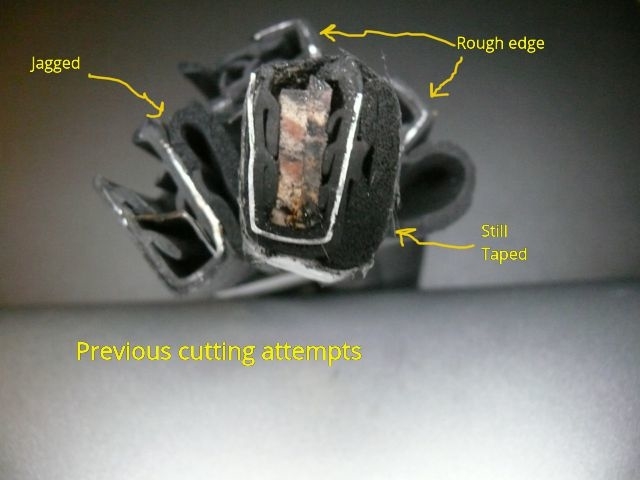
That's when I discovered, I had a problem. How do you cut this stuff cleanly? Well, I had a lot of the old piece to practice on, So, it was basically a discovery process with a carbide blade on a circular saw, an oscillating tool, a reciprocating saw ( a friend/neighbor tried his) and a fancy jig saw. It has blade wiggle. Usually, I would use it to cut aluminum sheet, but it was not appropriate for this.
It was time to evaluate the data and come up with a plan. It was better to cut into the open “U”. It was much better to “secure” the rubber section so it didn't flop. I could sand the end with 80 grit sandpaper with a finishing sander, I could “fire-polish” the rubber. I've done fire polishing of pyrex and quartz and acrylic and polycarbonate at work. Never did rubber.
The best cut I'm going to get on the rubber is with a single-edge razer blade. Eventually, I figured out that I needed to fill the “U-channel” and some wood shims that might be used to install a window in a house stared me in the face. They are a shallow wooden wedge. You want about 4-5” of material on the other side of the cut for gripping and clearance.
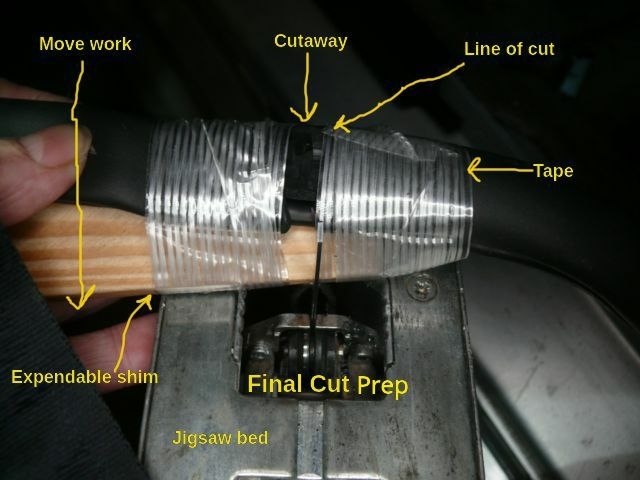
So, you mark. Insert the shim to fill the “U-channel”, Cut cleanly with a razer blade on that mark. Now remove about a 1/2” section of rubber away from the nice cut. Now you want to flatten out both sides, so I wrapped packing tape (the one with the strings in in) to fold down the rubber on both sides of the 1/2” wide cut with the shim in place too. One tape edge defines the good edge. The other edge just gives you something more solid and flat.
The sacrificial shim size should probably be about 3/16” x 5” x 3/4” W. The 3/16” is the estimate of what would fit in the channel comfortably. The 5” is the width of the jigsaw plus some finger-safe room. 3-5” is probably OK. ¾” is the minimum width. I used almost 2”.
The jigsaw needs to see something that appears to be solid.
I was actually doing this when it was dark. A post light was on and a flashlight was in my mouth and I was very successful.
The aluminum thickness of the channel is ~0.040”. That's what you need to cut with the jigsaw blade and you need a throw of about ¾ of an inch.
You need a blade designed to cut thin aluminum with wiggle set to zero on the saw. You need lube on the weatherstripping or you need to make a nice smooth surface on the saw.
To make a nice and slippery non-marring saw surface, cover it with large, thin double stick tape, but don;t remove the backing. The backing is your slippery surface.
With the saw between my legs and upside down, I could hold the weatherstripping and draw it across the blade while having a Mini-Maglite flashlight in my mouth. You want the blade to initially hit the open side of the “U-channel”. Your cutting into the wood shim too.
Remember, you need about a 4 inch overlap, before you do your final cut. You don't want too much excess when making the final cut.
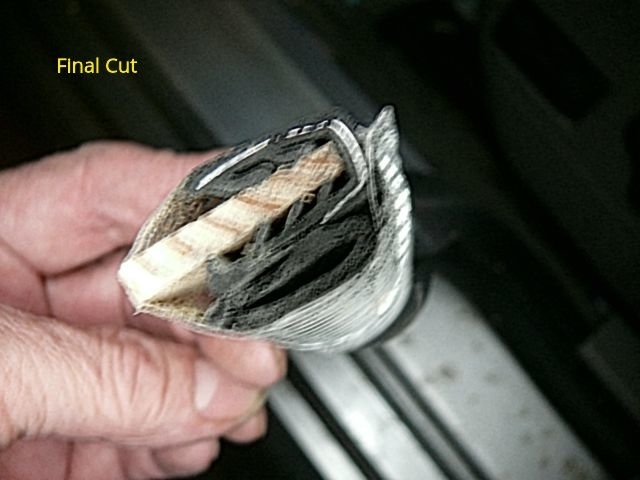
You can touch things up with 80 grit sandpaper on a finishing sander. Remove the tape and fire-polish the edges. I used one of those butane BBQ lighter sticks, Remember to practice on a piece of scrap something first.
Insert the PEG into the cut portion of the weatherstrip and put in place and then put the bottom molding back on and your good to go.
I did take some pictures. With interruptions and doing some of it in the dark, it took way longer than necessary.
Weatherstrip Asm-Front & Rear Side Door
Part Description
WEATHERSTRIP, Door Weatherstrip
Applications:
Chevrolet Impala 2000-2005 6 Cyl 3.1L, 6 Cyl 3.4L, 6 Cyl 3.8L
IMPALA, LS, LT, POLICE CAR, SS
Chevrolet Lumina 2000-2001 6 Cyl 3.1L, 6 Cyl 3.4L, 6 Cyl 3.8L
IMPALA, LS, SS
Chevrolet Monte Carlo 2000-2007
6 Cyl 3.1L, 6 Cyl 3.4L, 6 Cyl 3.5L, 6 Cyl 3.5L Flex, 6 Cyl 3.8L, 6 Cyl 3.9L, 8 Cyl 5.3L
IMPALA, LS, LT, POLICE CAR, SS
My adventures replacing this part on a 2000 Impala LS.
It comes as a continuous strip and the seam is installed at the bottom. When installing it, be sure to install the side with the PEG first. The weatherstrip will have to be cut in place after it's partially installed.
In anticipation of the install, I watched a youtube video which was basically “yank it out” and “stuff it back in”, Not in your life. I purchased some weatherstrip lube manufactured by www.pvr.com part #0075. It's used specifically to make weatherstripping slippery and make it easier to install.
It's a worthwhile product. Was it worthwhile for this project? Don't know. Probably. I didn't try to do it without it. I lubed the entire “U-channel”. I used some on the seat belt pieces of molding.
The next real problem was a problem that I had solved before. Undoing the seat belt pivot. I measured the nut and came up with 15mm and that size was not in my socket set. There is very little gripping height (about 1/8”) and a wrench verified the size, but it's not a good choice to remove the nut.
A good choice for a tool is a 1/2” drive 15mm 6-point socket and a long breaker bar, so that's what I used. And finished taking it off with a conventional ratchet. I didn't use a torque wrench on the nut when it was re-installed. The approximate feel was still there in my arm when I took it off. I had purchased 3/8 and 1/2” drive sockets. I'll probably go back and torque it.
The other thing I bought was an ABN-6211, an 11pc molding and fastener removal set of tools. www.autobodynow.com is the manufacturer. It was a very nice set. It made the removal and installation a lot easier.
So, you start by removing the seat belt pivot nut and remove the upper cover. The lower cover just needs the sides pulled away from the weatherstrip. You need access from the passenger door too. The other pieces of trim basically pull perpendicular to the trim. Clips were re-usable and stayed on the trim. Take note as to what pieces were removed first and install in the reverse order. I didn't.
Pull the old weatherstripping out.
Start at the bottom center with the end that has the PEG, Make it follow the bends tightly. A rubber mallot might have helped here. The center pillar area is a little tight because of clips. The trim removal tools helped here as well on the install.
There was about 2.5 feet of extrusion left at the overlap. I decided to put the trim back in place. I re-installed all of the trim except the lower piece, I figured if I made a corner too loose, I could still fix them before the final cut and seam splice was made. That was a good idea.
Now, might be a good time to clean the trim. I used “Superclean”,
That's when I discovered, I had a problem. How do you cut this stuff cleanly? Well, I had a lot of the old piece to practice on, So, it was basically a discovery process with a carbide blade on a circular saw, an oscillating tool, a reciprocating saw ( a friend/neighbor tried his) and a fancy jig saw. It has blade wiggle. Usually, I would use it to cut aluminum sheet, but it was not appropriate for this.
It was time to evaluate the data and come up with a plan. It was better to cut into the open “U”. It was much better to “secure” the rubber section so it didn't flop. I could sand the end with 80 grit sandpaper with a finishing sander, I could “fire-polish” the rubber. I've done fire polishing of pyrex and quartz and acrylic and polycarbonate at work. Never did rubber.
The best cut I'm going to get on the rubber is with a single-edge razer blade. Eventually, I figured out that I needed to fill the “U-channel” and some wood shims that might be used to install a window in a house stared me in the face. They are a shallow wooden wedge. You want about 4-5” of material on the other side of the cut for gripping and clearance.
So, you mark. Insert the shim to fill the “U-channel”, Cut cleanly with a razer blade on that mark. Now remove about a 1/2” section of rubber away from the nice cut. Now you want to flatten out both sides, so I wrapped packing tape (the one with the strings in in) to fold down the rubber on both sides of the 1/2” wide cut with the shim in place too. One tape edge defines the good edge. The other edge just gives you something more solid and flat.
The sacrificial shim size should probably be about 3/16” x 5” x 3/4” W. The 3/16” is the estimate of what would fit in the channel comfortably. The 5” is the width of the jigsaw plus some finger-safe room. 3-5” is probably OK. ¾” is the minimum width. I used almost 2”.
The jigsaw needs to see something that appears to be solid.
I was actually doing this when it was dark. A post light was on and a flashlight was in my mouth and I was very successful.
The aluminum thickness of the channel is ~0.040”. That's what you need to cut with the jigsaw blade and you need a throw of about ¾ of an inch.
You need a blade designed to cut thin aluminum with wiggle set to zero on the saw. You need lube on the weatherstripping or you need to make a nice smooth surface on the saw.
To make a nice and slippery non-marring saw surface, cover it with large, thin double stick tape, but don;t remove the backing. The backing is your slippery surface.
With the saw between my legs and upside down, I could hold the weatherstripping and draw it across the blade while having a Mini-Maglite flashlight in my mouth. You want the blade to initially hit the open side of the “U-channel”. Your cutting into the wood shim too.
Remember, you need about a 4 inch overlap, before you do your final cut. You don't want too much excess when making the final cut.
You can touch things up with 80 grit sandpaper on a finishing sander. Remove the tape and fire-polish the edges. I used one of those butane BBQ lighter sticks, Remember to practice on a piece of scrap something first.
Insert the PEG into the cut portion of the weatherstrip and put in place and then put the bottom molding back on and your good to go.
I did take some pictures. With interruptions and doing some of it in the dark, it took way longer than necessary.
Image (Click to enlarge)
Oct 29, 2019 at 1:14 PM