Rear brakes making noise

Tiny
BRADLEY07
  • MEMBER
  • 1997 DODGE DAKOTA
  • 5.2L
  • V8
  • 2WD
  • AUTOMATIC
  • 245,000 MILES
I replaced the rear drum brakes for the first time a few months back and have been fighting them since. The originals were not making any noise but after so many miles were looking rather thin. So I put new drums and shoes as well as hardware on it. Not long after they started getting louder and louder and sticking so I pulled then apart and found the wheel cylinder on the passenger side leaking. Replaced and cleaned. Noise continued after so I had the drums turned and cleaned again. This fixed them for about three weeks until the grabbing and sticking returned with noise. Pulled then apart again and found the driver side wheel cylinder (new) was leaking. Figured defective and but a new one on again. I cleaned up and test drove it. The sound was still there initially but ended after the first stop, there was no grabbing or locking so I was happy. It's now been a few days and they seemed to make noise every morning during the first stop and would be quite after but still felt good. However, today I have noticed the sound as being more consistent and not stopping. I have spent three months and lot of money trying to fix drum brakes and am getting ready to give up and figure out how to put disk on it. There is no sign of any contamination, no mechanical faults, absolutely nothing looks wrong. What should I do next?
Tuesday, March 26th, 2019 AT 6:11 AM

7 Replies

Tiny
SCGRANTURISMO
  • MECHANIC
  • 4,897 POSTS
Hello,

Sometimes when you get shoes you want to make sure that are chamfered on the ends to make sure you don't get any noise during initial break in. Also if get dust between the shoes and the drum it will make noise, as well. Also make sure your brake shoes are made out of the right material.
I have included a couple of guides for you to go to down below.

https://www.2carpros.com/articles/how-to-replace-rear-brake-shoes-and-drums
https://www.2carpros.com/articles/how-to-replace-a-wheel-cylinder

Please go through these guides and get back to us with what you find out.

Thanks,
Alex
2CarPros
Was this
answer
helpful?
Yes
No
Tuesday, March 26th, 2019 AT 9:07 AM
Tiny
BRADLEY07
  • MEMBER
  • 4 POSTS
Thanks for the reply Alex. The shoes are Wagner thermoquiets Riveted. They didn't come chamfered but I manually added chamfers in an attempt to fix the problem. They have been cleaned a few times to the extent of having the new drums turned and re-cleaned so I don't feel there is a dust problem. I also can't find any more signs of contamination, but that's what it feels like. When coming to a stop I can feel them grabbing more and more and the sound happens at low speed. During the worst points if I suddenly hit the brake I can make the rear attempt to lock before ABS steps in. Since the last round of me working with them, they haven't had the locking problem. Is it possible the shoes are still contaminated after being cleaned? Is there a point where brake fluid can't be cleaned off? After work today I will try to pinpoint which side is making the sound or if it's both. I can't lock down a side it's coming from while inside the truck.
Was this
answer
helpful?
Yes
No
Tuesday, March 26th, 2019 AT 10:22 AM
Tiny
SCGRANTURISMO
  • MECHANIC
  • 4,897 POSTS
Hello again,

I don't know. I have seen brake cleaner literally destroy plastic things before. The last time I was using it I accidentally got some on a digital food scale I had in the garage, and it hasn't worked since. It is pretty strong stuff. Did you say that you used new hardware when replacing the shoes?

Thanks,
Alex
2CarPros
Was this
answer
helpful?
Yes
No
Wednesday, March 27th, 2019 AT 2:59 AM
Tiny
BRADLEY07
  • MEMBER
  • 4 POSTS
Hello Alex,

Yes, new hardware was used during the initial replacement. They have been taken on and off a few times now but seem to still be in new condition. Driving to work this morning they made less noise then the day before but about as much as the first day since I put a new wheel cylinder on it. Still feel smooth. This tells me it's not getting worse or more contaminated if it is a contamination issue.
Was this
answer
helpful?
Yes
No
Wednesday, March 27th, 2019 AT 6:32 AM
Tiny
JACOBANDNICKOLAS
  • MECHANIC
  • 108,254 POSTS
Hi guys. Hope you don't mind if I jump in. I have owned a many Dakotas over the years. I have to start with a couple questions. First, can you describe the noise? Does it sound metallic? Next, does it change pitch when you apply the brake? Does it come from both sides? And one very important question. Are you certain you got the correct size shoes? The rear brakes on these vehicles came with either 9" or 10" drums. There is a chance they gave you shoes/drums that are incorrect. Also, when you remove the drum, is there any evidence as to where something may be rubbing? Also, there are components on this design that are specifically designed for left and right sides. Once last question. Did you lubricate the backing plate where the shoes make contact? That can actually cause the brakes to hang up.

Here are the specific directions for replacing the shoes. Review them and see if anything helps. It's simple to miss something.

_______________________________________________

The attached pics correlate with these directions.

BRAKE SHOE REMOVAL AND INSTALLATION
REMOVAL
1. Raise and support vehicle.
2. Remove wheel and tire assembly.
3. Remove clip nuts securing brake drum to wheel studs.
4. Remove drum. If drum is difficult to remove, proceed as follows:
a. Remove rear plug from access hole in support plate.
B. BInsert a thin screwdriver into access hole and push lever away from adjuster screw star wheel.
C. Insert an adjuster tool into brake adjusting hole and rotate adjuster star wheel to retract brake shoes.
5. Vacuum brake components to remove brake lining dust. If vacuum is not available, use water dampened cloths to remove dust.
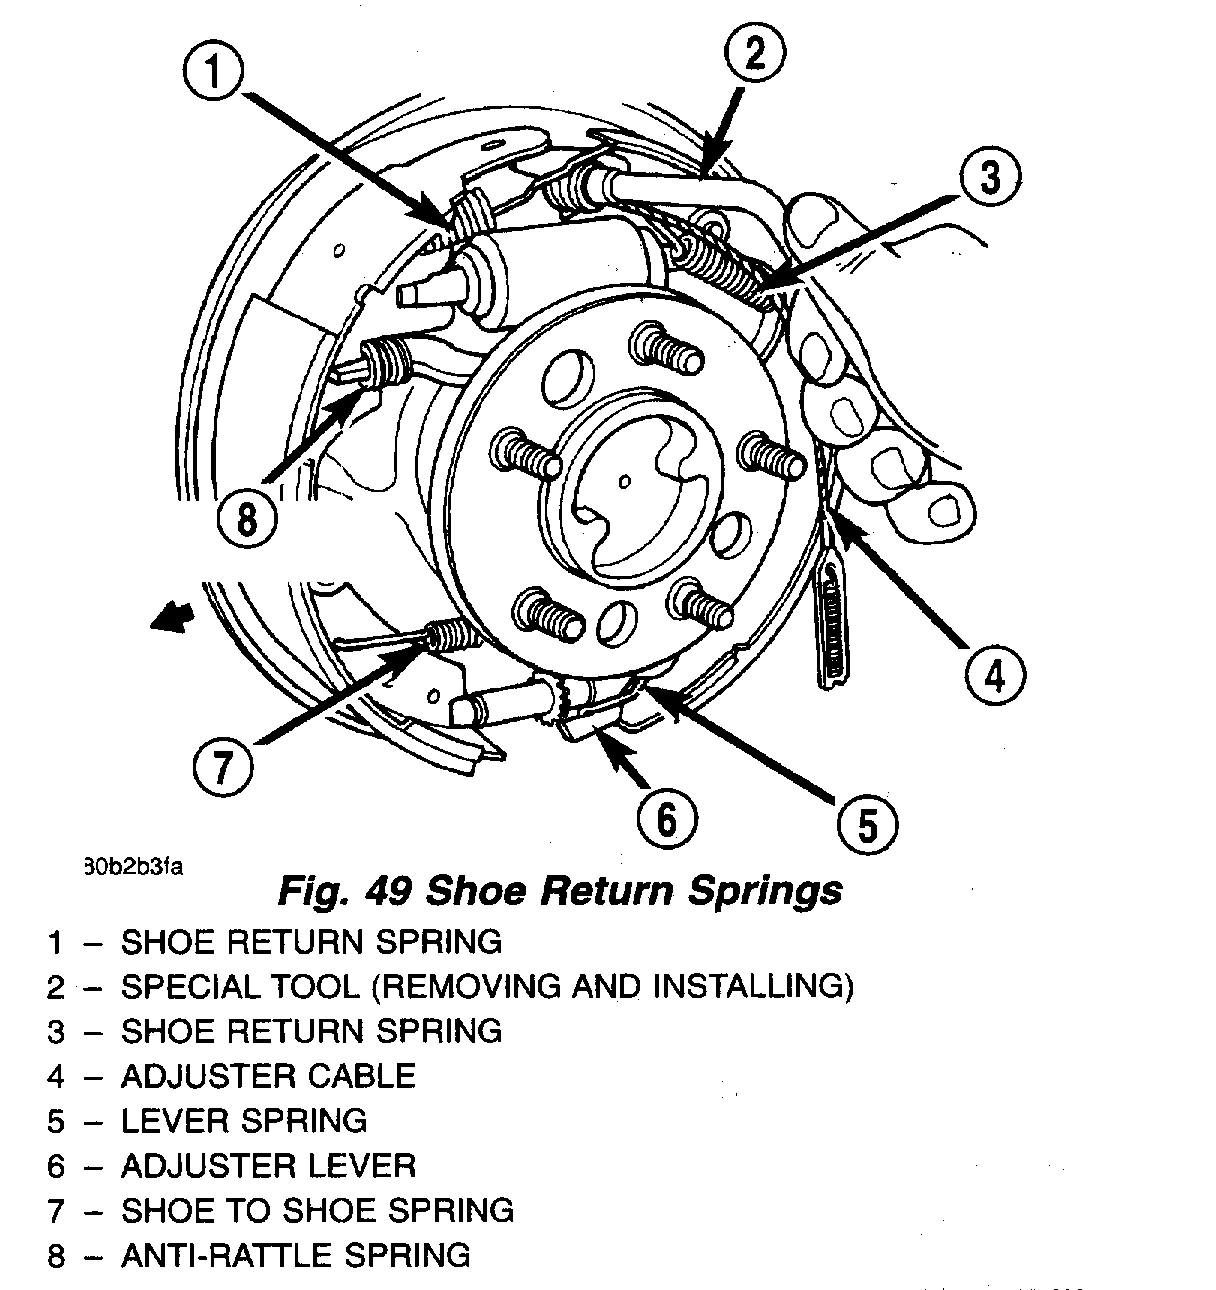
6. Remove shoe return springs with brake spring plier tool.

Picture 1

7. Remove adjuster cable. Slide cable eye off anchor pin, then unhook and remove cable from adjuster lever.
8. Remove cable guide from secondary shoe and anchor plate from anchor pin.
9. Remove adjuster lever. Disengage lever from spring by sliding lever forward to clear pivot and work lever out from under spring.
10. Remove adjuster lever spring from pivot.
11. Disengage and remove shoe spring from brake shoes.
12. Disengage and remove adjuster screw assembly from brake shoes.
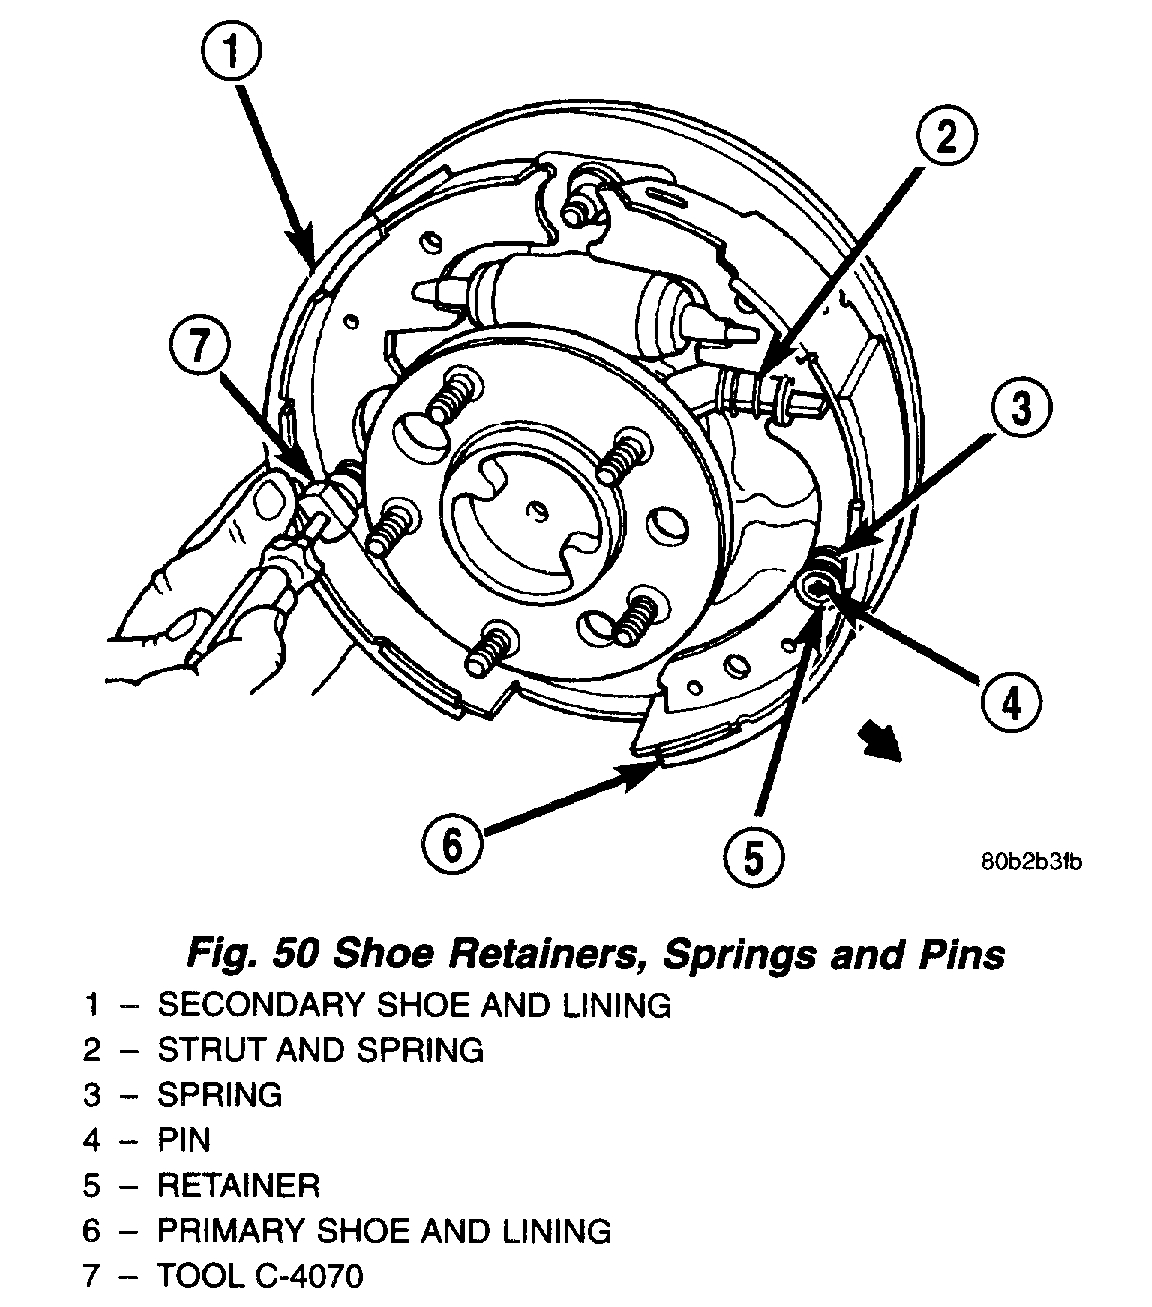
13. Remove brake shoe retainers and springs.

Picture 2

14. Remove secondary brake shoe from support plate.
15. Remove strut and spring.
16. Remove parking brake lever from secondary shoe.
17. Remove primary shoe from support plate.
18. Disengage parking brake lever from parking brake cable.

INSTALLATION
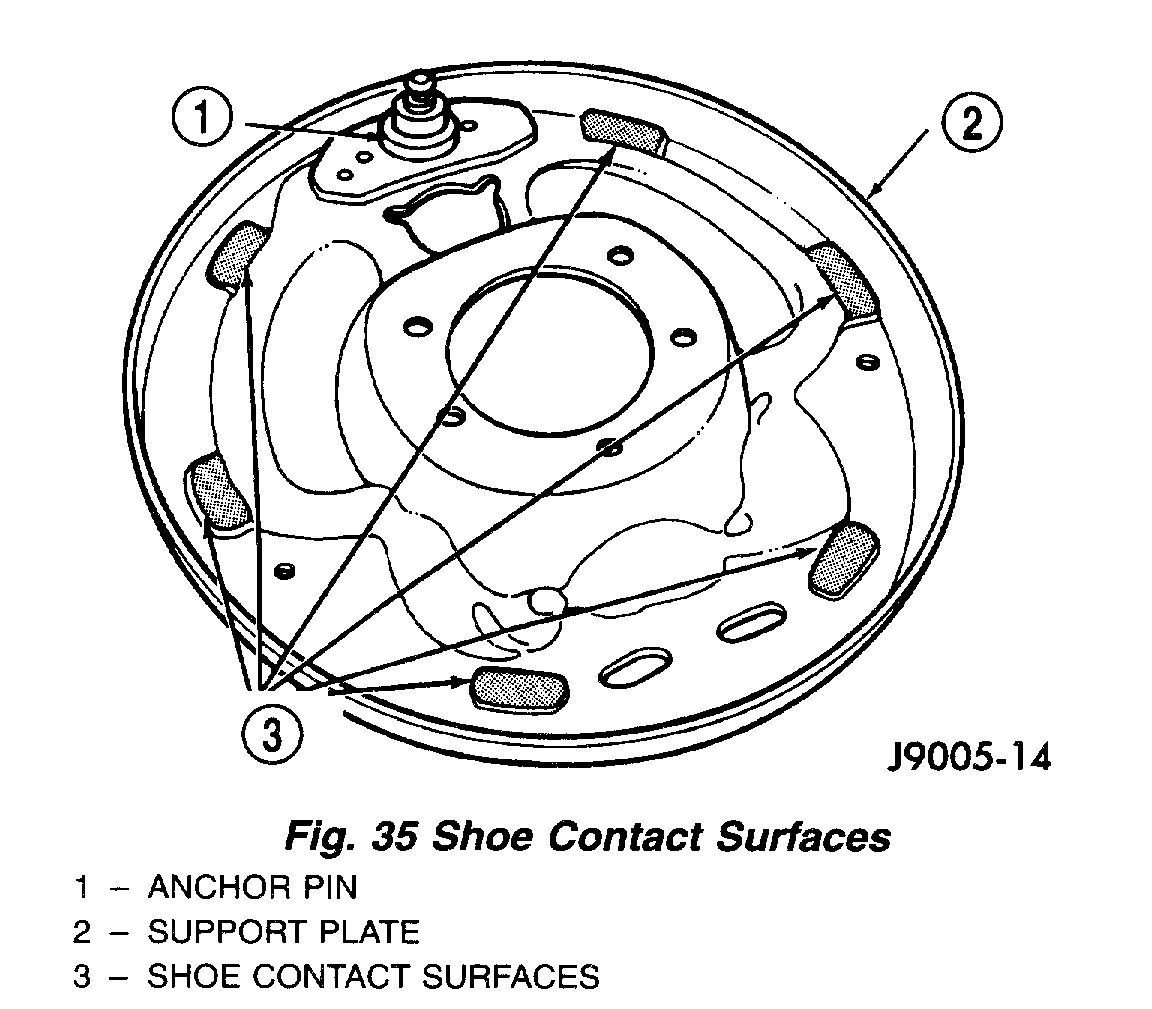
1. Clean and inspect individual brake components.
2. Lubricate anchor pin and brake shoe contact pads on support plate with high temperature grease or Lubriplate.

Picture 3

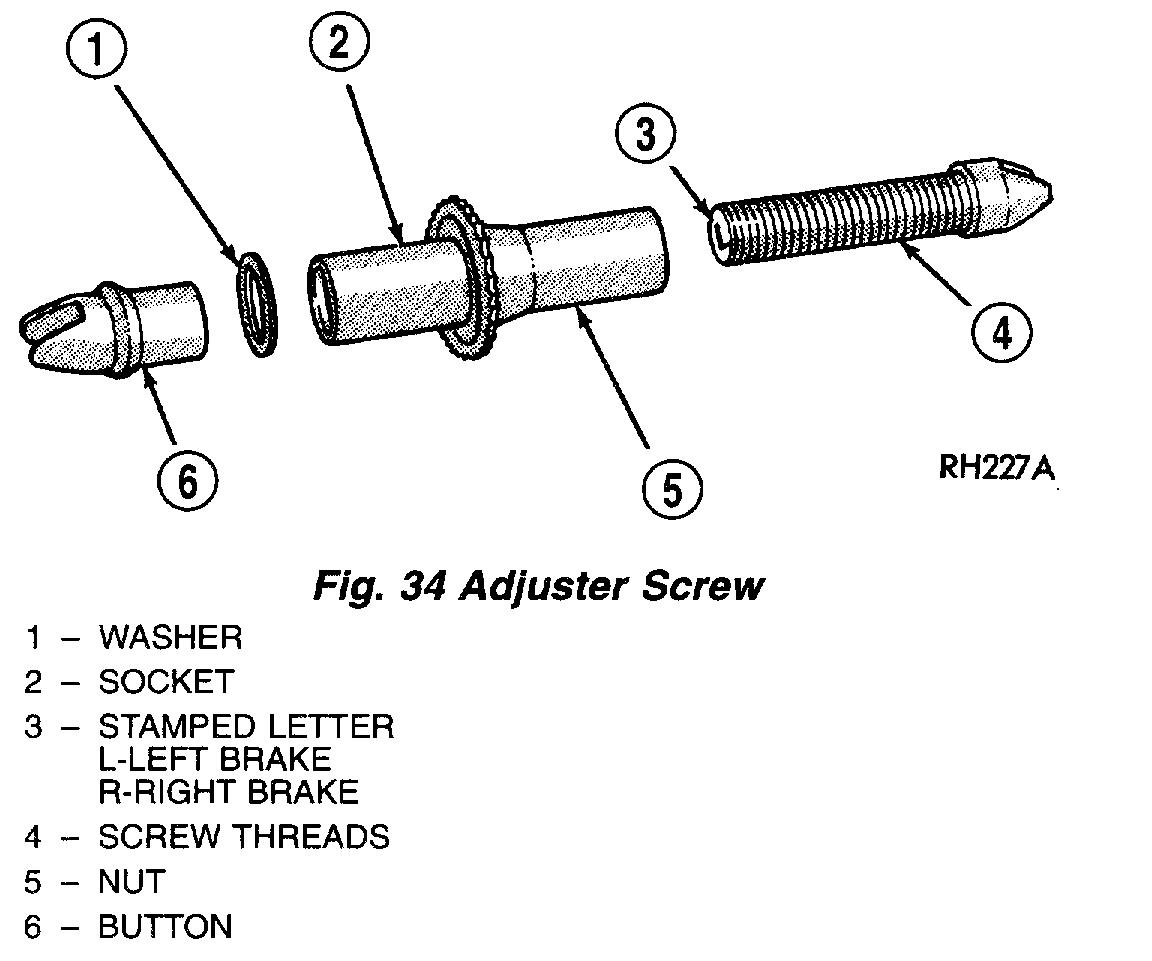
3. Lubricate adjuster screw socket, nut, button and screw thread surfaces with grease or Lubriplate.
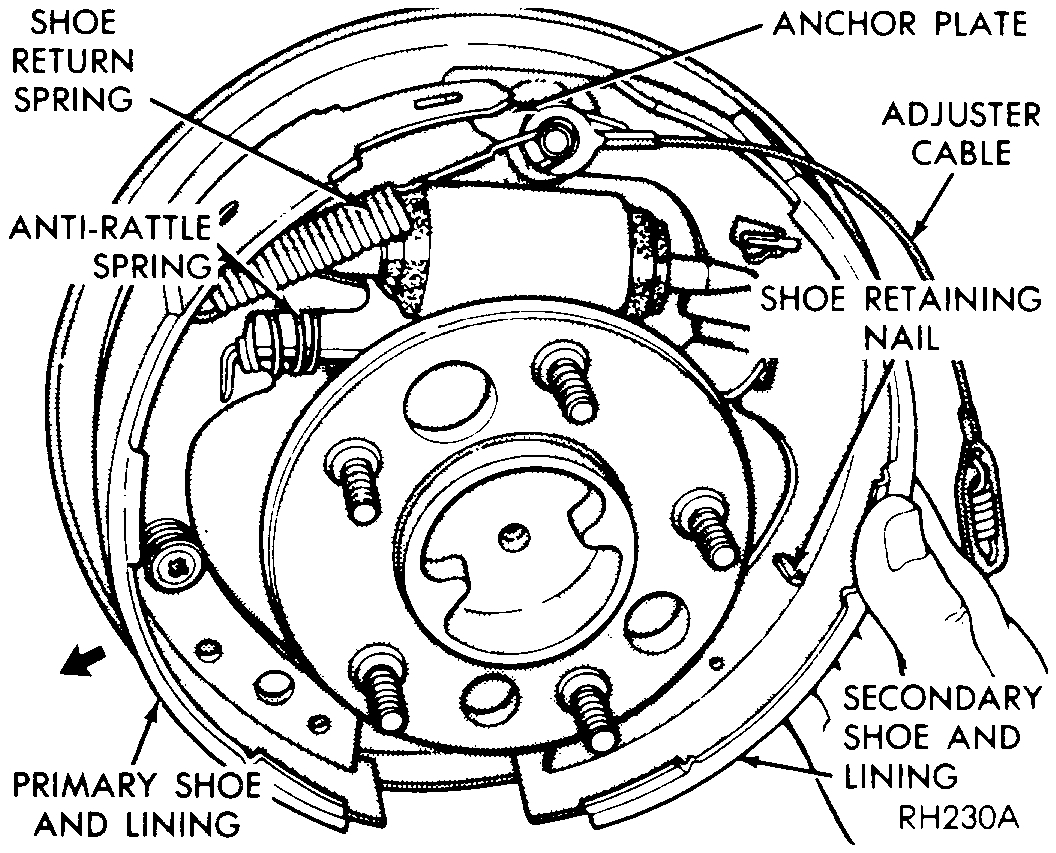
4. Attach parking brake cable to lever, then connect lever to secondary shoe.
5. Install primary shoe on support plate. Secure shoe with new spring retainers and pin.
6. Install spring on parking brake strut and engage strut in primary.
7. Install secondary shoe on support plate. Insert strut in shoe and guide shoe onto anchor pin. Temporarily secure shoe with retaining pin.

Fig 7 Installing Brake Shoes
picture 4

8. Install anchor plate and adjuster cable eyelet on support plate anchor pin.
9. Install cable guide in secondary shoe and position cable in guide.
10. Assemble adjuster screw, then install between the brake shoes.

Picture 5

NOTE: Be sure the adjuster screws are installed on the correct brake unit. The adjuster screws are marked L (left) and R (right) for identification.

11. Install adjuster lever and spring and connect adjuster cable to lever.
12. Install secondary shoe retainers and spring.
13. Install shoe spring. Connect spring to secondary shoe first, then to primary shoe.
14. Verity adjuster operation. Pull adjuster cable upward, cable should lift lever and rotate star wheel. Be sure adjuster lever properly engages star wheel teeth.
15. Adjust brake shoes to drum with brake gauge. See: Drum Brake System > Adjustments
16. Install wheel and tire assembly.

________________________________________________

Let me know if any of this helps or if you have other questions. Just some food for thought. If everything is working properly, it may be the shoes themselves. I have had pads and shoes sound like they were rubbing while the brake was not being used. (Only heard at low speeds) and had to replace the brake pads/shoes to stop the noise.

Take care,
Joe
Was this
answer
helpful?
Yes
No
Saturday, March 30th, 2019 AT 7:46 PM
Tiny
BRADLEY07
  • MEMBER
  • 4 POSTS
Thanks for the thought. It does have the tow package and 10" brakes and the shoes and drums match that size. I lubricated the appropriate parts during assembly. Over the weekend I have for sure determined the sound to be passenger. I found the adjuster spring to be flipped to the back and was causing mechanical limitations to the secondary shoe movement. That smoothed things up a bit but the noise still comes and goes. Usually not constant squeal while stopping, more of a pulsing sound. I had the original wheel cylinder leak on that side and the replacement. So it's been taken apart, handled, and cleaned twice. So it may be possible the sound will always be with those shoes until they are replaced. I hate to touch the driver side after all this though.
Was this
answer
helpful?
Yes
No
Monday, April 1st, 2019 AT 6:09 AM
Tiny
JACOBANDNICKOLAS
  • MECHANIC
  • 108,254 POSTS
Welcome back:

Honestly, I would return the shoes under warranty and see if the new ones make a difference. Since you have everything together correctly, that is the only thing it can be.

Regardless, let us know if you have other questions or need help with anything.

Take care,
Joe
Was this
answer
helpful?
Yes
No
Monday, April 1st, 2019 AT 5:08 PM

Please login or register to post a reply.

Sponsored links