Rack and pinion replacement?

Tiny
KANDY MURRAY
  • MEMBER
  • 2000 LINCOLN CONTINENTAL
  • V8
  • 2WD
  • AUTOMATIC
  • 10,000 MILES
What tools needed to replace rack and pinion? How do I do it?
Saturday, June 22nd, 2019 AT 11:34 AM

19 Replies

Tiny
JACOBANDNICKOLAS
  • MECHANIC
  • 108,133 POSTS
Welcome to 2CarPros.

On this vehicle, this is a big job. Many tools will be required. Unfortunately we don't have sizes of tools, sockets, or bolts as they are not included in the manual. Basically they leave that to the tech to figure out the best tool for the job. Not all are going to have the same tools so they don't try to list that. Most all these jobs can be done with hand tools like socket sets and wrenches but it will just take longer.

Here are the directions for removal and replacement. All of the pictures correlate with the directions.

_______________________________________________________

REMOVAL AND INSTALLATION

pic 1

Removal

pic 2

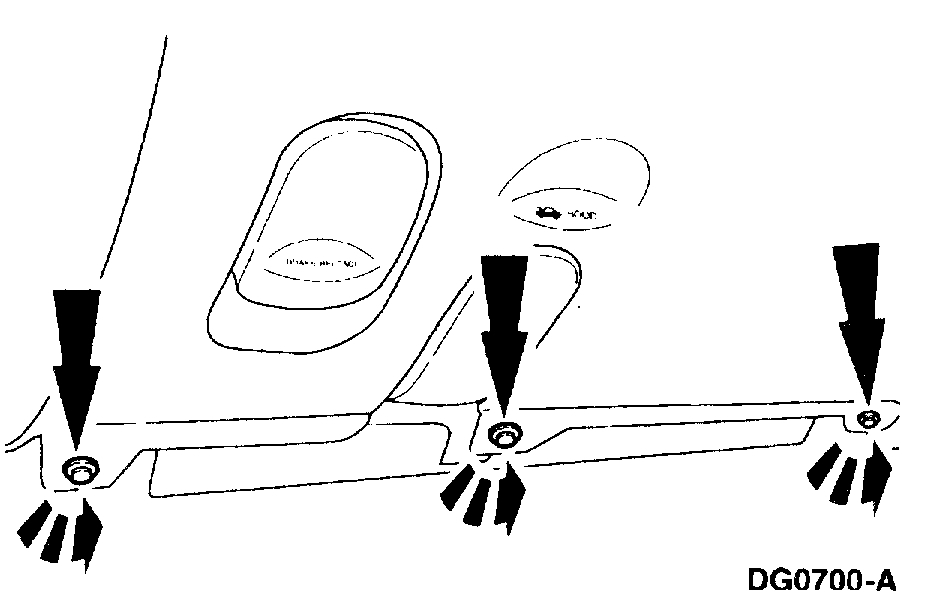
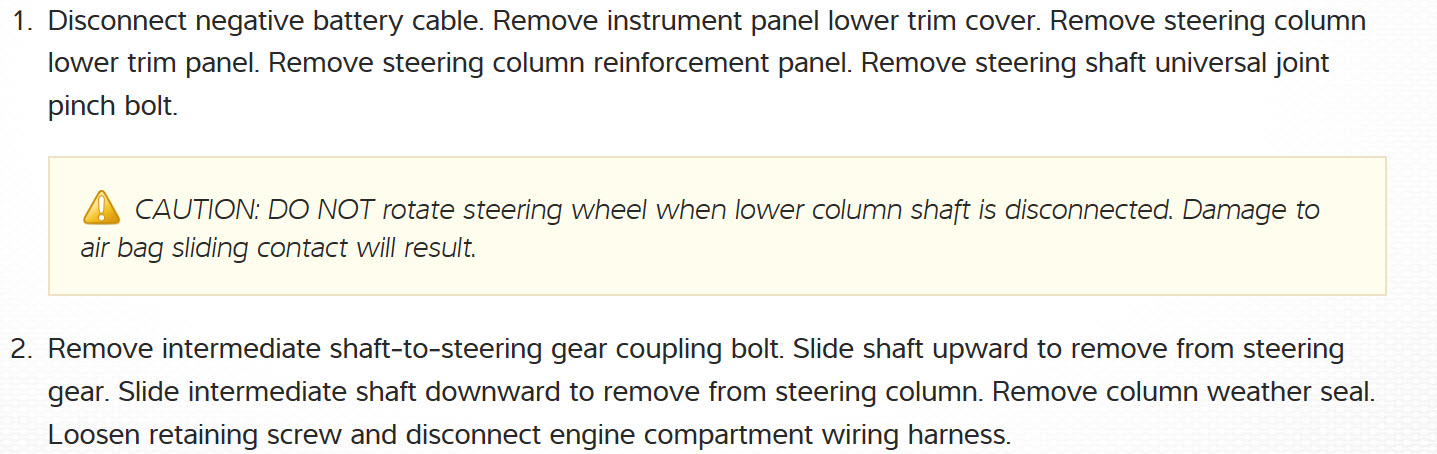
1. Remove the instrument panel lower trim cover.

Pic 3

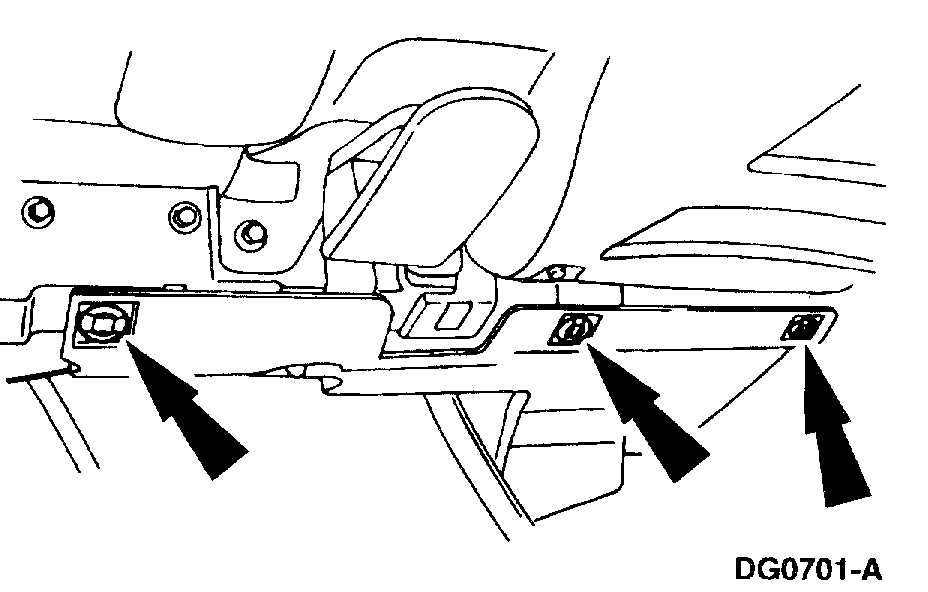
2. Remove the steering column lower trim panel.

Pic 4

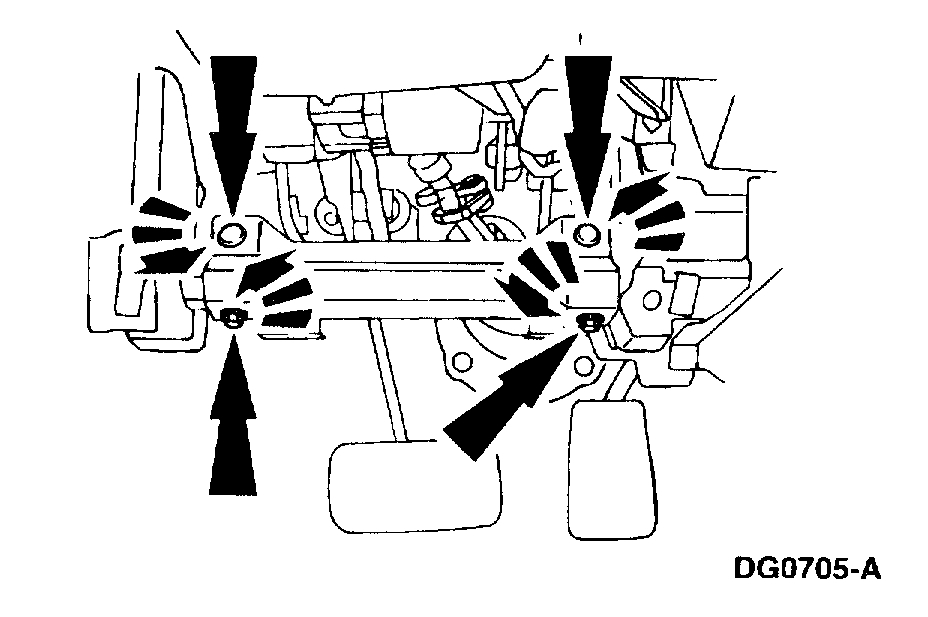
3. Remove the steering column reinforcement panel.

Pic 5

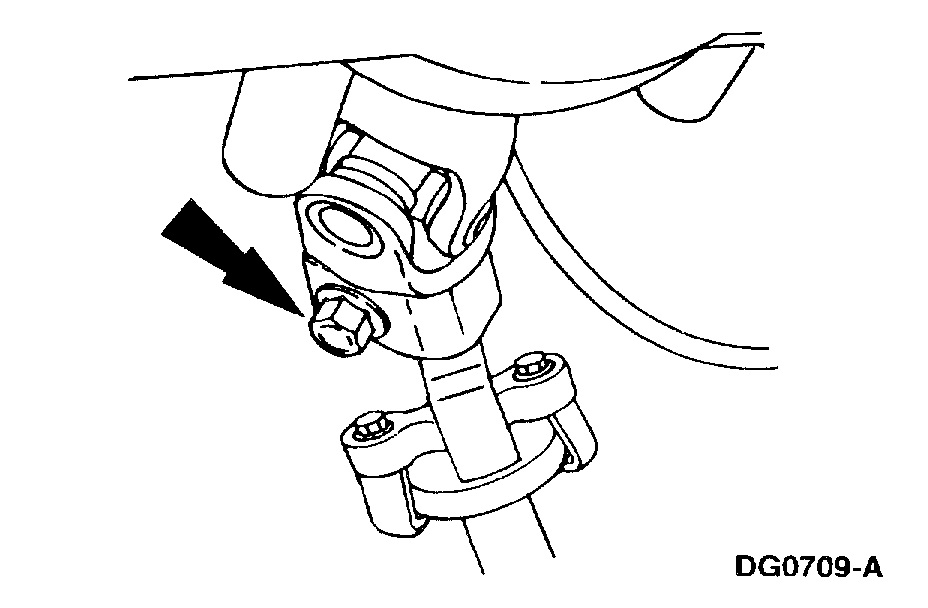
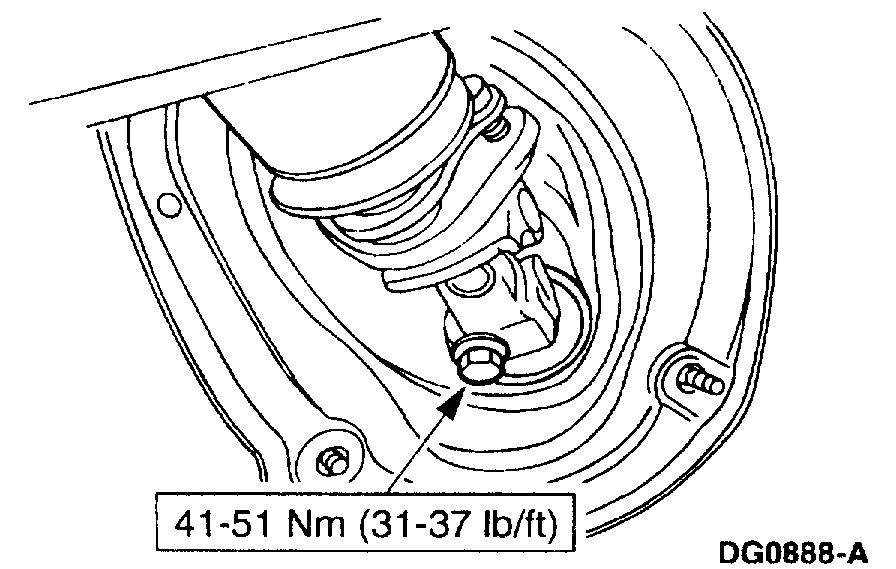
4. Remove the universal joint pinch bolt.

Pic 6

5. CAUTION: Do not rotate the steering wheel when the lower steering column shaft is disconnected, or damage to the air bag sliding contact will result.

Remove the bolt at the intermediate shaft-to-steering gear coupling. Slide the shaft upward to remove from the steering gear.
6. Slide the intermediate shaft downward to remove from the steering column.

Pic 7

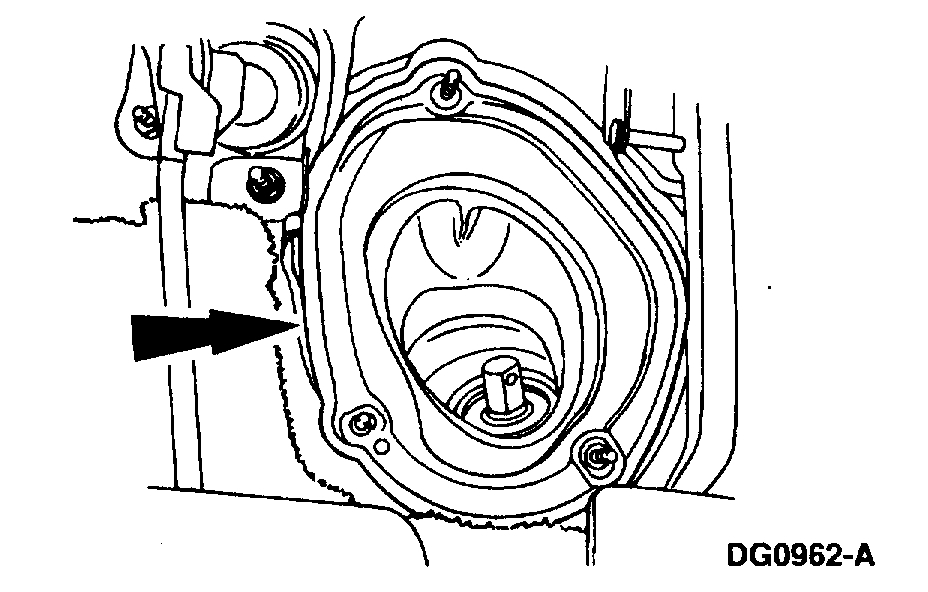
7. Remove the steering column opening weather seal.

Pic 8

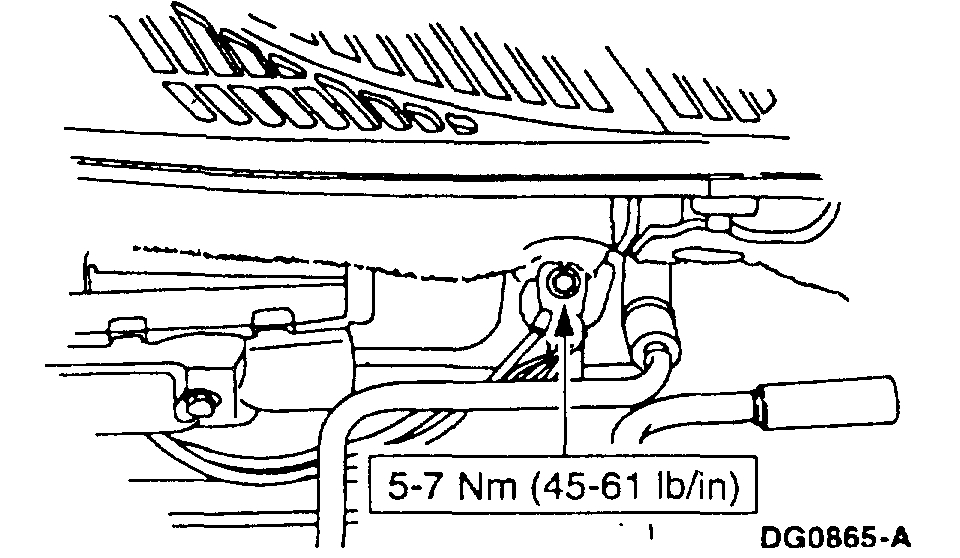
8. Loosen the retaining screw, and disconnect the engine compartment wiring harness.

Pic 9

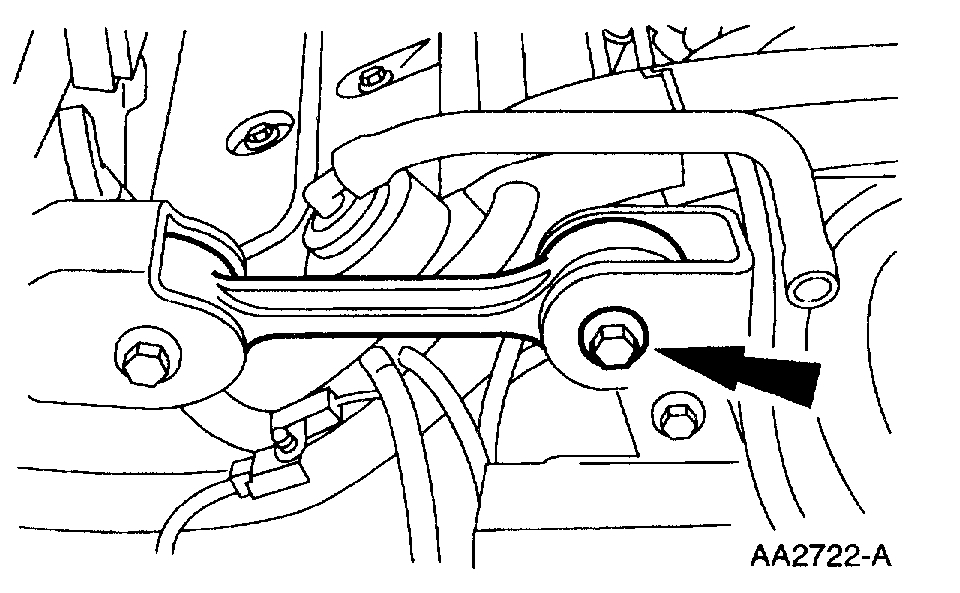
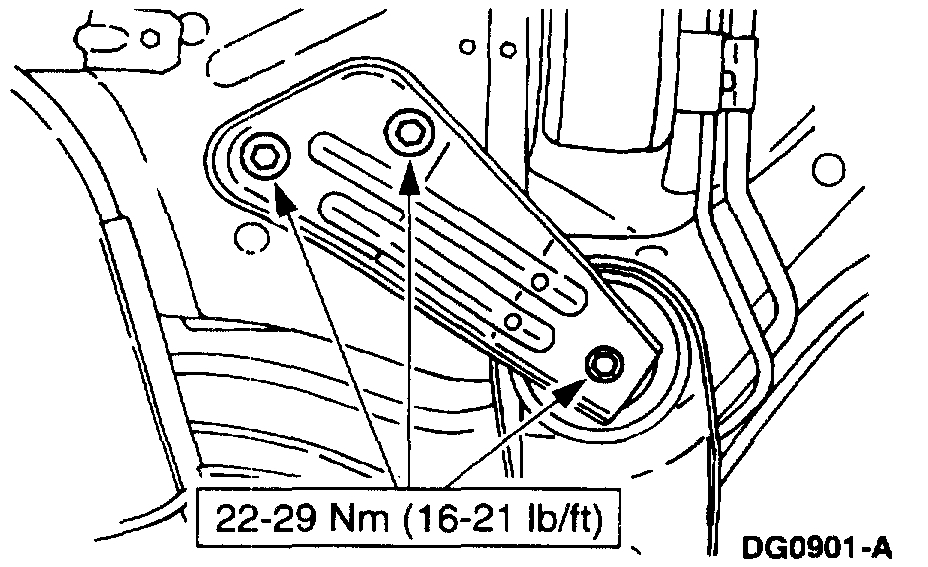
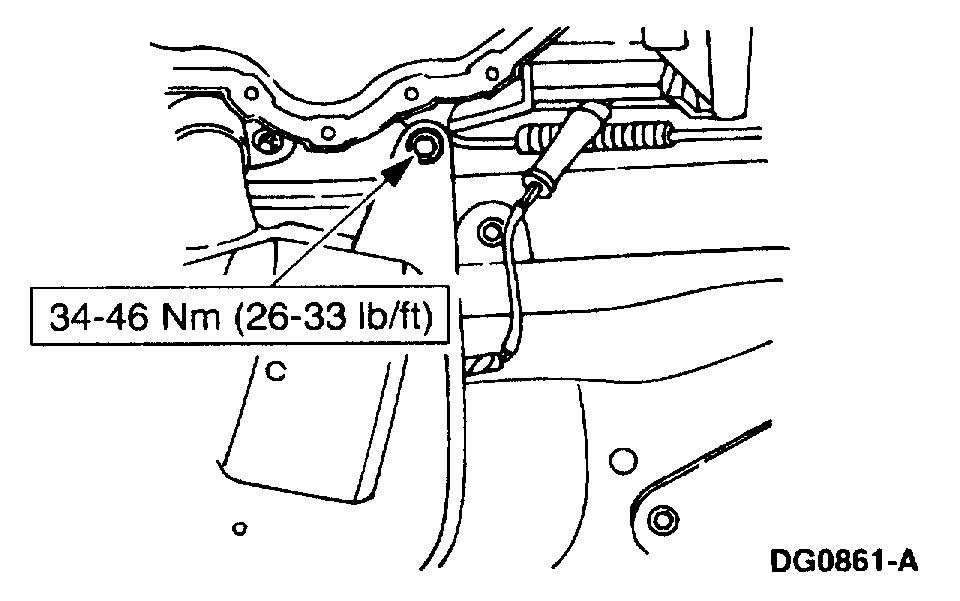
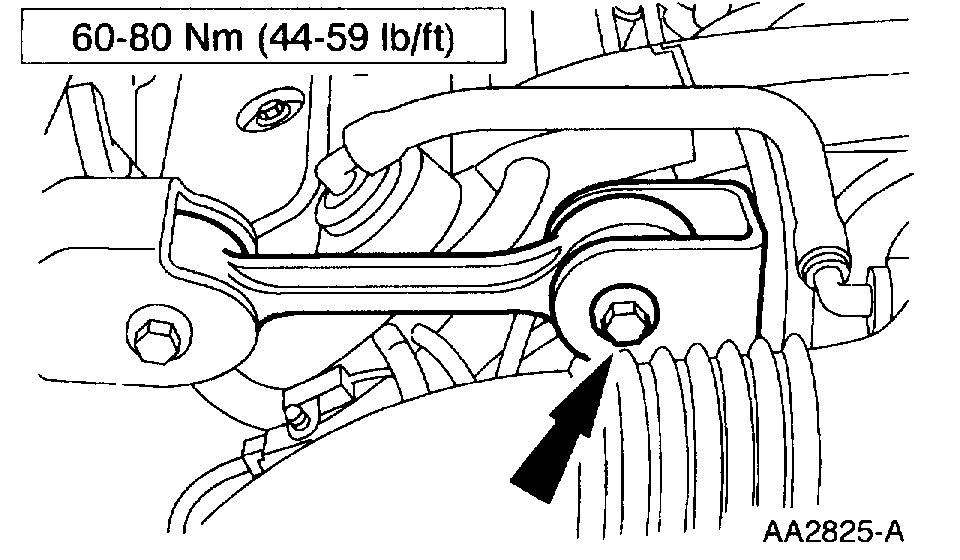
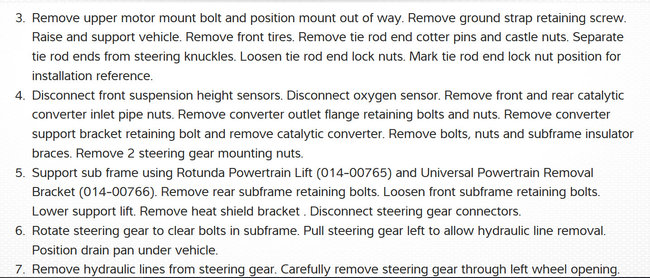
9. Remove the bolt and position the upper motor mount out of the way.

Pic 10

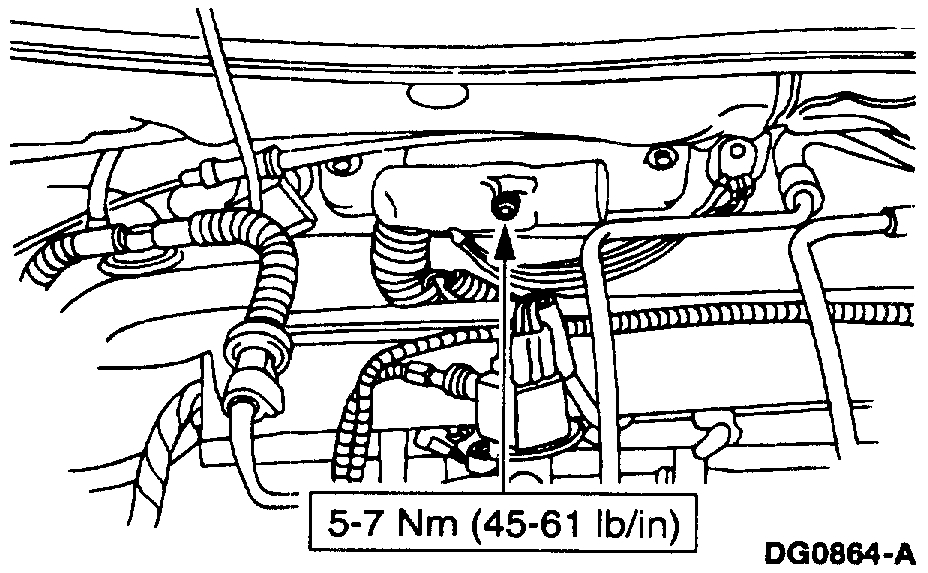
10. Remove the ground strap retaining screw.
11. Raise the vehicle.
12. Remove the wheels.

Pic 11

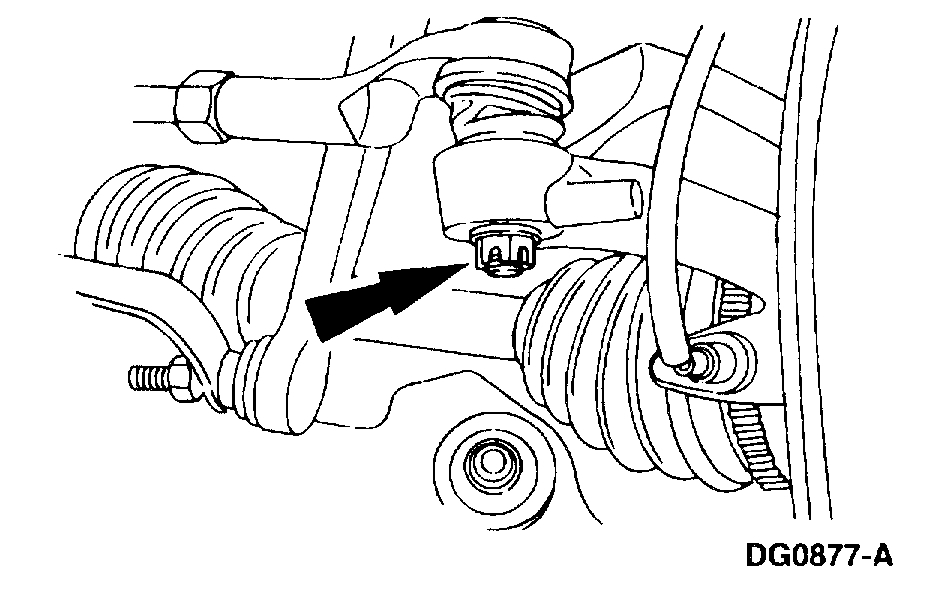
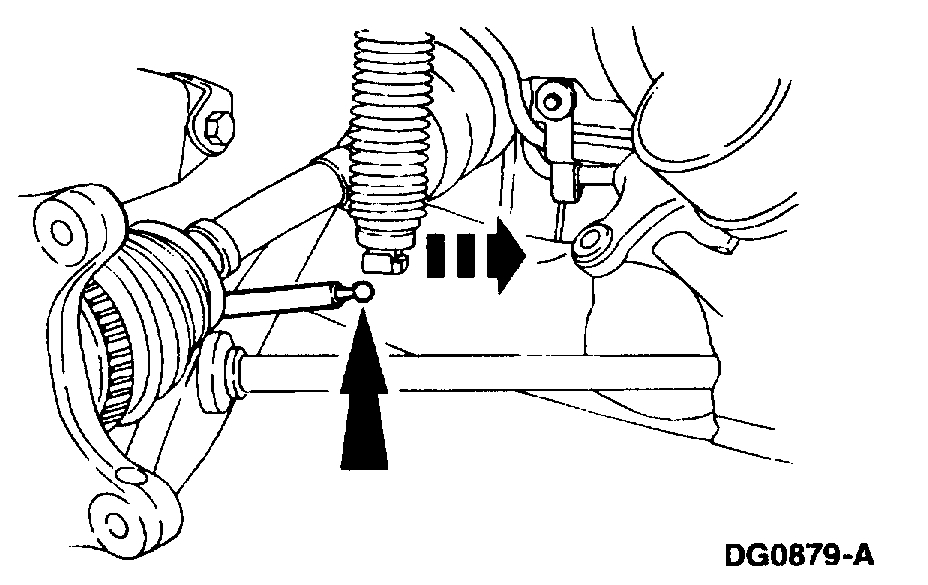
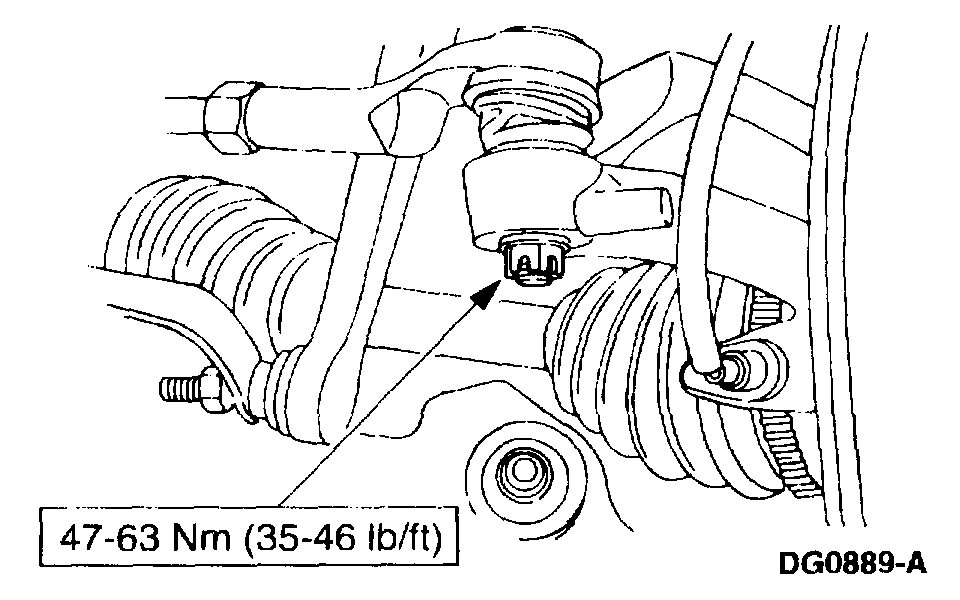
13. Remove the cotter pins and nuts at the tie rod ends.

Pic 12

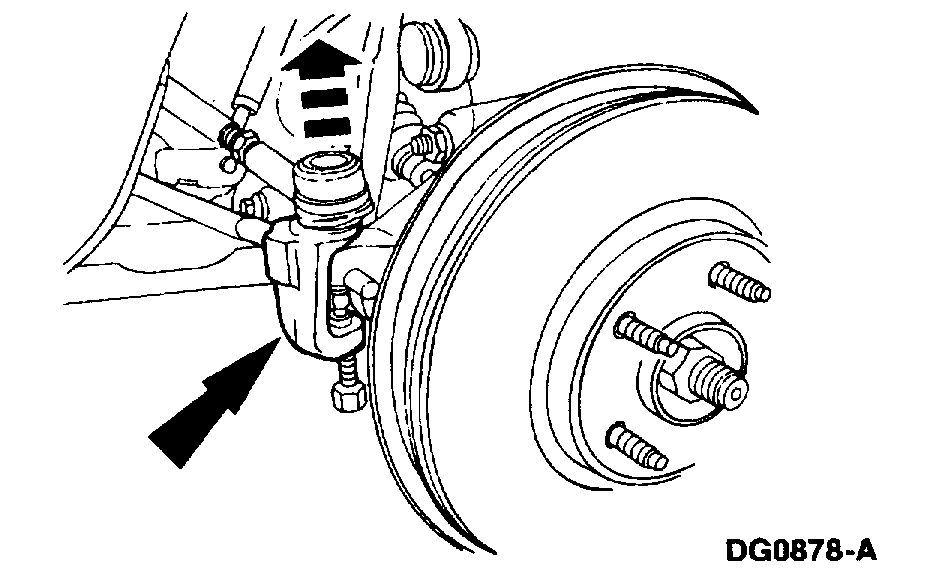
14. Separate the tie rods from the knuckles, using a suitable puller.

Pic 13

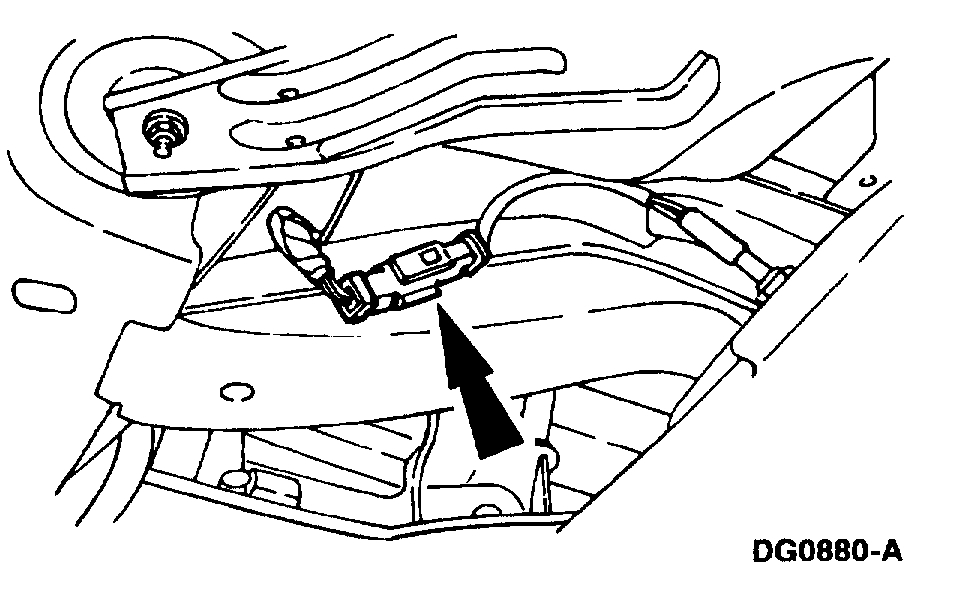
15. Disconnect the height sensors.

Pic 14

16. Disconnect the Heated Oxygen Sensor (HEGO).

Pic 15

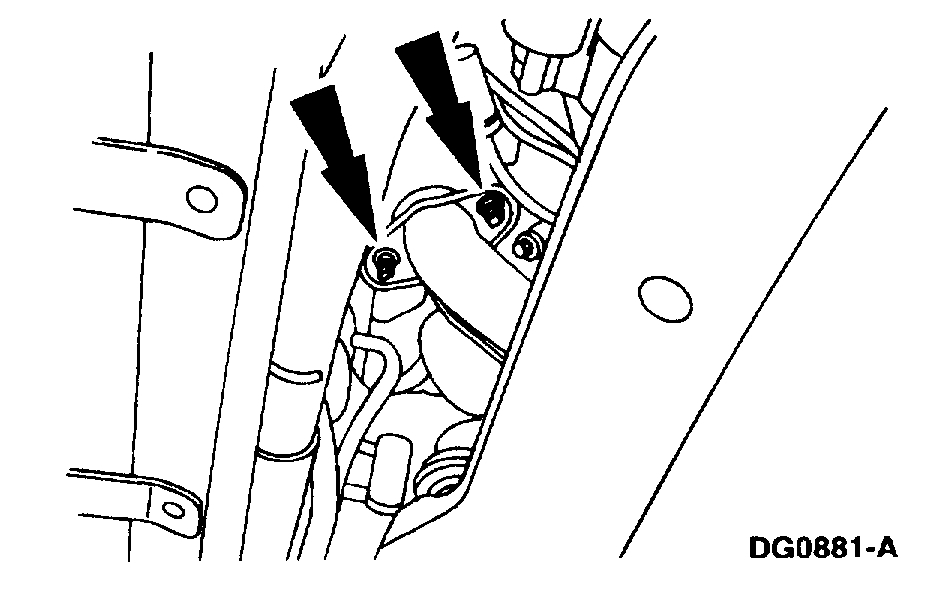
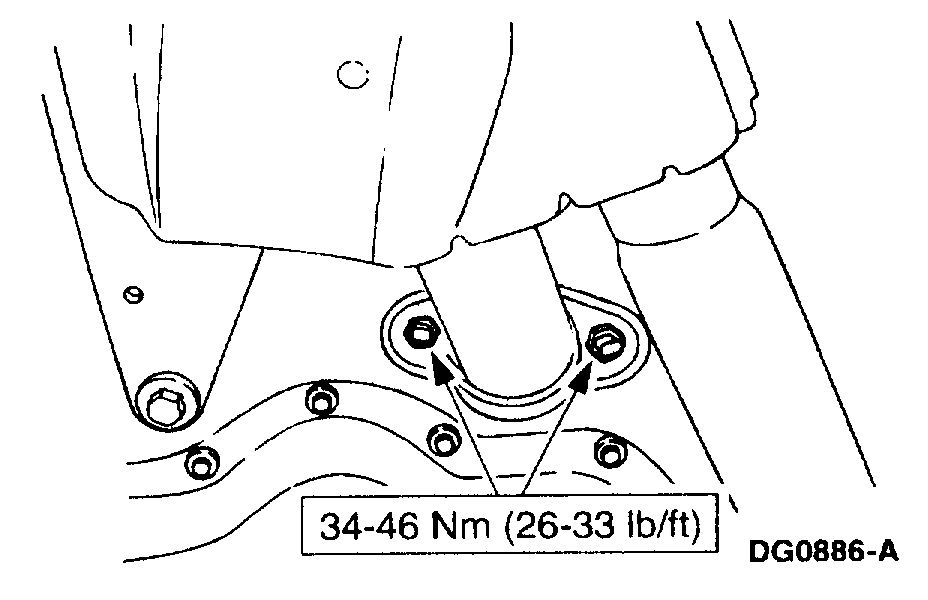
17. Remove the catalytic converter inlet pipe retaining nuts (front).

Pic 16

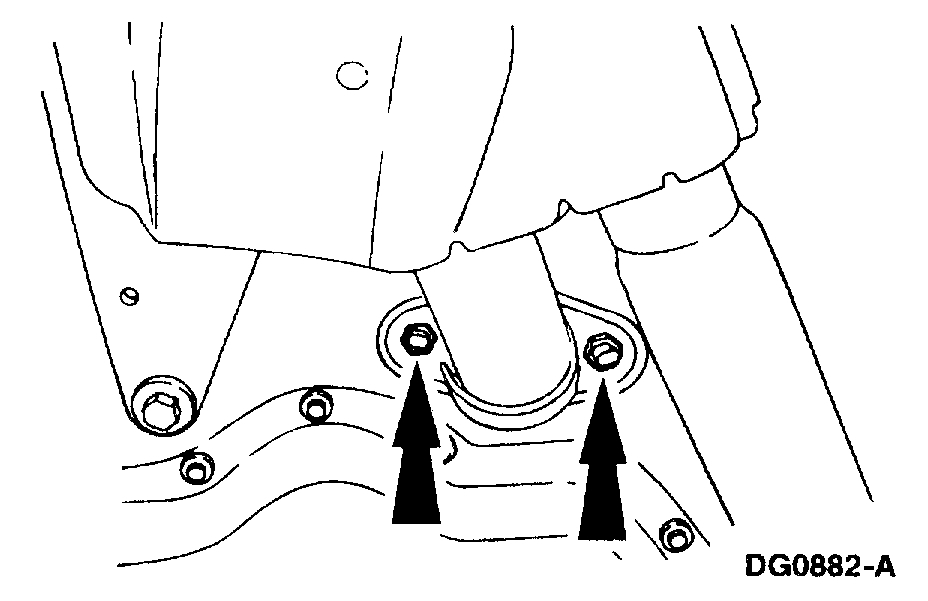
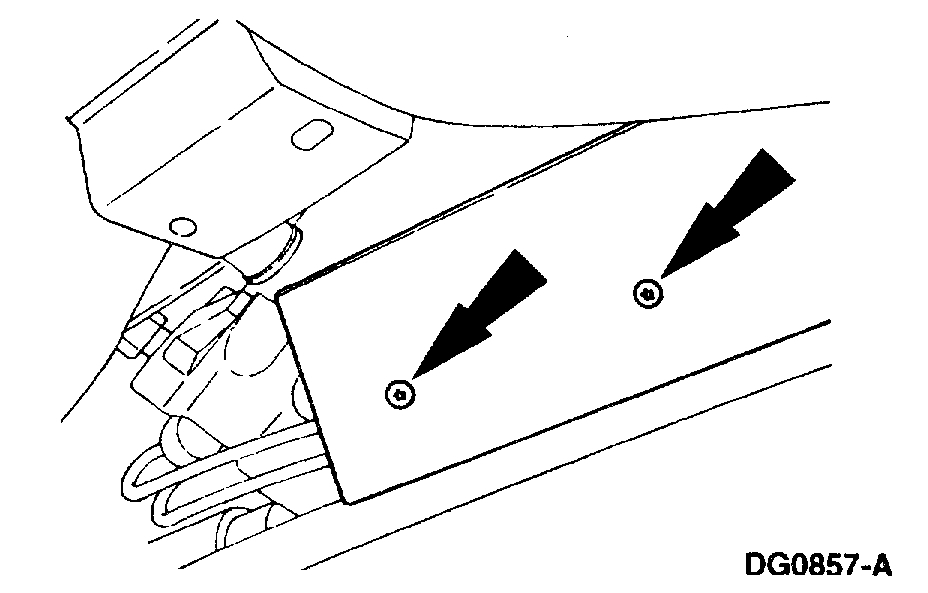
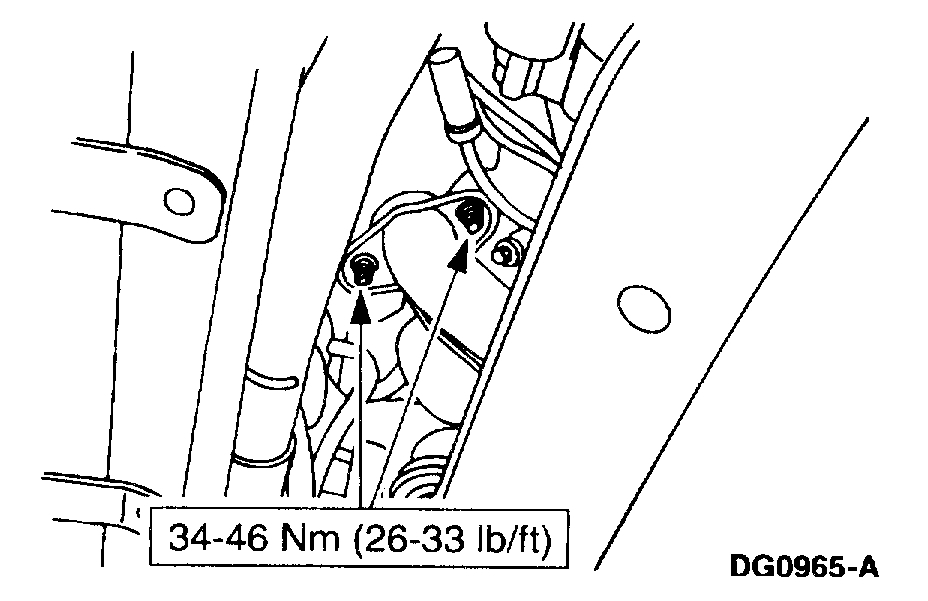
18. Remove the catalytic converter inlet pipe retaining nuts (rear).

Pic 17

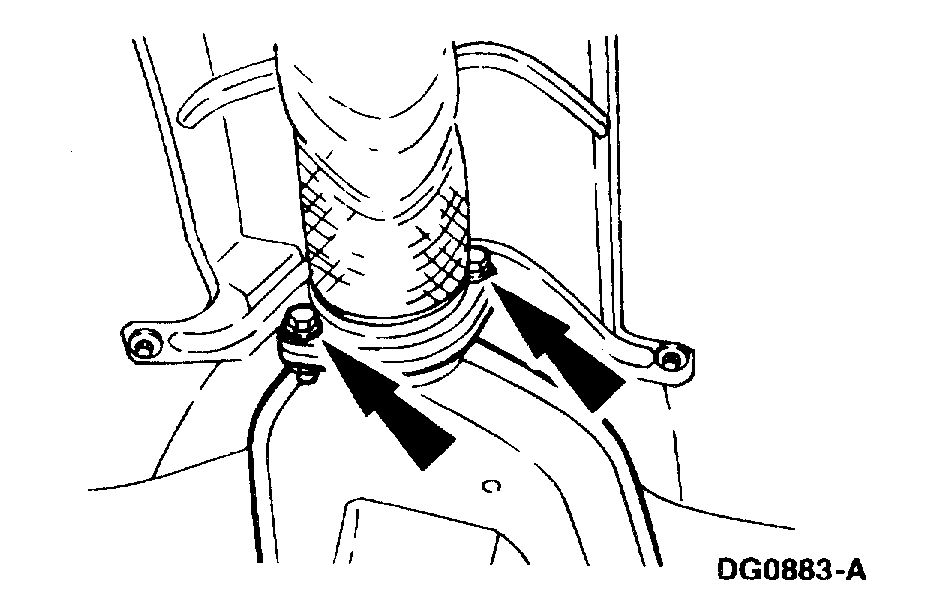
19. Remove the catalytic converter outlet flange retaining bolts and nuts.

Pic 18

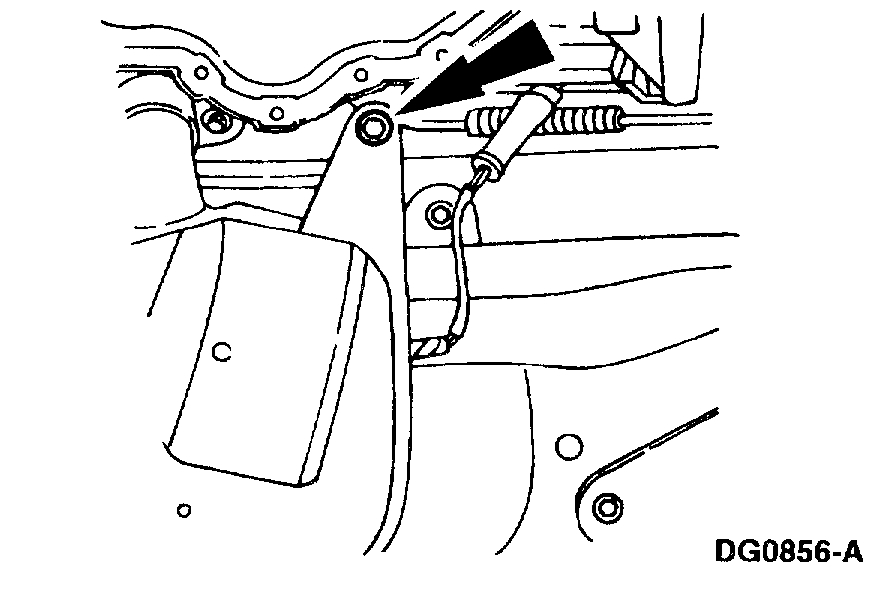
20. Remove the support bracket retaining bolt and the catalytic converter.

Pic 19

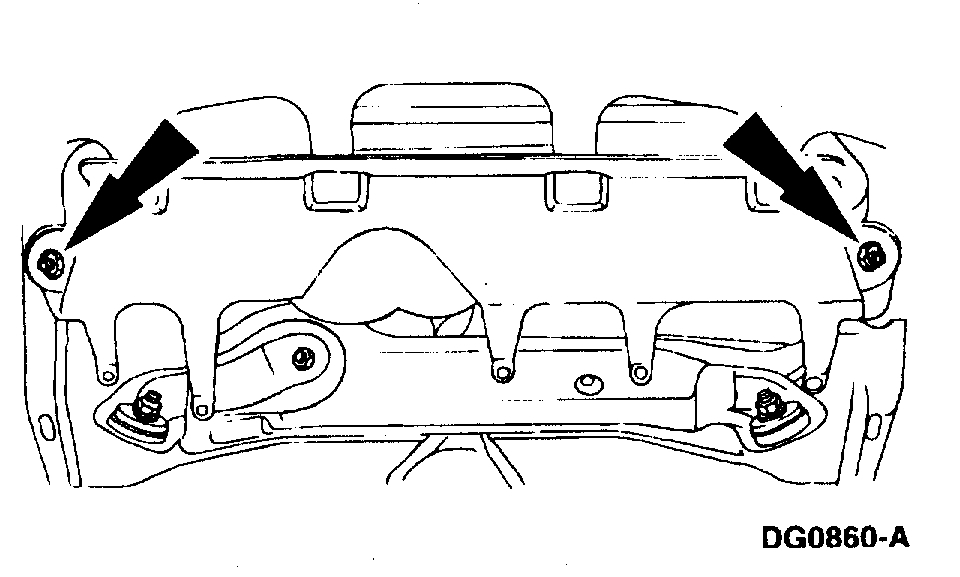
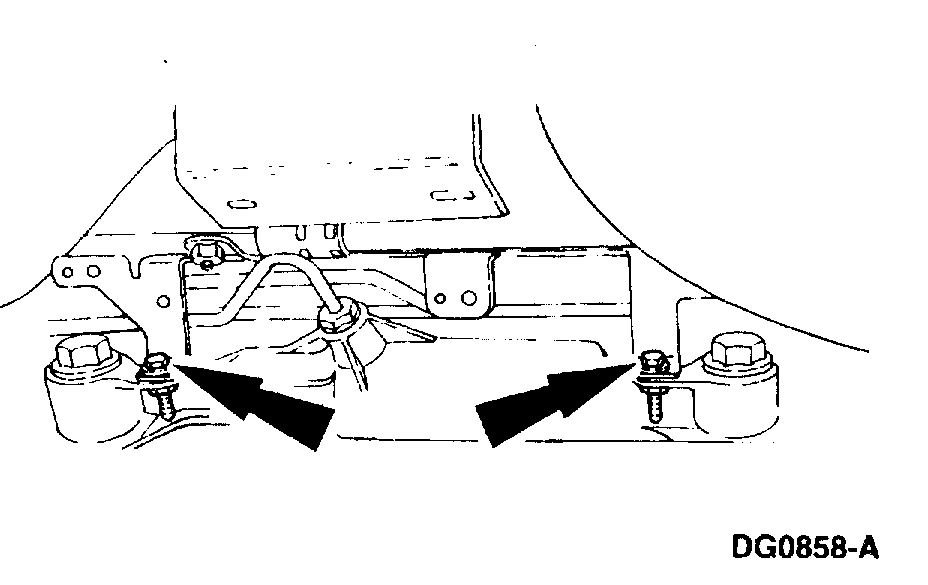
21. Remove the bolts, nuts and subframe insulator braces.

Pic 20

22. Remove the steering gear nuts.
23. Support the subframe, using a suitable jack.

Pic 21

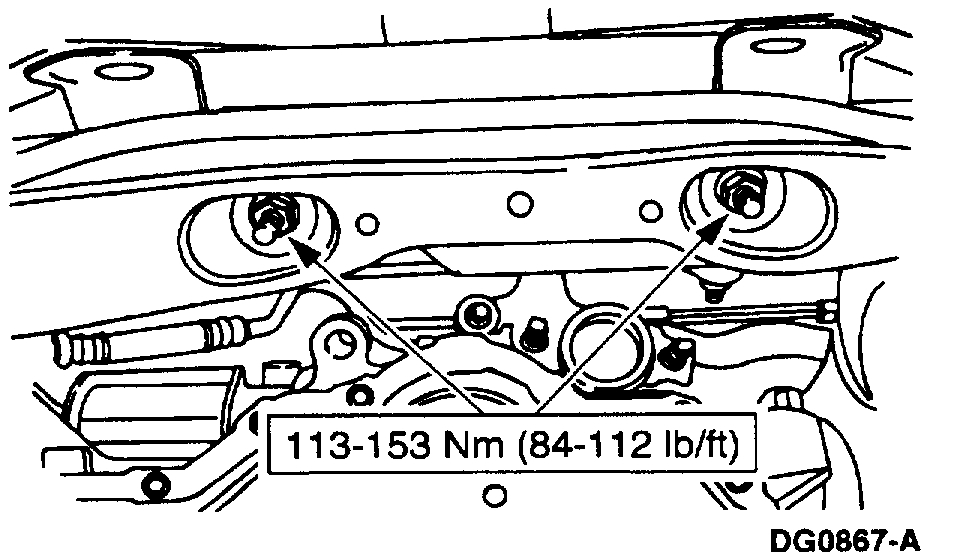
24. Remove the subframe retaining bolts (rear).

Pic 22

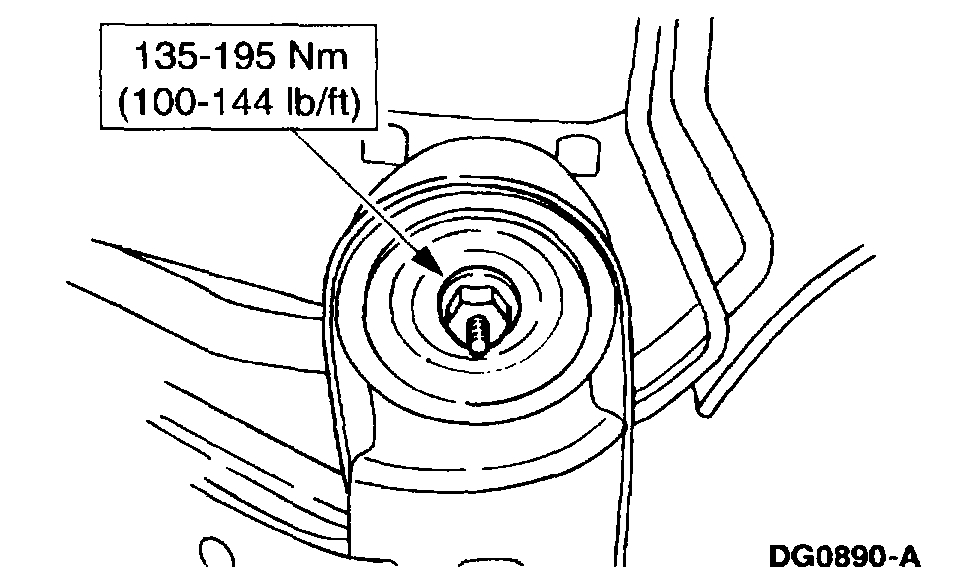
25. Loosen the subframe bolts (front).
26. Lower the lift.

Pic 23

27. Remove the pushpins and the heat shield.

Pic 24

28. Remove the screws and the heat shield bracket.

Pic 25

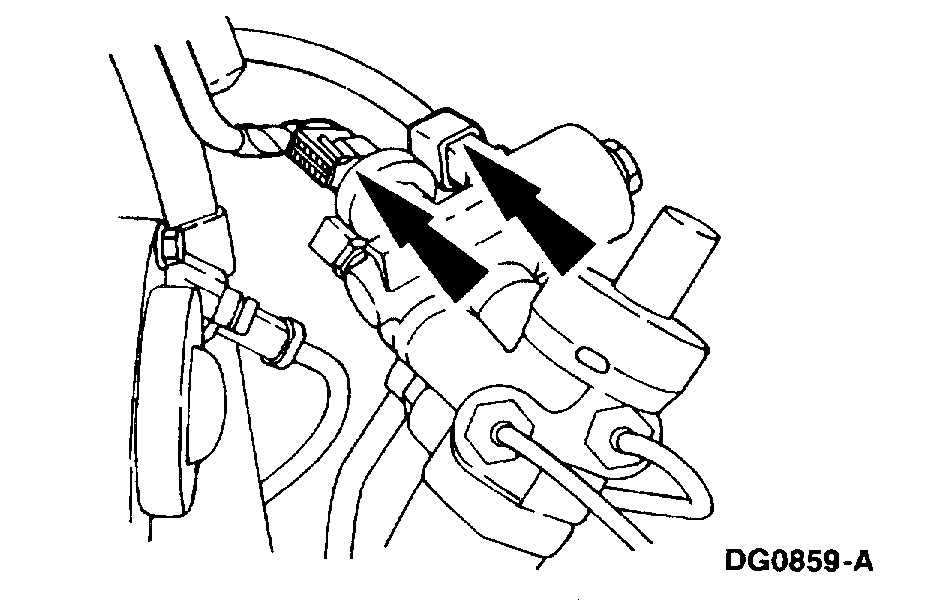
29. Disconnect the wiring at the steering gear.

Pic 26

30. Note: The steering gear must be rotated to clear the bolt from subframe and pulled to the left to access the power steering lines.

Disconnect the pressure and return lines at the steering gear.
31. Remove the steering gear through the left fender opening.

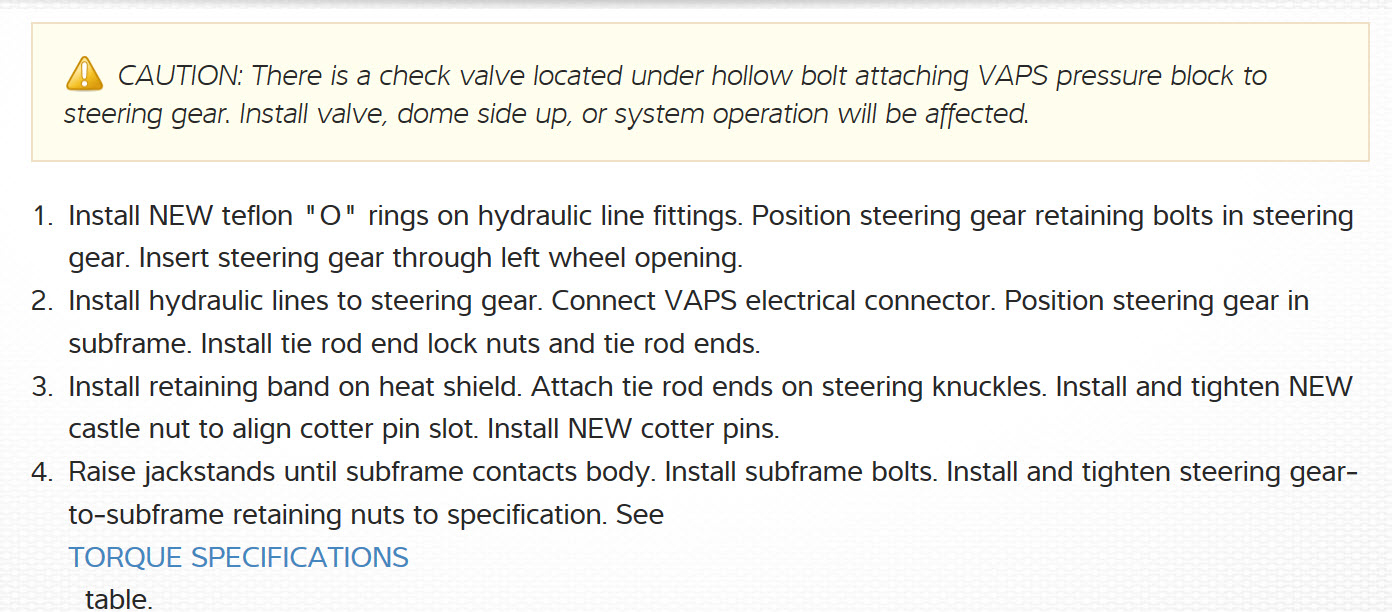
32. CAUTION: There is a check valve located under the hollow bolt that attaches the VAPS pressure block to the steering gear. Failure to install this valve, dome side up, can affect system operation.

If replacing the steering gear, transfer usable parts to the replacement gear.

Installation
1. Position the steering gear in the vehicle.

Pic 27

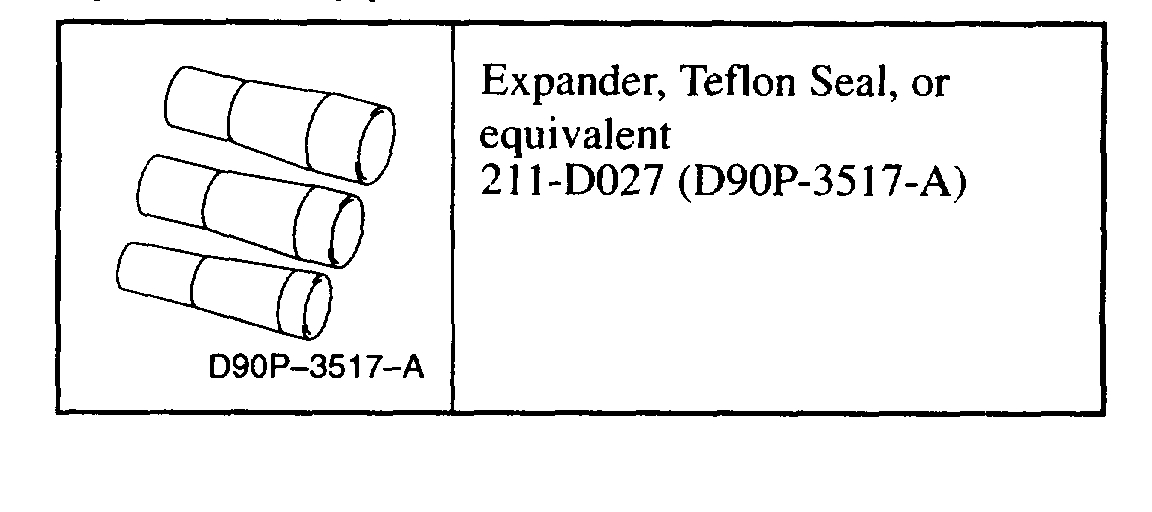
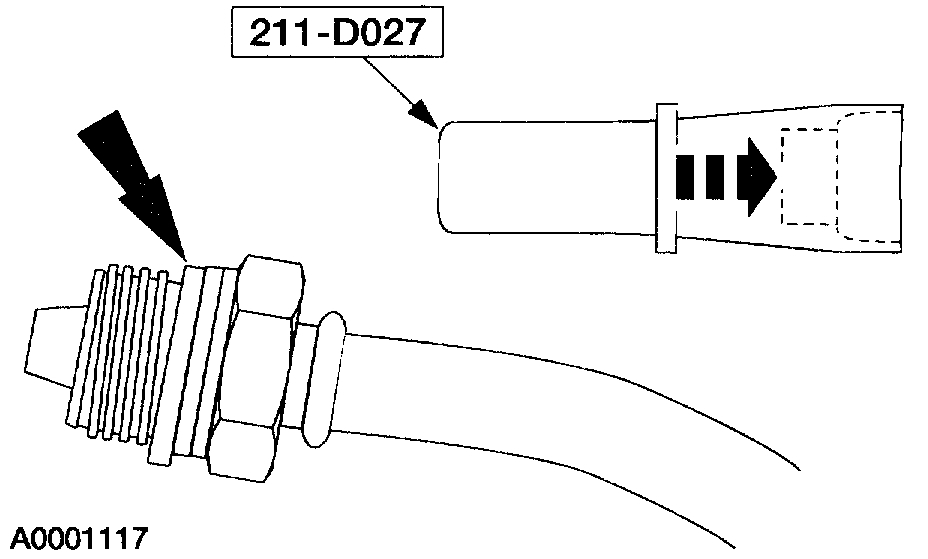
2. Replace the return line connector seal and the pressure line connector seal.
Use the Seal Replacer to install the seals over the fittings.

Pic 28

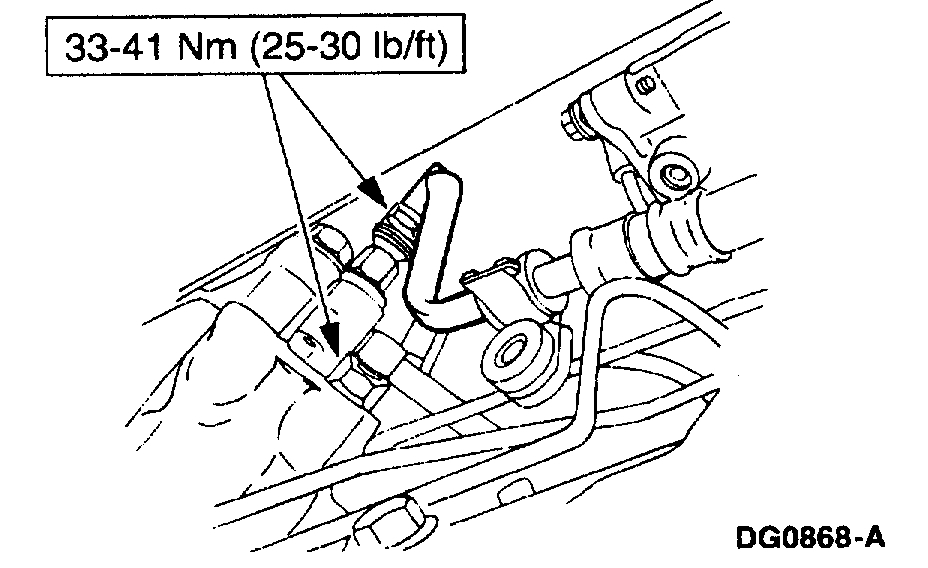
3. Connect the pressure and return lines.

Pic 29

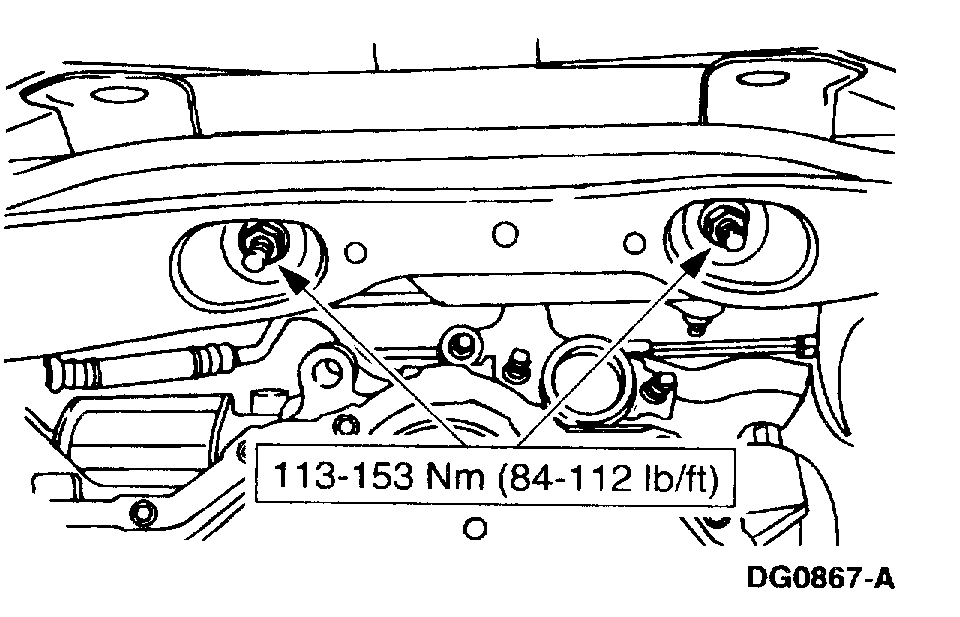
4. Position the steering gear on the subframe, and install the retaining nuts.
5. Connect the wiring at the steering gear.

Pic 30

6. Position the heat shield bracket, and install the retaining screws.
7. Position the heat shield, and install the pushpins.
8. Raise the lift.

Pic 31

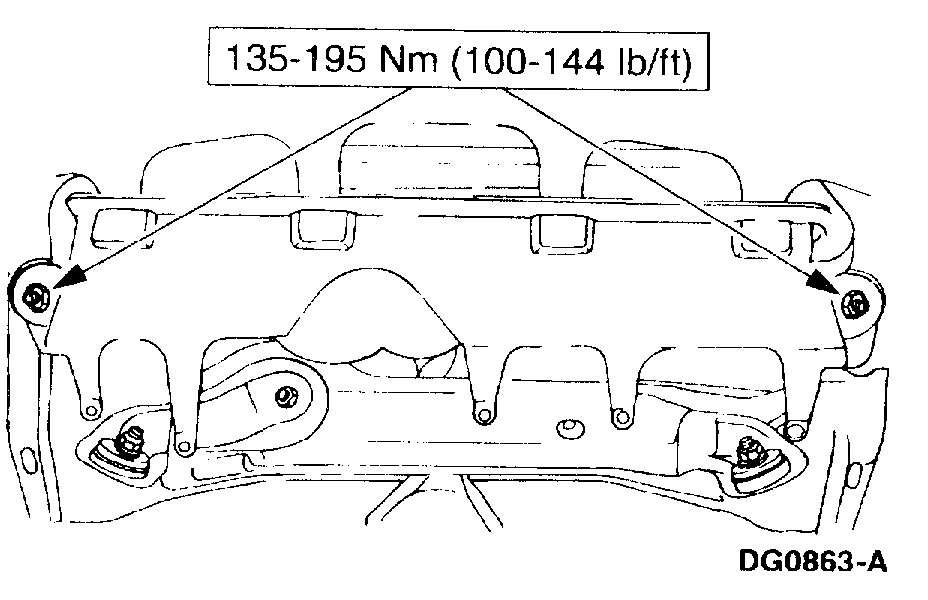
9. Install the subframe bolts (front).

Pic 32

10. Install the subframe bolts (rear).
11. Remove the lift.

Pic 33

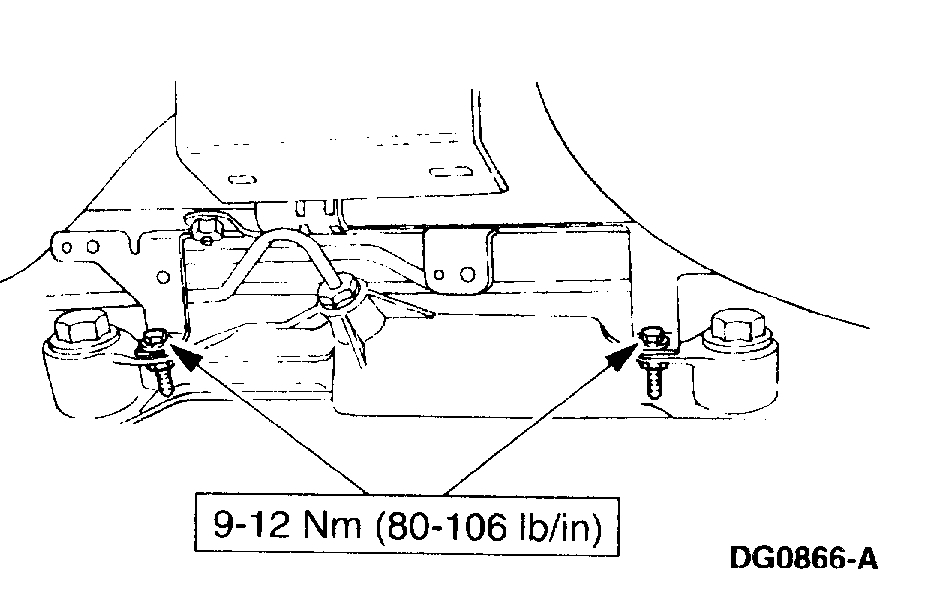
12. Position the subframe insulator braces, and install the retaining bolts.

Pic 34

13. Position the catalytic converter, and install the support bracket retaining bolt.

Pic 35

14. Install the nuts at the exhaust inlet pipe (rear).

Pic 36

15. Install the nuts at the exhaust inlet pipe (front).

Pic 37

16. Install the exhaust flange bolts and nuts.
17. Connect the HEGO sensor wiring.
18. Connect the height sensors.

Pic 38

19. Connect the tie rods, and install the retaining nuts.
20. Install the tie rod end cotter pins.
21. Install the wheels.
22. Lower the vehicle.

Pic 39

23. Position the ground strap, and install the retaining screw.

Pic 40

24. Connect the wiring harness.

Pic 41

25. Install the upper motor mount.
26. Install the weather seal.
27. Install the steering column intermediate shaft.

Pic 42

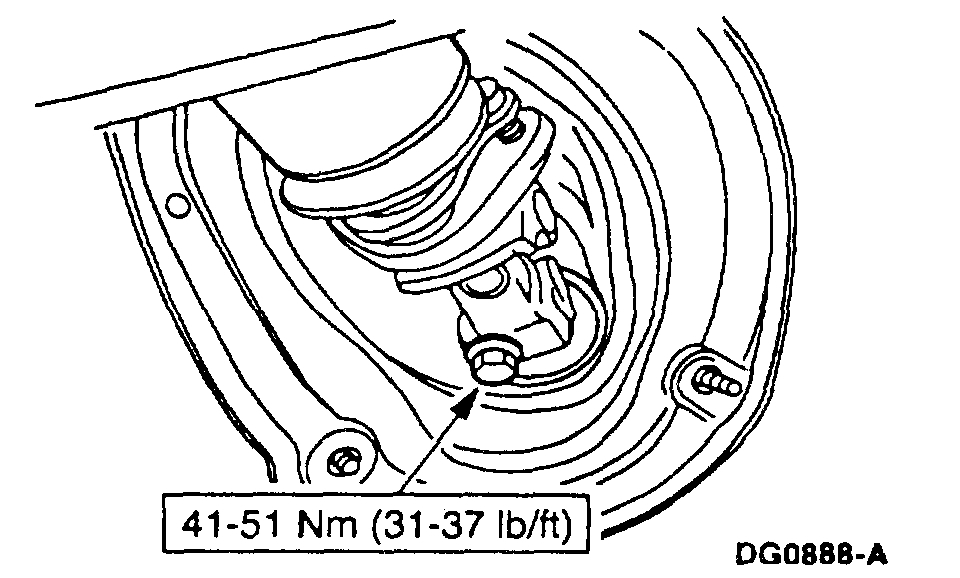
28. Install the pinch bolt in the intermediate shaft to gear coupling.
29. Install the pinch bolt in the intermediate shaft to column coupling.
30. Install the steering column reinforcement panel.
31. Install the steering column lower trim panel.
32. Install the instrument panel lower trim cover.
33. Fill and leak check the system.
34. Check and, if necessary, adjust the wheel alignment.

_________________

Let me know if this is what you needed.

Take care,
Joe
Was this
answer
helpful?
Yes
No
-1
Sunday, June 23rd, 2019 AT 12:05 AM
Tiny
JDUNCAN
  • MEMBER
  • 2 POSTS
  • 1998 LINCOLN CONTINENTAL
Steering problem
1998 Lincoln Continental Automatic 110238 miles

I just took my car in because the power steering fluid was leaking and they diagnosed it as a problem with the rack and pinion system rather than a leaky hose. So they replaced the rack and pinion.

As I started to drive it away from the shop I noticed that the "groaning" noise that indicates low power steering fluid was present. So I stopped and asked the mechanic why it was groaning. He told me there are sometimes air pockets in a new rack and pinion and to drive the car around for a while to get the air pockets out and then the noises should stop.

But I'm hearing other noises now too. Sort of a rhythmic whirring that increases as I accelerate. What's going on? Are these noises normal "settling-in" type noises after a repair of this type? Or should I be worried?
Was this
answer
helpful?
Yes
No
Tuesday, November 12th, 2019 AT 2:42 PM (Merged)
Tiny
CARADIODOC
  • MECHANIC
  • 33,727 POSTS
He's exactly right. Fords can be unusually hard to burp the air out. Also, if you find the fluid looks pink or foamy, that also indicates air, but not in big pockets. It is in tiny bubbles that will not float out until the engine has been stopped for a long period of time. It can take days for those bubbles to work their way out.

Another common problem that only seems to affect Fords is for the fluid to plop a big puddle on the ground when you stop the engine. This is from a trapped air pocket expanding rapidly when the pressure in the system is removed.

The best you can do is drive for a few days. Most people don't notice when the noise goes away. If it hasn't in a week or two, then return to the shop for an inspection.

Caradiodoc
Was this
answer
helpful?
Yes
No
Tuesday, November 12th, 2019 AT 2:42 PM (Merged)
Tiny
JDUNCAN
  • MEMBER
  • 2 POSTS
Thanks for the advice. Are you saying that a Lincoln and Ford are the same basic vehicle? (I know that some car companies own several different "brands") just wanna make sure I understand why you replied to my question about a Lincoln with information about a Ford.
Was this
answer
helpful?
Yes
No
Tuesday, November 12th, 2019 AT 2:42 PM (Merged)
Tiny
CARADIODOC
  • MECHANIC
  • 33,727 POSTS
Yup. You start with a Ford. If you add fancy interior trim and turn some optional eqipment such as cruise control and air conditioning into standard equipment, you have a Mercury. When you add the toys and conveniences a lot of people demand, you have a Lincoln.

Plymouth used to be the "working man's car". It was basic reliable transportation, but you could dress it up with options. It was less expensive to buy the same car with the same conveniences included. That was the Dodge. To really add class with fancy seats and a super radio, etc, you had a Chrysler. My garage is full of all three of them. When you look underneath or work on the brakes, steering, and suspension, they are all the same and they all use the same replacement parts. Makes it real nice for stocking parts.

With GM, Chevrolet was the basic car, but as you went up to a higher class car, they rarely kept anything the same. Buick parts don't fit an Oldsmobile, and Cadillac is in a world by themselves. GM cars take lots of special tools and are geared specifically to get off the assembly line in a hurry. Chrysler used to be designed with ease of serviceability in mind. I even have a 1980 Volare that has a lot of engine parts in common with a 1960 model. Real easy to find parts for those cars. Older Fords used the same oil filter as Chrysler products from 1960 up through the late 1980s. Shops loved that too because it was real easy to have in stock right now what you needed. Today every manufacturer has their own designs that often change from one year to the next. It is impossible for any shop to stock every part you might need in an emergency. This parts issue is just one of many reasons I own OLD Chryslers and am bound and determined to never buy another new car. My daily driver is my fifth oldest vehicle, a 1988 Grand Caravan, and is the only one I trusted to take on four cross-country trips in the last year and a half. Being a former instructor and a former dealership mechanic, what does that tell you about my opinion of new cars?

That Grand Caravan has been so terribly reliable. It has 378,000 miles, and will only die eventually due to rust. I would never trade it even up for a new one. For any new car for that matter. I realize most people don't have the luxury of being able to work on their own cars, and they don't have the time. What frustrates me is how they are held hostage to huge repair bills due to the way manufacturers design today's cars. There is no excuse for hanging a very unreliable, expensive, high-failure computer onto a simple windshield wiper circuit or the dome light circuit. Yet people demand these things and buy one car over another because the lights fade out slowly instead of just turning off when the doors are closed. Your horn is another perfect example. On my cars, if the horn stops working, it's usually a ten-dollar relay. On your vehicle, the horn switch sends a voltage to the most intelligent computer on the car, the instrument cluster. There it is interpreted and a coded signal is sent to the FEM, the Front Electronic Module, which interprets it and turns on the horn relay. Two computers involved in honking the horn! Non-working horns are real common now. With diagnosis and parts, the repair to this formerly simple and reliable circuit typically runs over $800.00. I fail to see how that benefits the owner.

Sorry for getting up on my soapbox. I hope I answered your original question even though I included WAY too much detail. If you have more questions, I'll be back in a few hours.

Caradiodoc
Was this
answer
helpful?
Yes
No
Tuesday, November 12th, 2019 AT 2:42 PM (Merged)
Tiny
FIXYA
  • MEMBER
  • 2 POSTS
  • 1998 LINCOLN CONTINENTAL
  • V8
  • FWD
  • AUTOMATIC
  • 138,000 MILES
Do I need to pull out the transmission or pull the motor or fire wall to change out rack and pinion steering
Was this
answer
helpful?
Yes
No
Tuesday, November 12th, 2019 AT 2:42 PM (Merged)
Tiny
MERLIN2021
  • MECHANIC
  • 17,250 POSTS
By the book, not a typical backyard repair!
STEERING GEAR

1. Disconnect negative battery cable. Remove instrument panel lower trim cover. Remove
steering column lower trim panel. Remove steering column reinforcement panel. Remove
steering shaft universal joint pinch bolt.
2. Remove intermediate shaft-to-steering gear coupling bolt. Slide shaft upward to remove from
steering gear. Slide intermediate shaft downward to remove from steering column. Remove
column weather seal. Loosen retaining screw and disconnect engine compartment wiring
harness.
3. Remove upper motor mount bolt and position mount out of way. Remove ground strap
retaining screw. Raise and support vehicle. Remove front tires. Remove tie rod end cotter pins
and castle nuts. Separate tie rod ends from steering knuckles. Loosen tie rod end lock nuts.
Mark tie rod end lock nut position for installation reference.
4. Disconnect front suspension height sensors. Disconnect oxygen sensor. Remove front and rear
catalytic converter inlet pipe nuts. Remove converter outlet flange retaining bolts and nuts.
Remove converter support bracket retaining bolt and remove catalytic converter. Remove
bolts, nuts and subframe insulator braces. Remove 2 steering gear mounting nuts.
5. Support sub frame using Rotunda Powertrain Lift (014-00765) and Universal Powertrain
Removal Bracket (014-00766). Remove rear subframe retaining bolts. Loosen front subframe
retaining bolts. Lower support lift. Remove heat shield bracket. Disconnect steering gear
connectors.
6. Rotate steering gear to clear bolts in subframe. Pull steering gear left to allow hydraulic line
removal. Position drain pan under vehicle.
7. Remove hydraulic lines from steering gear. Carefully remove steering gear through left wheel
opening.
Installation

1. Install NEW teflon "O" rings on hydraulic line fittings. Position steering gear retaining bolts in
steering gear. Insert steering gear through left wheel opening.
2. Install hydraulic lines to steering gear. Connect VAPS electrical connector. Position steering
gear in subframe. Install tie rod end lock nuts and tie rod ends.
3. Install retaining band on heat shield. Attach tie rod ends on steering knuckles. Install and
tighten NEW castle nut to align cotter pin slot. Install NEW cotter pins.
4. Raise jackstands until subframe contacts body. Install subframe bolts. Install and tighten
steering gear-to-subframe retaining nuts to specification. See TORQUE SPECIFICATIONS
table.
CAUTION: DO NOT rotate steering wheel when lower column shaft is
disconnected. Damage to air bag sliding contact will result.
CAUTION: There is a check valve located under hollow bolt attaching VAPS
pressure block to steering gear. Install valve, dome side up, or
system operation will be affected.
5. Install catalytic converter. Attach height sensors. Install wheels. Remove jackstands and lower
vehicle. Fill and bleed power steering system.
6. Install secondary steering column boot on steering gear from inside passenger compartment.
Install primary steering column boot.
7. Attach intermediate steering column shaft. Align front end as necessary. See appropriate
SPECIFICATIONS & PROCEDURES article in WHEEL ALIGNMENT.
Was this
answer
helpful?
Yes
No
Tuesday, November 12th, 2019 AT 2:42 PM (Merged)
Tiny
MSSHOALS
  • MEMBER
  • 3 POSTS
  • 1998 LINCOLN CONTINENTAL
Is it possible to replace the seal in my car
Was this
answer
helpful?
Yes
No
Tuesday, November 12th, 2019 AT 2:43 PM (Merged)
Tiny
HMAC300
  • MECHANIC
  • 48,601 POSTS
If it's the ack and pinion normally auto parts willsell the whole unit rebuilt. But you can replace seals as well
Was this
answer
helpful?
Yes
No
Tuesday, November 12th, 2019 AT 2:43 PM (Merged)
Tiny
FIXYA
  • MEMBER
  • 2 POSTS
  • 1998 LINCOLN CONTINENTAL
  • V8
  • FWD
  • AUTOMATIC
  • 138,000 MILES
How do I change a rack and pinion steering on a 1998 lincoln continental
Was this
answer
helpful?
Yes
No
Tuesday, November 12th, 2019 AT 2:43 PM (Merged)
Tiny
KHLOW2008
  • MECHANIC
  • 41,815 POSTS
Here are the procedures.

STEERING GEAR
1. Disconnect negative battery cable. Remove instrument panel lower trim cover. Remove steering column lower trim panel. Remove steering column reinforcement panel. Remove steering shaft universal joint pinch bolt.

CAUTION: DO NOT rotate steering wheel when lower column shaft is disconnected. Damage to air bag sliding contact will result.

2. Remove intermediate shaft-to-steering gear coupling bolt. Slide shaft upward to remove from steering gear. Slide intermediate shaft downward to remove from steering column. Remove column weather seal. Loosen retaining screw and disconnect engine compartment wiring harness.

3. Remove upper motor mount bolt and position mount out of way. Remove ground strap retaining screw. Raise and support vehicle. Remove front tires. Remove tie rod end cotter pins and castle nuts. Separate tie rod ends from steering knuckles. Loosen tie rod end lock nuts. Mark tie rod end lock nut position for installation reference.

4. Disconnect front suspension height sensors. Disconnect oxygen sensor. Remove front and rear catalytic converter inlet pipe nuts. Remove converter outlet flange retaining bolts and nuts. Remove converter support bracket retaining bolt and remove catalytic converter. Remove bolts, nuts and subframe insulator braces. Remove 2 steering gear mounting nuts.

5. Support sub frame using Rotunda Powertrain Lift (014-00765) and Universal Powertrain Removal Bracket (014-00766). Remove rear subframe retaining bolts. Loosen front subframe retaining bolts. Lower support lift. Remove heat shield bracket. Disconnect steering gear connectors.

6. Rotate steering gear to clear bolts in subframe. Pull steering gear left to allow hydraulic line removal. Position drain pan under vehicle.

7. Remove hydraulic lines from steering gear. Carefully remove steering gear through left wheel opening.

7.
Installation

CAUTION:There is a check valve located under hollow bolt attaching VAPS pressure block to steering gear. Install valve, dome side up, or
system operation will be affected.

1. Install NEW teflon "O" rings on hydraulic line fittings. Position steering gear retaining bolts in steering gear. Insert steering gear through left wheel opening.

2. Install hydraulic lines to steering gear. Connect VAPS electrical connector. Position steering gear in subframe. Install tie rod end lock nuts and tie rod ends.

3. Install retaining band on heat shield. Attach tie rod ends on steering knuckles. Install and tighten NEW castle nut to align cotter pin slot. Install NEW cotter pins.

4. Raise jackstands until subframe contacts body. Install subframe bolts. Install and tighten steering gear-to-subframe retaining nuts to specification.

5. Install catalytic converter. Attach height sensors. Install wheels. Remove jackstands and lower vehicle. Fill and bleed power steering system.

6. Install secondary steering column boot on steering gear from inside passenger compartment. Install primary steering column boot.

7. Attach intermediate steering column shaft. Align front end as necessary.
Was this
answer
helpful?
Yes
No
+1
Tuesday, November 12th, 2019 AT 2:43 PM (Merged)
Tiny
CMW2287
  • MEMBER
  • 1 POST
  • 1998 LINCOLN CONTINENTAL
  • V8
  • 2WD
  • AUTOMATIC
  • 152,000 MILES
How much should the labor be to replace a rack and pinion, tire rod ends and get a front end alignment all together or separately on a 1998 lincoln continental?
Was this
answer
helpful?
Yes
No
Tuesday, November 12th, 2019 AT 2:43 PM (Merged)
Tiny
FACTORYJACK
  • MECHANIC
  • 4,159 POSTS
Part OEM Part Price
Steering Gear
6 - Steering Gear Assembly F8OZ3504BCRM $228.96 Notes
Rack Gear Only
Notes
Serviced In Gear Assembly

Steering Gear
Replace
Complete Assembly With Transfer Of Parts 4.0

Tie rod ends should be included in transfer of parts.

Labor Times

Alignment
Align
Front Toe-In, Adjust 0.4
Front 1.2
Rear 0.8
Four Wheel 1.9

Figure a shop labor rate to be around $100 per flat rate hour, on average.
Was this
answer
helpful?
Yes
No
Tuesday, November 12th, 2019 AT 2:43 PM (Merged)
Tiny
BJNESS
  • MEMBER
  • 1 POST
  • 1998 LINCOLN CONTINENTAL
  • 5.7L
  • V8
  • FWD
  • AUTOMATIC
  • 157,000 MILES
Chilton describes how to remove the nuts from the gear to subframe. I have removed the left one but the right nut has the exhaust right under. Just wondering how to remove this nut?
Was this
answer
helpful?
Yes
No
Sunday, September 27th, 2020 AT 1:16 PM (Merged)
Tiny
HMAC300
  • MECHANIC
  • 48,601 POSTS
This is a big job make sure to follow all instructions or steering will be affected. Check out the diagrams (Below). Please let us know if you need anything else to get the problem fixed.
Was this
answer
helpful?
Yes
No
Sunday, September 27th, 2020 AT 1:16 PM (Merged)
Tiny
AMORGAN780
  • MEMBER
  • 2 POSTS
  • 1996 LINCOLN CONTINENTAL
  • 5.0L
  • V8
  • FWD
  • AUTOMATIC
  • 108,000 MILES
I installed a new power steering rack on a 1996 lincoln continental. I am in the process of bleeding the system and in a situation were the steering wheel jerks violently from end to end. So I am not sure is there a step I missed? Im looking into the evo sensor for ideas but not sure were to begin. Its been a difficult assembly since its a v8 front wheel drive set up there isnt much room to work with. It took a few days just to figure out a removal plan. Any ideas on what is wrong and pointers would be a awesome thx in advance.
Was this
answer
helpful?
Yes
No
Sunday, September 27th, 2020 AT 1:16 PM (Merged)
Tiny
WRENCHTECH
  • MECHANIC
  • 20,757 POSTS
Sounds like you may have the hoses backwards.
Was this
answer
helpful?
Yes
No
Sunday, September 27th, 2020 AT 1:16 PM (Merged)
Tiny
AMORGAN780
  • MEMBER
  • 2 POSTS
I just wanted to thank you for your assistance. You were correct. I passed the information to my mechanic.

Thank you Again

Adam
Was this
answer
helpful?
Yes
No
Sunday, September 27th, 2020 AT 1:16 PM (Merged)
Tiny
WRENCHTECH
  • MECHANIC
  • 20,757 POSTS
Glad to hear you got it resolved.
Was this
answer
helpful?
Yes
No
Sunday, September 27th, 2020 AT 1:16 PM (Merged)

Please login or register to post a reply.

Sponsored links