Welcome to 2CarPros.
It could be a bad motor or connection. Now, there are only two wires that go to the motor. Based on the position you select (up or down) power is supplied in one wire, and a ground is supplied in the opposite. By reversing polarity of the power supply determines if the motor goes one direction or the other.
The two wires that go to the motor are tied together with both switches. So, your theory is a good one, but to confirm it is the motor, you need to check if power is available to the motor when it fails.
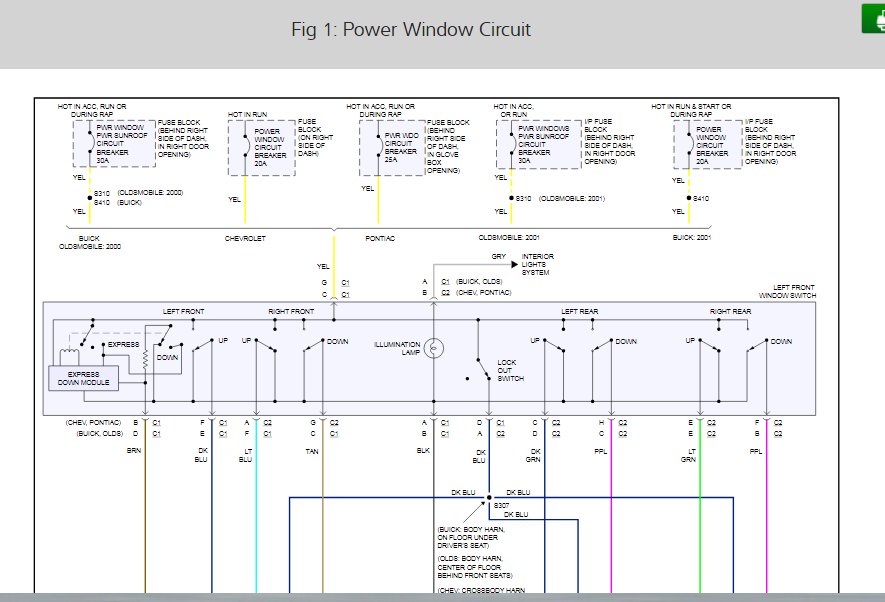
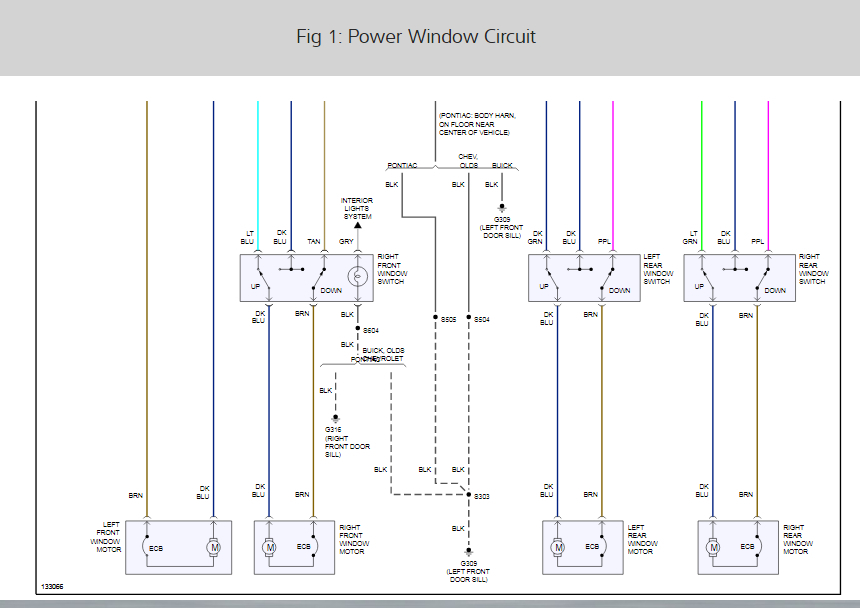
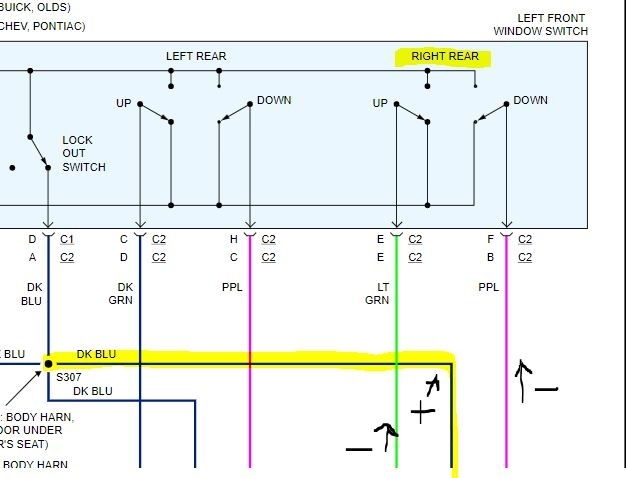
The first two pics I attached show the wiring to the switches and to the motor. I identified the power wire with a + and the ground with a -. The power is supplied via a dark blue wire and then based on the direction you are selecting at the switch, flows into either light green or purple wire from the driver's side door and is sent to the back switch which allows power to flow through the direction you selected into the dark blue or brown wire which then goes to the motor. What might be hard to understand is either of those wires can be a power supply or a ground based on switching.
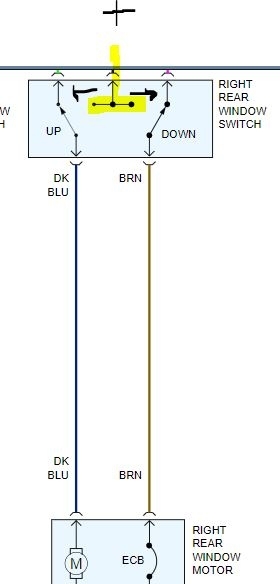
When the window fails to operate, remove the door panel, unplug the connector at the motor, and check for power. The brown wire should have power when selecting the down function and the dark blue should have power when selecting the up function.
If you have power and the window won't move, then replace the motor. If there is no power, then you need to work backwards to find where power is lost. Most likely, at one of the switches.
Here are a few link to help with checking for power:
https://www.2carpros.com/articles/how-to-use-a-test-light-circuit-tester
https://www.2carpros.com/articles/how-to-check-wiring
+++++++++++++++++++++++++++++++++++++++++++++++
Here are the directions for removal and replacement of the door panel:
REAR SIDE DOOR TRIM PANEL REPLACEMENT
Rear Side Door Trim Panel Replacement
Tools Required
J 38778 Door Trim Pad Clip Remover
Removal Procedure
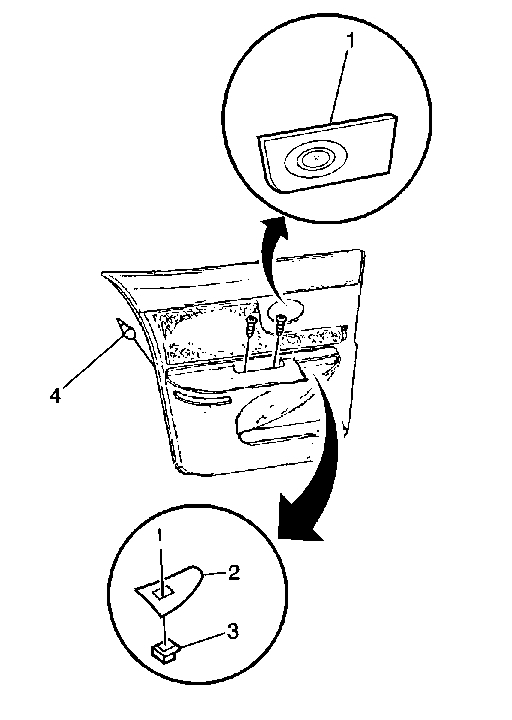
1. Remove the power window switch (3).
2. Remove the arm rest pull cup cover (1).
pic 3
3. Remove the armrest pull cup screws.
4. Starting at the door bottom, use the J 38778 to release the door trim panel retainers.
5. Lift the trim panel up to release the top edge and remove it from the door.
Installation Procedure
pic 3 again
Important: Before installing the door trim panel to the door, discard the old trim panel retainers. Use new trim panel retainers in order to properly secure the trim panel to the door .
1. Install the new trim panel retainers to the trim panel.
2. Position the top of the trim panel at the window opening and press down.
3. Align the fasteners into the holes in the door metal.
4. Firmly press the door panel to seat the fasteners.
Notice: Refer to Fastener Notice in Cautions and Notices.
5. Install the armrest pull cup screws.
Tighten the armrest pull cup screws to 2 N.m (18 lb in).
6. Install the armrest pull cup cover (1).
7. Install the power window switch (3).
+++++++++++++++++++++++++++++++++++++++++++++
Here are the directions for replacing the motor.
Rear Side Door Window Regulator Motor Replacement
Removal Procedure
1. Remove the rear door water deflector. Refer to Rear Side Door Water Deflector Replacement (See: Rear Door Panel > Removal and Replacement) .
pic 4
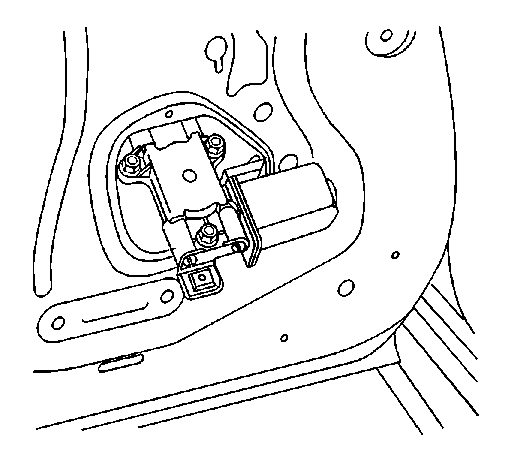
Important: The window regulator screws are seated into key slots in the inner door panel and is unnessessary to remove thescrews completely from the window regulator.
2. Loosen the 3 rear door window regulator screws.
3. Position the rear door window regulator motor through the access opening in the inner door to gain access to the electrical connector and the rear window regulator motor screws.
4. Disconnect the rear door window regulator motor electrical connector.
5. Remove the rear door window regulator motor screws.
6. Remove the rear door window regulator motor and bracket from the rear window regulator.
Installation Procedure
pic 5
1. Position the rear door window regulator motor and bracket to the rear door window regulator.
Notice: Refer to Fastener Notice in Cautions and Notices.
2. Install the rear door window regulator motor screws.
Tighten the screws to 6 N.m (53 lb in).
3. Connect the rear door window regulator motor electrical connector.
4. Position the rear door window regulator motor inside the rear door and install it into the key slots in the inner door panel.
5. Hand tighten the rear door window regulator screws.
Tighten the screws to 10 N.m (89 lb in).
6. Install the rear door water deflector. Refer to Rear Side Door Water Deflector Replacement (See: Rear Door Panel > Removal and Replacement) .
________________________________
Let me know if this helps or if you have other questions. Please keep in mind, this could be something as simple as a loose or corroded connection, so make sure to check all connections.
Take care,
Joe
Images (Click to enlarge)
Jul 17, 2019 at 8:28 PM