Possible battery cable/electrical issue?

Tiny
RAZED_UP
  • MEMBER
  • 2008 HONDA ODYSSEY
  • 3.5L
  • 6 CYL
  • 2WD
  • AUTOMATIC
  • 192,000 MILES
We have owned our van for 2 months with no problems. Two weeks ago, it wouldn't start, just clicked. I tried to jump it with cables and then a jump pack. Figured the battery was dead (it was from 2017) so I bought a new one. Van started right up and ran fine the rest of the day, with multiple times starting it.
The next morning it just clicked again. Tried jumping it and wouldn't start. Took the cables off, took the battery back to Walmart and they said it was fully charged and had no problems. Put the battery back in and it started. Turned it off and it wouldn't restart. Took only the positive cable off and put it back on. Started. Ran great for a week, then just clicked again.
Took the positive cable off and put it back on. Didn't start. Loosened the positive cable's bolt 1 1/2 turns (didn't move the cable at all) and it started right up. I haven't messed with it for 3 days and it's been fine.
I also wanted to note that twice I noticed a pop and a spark with some smoke from the positive battery cable when it would just click. Once from the little bit of bare cable right in front of the cable clamp and once from in the crack where the post and cable connect.
I think that's all, thanks for your help!
Sunday, September 4th, 2022 AT 1:42 PM

4 Replies

Tiny
RAZED_UP
  • MEMBER
  • 3 POSTS
I forgot to add that the battery, alternator, and starter were all checked as well.
Was this
answer
helpful?
Yes
No
Sunday, September 4th, 2022 AT 1:49 PM
Tiny
CARADIODOC
  • MECHANIC
  • 33,760 POSTS
You've already diagnosed the cause. You just don't know it yet. Thank you for posting the dandy photos. There's where I see the first problem. The cable clamps are universal replacements, but they were never intended to make permanent repairs. Those are only meant as a temporary fix to get you back on the road for now. The proper repair is to replace the cables. When it became necessary to cut the original clamps off to replace them, it was because the copper wire strands had corroded off. That corrosion extends well down the cable under the insulation where you can't see it.

The next concern has to do with the sparking and smoking. We don't always get such helpful clues. The story here refers to "voltage drops". Basically, you start with 12 volts from the battery, and when a circuit is turned on, all of that 12 volts gets used up at various places.

I should make a side note and explain the battery's voltage gets drawn down when it delivers a very high current such as in a starter circuit. Under normal conditions it will get drawn down to as low as 10 volts, but we're not dealing with normal conditions here. For this story, 12 volts is normal and what we expect to start with. Under ideal conditions, all of that 12 volts will be "dropped" or used up, across the starter motor. In reality, there is resistance to the flow of electrical current, and that causes a small amount of voltage to be dropped across it when current is trying to flow. This is exactly the same as water flowing through a garden hose. If you start with 50 psi at the faucet, all of that gets used up by the time the water leaves the nozzle, but only when that nozzle is open and water is flowing. That's the normal condition. An abnormal condition would be when you place your foot on the hose. That adds undesirable resistance, and the flow of water slows down. We still use up all of the 50 psi, but now some of that pressure is dropped across your foot, so there's less left to shoot the water out of the nozzle. If you want more water to flow, you must remove your foot. If you want still more water to flow, you need a larger-diameter hose.

This is why in an electrical circuit, if we want to be able to get more current to flow, we need bigger diameter cables. Starter circuits use the biggest cables on the vehicle. That's to lower their resistance. What you have now is so much resistance in the entire circuit that enough current to run the starter motor can't flow. There's too much resistance, and we have to figure out where that is and remove it. This "Notes Page" is a copy of what I handed out in the classroom. It shows all the common places we're going to find excessive voltage drops. I'm going to skip over adding confusion with the starter motor itself because we already know it is okay. By far the most common cause of undesirable resistance is the mechanical connection where a cable clamp is attached to the battery's post. That's points 1 and 3 in my sad drawing. We have to add two more points not shown. Those are where the cables are clamped to the aftermarket clamps.

It sounds like you've seen the sparks on the positive cable clamp, so I'll limit this discussion to that point. With your garden hose, its small diameter is what limits how much water will flow through it. That means the hose has resistance to the flow of water, but that resistance is small enough to have little effect on its operation. Now imagine if you could place two water pressure gauges on the hose, about six inches apart. We know the further along the hose you go, the lower the pressure becomes, but it's going to be a very gradual decrease. Lets say in the middle of the hose you find 25.0 psi on the first gauge, and 24.9 psi on the second gauge. That's normal and acceptable. But, now if you place your foot on the hose between the two gauges and measure again, you might find 35 psi on the first gauge, and 15 psi on the second one. That's a pressure drop of 20 psi. That is unacceptable and will prevent the system from operating properly.

Those two gauges were almost in the same place along the hose, so normal would be to see the same pressure at each one. To say that a different way, the pressure difference should be nearly 0 psi. That brings us to your starter circuit. If you look at the lower left of my drawing, it shows the two leads of the voltmeter on the battery post and the cable clamp bolted to it. Those are also the same point in the circuit. The voltage should be the same at both places. With the garden hose we took two pressure readings, then calculated the difference. We could do that in the starter circuit too, but it's way easier to take just one reading of that voltage drop as it occurs. Also, as water needs to be flowing in the hose, current needs to be flowing in the starter circuit. That means you'll need a helper to run the ignition switch while you run the voltmeter.

If you've never used a voltmeter before, look at this article first:

https://www.2carpros.com/articles/how-to-use-a-voltmeter

They're using an "auto-ranging" meter in this article. That's an expensive feature you don't need. Harbor Freight Tools has a perfectly fine digital voltmeter for around $7.00. You can find them at Walmart and any hardware store too. If you need help setting it up, I can help with that too.

Place one probe on the battery post. Place the other probe on the clamp attached to that post. The meter will show 0.00 volts. Now have your helper turn the ignition switch to "crank". In a properly working circuit, you're going to find a reading of less than 0.2 volts while the starter is cranking the engine. That's due to current flowing through the tiny amount of resistance that can't be avoided between the post and clamp.

The goal now is to catch it while the problem is occurring. Do the same test and see what the voltage is when you get the failure to crank. If it's 0.00 volts or real low, move on to the next mechanical connection. On your vehicle, leave the probe on the clamp, and move the other one from the post to the copper wire strands next to the strap on the clamp. Here again, these are the same points in the circuit, so you should find 0.00 volts. If the actual voltage is high when your helper tries to crank the engine, that is the connection that has the excessive resistance.

At a minimum, where you find the high voltage, that mechanical connection must be taken apart and each part cleaned and shined up, then reassembled. It sounds like you may have more than one intermittent connection, so don't be surprised if the problem occurs again after the first repair. Simply repeat the test procedure on all the other connections until you find the next one with high resistance.

Also be aware digital voltmeters don't care about polarity, meaning which probe goes where. As I had you move the one probe, one of your readings would likely come up with a minus sign for the voltage. You can ignore that and just look at the value. If the negative reading bothers you, just switch the positions of the two probes. You'll get the same voltage reading but without the minus sign.

Also look at this article:

https://www.2carpros.com/articles/how-to-check-wiring

Let me know what you find or if I provided enough confusion that needs clearing up.
Was this
answer
helpful?
Yes
No
+1
Sunday, September 4th, 2022 AT 4:15 PM
Tiny
RAZED_UP
  • MEMBER
  • 3 POSTS
Thanks for your reply. Since you described it well in layman's terms, I think I have a grasp on what you're recommending. If it happens again, I'll try the method you recommend. In the meantime, if I just replace the whole cable assembly, theoretically, that should fix my problem. I have looked up the cable and I have narrowed down my brand choices to: OEM (which is as little higher than I would like to pay, but if it's worth it, I'll do it), Standard, SMP, and Napa Echlin. Any recommendations? Thanks again for your time and consideration.
Was this
answer
helpful?
Yes
No
Tuesday, September 6th, 2022 AT 8:39 AM
Tiny
CARADIODOC
  • MECHANIC
  • 33,760 POSTS
Standard and Echlin are well-known aftermarket name brands. I attended a seminar where a Standard representative explained their process of reverse engineering original parts to learn why they fail, and how to redesign them better and to address common issues.

I'm cheap, ... Ah, ... I mean "frugal", so I look for the least expensive as long as the quality is sufficient. Very often the aftermarket manufacturers address common problems with the original parts into their designs, so you could get a better part for less money. It is also not uncommon to find a manufacturer's original part has been reboxed, rebranded, and sold under a different name, also at a lower cost. Chrysler fuel pumps are a good example of that. Napa and Chrysler both buy their fuel pumps from Carter, so they're the same part with different brand names. Parts through the dealer will almost always cost more because they pass through more hands on their way to you, and at every stop, the cost goes up a little. Also, parts coming through the dealer usually also go through more rigorous testing. All of that adds to the cost. When the dealer sells you a cable, they likely had to order that one part. When Napa or Auto Zone buys their parts from their suppliers, they buy them in huge quantities to get the better prices, then distribute them to their stores.

Along these lines, improving a weak point in the design costs the aftermarket manufacturer very little, so it's in everyone's interest for them to do that. When the car manufacturer has to go through a redesign, the costs add up at every stage of the design and manufacturing process. As an example, in the mid '70s, a Ford engineer figured out grease fittings cost them about five cents each, and they could save 20 cents per car if they left four of them off on tie rod ends and ball joints. That could translate into two or three dollars on the final retail cost of the car. Once all the failures had developed a well-known history, it only cost that five cents per part for Moog and other aftermarket manufacturers to put grease fittings back on those parts. This is a perfect example of where the less-expensive aftermarket part was hugely superior to the originals, but cost less.

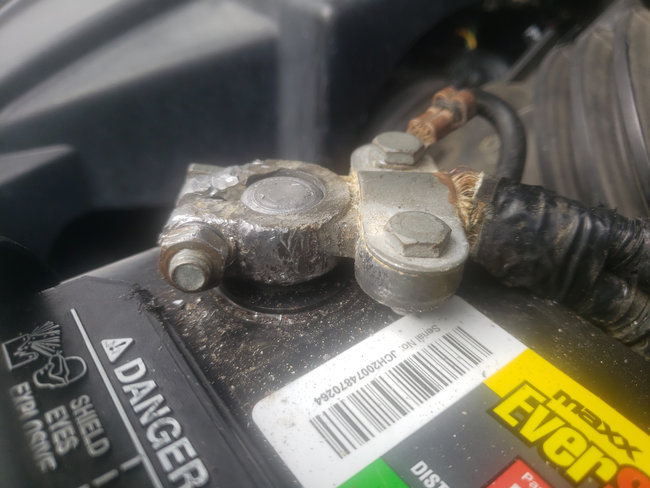
Sometimes you can find a better value with a used part from a salvage yard, but this is not usually true with battery cables. My experience has been those that I find are just as worn or deteriorated as the one I'm replacing. Other than a little vibration, the only "wear" battery cables see is the corrosion caused by two different metals, (lead and copper or aluminum), and an acid, (road salt and the condensed fumes venting from the battery). Two different metals and an acid produces "galvanic action", similar to what takes place in batteries, or in this case, corrosion. Now add to that, a used cable that has been sitting in the open with rain and snow falling on it, and that corrosion becomes even worse. This is one place where I would bite the bullet and buy a new cable.

Some of the replacement cables are less expensive because they are of a more universal design. In this case, you buy one of the correct length and the correct size clamp, (positive is larger in diameter), then the smaller second wire may have a universal crimp-type splice connector. You reuse part of that original smaller wire. These work fine with only a little extra work. If you want the exact bolt-on replacement, you'll pay more for those cables, and often they're a special-order item.

Keep in mind what you have now might only be half a cable, with half of the copper strands corroded off. That means even the cheapest replacement cable you can find will do a better job of what you have now. That brings me to my final comment of value. That's the new cable's diameter, or gauge. If you see "6 volt" cables available, you don't want those. They have to be twice the diameter to carry twice the current to deliver the same power. Bumping the electrical system up to 12 volts means we need half the current to do the same work, and that means a smaller-diameter cable is sufficient. The rule here is don't buy anything of a smaller diameter than the original cable, and it won't hurt to go up one size. Anything fatter than that is just spending more money unnecessarily. A better plan is to save the extra cost of a fatter cable and spend that money on a quality battery post cleaner. I've had some with a metal scraper blade that reshapes the posts and the holes in the cables, and I've had the round wire brushes that you rotate on the parts. Both work well. Be sure to shine up the posts and new cable clamps. Don't pound the clamps onto the posts as that can break the posts under the battery's cover, leading to early failure.

Now that I mentioned that, I should also point out that import vehicles seem to always come with the bare minimum cable diameter to do the job, and with stamped steel clamps that leave a lot of room for improvement. Consider going a little fatter with the new cables, and try to get them with lead clamps.

Speaking of battery failures, don't waste your money on battery terminal sprays or "juicy rings" that ward off corrosion. While at the dealership, I found that almost without exception, if there was no corrosion growing on the terminals, there was no need for terminal treatments, and if there was corrosion that looked like cauliflower, that battery was positively going to fail within six months, and no treatments were going to prevent that. As all batteries age, the lead gradually flakes off the plates and collects in the bottom of the case. Once that lead builds up high enough, that cell becomes shorted and the battery must be replaced. Before that happens, there is so much lead flaked off that the plates become electrically smaller and smaller. The charging system is designed for a certain size battery. Now that it's smaller, but with the same amount of current flowing through the plates, they tend to get hotter, both while recharging and while discharging to start the engine. That heat transfers into the acid which bubbles much harder than normal. Those bubbles float to the top where they pop right under the bottom of the top cover, leaving liquid acid there. That acid is what migrates out between the cover and the posts, leading to that excessive corrosion. Even if you clean off that corrosion, the original cause is still that the battery has lost too much of the lead pressed into the plates, and is going to fail soon.

Add to that, the lead flakes off faster in hot weather, but the failure doesn't show up until the weather turns cold. Engine oil becomes thicker in cold weather, so the engine is harder to turn. The result is the starter requires much higher current, and, ... The battery, being a chemical reaction that slows down in colder temperatures, is less able to deliver that current. All of these factors combine to cause most battery failures in winter.

When a starter motor is loaded down harder by cold, thick engine oil, and it draws higher current as a result, is a story for another day. That involves some basic electrical theory as it relates to generators and motors.
Was this
answer
helpful?
Yes
No
Tuesday, September 6th, 2022 AT 3:21 PM

Please login or register to post a reply.

Sponsored links