Hello
Do you have engine size 3.0L or 3.3L or 3.3L CNG?
You sound frustrated. . ...I would be too. So, take a brake. Have a coke, relax. Believe me, it will come off and not just with plastic explosives.
I may need more specifics to your question, but I figured I would shoot you what I have on the dash removal and see if this helps. If not, then get back with me and let me know more of what the problem is. Is it hanging up on one side etc.
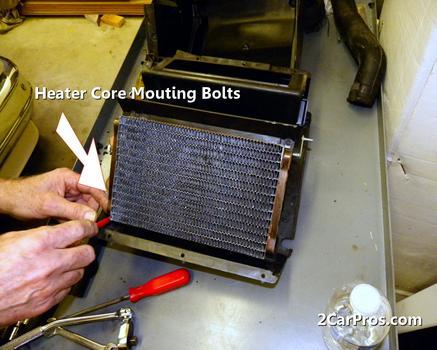
Hang in there. Heater core - wow, that's a job. . ...you are doing good.
Chock wheels. As steering column is to be removed, transmission may be out of Park position.
Remove top cover by prying either end with a flat blade tool and continuing across full length.
Pull up and remove cluster bezel grille with a 1/16 inch wire hook.
Remove six mounting screws from hood and message center assembly. Using a pry tool on either end, remove module and disconnect wire connector.
Disconnect center bezel attaching clips, starting in lower right corner, and remove bezel.
Remove three lower and three upper cluster bezel screws, then pull up and rearward on top edge of bezel to remove.
Disconnect POD switch connectors.

Remove lower steering column cover, premium console and center trim bezel.
Remove ash tray lamp and socket, then A/C heater control. Disconnect cigar lighter.
Remove seven attaching screws and right lower panel.
Remove lower left instrument panel silencer, then set parking brake and shift gear selector to Low position.
Remove lower left reinforcement, then disconnect PRNDL at column as follows:
Disconnect PRNDL cable eyelet from column actuating arm.
Release column insert lock tab.
Squeeze legs together and lift insert from steering column. Leave insert free.
Place cable on instrument panel to avoid damage during removal.
Remove steering column as described in "Steering Columns."
Remove lower right instrument panel silencer, then the forward console and instrument panel speaker grilles.
Remove floor braces, A-pillar intermediate and sill scuff garnish moldings.
Disconnect hood release mechanism from side cowl.
Remove parking brake handle bracket, then disconnect brake light switch, parking brake switch and bulk head wiring connectors.
Disconnect ABS connector and resistor block in engine compartment.
Remove grommet at instrument panel and feed wiring back into passenger compartment.
Remove two nuts securing instrument panel at left cowl side ramp bracket.
Remove six screws securing instrument panel at fence line, then loosen roll up bolts.
Lift upward on instrument panel to clear roll up ramp. Roll instrument panel back and hang from short position of roll up hook.
With instrument panel hanging in short position, disconnect left side body wiring connectors.
Roll instrument panel to long position on roll up hook and proceed as follows:
Disconnect antenna cable.
Disconnect blower motor lead connection.
Disconnect temperature control cable from A/C or heater unit.
Disconnect vacuum lines from climate control assembly.
Disconnect right side body wiring connectors.
Carefully remove instrument panel from vehicle.
Reverse procedure to install, noting the following:
Do not kink or bind PRNDL guide tube and position tube in original location.
Adjust PRNDL pointer if necessary
Saturday, November 1st, 2008 AT 12:11 AM