Welcome to 2CarPros.
Since you have noticed there is no pressure, then you must simply have a leak. Here is the definition of the code:
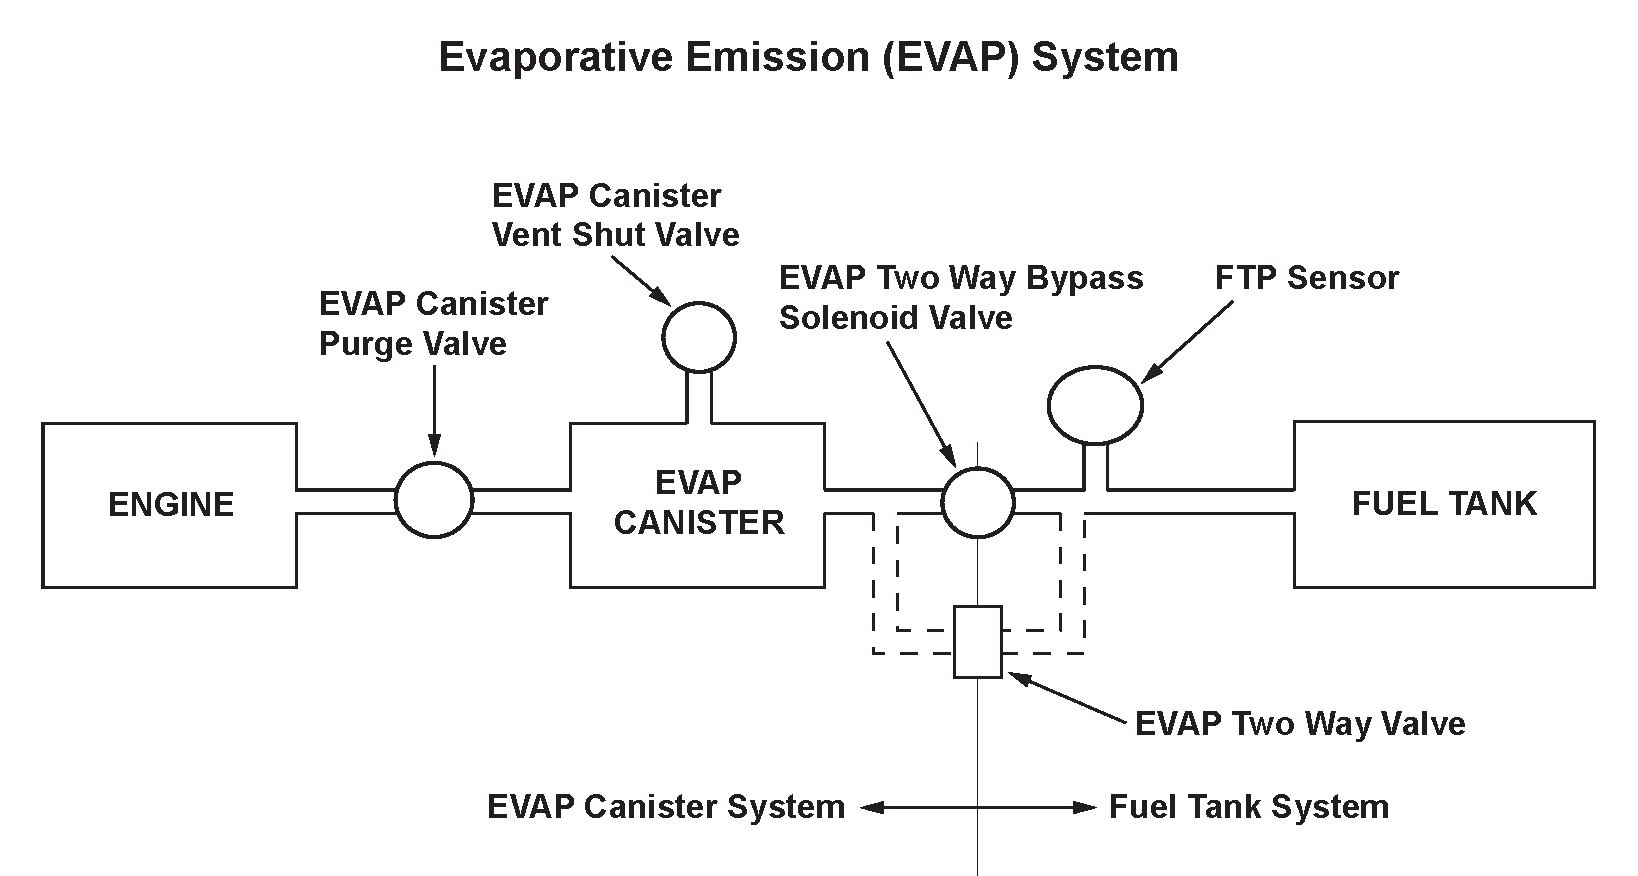
DTC P1457: Evaporative Emission (EVAP) Control System Leakage (EVAP Canister System)
Because there are several areas which can leak, what I suggest is to have the system fogged. Basically, fog or smoke is injected into the EVAP system at a very low pressure. Where the leak is located, smoke will come out.
As far as the FTPS, I don't think that is the issue here. However, if you want to try diagnosing the issue (and based on what you have already done you seem more than capable) here are the directions. The attached pictures correlate with the directions.
_____________________________
1998 Honda Accord DX Sedan L4-2254cc 2.3L SOHC MFI
DTC Troubleshooting
Vehicle ALL Diagnostic Trouble Codes ( DTC ) Testing and Inspection P Code Charts P1457 DTC Troubleshooting
DTC TROUBLESHOOTING
DTC P1457: Leak Detected in EVAP Control System (EVAP control canister system)
NOTE: The fuel system is designed to allow specified maximum vacuum and pressure conditions. Do not deviate from the vacuum and pressure tests as indicated in these procedures. Excessive pressure/vacuum would damage the EVAP components or cause eventual fuel tank failure.
Special Tools Required
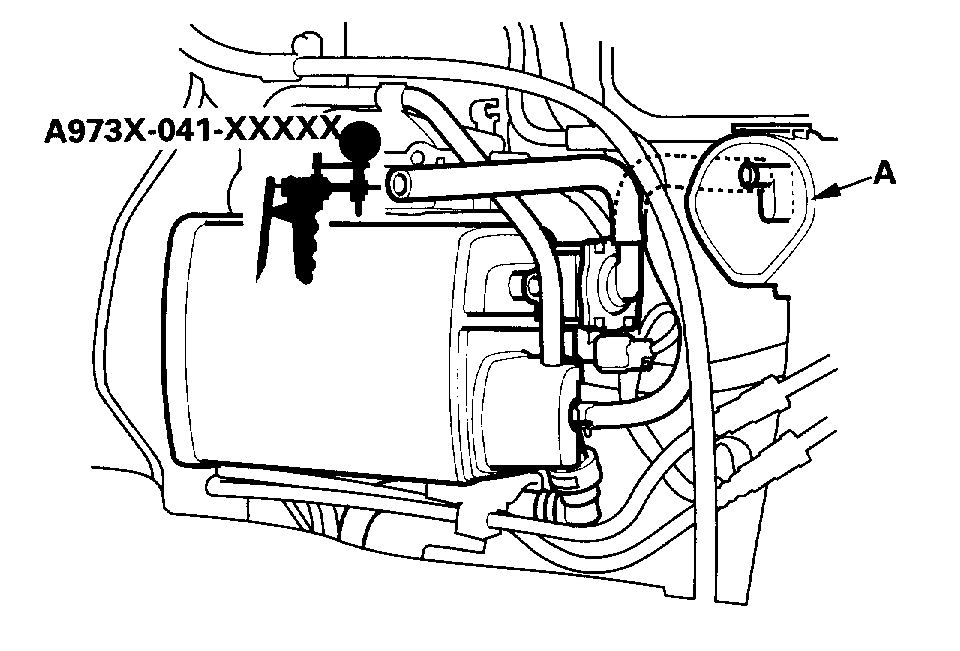
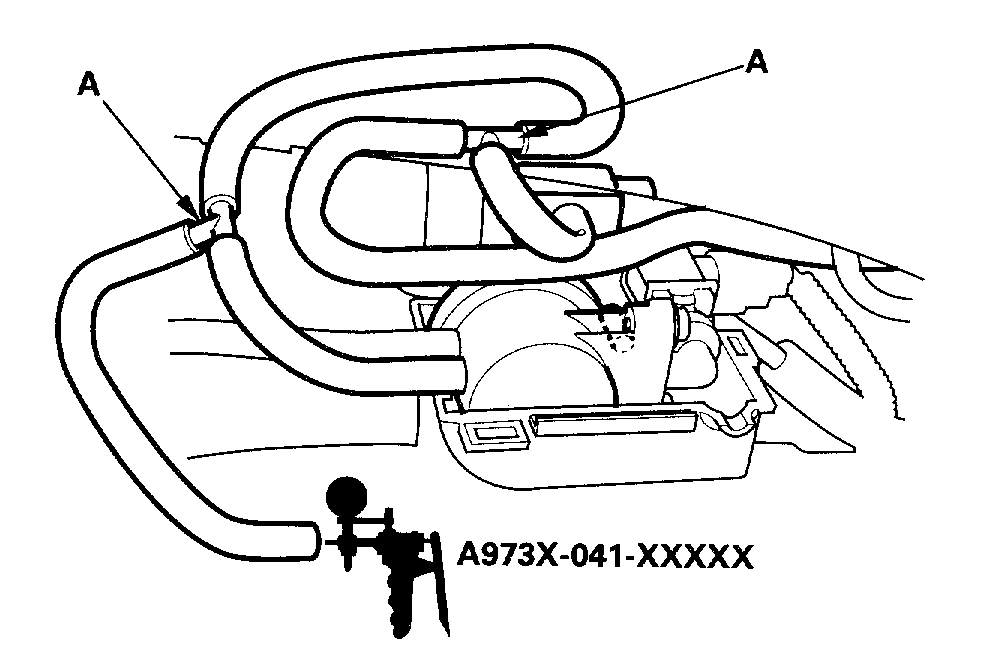
- Vacuum pump/gauge, 0 - 30 in.Hg A973X-041-XXXXX
- Vacuum/pressure gauge, 0 - 4 in.Hg 07JAZ-001000B
Please note that these are two-trip codes, once cleared, they cannot be reproduced in one trip. Also certain specific driving and ambient conditions must occur before the ECM/PCM will complete the system checks. Additional test drives may still not meet the specific conditions needed to reproduce the codes.
Therefore, follow these troubleshooting procedures carefully to ensure the integrity of the system and to confirm the cause of the problem or code.
NOTE: Fresh fuel has a higher volatility that will create greater pressure/vacuum. The optimum condition for testing is fresh fuel, and must be less than a full tank of gas. If possible, to assist in leak detection, add one gallon of fresh fuel to the tank (as long as it will not fill the tank), just before starting these procedures.
EVAP Purge Control Solenoid Valve Test
pic 1
1. Disconnect the vacuum hose from the EVAP purge control solenoid valve (A), and connect the vacuum pump to the hose.
pic 2
2. Connect the ECM/PCM connector terminal A6 to body ground with a jumper wire.
3. Turn the ignition switch ON (II).
4. Apply vacuum to the hose.
Does the valve hold vacuum?
YES-Go to step 5.
NO-The EVAP purge control solenoid valve is OK. Go to step 10.
5. Turn the ignition switch OFF.
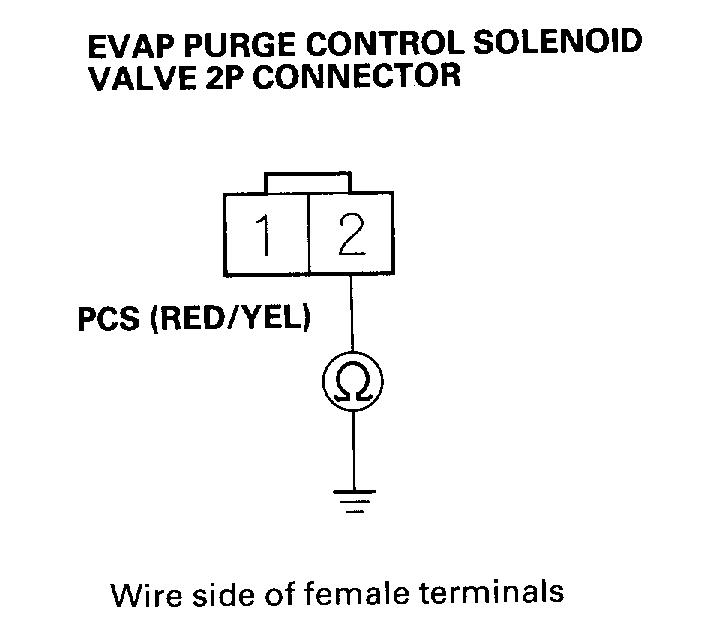
6. Disconnect the EVAP purge control solenoid valve 2P connector.
pic 3
7. Check for continuity between the EVAP purge control solenoid valve 2P connector terminal No.2 and body ground.
Is there continuity?
YES-Go to step 8.
NO-Repair open in the wire between the EVAP purge control solenoid valve and ECM/PCM (A6).
8. Turn the ignition switch ON (II).
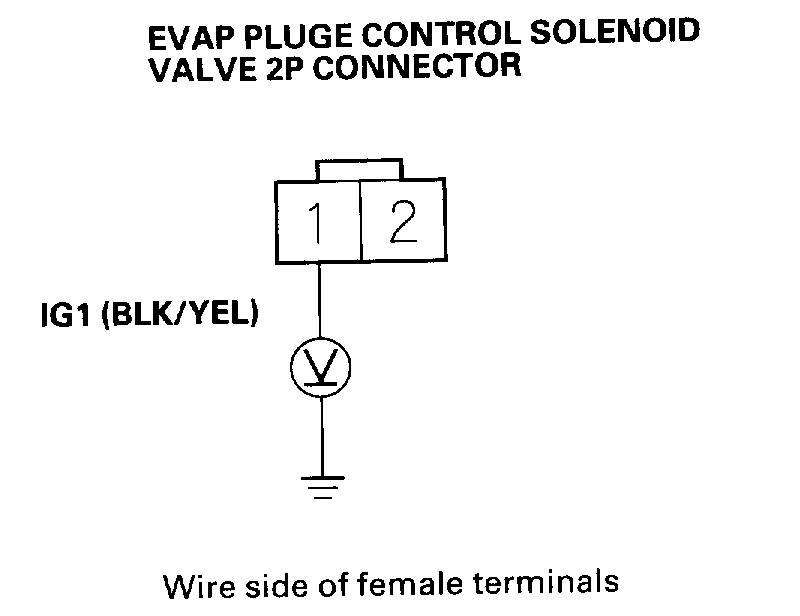
pic 4
9. Measure voltage between the EVAP purge control solenoid valve 2P connector terminal No.1 and body ground.
Is there battery voltage?
YES-Replace the EVAP purge control solenoid valve.
NO-Repair open in the wire between the EVAP purge control solenoid valve and No.6 ECU (ECM/PCM) CRUISE CONTROL (15 A) fuse.
EVAP Bypass Solenoid Valve Test
pic 5
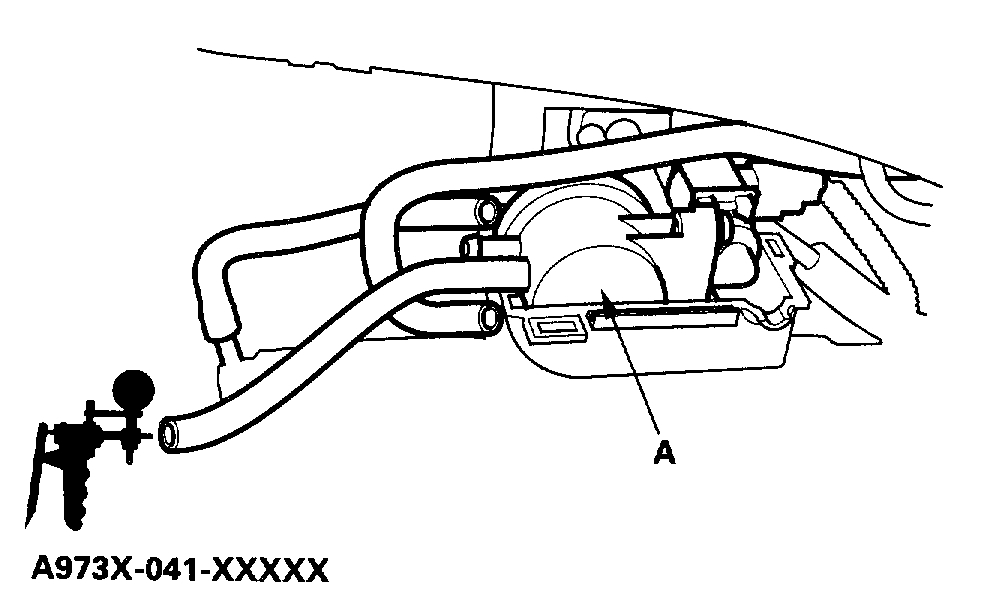
10. Disconnect the vacuum hose from the EVAP two way valve (A), and connect a vacuum pump to the hose.
11. Turn the ignition switch ON (II).
12. Apply vacuum to the hose.
Does the valve hold vacuum?
YES-EVAP bypass solenoid valve/EVAP two-way valve is OK. Go to step 18.
NO-Go to step 13.
13. Turn the ignition switch OFF.
14. Disconnect the EVAP bypass solenoid valve 2P connector.
pic 6
pic 7
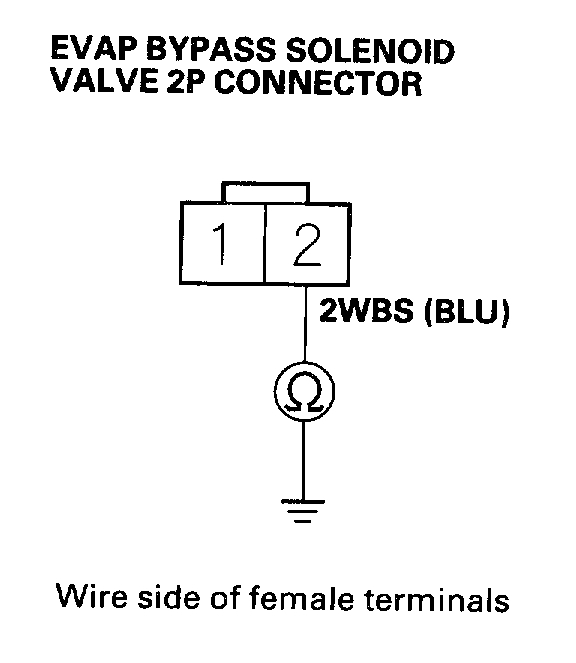
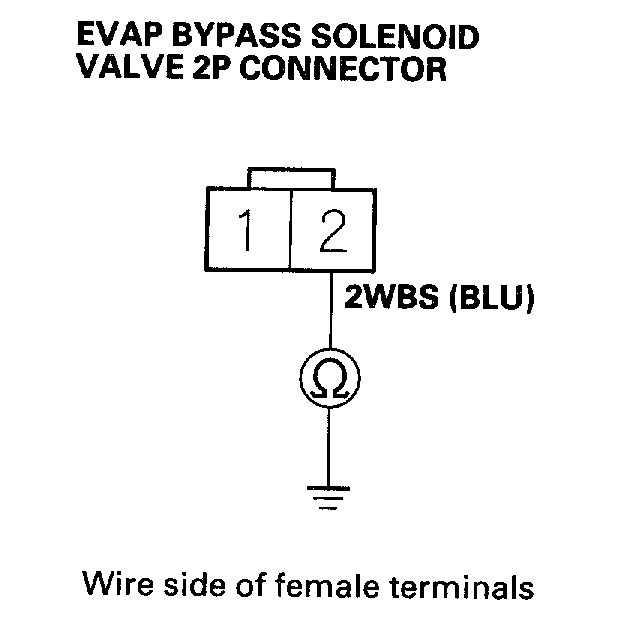
15. Check for continuity between the EVAP bypass solenoid valve 2P connector terminal No.2 and body ground.
Is there continuity?
YES-Go to step 16.
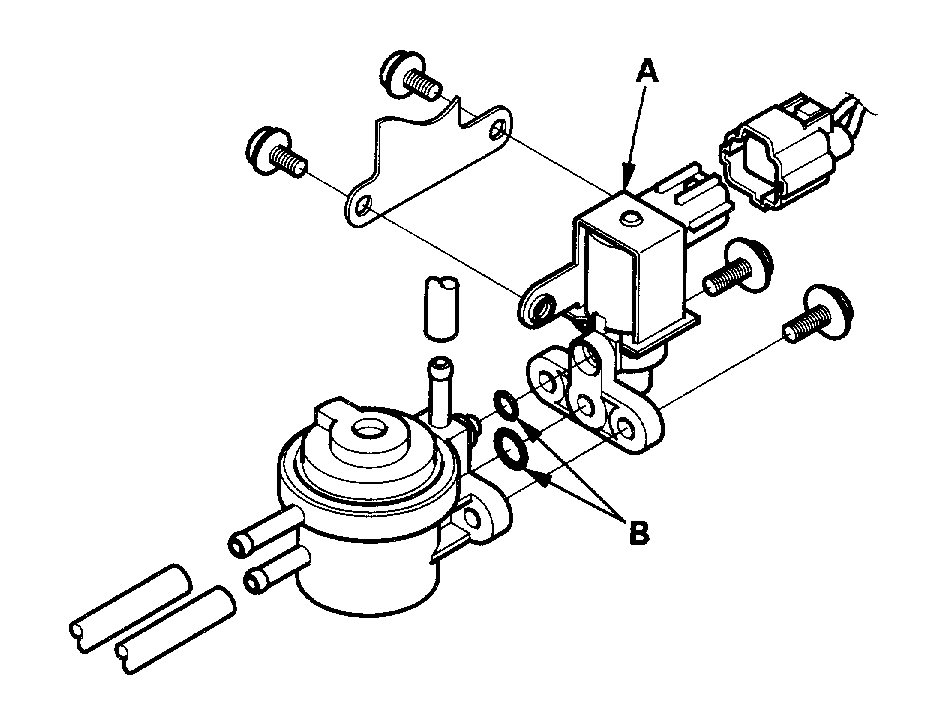
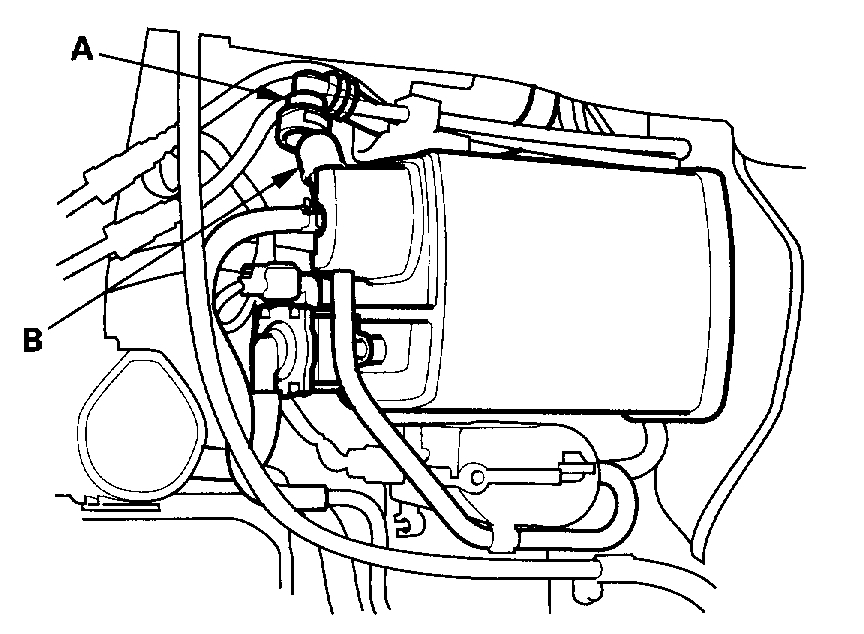
NO-Replace the EVAP bypass solenoid valve (A) and O-rings (B).
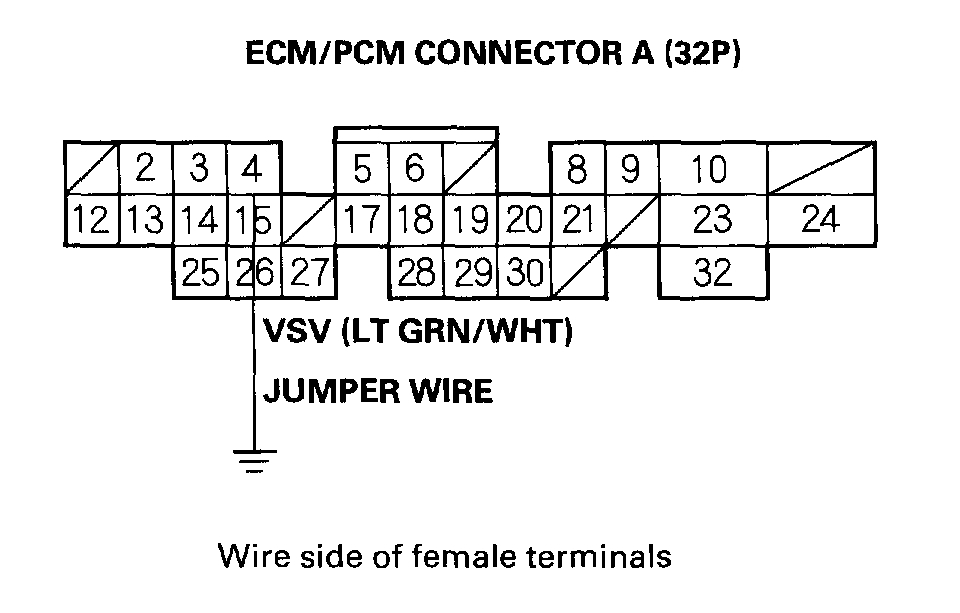
16. Disconnect the ECM/PCM connector A (32P).
pic 8
17. Check for continuity between the EVAP bypass solenoid valve 2P connector terminal No.2 and body ground.
Is there continuity?
YES-Replace short in the wire between the EVAP bypass solenoid valve and ECM/PCM (A3).
NO-Substitute a known-good ECM/PCM and recheck. If the symptom/indication goes away, replace the original ECM/PCM.
EVAP Control Canister Vent Shut Valve Test
pic 9
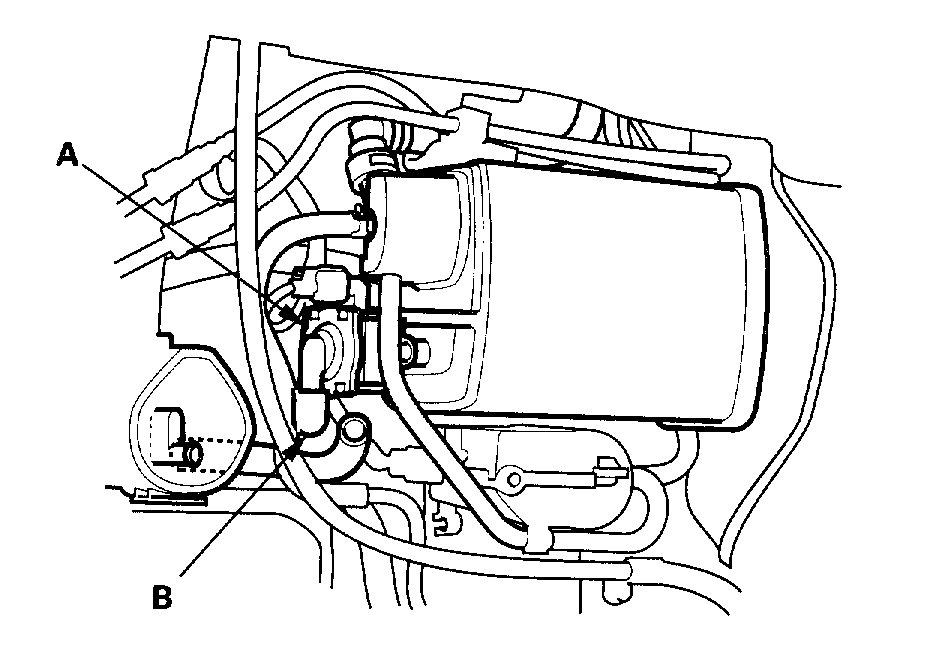
18. Disconnect the vacuum hose from the EVAP control canister filter (A), and connect a vacuum pump to the hose.
pic 10
19. Connect the ECM/PCM connector terminal A4 to body ground with a jumper wire.
20. Turn the ignition switch ON (II)
21. Apply vacuum to the hose. Does the valve hold vacuum?
YES-EVAP control canister vent shut valve is OK.
Go to step 27.
NO-Go to step 22.
22. Turn the ignition switch OFF.
23. Disconnect the EVAP control canister vent shut valve 2P connector.
pic 11
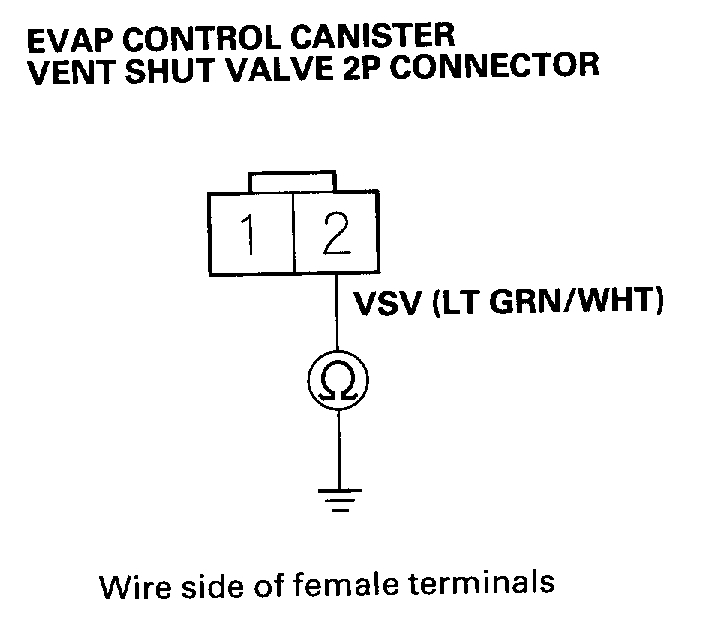
24. Check for continuity between the EVAP control canister vent shut valve 2P connector terminal No.2 and body ground.
Is there continuity?
YES-Go to step 25.
NO-Repair open in the wire between the EVAP control canister vent shut valve and ECM/PCM (A4).
25. Turn the ignition switch ON (II).
pic 12
pic 13
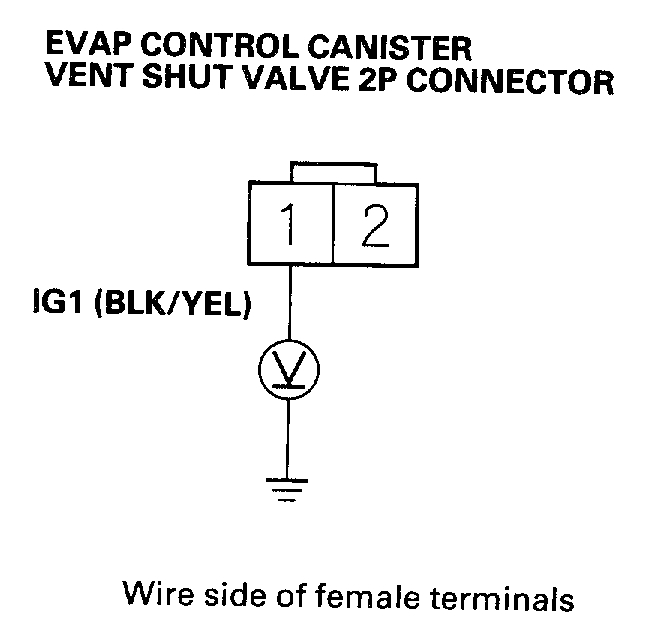
26. Measure voltage between the EVAP control canister vent shut valve 2P connector terminal No.1 and body ground.
Is there battery voltage?
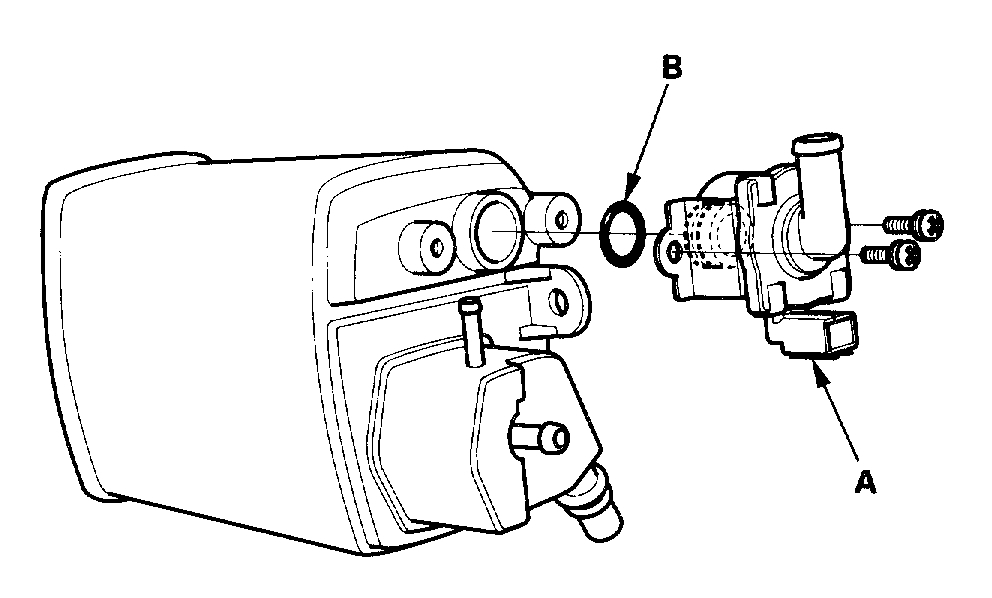
YES-Replace the EVAP control canister vent shut valve (A) and O-ring (B).
NO-Repair open in the wire between the EVAP control canister vent shut valve and No.6 ECU (ECM/PCM) CRUISE CONTROL (15 A) fuse.
Canister System Leak Test
27. Turn the ignition switch OFF.
pic 14
28. Connect two three-way tee fittings (A) into the hose from the EVAP control canister to the EVAP two-way valve. Connect the fuel tank pressure sensor to one of the tee fittings and the vacuum pump to the other.
pic 15
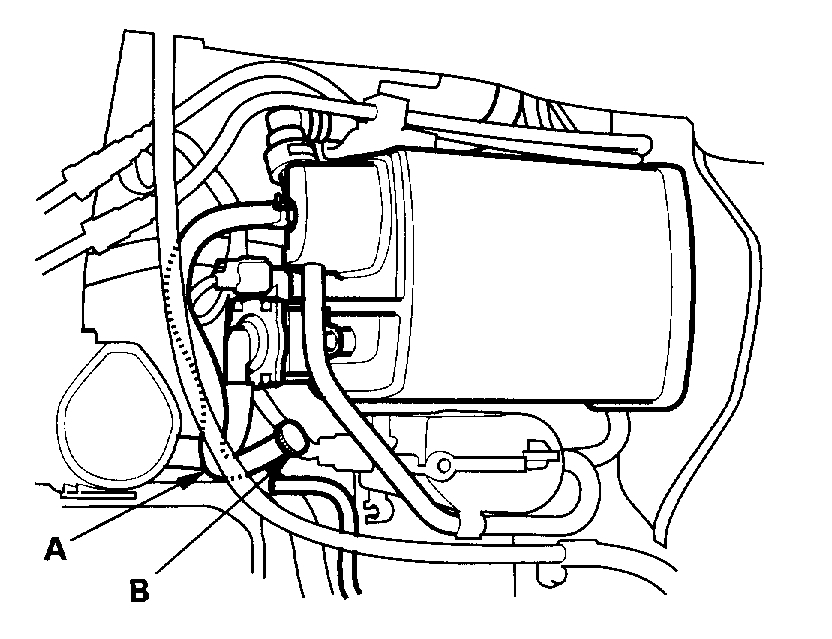
29. Remove the vent hose from the EVAP control canister vent shut valve (A) and plug the port (B) to seal the fresh air vent for the EVAP control canister.
30. Turn the ignition switch ON (II).
31. While monitoring the FTP sensor voltage with the Honda PGM Tester, or measuring voltage between ECM/PCM connector terminals A29 and C18, slowly pump the vacuum pump using a stroke every 1-2 seconds.
32. Continue to pump vacuum until the voltage drops to approx. 1.5 V.
NOTE: Make sure that the engine coolant temperature still above 95°F (35°C) and your vacuum pump has no leak.
33. Monitor the voltage for 20 seconds.
Does the voltage drop 1.5 V and holds for at least 20 seconds?
YES-Inspect the EVAP control canister vent shut valve line and connections.
NO-Go to step 34.
34. Turn the ignition switch OFF.
pic 16
35. Disconnect the quick-connect fitting (A) from the EVAP control canister and plug the canister port (B).
36. Turn the ignition switch ON (II).
37. While monitoring the FTP sensor voltage with the Honda PGM Tester, or measuring voltage between ECM/PCM connector terminals A29 and C18, slowly pump the vacuum pump using a stroke every 1-2 seconds.
38. Continue to pump vacuum until the voltage drops to approx. 1.5 V.
NOTE: Make sure that the engine coolant temperature still above 95°F (35°C) and your vacuum pump has no leak.
39. Monitor the voltage for 20 seconds.
Does the voltage drop to 1.5 V and hold for at least 20 seconds?
YES-Inspect the ORVR vent line and connections.
NO-Go to step 40.
40. Turn the ignition switch OFF.
pic 17
41. Disconnect the purge line hose (A) from the canister at the metal line and plug the hose (B).
42. Turn the ignition switch ON (II).
43. While monitoring the FTP sensor voltage with the Honda PGM Tester, or measuring voltage between ECM/PCM connector terminals A29 and C7, slowly pump the vacuum pump using a stroke every 1-2 seconds.
44. Continue to pump vacuum until the voltage drops to approx. 1.5 V.
NOTE: Make sure that the engine coolant temperature still above 95°F (35°C) and your vacuum pump has no leak.
45. Monitor the voltage for 20 seconds.
Does the voltage drop to 1.5 V and hold at least 20 seconds?
YES-Inspect EVAP purge control solenoid valve line and connections. If they are OK, do the EVAP two-way valve test, and ORVR vent shut valve test.
NO-Replace the EVAP control canister.
Let me know if this helps or if you have other questions. Also, please ignore the first 4 pics. I wasn't able to delete them.
Take care,
Joe
Images (Click to enlarge)
Sep 15, 2019 at 7:27 PM