Hi and thanks for using when cooled down it does not start immediately and sputters.
Based on your description, it sounds like you have fuel pressure drop off. Basically, the fuel system is designed to maintain a certain amount of pressure to ensure adequate fuel pressure to the engine, regardless of it is warm or cold. Try this little trick. When the engine has been off and would normally have a delayed start, cycle the ignition key from off to the on position (not start) three times. Each time you cycle to on, allow five seconds before turning it back off. After doing this, see if it starts right away. If I am correct, cycling the switch will allow the fuel pump to rebuild lost pressure.
Other than that, you could check fuel pump pressure, the regulator, and fuel pressure drop off. Here a link that shows in general how it is done:
https://www.2carpros.com/articles/how-to-check-fuel-system-pressure-and-regulator
Here are the directions specific to your vehicle for testing the fuel pressure. There are two different methods listed. The attached pictures correlate with these directions.
_________________________________________
FUEL PRESSURE CHECK
Before disconnecting fuel line, release fuel pressure from fuel line to eliminate danger.
NOTE: Prepare pans or saucers under the disconnected fuel line because the fuel may spill out. The fuel pressure cannot be completely released because L31 models do not have fuel return system.
Method A
CAUTION:
- The fuel hose connection method used when taking fuel pressure check must not be used for other purposes.
- Be careful not to scratch or put debris around connection area when servicing, so that the quick connector maintains sealability with O-rings inside.
- Do not perform fuel pressure check with electrical systems operating (i.e. lights, rear defogger, A/ C, etc.) Fuel pressure gauge may indicate false readings due to varying engine load and changes in manifold vacuum.
1. Release fuel pressure to zero. Refer to "FUEL PRESSURE RELEASE".
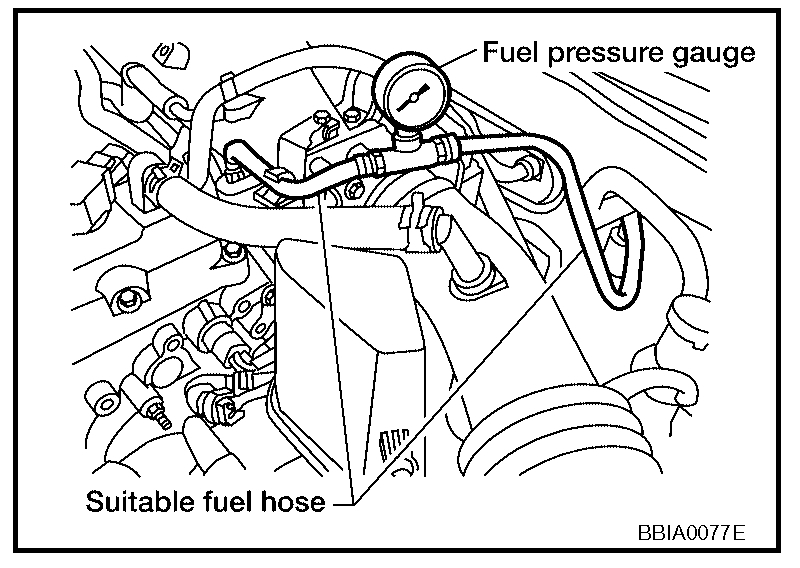
2. Prepare fuel hose for fuel pressure check, and connect fuel pressure gauge.
- Use suitable fuel hose for fuel pressure check (genuine NISSAN fuel hose without quick connector).
- To avoid unnecessary force or tension to hose, use moderately long fuel hose for fuel pressure check.
- Do not use the fuel hose for checking fuel pressure with damage or cracks on it.
- Use Pressure Gauge to check fuel pressure.
3. Remove fuel hose. Refer to "INTAKE MANIFOLD".
- Do not twist or kink fuel hose because it is plastic hose.
- Do not remove fuel hose from quick connector.
- Keep the original fuel hose to be free from intrusion of dust or foreign substances with a suitable cover.
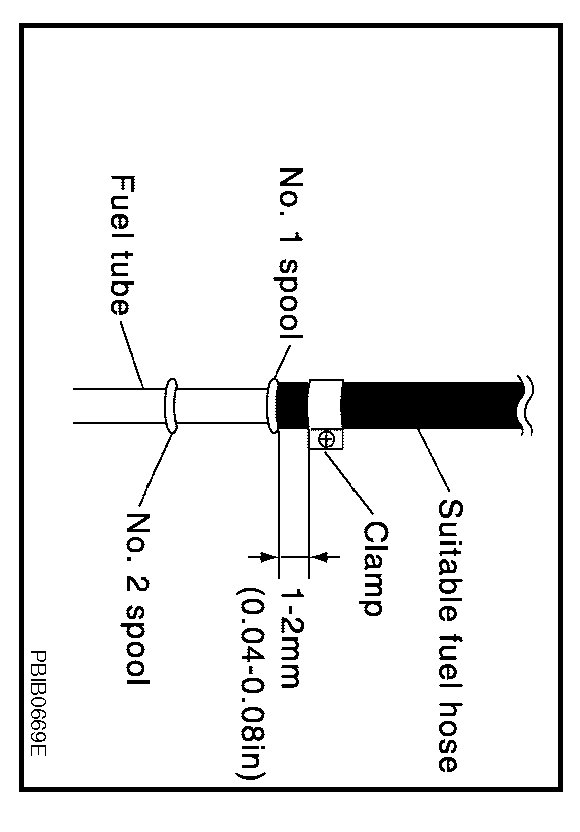
4. Install the fuel pressure gauge as shown in the figure.
- Wipe off oil or dirt from hose insertion part using cloth moistened with gasoline.
- Apply proper amount of gasoline between top of the fuel tube and No.1 spool.
- Insert fuel hose for fuel pressure check until it touches the No.1 spool on fuel tube.
- Use NISSAN genuine hose clamp (part number: 16439 N4710 or 16439 40U00).
- When reconnecting fuel line, always use new clamps.
- When reconnecting fuel hose, check the original fuel hose for damage and abnormality.
- Use a torque driver to tighten clamps.
- Install hose clamp to the position within 1 - 2 mm (0.04 - 0.08 in).
Tightening torque: 1 - 1.5 N.m (0.1 - 0.15 kg-m, 9 - 13 in-lb)
- Make sure that clamp screw does not contact adjacent parts.
5. After connecting fuel hose for fuel pressure check, pull the hose with a force of approximately 98 N (10 kg, 22 lb) to confirm fuel tube does not come off.
6. Turn ignition switch ON, and check for fuel leakage.
7. Start engine and check for fuel leakage.
8. Read the indication of fuel pressure gauge.
- Do not perform fuel pressure check with system operating. Fuel pressure gauge may indicate false readings.
- During fuel pressure check, confirm for fuel leakage from fuel connection every 3 minutes.
At idling: Approximately 350 kPa (3.57 kg/sq.cm, 51 psi)
9. If result is unsatisfactory, go to next step.
10. Check the following.
- Fuel hoses and fuel tubes for clogging
- Fuel filter for clogging
- Fuel pump
- Fuel pressure regulator for clogging
If OK, replace fuel pressure regulator.
If NG, repair or replace.
Method B
CAUTION:
- Be careful not to scratch or get the fuel hose connection area dirty when servicing, so that the quick connector O-ring maintains sealability.
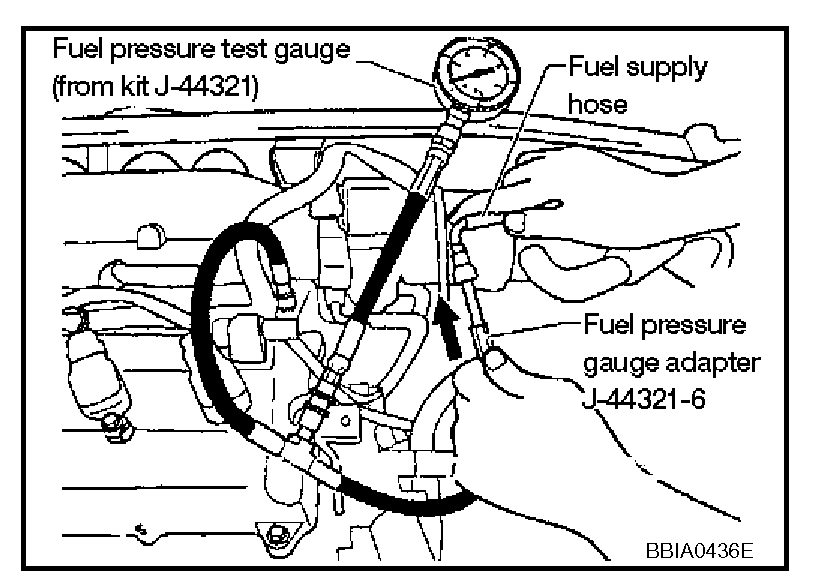
- Use Fuel Pressure Gauge Kit J-44321 and Fuel Pressure Adapter J-44321-6 to check fuel pressure.
1. Release fuel pressure to zero. Refer to "FUEL PRESSURE RELEASE".
2. Remove fuel hose using Quick Connector Release J-45488. Refer to "FUEL INJECTOR AND FUEL TUBE".
- Do not twist or kink fuel hose because it is plastic hose.
- Do not remove fuel hose from quick connector.
- Keep fuel hose connections clean.
3. Install Fuel Pressure Adapter J-44321-6 and Fuel Pressure Gauge (from kit J-44321) as shown in the figure.
- Do not distort or bend fuel rail tube when installing fuel pressure gauge adapter.
- When reconnecting fuel hose, check the original fuel hose for damage and abnormality.
4. Turn ignition switch ON (reactivate fuel pump), and check for fuel leakage.
5. Start engine and check for fuel leakage.
6. Read the indication of fuel pressure gauge.
- During fuel pressure check, check for fuel leakage from fuel connection every 3 minutes.
At idling: Approximately 350 kPa (3.57 kg/sq.cm, 51 psi)
7. If result is unsatisfactory, go to next step.
8. Check the following.
- Fuel hoses and fuel tubes for clogging
- Fuel filter for clogging
- Fuel pump
- Fuel pressure regulator for clogging If OK, replace fuel pressure regulator. If NG, repair or replace.
9. Before disconnecting Fuel Pressure Gauge and Fuel Pressure Adapter J-44321-6, release fuel pressure to zero. Refer to "FUEL PRESSURE RELEASE"
___________________________________________
I hope this helps. Try the trick I mentioned and let me know what happens.
Take care,
Joe
Images (Click to make bigger)
Sunday, April 25th, 2021 AT 1:34 PM