Hi and thanks for using 2CarPros.com Since it sounds like just the starter is spinning, are you certain the timing was correct? That type of a sound usually indicates there is no compression. Something is telling me it is not on correctly.
The first thing I would suggest is to check for compression to see if the timing could be the issue. Here are general directions for testing compression:
.
https://www.2carpros.com/articles/how-to-test-engine-compression
Here are common causes of low compression:
https://www.2carpros.com/articles/the-reasons-for-low-compression
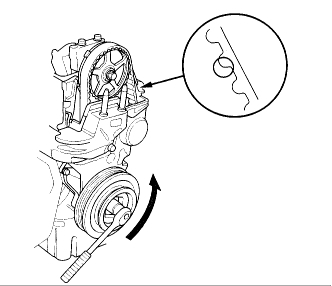
Now, in the United States, we don't have that model. However, to the best of my knowledge, it is based on the Honda Civic here. I have looked up information related to the Civic 1.7L which should be relevant for your vehicle. Here is timing belt inspection and picture 1 correlates with these directions:
TESTING AND INSPECTION
Inspection
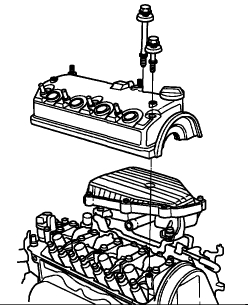
Remove the ignition coil cover, then remove the four ignition coils.
Remove the throttle cable clamps and harness holder mounting bolts.
Remove the cylinder head cover.
Inspect the timing belt for cracks and oil or coolant soaking. Replace the belt if it is oil or coolant soaked. Remove any oil or solvent that gets on the belt.
After inspecting, retorque the crankshaft pulley bolt.
Here are specific directions for removal and replacement of the belt. They are extensive and the remaining pictures are related to these directions.
SERVICE AND REPAIR
Removal
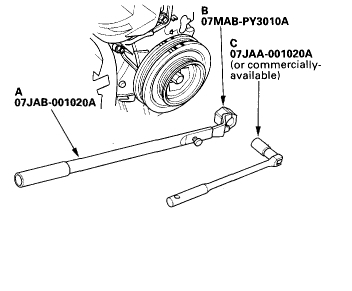
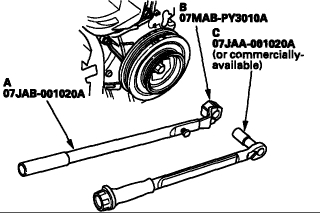
Special Tools Required
Holder handle 07JAB-001020A
Holder attachment, 50 mm, offset 07MAB-PY3010A
Socket, 19 mm 07JAA-001020A or a commercially-available 19 mm socket
Make sure you have the anti-theft code for the radio, then write down the frequencies for the radio's preset buttons.
Disconnect the battery negative terminal.
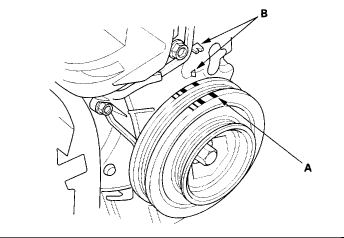
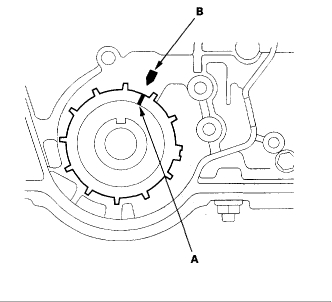
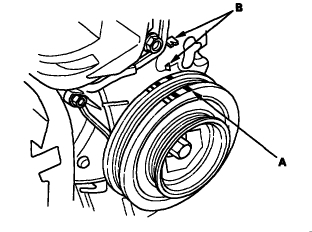
Turn the crankshaft pulley so its Top Dead Center (TDC) mark (A) lines up with the pointers (B).
Remove the front tires/wheels.
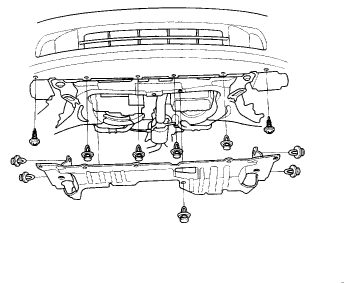
Remove the splash shield.
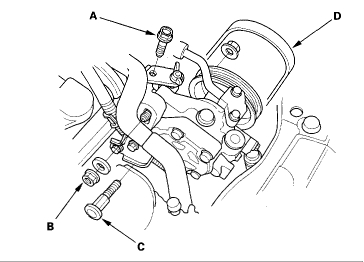
Remove the adjust plate mounting bolt (A), locknut (B) and mounting bolt (C), then remove the power steering (P/S) pump belt (D) and pump without disconnecting the P/S hoses.
Remove the alternator.
Remove the four ignition coils.
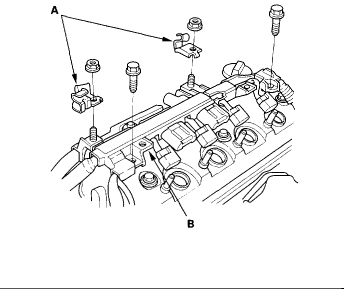
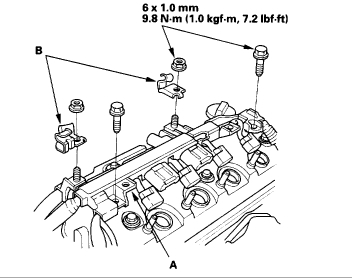
Remove the throttle cable clamps (A) and harness holder (B) from the cylinder head cover.
Remove the cylinder head cover.
Hold the pulley with holder handle (A) and holder attachment (B).
Remove the bolt with a heavy duty 19 mm socket (C) and breaker bar.
Support the engine with a jack and wood block under the oil pan.
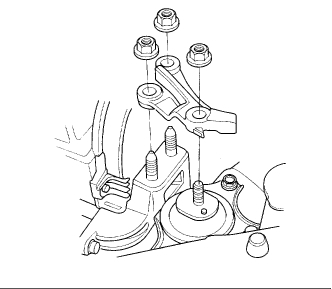
Remove the upper bracket.
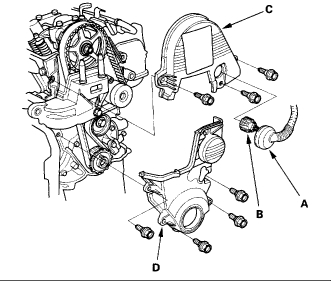
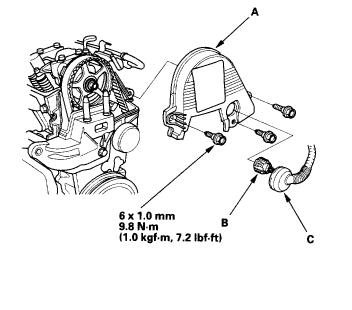
Remove the grommet (A) from the upper cover, and disconnect the CMP (TDC) sensor connector (B).
Remove the upper cover (C) and lower cover (D).
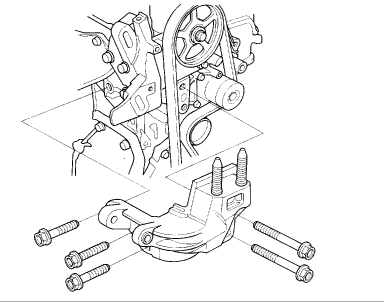
Remove the side engine mount bracket.
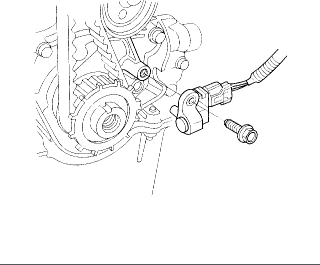
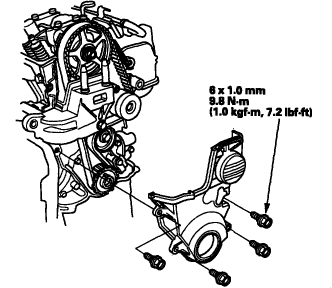
Remove the crankshaft position (CKP) sensor from the oil pump without disconnecting the connector.
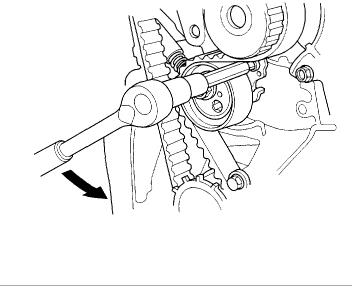
Apply a force of 98 Nm (10 kgf-cm, 22 ft. lbs.) to the timing belt at the mid point between the camshaft pulley and the water pump pulley and check that the auto-tensioner move smoothly.
If the auto-tensioner does not move smoothly, replace the auto-tensioner.
Inspect the auto-tensioner when replacing the timing belt.
Move the auto-tensioner to remove tension from the timing belt, then remove the timing belt.
Installation
Special Tools Required
Holder handle 07JAB-001020A
Holder attachment, 50 mm, offset 07MAB-PY3010A
Socket, 19 mm 07JAA-001020A or a commercially-available 19 mm socket
NOTE: If you are removing the auto-tensioner, refer to the auto-tensioner installation procedure.
Clean the timing belt pulleys, and the upper and lower covers.
Set the crankshaft to top dead center (TDC) . Align the TDC mark (A) on the timing belt drive pulley with the pointer (B) on the oil pump.
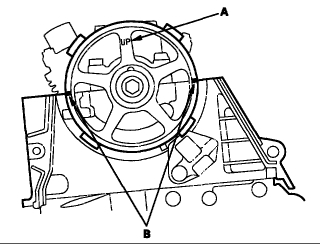
Clean the camshaft pulley and set it to TDC.
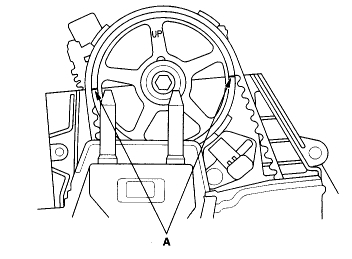
The "UP" mark (A) on the camshaft pulley should be at the top.
Align the TDC marks (B) on the camshaft pulley with the top edge of the head.
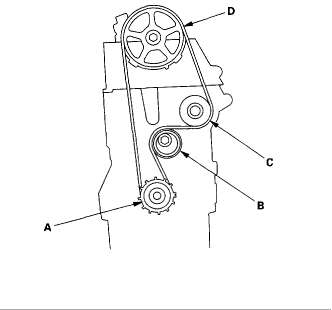
Install the timing belt in a counterclockwise sequence, starting with the drive pulley.
Drive pulley (A).
Tensioner pulley (B).
Water pump pulley (C).
Camshaft pulley (D).
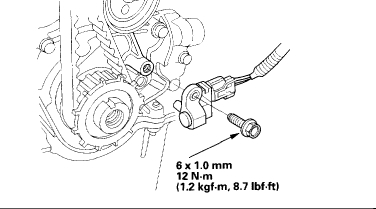
Install the crankshaft position (CKP) sensor.
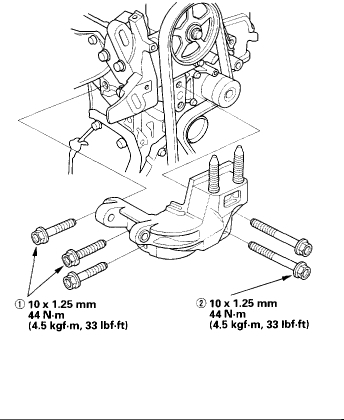
Install the ail bolts loosely, then tighten the mounting bolts as the numbered sequence shown.
Install the lower cover.
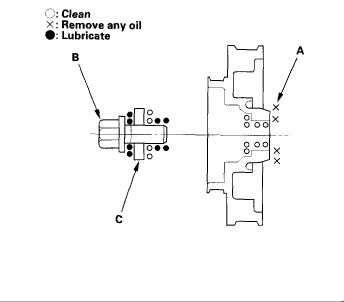
Clean the pulley bolt and washer.
Clean all oil off the inside face (A) of the crankshaft pulley, and apply lubricant to the pulley bolt (B) and washer (C).
Install the crankshaft pulley, and hold the pulley with holder handle (A) and holder attachment (B).
Tighten the bolt to 200 Nm (148 ft. lbs.) with a torque wrench and 19 mm socket (C).
Rotate the crankshaft pulley about five or six turns counter clockwise so that the timing belt positions on the pulleys.
Turn the crankshaft pulley so its TDC mark (A) lines up with the pointers (B).
Check the camshaft pulley marks (A)
If the camshaft pulley marks are also at TDC, go to step 15.
If the camshaft pulley marks are not at TDC, remove the timing belt and repeat steps 2 through 11.
Install the upper cover (A), then connect the camshaft position (CMP) (top dead center (TDC) ) sensor connector (B), and install the grommet (C).
Install the upper bracket (A), then tighten the nuts in the numbered sequence shown.
Install the cylinder head cover.
Install the harness holder (A) and throttle cable clamps (B).
Install the ignition coils.
Loosely install the alternator.
Adjust the alternator belt tension or the alternator-compressor belt tension.
Loosely install the power steering (P/S) pump belt and pump.
Adjust the P/S pump belt.
Install the splash shield.
Install the front tires/wheels.
Clean the battery posts and cable terminals with sandpaper. Connect the negative cable, then positive cable and apply grease to prevent corrosion.
Enter the anti-theft code for the radio, then enter the customer's radio station presets.
I realize this is extensive; however, you need to make sure you followed all these directions. Note: Again, the Concerto is not a US model. The aforementioned directions are for a Civic which is the same vehicle, to the best of my knowledge.
I hope this helps. Let me know if you have other questions.
Take care,
Joe
Images (Click to enlarge)
May 19, 2018 at 9:29 PM