Hi and thanks for using 2CarPros.
Since you replaced the brake vacuum booster, that tells me you were both under the dash working as well as under the hood. I have a feeling you pinched a wire or skinned one so that power is going through the system all the time. Retrace your work and look for wiring that may have been pinched between metal items. I have a feeling you pinched one of the wires from the brake light switch.
Now, if you only replaced the booster, then you never opened the hydraulic system. Therefore, it should not need bleed.
However, here are the directions specific to your vehicle for bleeding the system. There are two different process. Both are covered in these directions. I will separate the two with a line. Picture 1 correlates with pressure bleeding.
__________________________
Manual Bleeding
1. If vehicle is equipped with power brakes, remove vacuum reserve by applying brakes several times with engine off.
2. Fill master cylinder reservoirs with suitable brake fluid. Be sure to always keep master cylinder reservoirs at least half full during entire bleeding procedure.
3. If master cylinder is suspected to have air in the bore, it must be bled first, as follows:
a. Disconnect forward brake pipe connection at master cylinder.
b. Allow brake fluid to fill master cylinder bore until it begins to flow from forward pipe connector port.
c. Connect and tighten forward brake pipe at master cylinder.
d. Depress brake pedal slowly one time and hold, then loosen forward brake pipe connection at master cylinder to purge air from bore. Tighten connection, then release brake pedal slowly. Wait fifteen seconds, then repeat sequence, including fifteen second wait, until all air is purged from bore.
e. Bleed rear bore of master cylinder as front bore was bled.
4. Bleed right rear brake as follows:
a. Depress brake pedal slowly one time and hold.
b. Loosen bleeder valve to purge air from brake, then tighten bleeder valve and slowly release pedal.
c. Wait fifteen seconds, then repeat sequence, including fifteen second wait, until all air is purged.
5. Bleed left rear, right front, and left front brakes, in that order, using same method as for right rear brake.
6. Check brake operation and ensure pedal is firm. Also check master cylinder fluid level and add fluid as necessary.
7. Turn off brake warning light by applying moderate pressure to brake pedal several times.
8. Road test vehicle.
___________________________________________________________________________________________
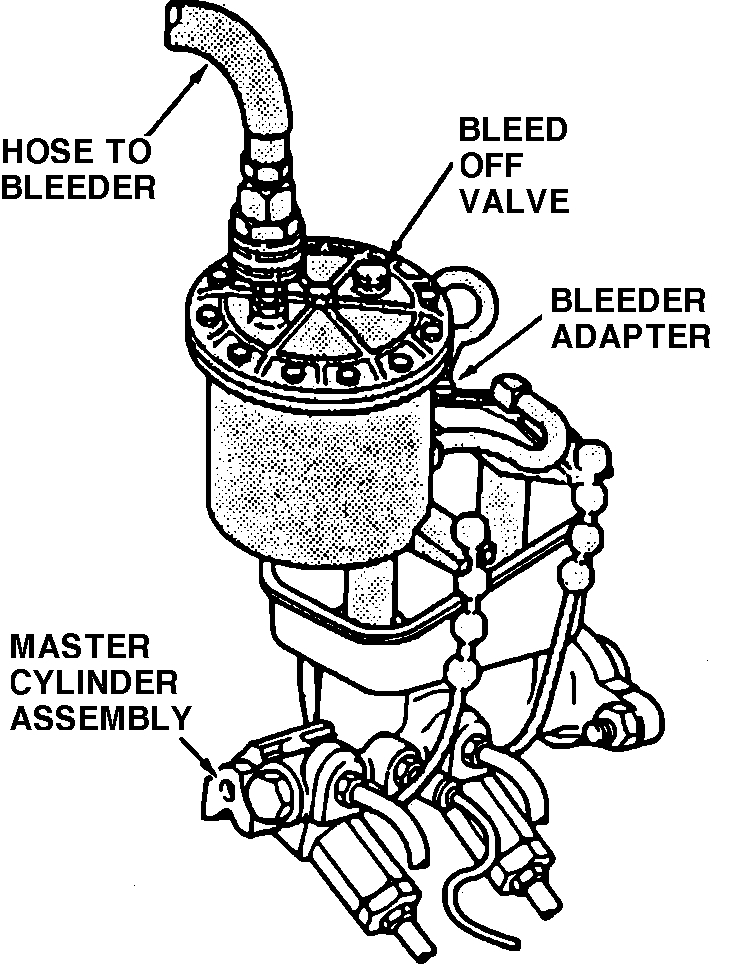
Fig. 1 Installing Pressure Bleeder Adapter (pic 1)
Pressure Bleeding
1. Loosen, then slightly retighten bleeder valves at all four wheels. Repair any broken, stripped or frozen valves at this time.
2. Using a diaphragm type pressure bleeder, install suitable bleeder adapter to master cylinder, Fig. 1.
3. Charge bleeder ball to 20-25 psi, then depress and hold valve stem on combination valve.
4. Connect pressure bleeder line to adapter.
5. Open line valve on pressure bleeder, then depress bleed-off valve on adapter until a small amount of brake fluid is released.
6. Raise and support vehicle.
7. Bleed right rear, left rear, right front and left front brakes, in that order.
8. Place transparent tube over bleeder valve, then allow tube to hang down into transparent container. Ensure end of tube is submerged in clean brake fluid.
9. Open bleeder valve 1/2 to 3/4 turn and allow fluid to flow into container until all air is purged from line.
Flushing Hydraulic System
If brake fluid is old, rusty or contaminated, or whenever new parts are installed in the hydraulic system, the system must be flushed. Bleed brakes, allowing at least one quart of clean brake fluid to pass through system. Any rubber parts in hydraulic system which were exposed to contaminated fluid must be replaced.
______________________________________________
Also, often times a soft brake pedal is the result of the rear brakes being out of adjustment. Check that.
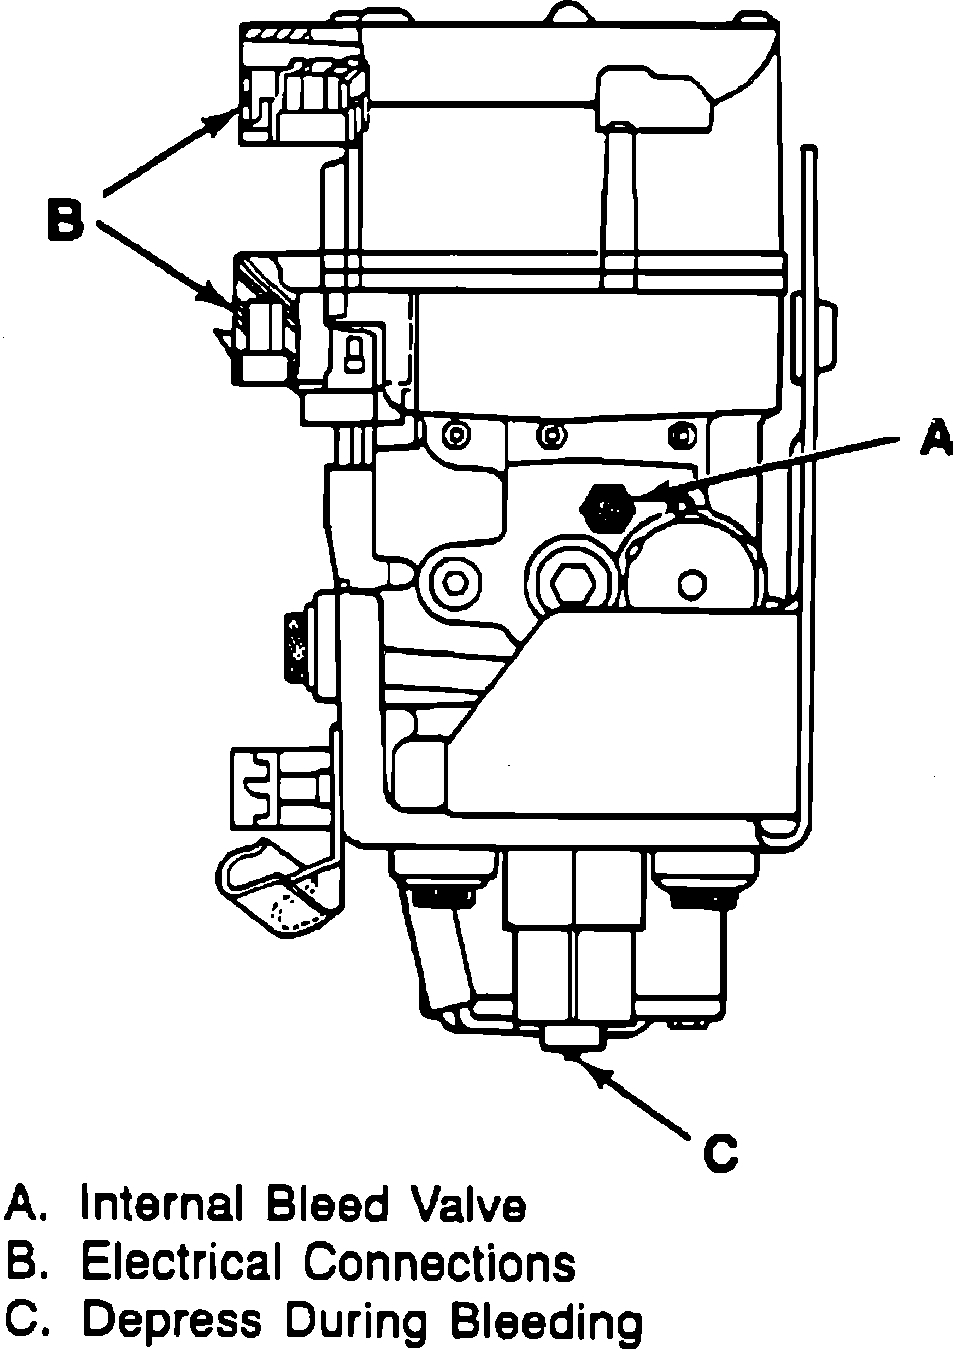
As far as the ABS module, here are the directions for bleeding it. It does require the use of a live data scanner. See pic 2
The EHCU Module should be bled after replacement or if trapped air is in the unit. If bleeding is required the module must be bled thoroughly before the wheel cylinders and calipers.
There are two bleeders on top of the unit that appear to be normal bleeders, Fig. 59. These are modulator bleeders and must remain closed when the unit is not pressurized.
The internal bleeders are on either side of EHCU module. The valves are used to open the internal passages within the EHCU module. Both bleed valves must be rotated 1/4 to 1/2 a turn counterclockwise before beginning the bleed process. The valve on the left hand side is used for the rear brakes and the valve on the right hand side is used for the front brakes.
The ignition switch must be in the ``Off'' position or false trouble codes may be stored.
1. Install combination valve depressor tool No. J 35836 or equivalent to LH high pressure accumulator bleed stem of EHCU module.
2. Install combination valve depressor tool No. J 35836 or equivalent to RH high pressure accumulator bleed stem of EHCU module.
3. Install combination valve depressor tool No. J 35836 or equivalent to rear combination valve.
4. Ensure master cylinder fluid level, fill if required.
5. Bleed EHCU module as follows:
a. Slowly depress brake pedal one time and hold.
b. Open left modulator bleeder, until fluid flows clearly or pedal is depressed, the close left bleeder.
c. Slowly release brake pedal.
d. Wait 15 seconds, then repeat a through d until all air is bled from EHCU module.
e. Close LH internal bleed valve. Torque bleed valve to 60 inch lbs.
f. Repeat steps b through e for RH bleed procedure.
g. Remove three tool Nos. J 35856 or equivalents.
6. Ensure master cylinder fluid level, fill if required.
7. Bleed wheel cylinder and calipers.
8. Turn ignition key to ``On'' position, then perform three function test with TECH1 scanner.
9. Check brake pedal feel and braking performance, repeat procedure if required.
Let me know if any of this helps. As far as the light issue, make sure you specifically did not pinch the wiring from the brake light switch under the dash.
Take care,
Joe
Images (Click to enlarge)
Mar 19, 2021 at 12:31 PM