Hi and thanks for using 2CarPros.com.
Chances are it is the front brakes in need of replacement. Today's cars mostly have steel sensors mounted on the backing plate.of the pads that are designed to indicate when the pads are ready to be replaced. If the sound changes when you apply the brakes, that is my first suspect.
Here is a link that shows how in general to replace front brake pads:
Front:
https://www.2carpros.com/articles/how-to-replace-front-brake-pads-and-rotors-fwd
Rear:
https://www.2carpros.com/articles/how-to-replace-rear-brake-pads-and-rotors
___________________________________________________
Here are the directions specific to your vehicle for both front and rear brake replacement, checking rotors, and pad replacement. All attached pictures correlate with these directions.
__________________________________________________
DISC BRAKES AND PADS - REPAIR PROCEDURES
Inspection
Check the pads for excessive wear, discs for run out and wear, and calipers for fluid leakage.
Front Brake
Front Brake Disc Thickness Check
1. Check the brake pads for wear and fade.
2. Check the brake disc for damage and cracks.
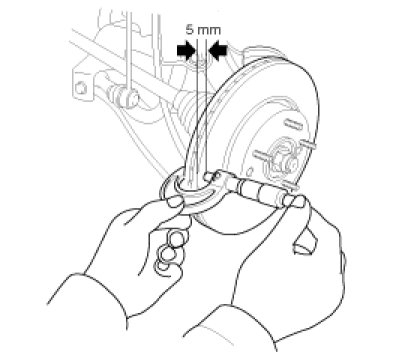
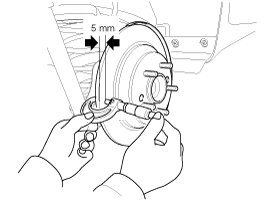
3. Remove all rust and contamination from the surface, and measure the disc thickness at 8 points, at least, of same distance (5mm) from the brake disc outer circle.
Front brake disc thickness
Standard : 23 mm (0.906 in)
Service Limit : 21 mm (0.827 in)
Deviation: Less than 0.005 mm (0.0002 in)
4. If wear exceeds the limit, replace the discs and pad assembly left and right of the vehicle.
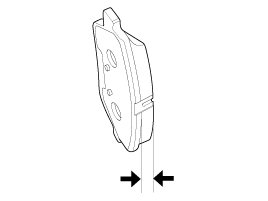
Front Brake Pad Check
1. Check the pad wear. Measure the pad thickness and replace it, if it is less than the specified value.
Pad thickness
Standard value: 10.5 mm (0.413 in)
Service limit: 2.0 mm (0.0787 in)
2. Check that grease is applied, to sliding contact points and the pad and backing metal for damage.
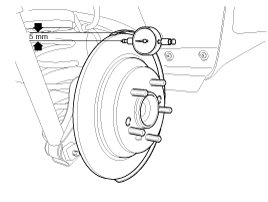
Front Brake Disc Runout Check
1. Place a dial gauge about 5mm (0.2 in.) from the outer circumference of the brake disc, and measure the runout of the disc.
Brake disc runout
Limit: 0.04 mm (0.0016 in.) or less (new one)
2. If the runout of the brake disc exceeds the limit specification, replace the disc, and then measure the runout again.
3. If the runout does not exceed the limit specification, install the brake disc after turning it 180° and then check the runout of the brake disc again.
4. If the runout cannot be corrected by changing the position of the brake disc, replace the brake disc.
Rear Brake
Rear brake disc thickness check
1. Check the brake pads for wear and fade.
2. Check the brake disc for damage and cracks.
3. Remove all rust and contamination from the surface, and measure the disc thickness at 8 points, at least, of same distance (5mm) from the brake disc outer circle.
Brake disc thickness
Standard: 10 mm (0.393 in)
Service limit: 8.4 mm (0.331 in)
Deviation: Less than 0.005mm (0.0002in)
4. If wear exceeds the limit, replace the discs and pad assembly left and right of the vehicle.
Rear Brake Pad Check
1. Check the pad wear. Measure the pad thickness and replace it, if it is less than the specified value.
Pad thickness
Standard value: 10 mm (0.394 in)
Service limit: 2.0 mm (0.0787 in)
2. Check that grease is applied, to sliding contact points and the pad and backing metal for damage.
Rear Brake Disc Runout Check
1. Place a dial gauge about 5mm (0.2 in.) from the outer circumference of the brake disc, and measure the runout of the disc.
Brake disc runout
Limit: 0.05 mm (0.0020 in.) or less (new one)
2. If the runout of the brake disc exceeds the limit specification, replace the disc, and then measure the runout again.
3. If the runout does not exceed the limit specification, install the brake disc after turning it 180° and then check the runout of the brake disc again.
4. If the runout cannot be corrected by changing the position of the brake disc, replace the brake disc.
Replacement
Front brake pads
1. Remove the front wheel & tire.
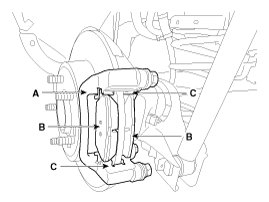
2. Loosen the guide rod bolt (B) and pivot the caliper body (A) up out of the way.
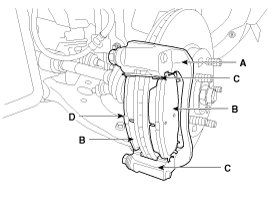
3. Replace pad shim (D), pad retainers (C) and brake pads (B) in the caliper carrier (A).
4. Compress the piston into the caliper body using the SST (09581-11000).
5. Place the caliper body (A) on the caliper carrier and tighten the guide rod bolt (B).
Tightening torque :
21.6 - 31.4 N.m (2.2 - 3.2 kgf.m, 15.9 - 23.1 lb-ft)
6. Install the front wheel & tire.
Tightening torque :
88.3 - 107.9 N.m (9.0 - 11.0 kgf.m, 65.1 - 79.6 lb-ft)
Rear Brake Pads
1. Remove the front wheel & tire.
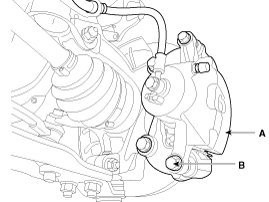
2. Loosen the guide rod bolt (B) and the remove the rear caliper body (A).
Tightening torque :
21.6 - 31.4 N.m (2.2 - 3.2 kgf.m, 15.9 - 23.1 lb-ft)
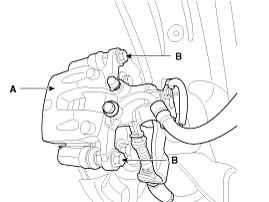
3. Replace pad retainers (C) and brake pads (B) in the caliper carrier (A).
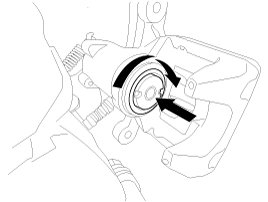
4. Rotate the caliper piston and push the direction of the arrow.
5. Place the caliper body (A) on the caliper carrier and tighten the guide rod bolt (B).
Tightening torque :
21.6 - 31.4 N.m (2.2 - 3.2 kgf.m, 15.9 - 23.1 lb-ft)
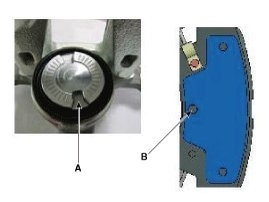
NOTE:
Assemble the caliper body so that the piston groove (A) is in-line with the pad center lobe (B).
* Make sure that the piston and pad are tightly attached.
6. Install the front wheel & tire.
Tightening torque :
88.3 - 107.9 N.m (9.0 - 11.0 kgf.m, 65.1 - 79.6 lb-ft)
____________________________________________________________
I hope this is helpful. Please feel free to ask any questions you may have.
Take care,
Joe
Images (Click to enlarge)
Oct 29, 2018 at 7:12 PM