Hi,
If the brake pedal is going to the floor and there are no leaks, chances are it is the master cylinder. Take a look through this link:
https://www.2carpros.com/articles/brake-pedal-goes-to-the-floor
As far as tricks, this is a straight forward job. Just make sure you bench bleed the new master cylinder before you install it. Here is a link that shows in general how one is replaced. I will provide specifics next.
https://www.2carpros.com/articles/how-to-replace-a-brake-master-cylinder
Here are all the specifics for your vehicle. This will be broken into a few different steps which will need done. Look over all of them before you start so you don't have to redo anything.
__________________________________________________________________________________
2005 Chevrolet Malibu V6-3.5L VIN 8
Master Cylinder Replacement
Vehicle Brakes and Traction Control Hydraulic System Brake Master Cylinder Service and Repair Procedures Master Cylinder Replacement
MASTER CYLINDER REPLACEMENT
Master Cylinder Replacement
Caution: Refer to in Brake Fluid Irritant Caution in Service Precautions.
Notice: Refer to Brake Fluid Effects on Paint and Electrical Components Notice in Service Precautions.
Removal Procedure
pic 1
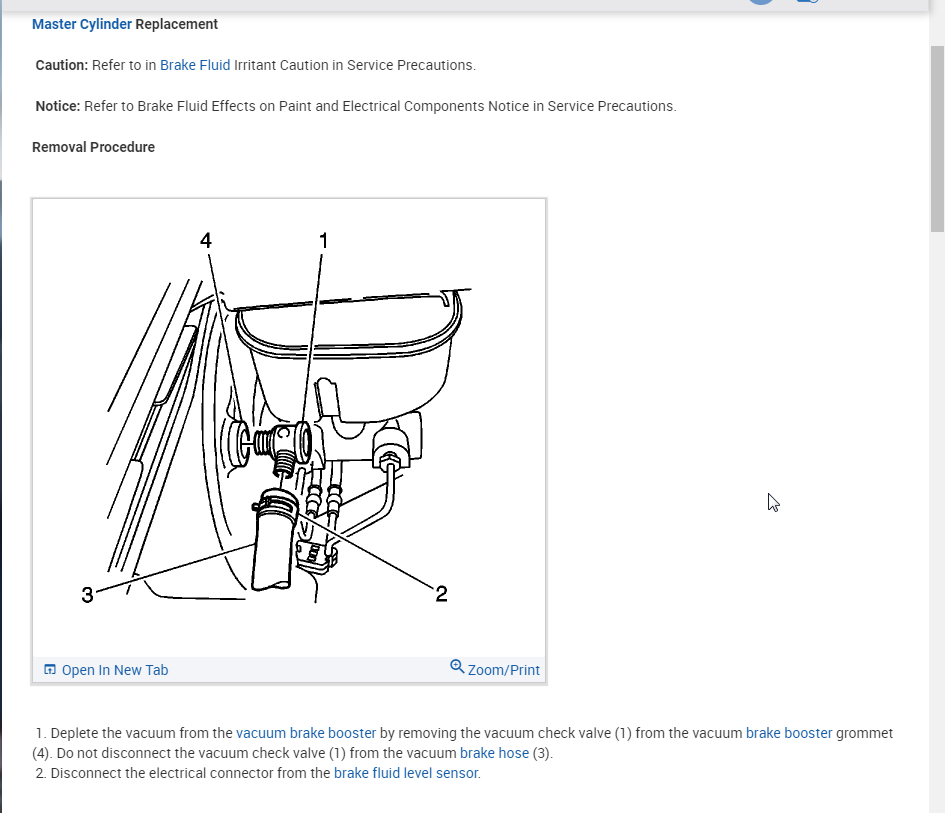
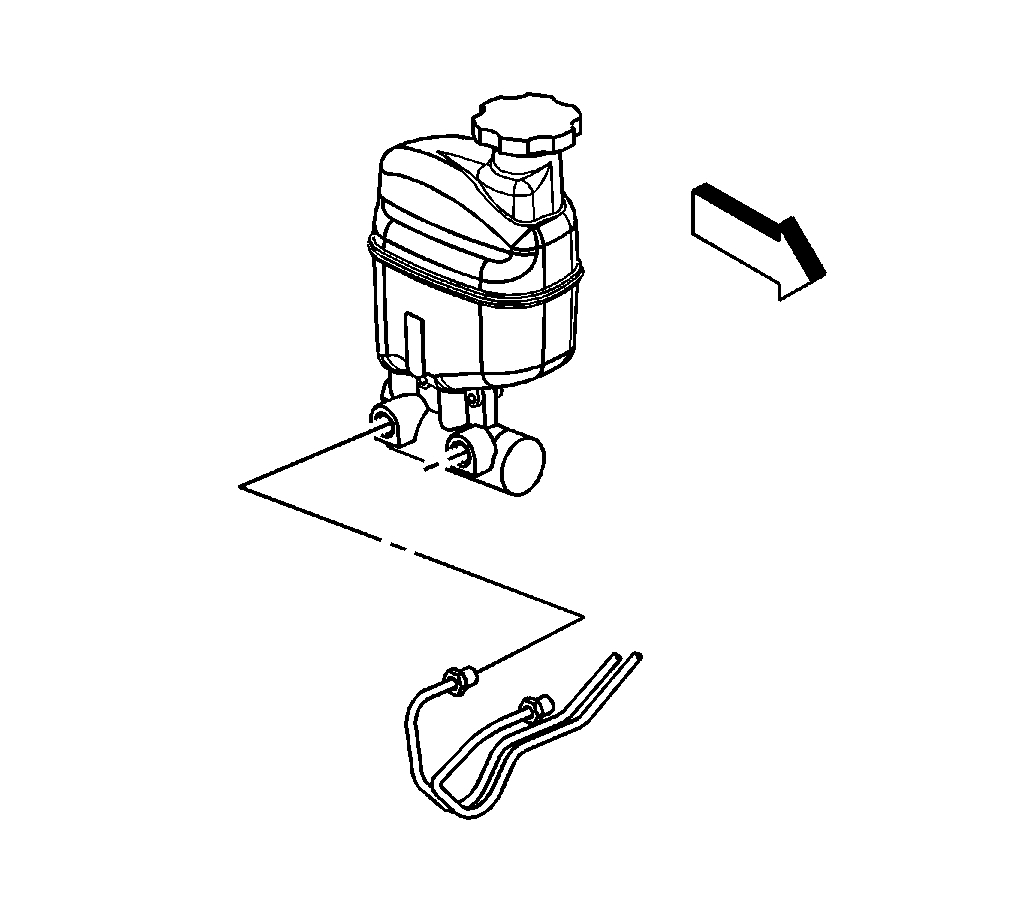
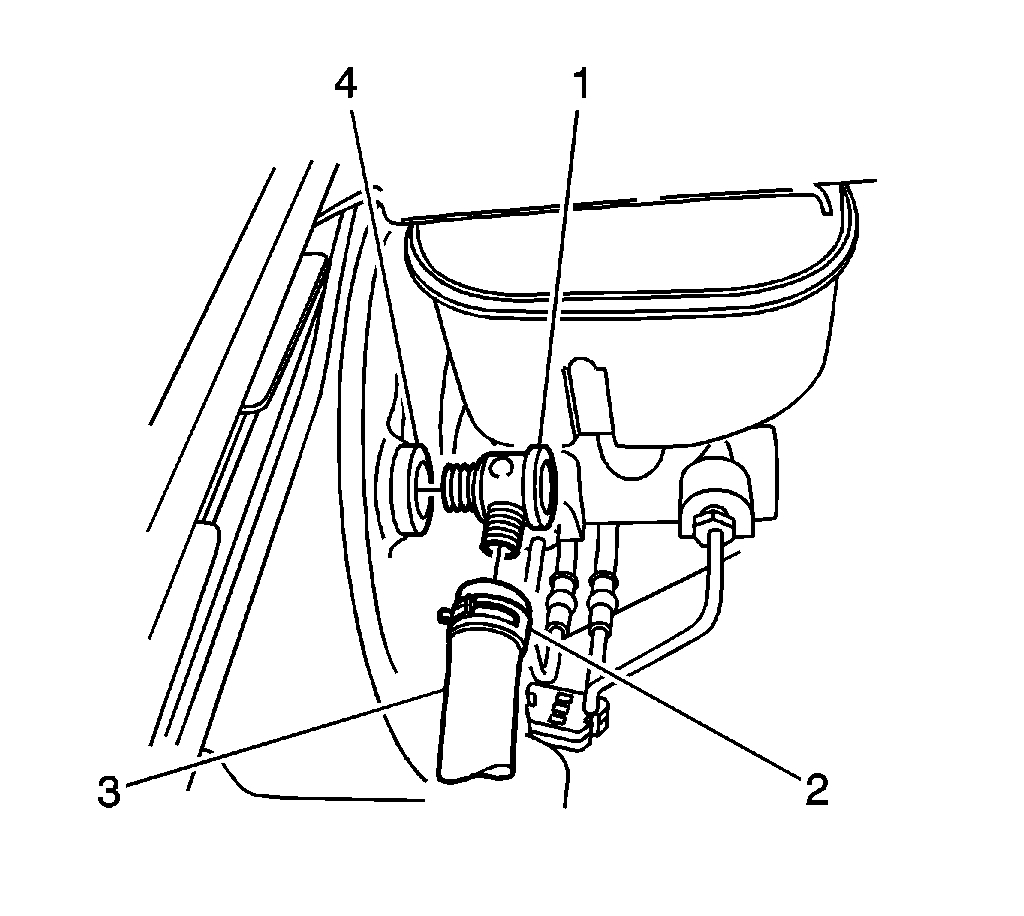
1. Deplete the vacuum from the vacuum brake booster by removing the vacuum check valve (1) from the vacuum brake booster grommet (4). Do not disconnect the vacuum check valve (1) from the vacuum brake hose (3).
2. Disconnect the electrical connector from the brake fluid level sensor.
pic 2
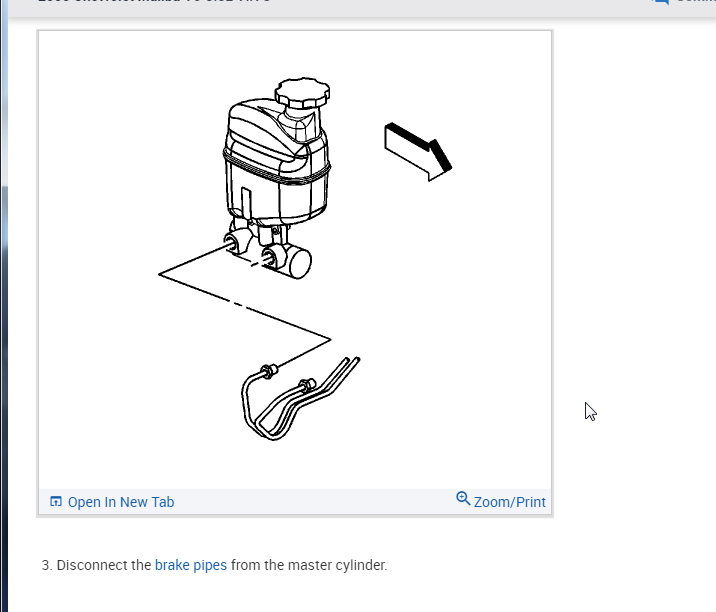
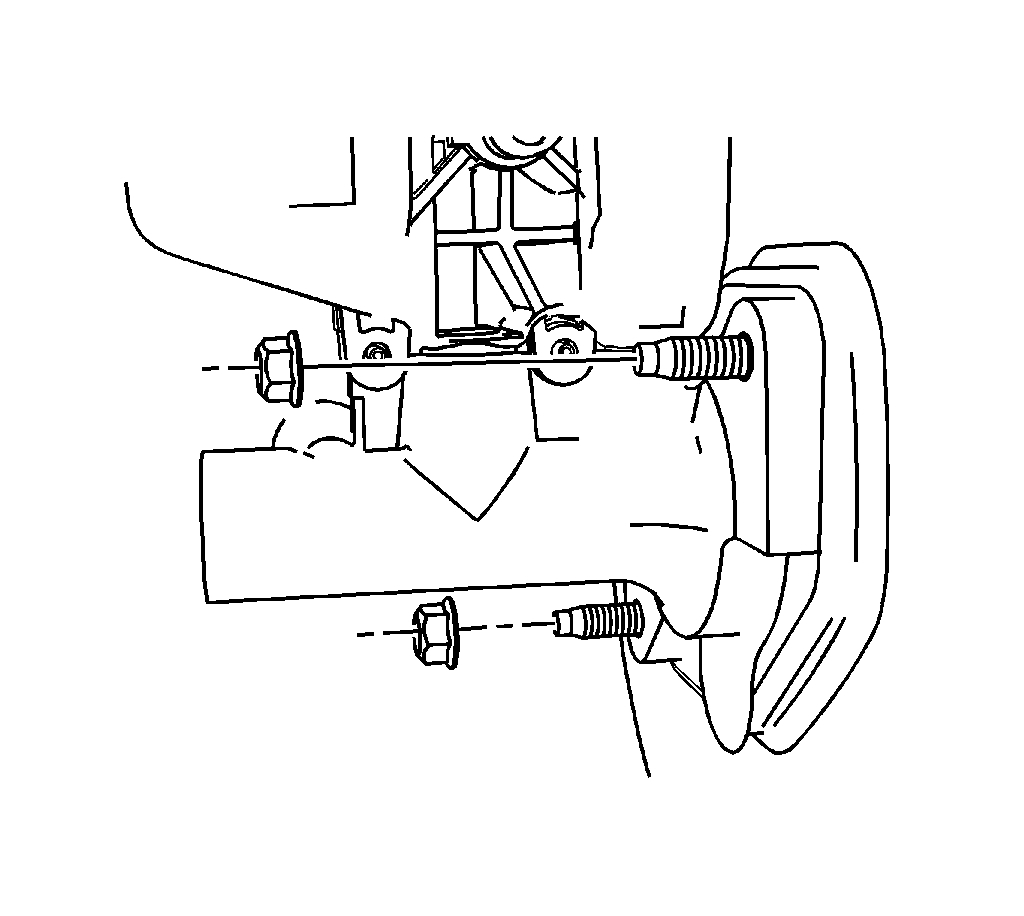
3. Disconnect the brake pipes from the master cylinder.
pic 3
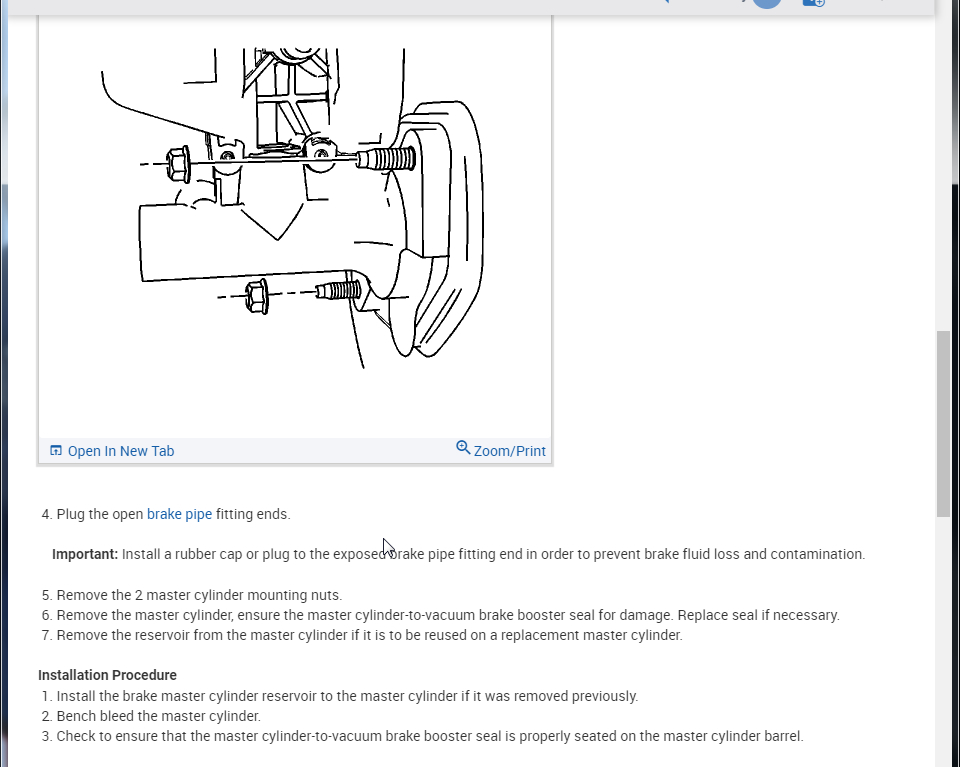
4. Plug the open brake pipe fitting ends.
Important: Install a rubber cap or plug to the exposed brake pipe fitting end in order to prevent brake fluid loss and contamination.
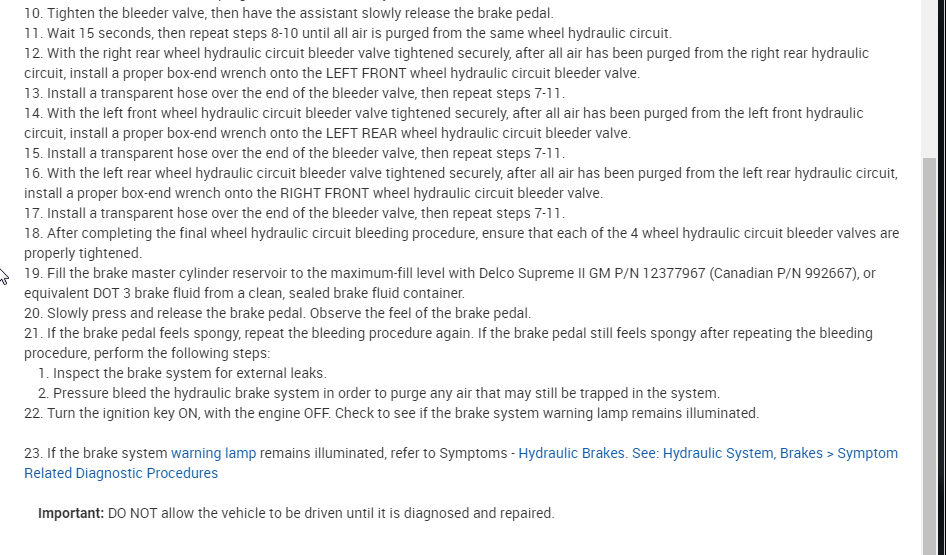
5. Remove the 2 master cylinder mounting nuts.
6. Remove the master cylinder, ensure the master cylinder-to-vacuum brake booster seal for damage. Replace seal if necessary.
7. Remove the reservoir from the master cylinder if it is to be reused on a replacement master cylinder.
Installation Procedure
1. Install the brake master cylinder reservoir to the master cylinder if it was removed previously.
2. Bench bleed the master cylinder.
3. Check to ensure that the master cylinder-to-vacuum brake booster seal is properly seated on the master cylinder barrel.
pic 4
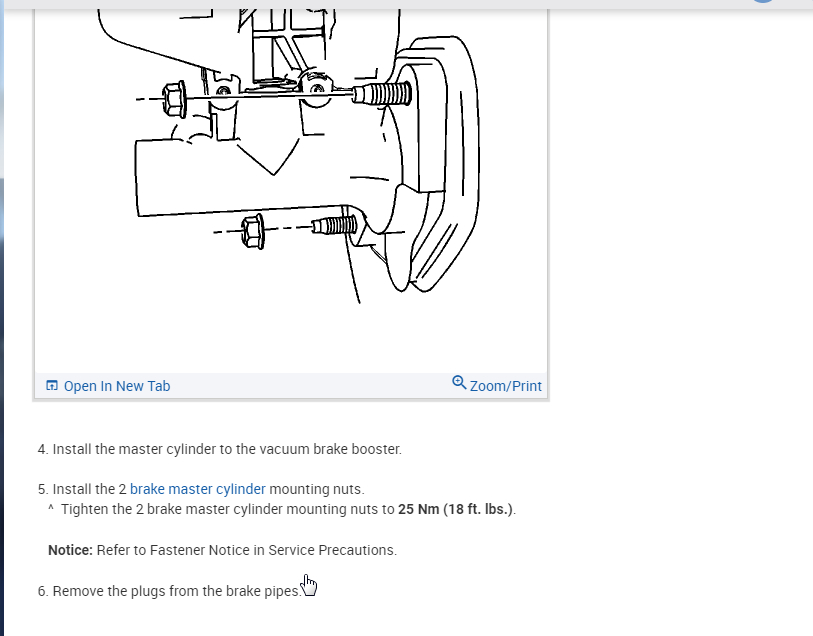
4. Install the master cylinder to the vacuum brake booster.
5. Install the 2 brake master cylinder mounting nuts.
^ Tighten the 2 brake master cylinder mounting nuts to 25 Nm (18 ft. lbs.).
Notice: Refer to Fastener Notice in Service Precautions.
6. Remove the plugs from the brake pipes.
pic 5
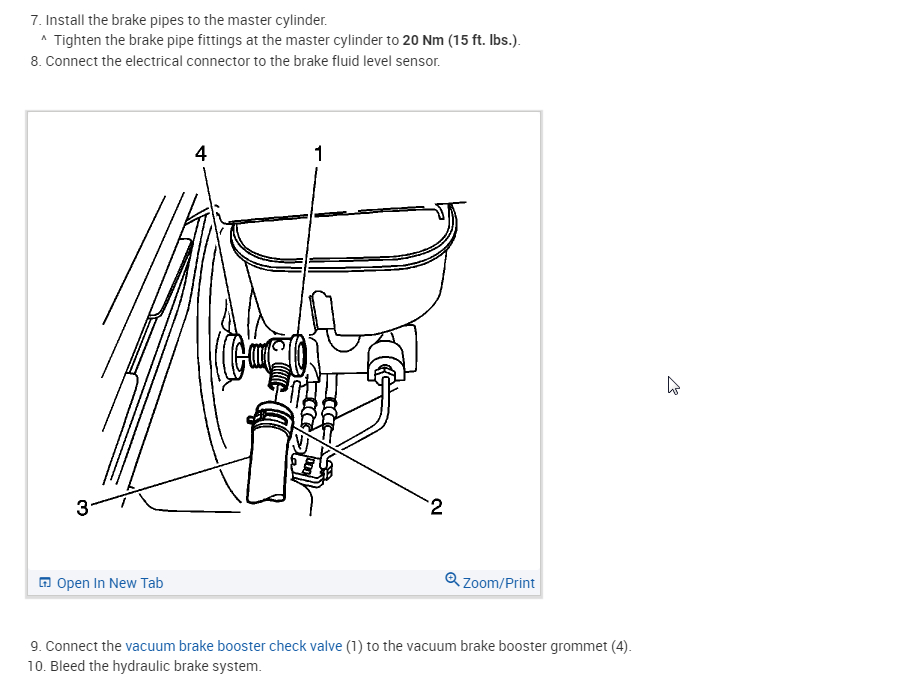
7. Install the brake pipes to the master cylinder.
^ Tighten the brake pipe fittings at the master cylinder to 20 Nm (15 ft. lbs.).
8. Connect the electrical connector to the brake fluid level sensor.
pic 6
9. Connect the vacuum brake booster check valve (1) to the vacuum brake booster grommet (4).
10. Bleed the hydraulic brake system.
___________________________________________________________________________
Often times, a new master cylinder will not come with the brake fluid reservoir. Here are the directions to remove and reinstall the one you have on the old MC.
2005 Chevrolet Malibu V6-3.5L VIN 8
Master Cylinder Reservoir Replacement
Vehicle Brakes and Traction Control Hydraulic System Brake Master Cylinder Service and Repair Procedures Master Cylinder Reservoir Replacement
MASTER CYLINDER RESERVOIR REPLACEMENT
Master Cylinder Reservoir Replacement
Caution: Refer to Brake Fluid Irritant Caution in Service Precautions.
Notice: Refer to Brake Fluid Effects on Paint and Electrical Components Notice in Service Precautions.
Removal Procedure
1. Remove the master cylinder from the vehicle.
pic 7
2. Remove the fluid level sensor.
3. Drain the brake fluid from the master cylinder reservoir.
4. Secure the mounting flange of the brake master cylinder in a bench vise so the rear of the primary piston is accessible.
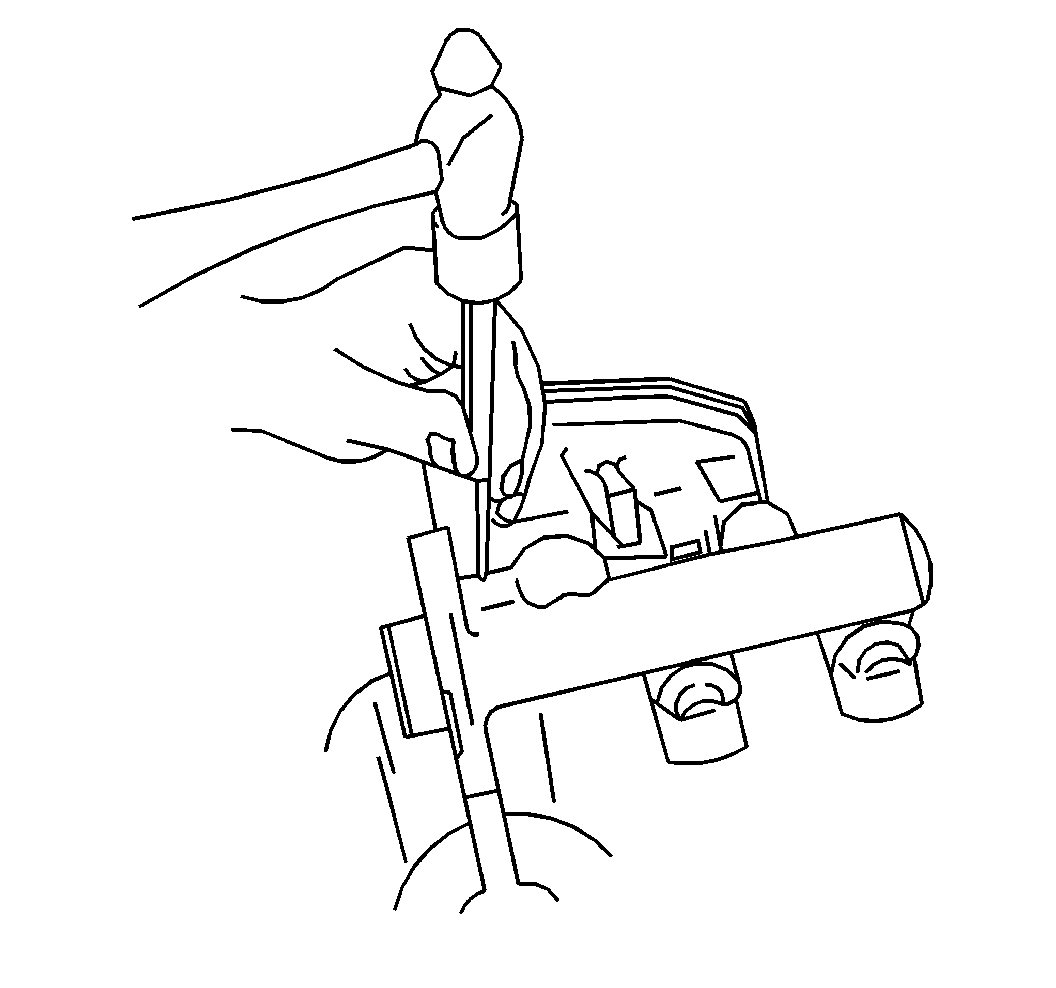
5. Carefully tap out the reservoir retaining pins until clear of reservoir.
pic 8
6. Remove the reservoir from the master cylinder.
7. Remove the seals from the master cylinder reservoir.
Installation Procedure
1. Inspect the reservoir for cracks or deformities. If found, replace the reservoir.
2. Clean the reservoir with clean denatured alcohol, or equivalent.
3. Dry the reservoir with non-lubricated, filtered air.
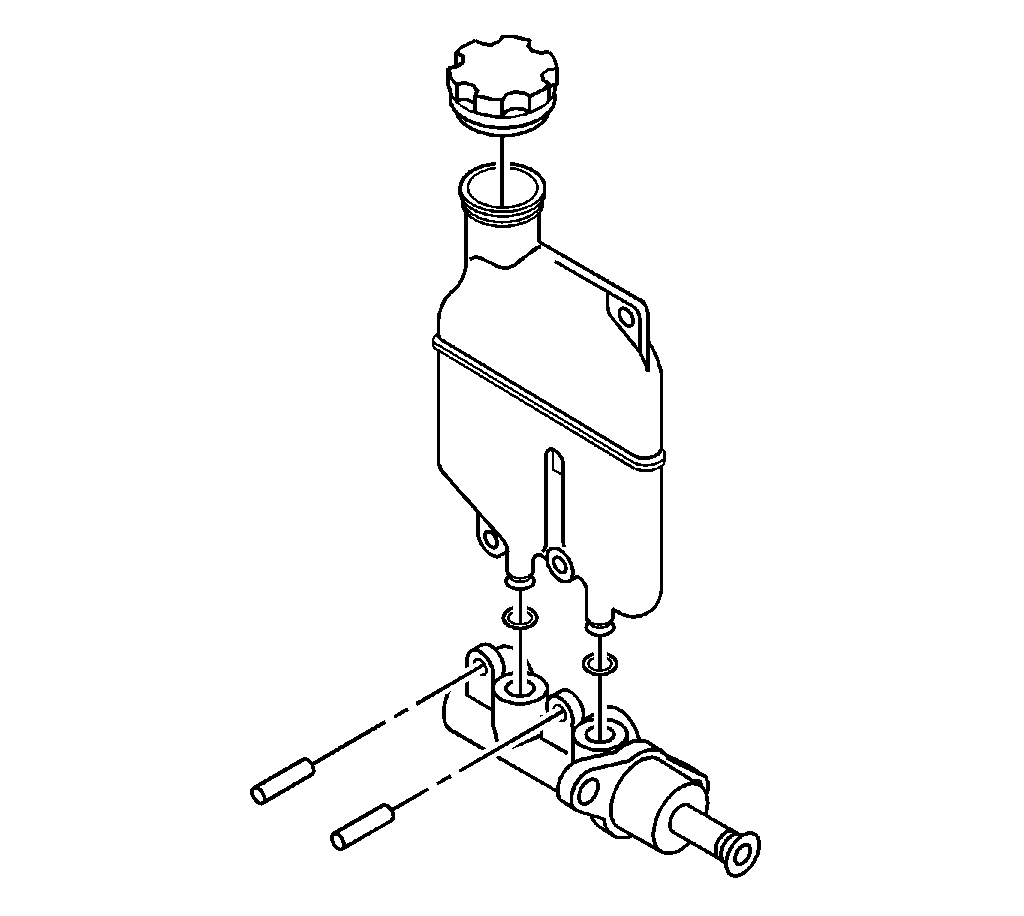
pic 9
4. Lubricate the new seals and the reservoir bayonets with new Delco Supreme II, GM P/N 12377967 (Canadian P/N 992667) or equivalent DOT-3 brake fluid.
5. Install the seals, making sure they are fully seated.
6. Install the reservoir onto the master cylinder by pressing straight down by hand until pin holes are aligned.
pic 10
7. Carefully tap in the reservoir retaining pins to secure the reservoir.
8. Fill the master cylinder reservoir.
9. Install the brake fluid level sensor.
10. Remove the master cylinder from the vise.
11. Install the master cylinder to the vehicle.
___________________________________________________
Here are directions for bench bleeding the new MC.
2005 Chevrolet Malibu V6-3.5L VIN 8
Master Cylinder Bench Bleeding
Vehicle Brakes and Traction Control Hydraulic System Brake Bleeding Service and Repair Procedures Master Cylinder Bench Bleeding
MASTER CYLINDER BENCH BLEEDING
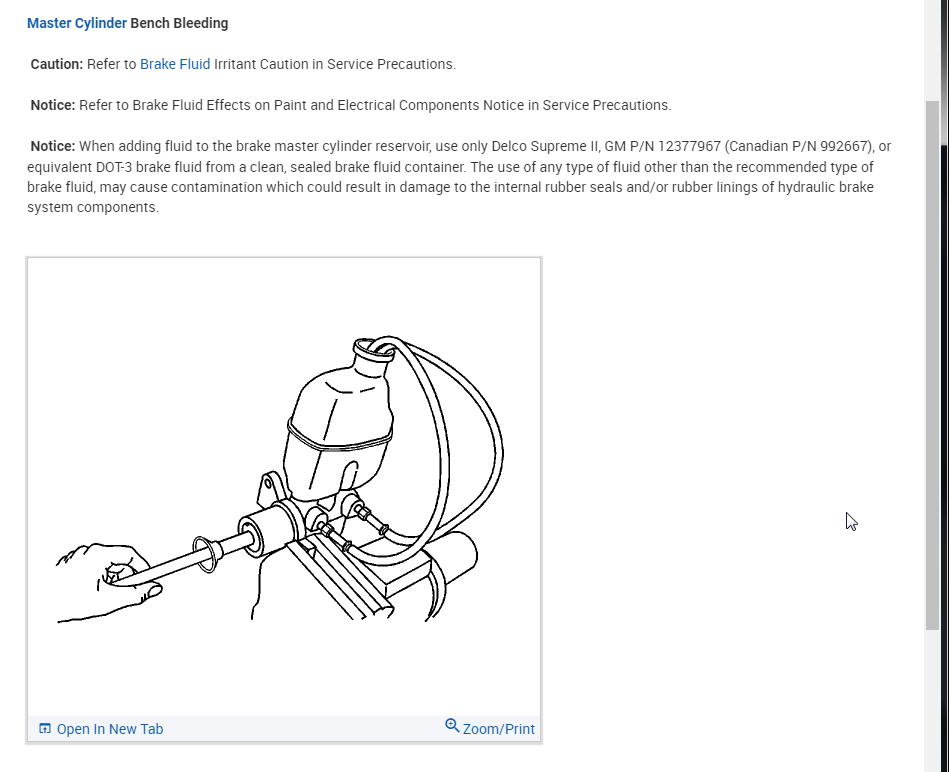
Master Cylinder Bench Bleeding
Caution: Refer to Brake Fluid Irritant Caution in Service Precautions.
Notice: Refer to Brake Fluid Effects on Paint and Electrical Components Notice in Service Precautions.
Notice: When adding fluid to the brake master cylinder reservoir, use only Delco Supreme II, GM P/N 12377967 (Canadian P/N 992667), or equivalent DOT-3 brake fluid from a clean, sealed brake fluid container. The use of any type of fluid other than the recommended type of brake fluid, may cause contamination which could result in damage to the internal rubber seals and/or rubber linings of hydraulic brake system components.
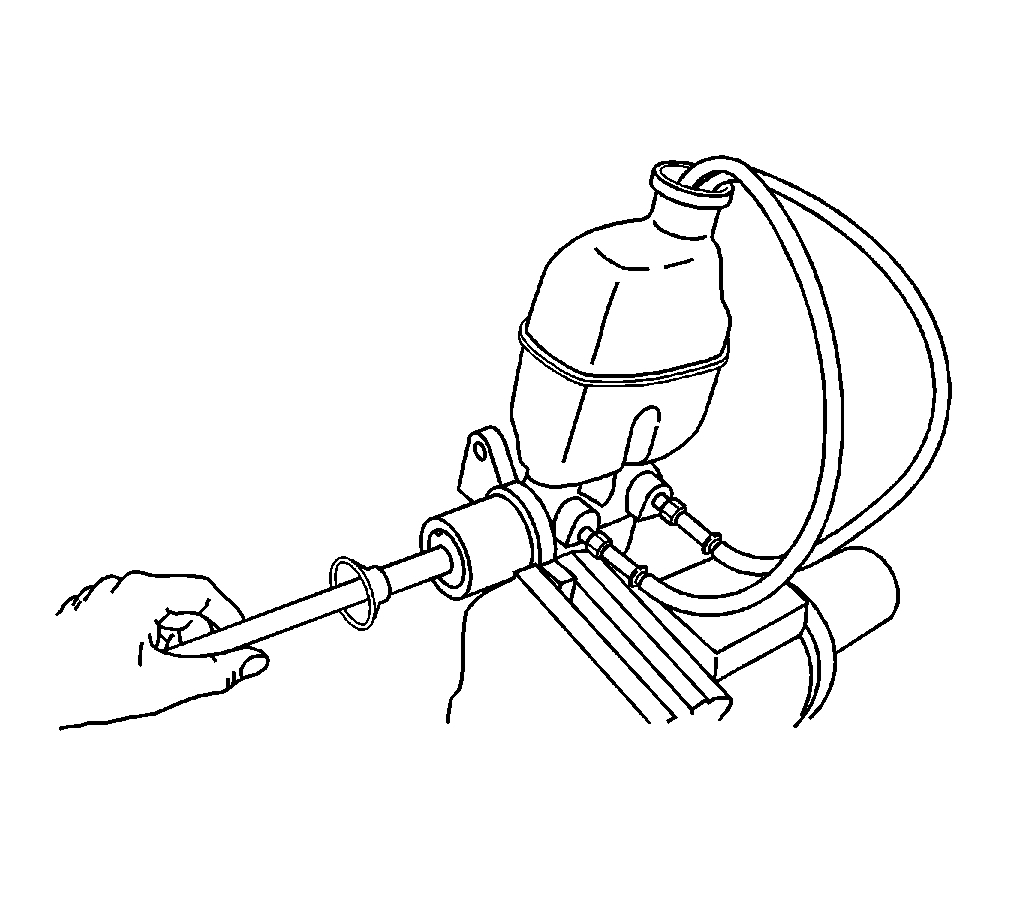
pic 11
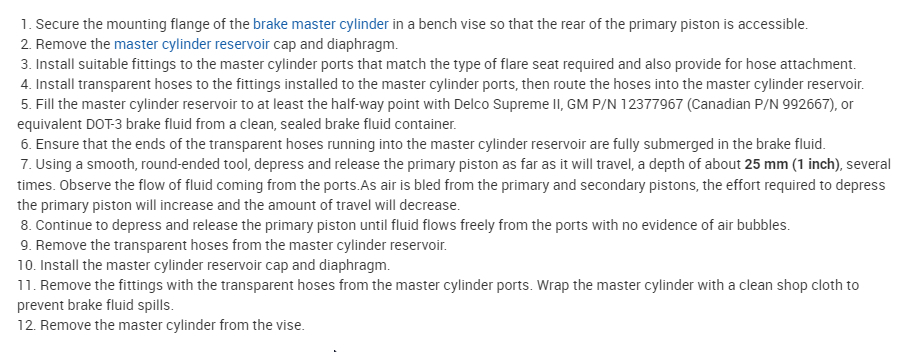
1. Secure the mounting flange of the brake master cylinder in a bench vise so that the rear of the primary piston is accessible.
2. Remove the master cylinder reservoir cap and diaphragm.
3. Install suitable fittings to the master cylinder ports that match the type of flare seat required and also provide for hose attachment.
4. Install transparent hoses to the fittings installed to the master cylinder ports, then route the hoses into the master cylinder reservoir.
5. Fill the master cylinder reservoir to at least the half-way point with Delco Supreme II, GM P/N 12377967 (Canadian P/N 992667), or equivalent DOT-3 brake fluid from a clean, sealed brake fluid container.
6. Ensure that the ends of the transparent hoses running into the master cylinder reservoir are fully submerged in the brake fluid.
7. Using a smooth, round-ended tool, depress and release the primary piston as far as it will travel, a depth of about 25 mm (1 inch), several times. Observe the flow of fluid coming from the ports.As air is bled from the primary and secondary pistons, the effort required to depress the primary piston will increase and the amount of travel will decrease.
8. Continue to depress and release the primary piston until fluid flows freely from the ports with no evidence of air bubbles.
9. Remove the transparent hoses from the master cylinder reservoir.
10. Install the master cylinder reservoir cap and diaphragm.
11. Remove the fittings with the transparent hoses from the master cylinder ports. Wrap the master cylinder with a clean shop cloth to prevent brake fluid spills.
12. Remove the master cylinder from the vise.
_____________________________________________________________
I hope this helps. Let me know if you have questions or need help. if you have a chance, let me know how things work out for you.
Take care,
Joe
Images (Click to enlarge)
Mar 29, 2021 at 2:37 PM