LED bulb replacements

Tiny
PACKERS27
  • MEMBER
  • 2000 GMC SIERRA
  • 5.3L
  • V8
  • 2WD
  • AUTOMATIC
  • 250,000 MILES
So I changed out all of my front exterior lights to LED. Hi and Low beams, daytime running lights, blinkers and marker lights. All of them. The only thing that works now is my marker lights and Hi beam. By blinkers do work but they hyperplasia and I'm assuming I will need a new relay but there's no flasher relay in the instrument panel, under the hood or in the manual that I've seen. I need some help with all of this. Thank you
Saturday, December 5th, 2020 AT 4:21 PM

5 Replies

Tiny
STEVE W.
  • MECHANIC
  • 13,021 POSTS
The flasher is an electronic one located in the fuse block. It is the same one used for the hazard lights. Changing it will not change the flash rate though, at the moment the lower current draw of the LED's is making the body control module think that the bulbs have failed, A side effect of that will be the fast flashing which is to alert the driver that a bulb is burnt out. The way around this will be to install ballast resistors at each turn signal socket to make the BCM think you have normal bulbs installed.
As for the high beams only working, changing to LED's shouldn't have caused that as the system uses a mechanical switch to select which beam is operational. I would try swapping the LED's back out to the regular bulbs and see if they work on both beams, if they do then something in the LED's is defective. The system uses the same fuses to power both beams with power going into all lamps on the orange wire. Then to select high beam the purple wire is grounded through the dimmer switch and on low beam the yellow wire is grounded. Both of those use the same ground connection. If swapping back to regular bulbs doesn't restore the low beams then the first step will be using a test light to see if the dimmer switch is selecting the beams properly. When you try to switch from high to low beam what happens?
Was this
answer
helpful?
Yes
No
Saturday, December 5th, 2020 AT 4:48 PM
Tiny
PACKERS27
  • MEMBER
  • 187 POSTS
Nothing happens when I do that. They don't work at all. Before the install, is was fine. I did have to tap on one of the assemblies to get the low bean to come on. Doesn't the headlamp relay control voltage change from high beam or low? Is this a possibility? What about DRL?
Was this
answer
helpful?
Yes
No
Saturday, December 5th, 2020 AT 4:58 PM
Tiny
STEVE W.
  • MECHANIC
  • 13,021 POSTS
The relay supplies power to both high and low beam, nothing more, the DRL's on that truck should be different bulbs unless someone altered the system. So you swapped them and still only have high beam. In that case get a cheap test light and go to the dimmer switch connector on the side of the steering column under the dash and find the yellow wire that acts as the ground for the low beams. With the test light connected to battery positive that yellow wire should ground on low beam.
Was this
answer
helpful?
Yes
No
Saturday, December 5th, 2020 AT 5:40 PM
Tiny
PACKERS27
  • MEMBER
  • 187 POSTS
Is the dashboard easy to get of off?
Was this
answer
helpful?
Yes
No
Sunday, December 6th, 2020 AT 12:04 AM
Tiny
STEVE W.
  • MECHANIC
  • 13,021 POSTS
No need to remove the dash, the switch is easy to access from the drivers foot well. You may need to remove the trim panel under the dash but the harness is easy to get to then.
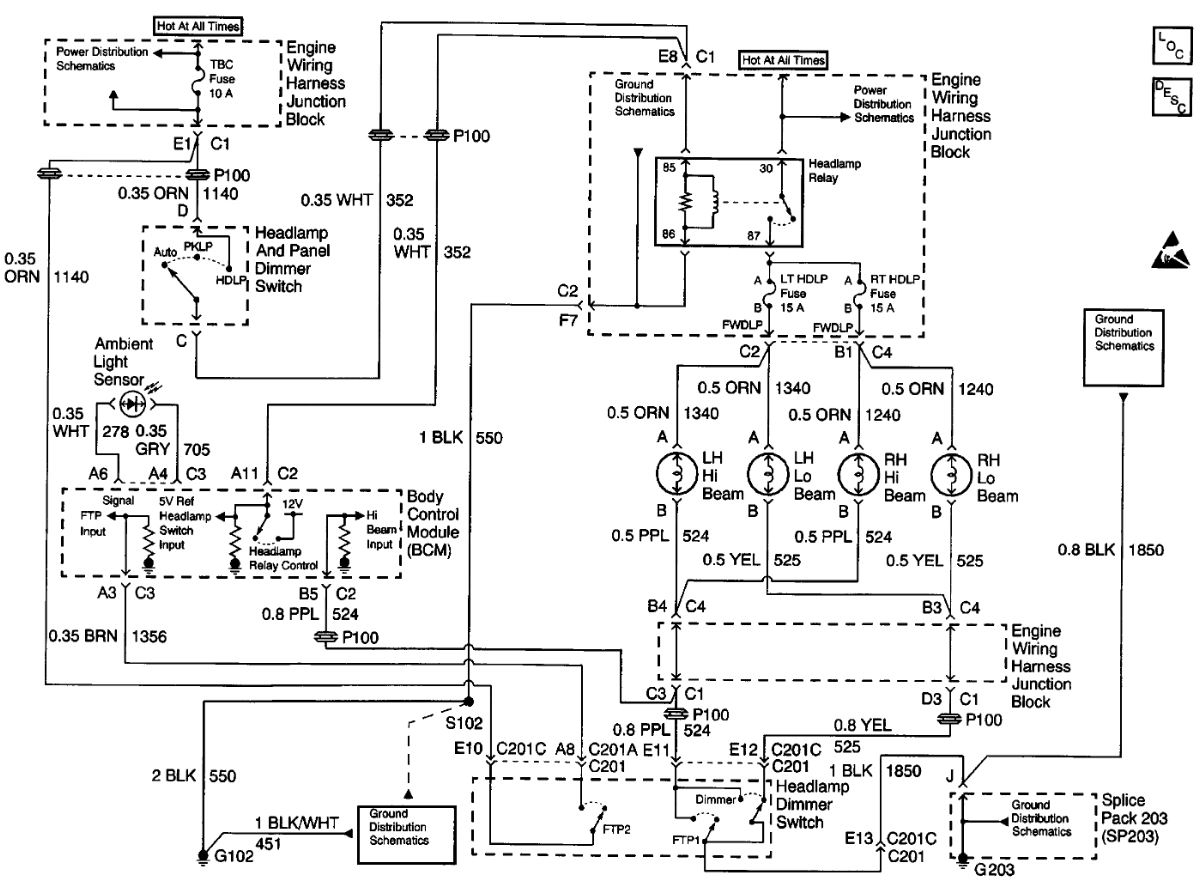
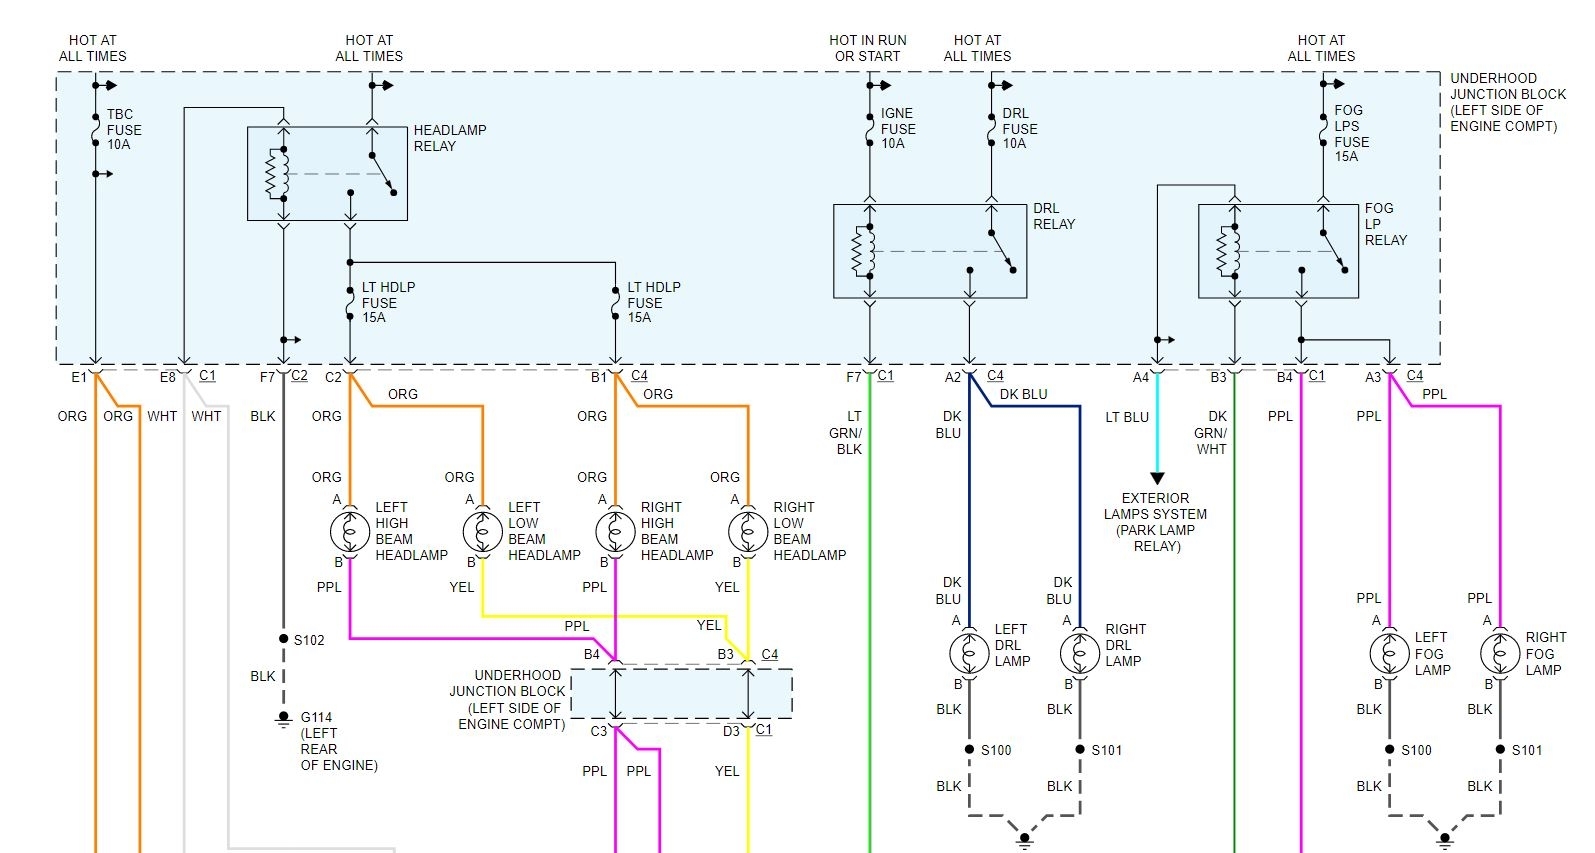
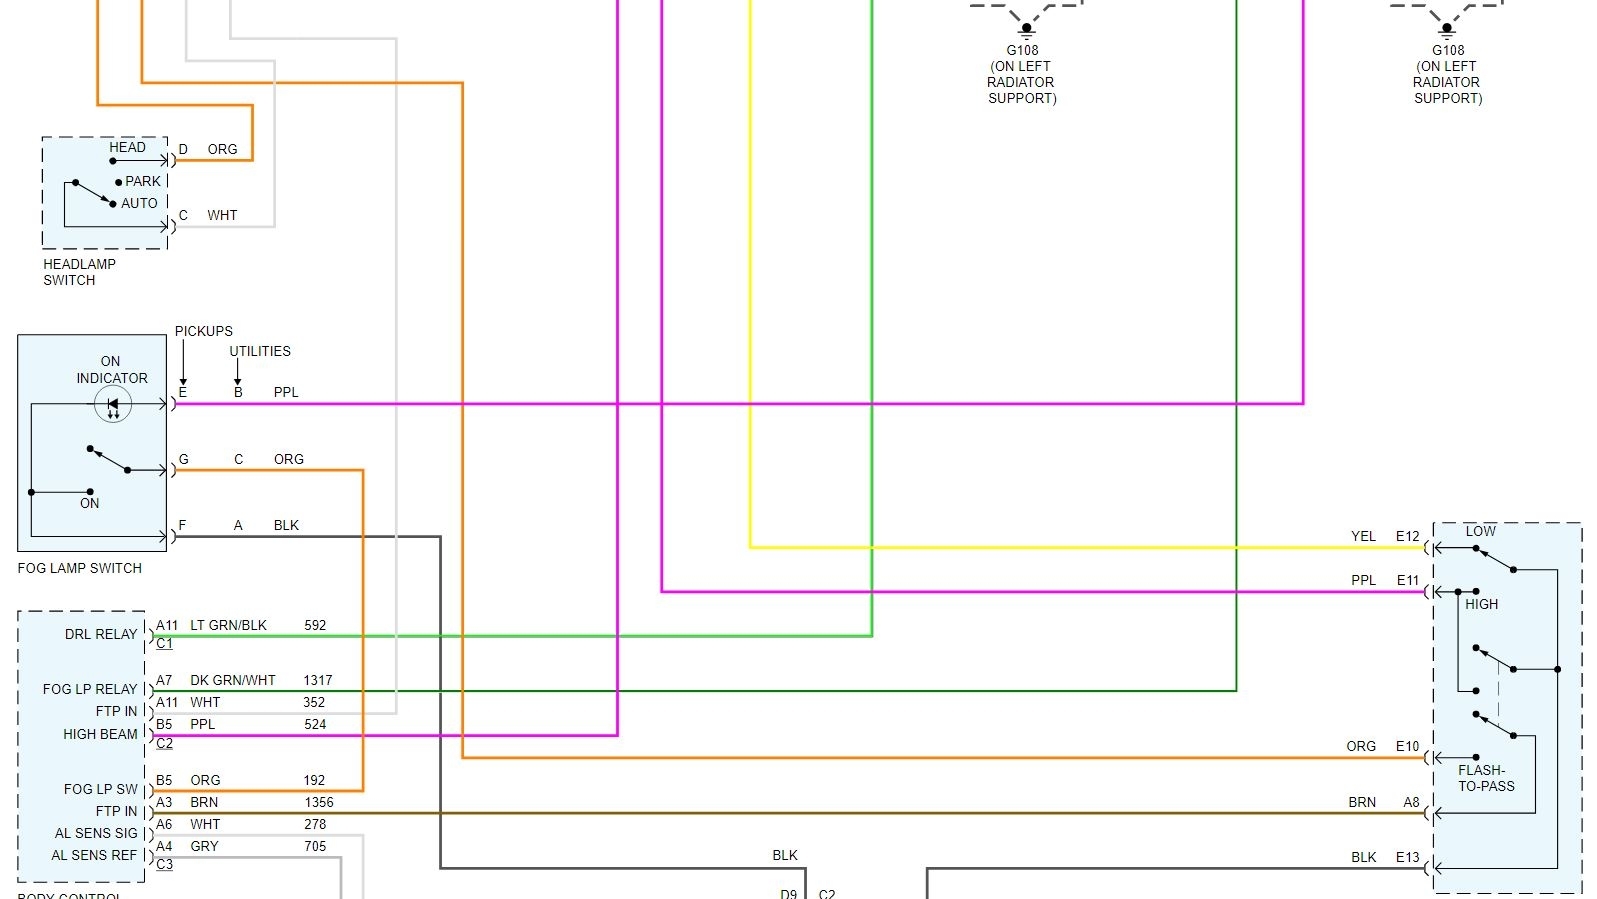
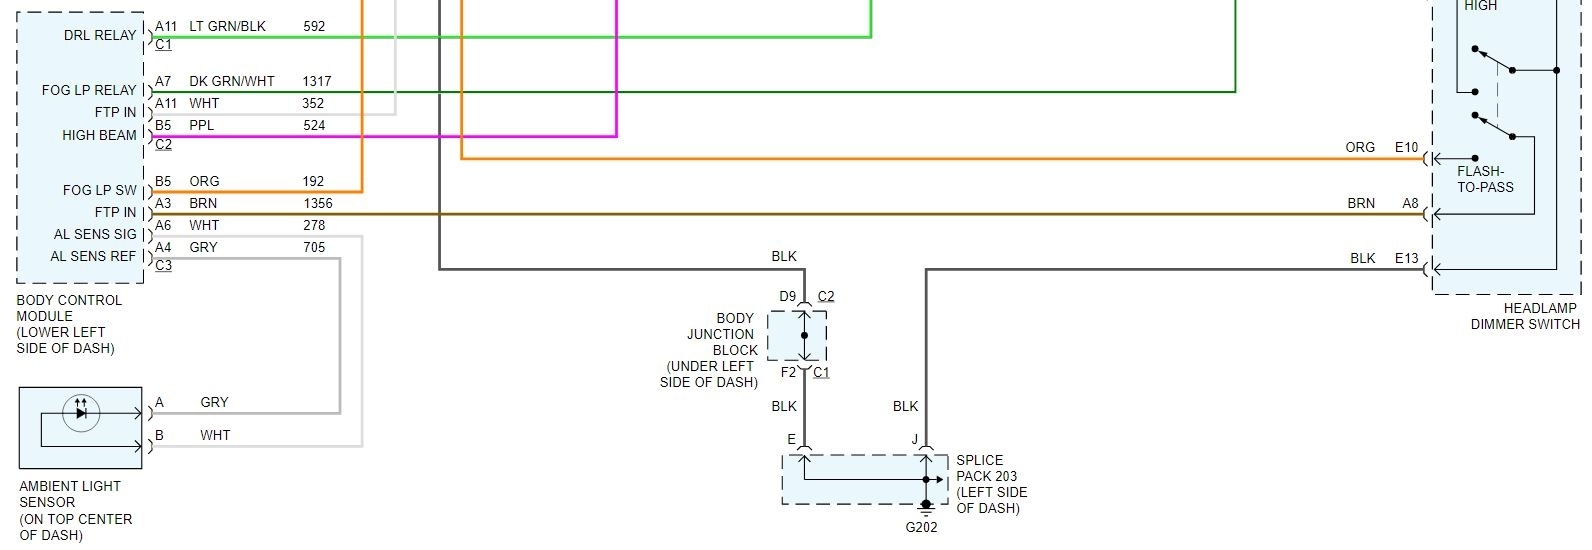
The hard part will be replacing the switch if it's faulty. One quick test to see if the issue is in the harness would be to put the old bulbs in as you know they worked, then at one of the bulbs use a fused jumper lead to ground the yellow wire on one side. If both lights come on with the key on then it points more to the switch or a bad connection at the base of the steering column than the wiring itself.

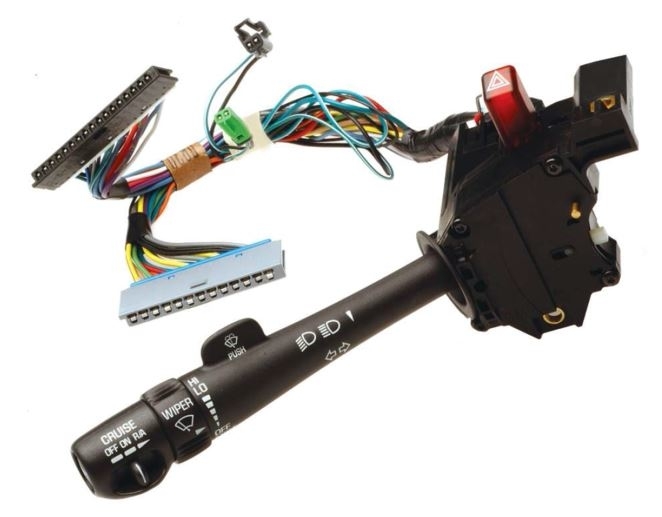
If you need to replace the switch this is the procedure,

1. Ensure the lever is off.
2. Disconnect the negative battery cable.
3. Disable the Supplemental Inflatable Restraint (SIR) system.
4. Remove the steering wheel airbag module.
5. Remove the horn switch.
6. Remove the tilt lever.
7. Remove the steering wheel.
8. Remove the knee bolster.
9. Loosen the steering column bracket nuts.
10. Remove the 2 TORX head screws from the lower column cover.
11. Tilt the cover down. Slide the cover back in order to disengage the locking tabs.
12. Remove the lower column cover.
13. Remove the TORX head screw from the upper column cover.
14. Remove the upper column cover.
15. Remove the 2 wire harness straps from the steering column wire harness.
16. Remove the Connector Position Assurance (CPA) retainer from the brake transmission shift interlock.
17. Disconnect the steering column bulkhead connector from the vehicle wire harness.
18. Disconnect the gray and the black connectors of the switch from the column bulkhead connector.
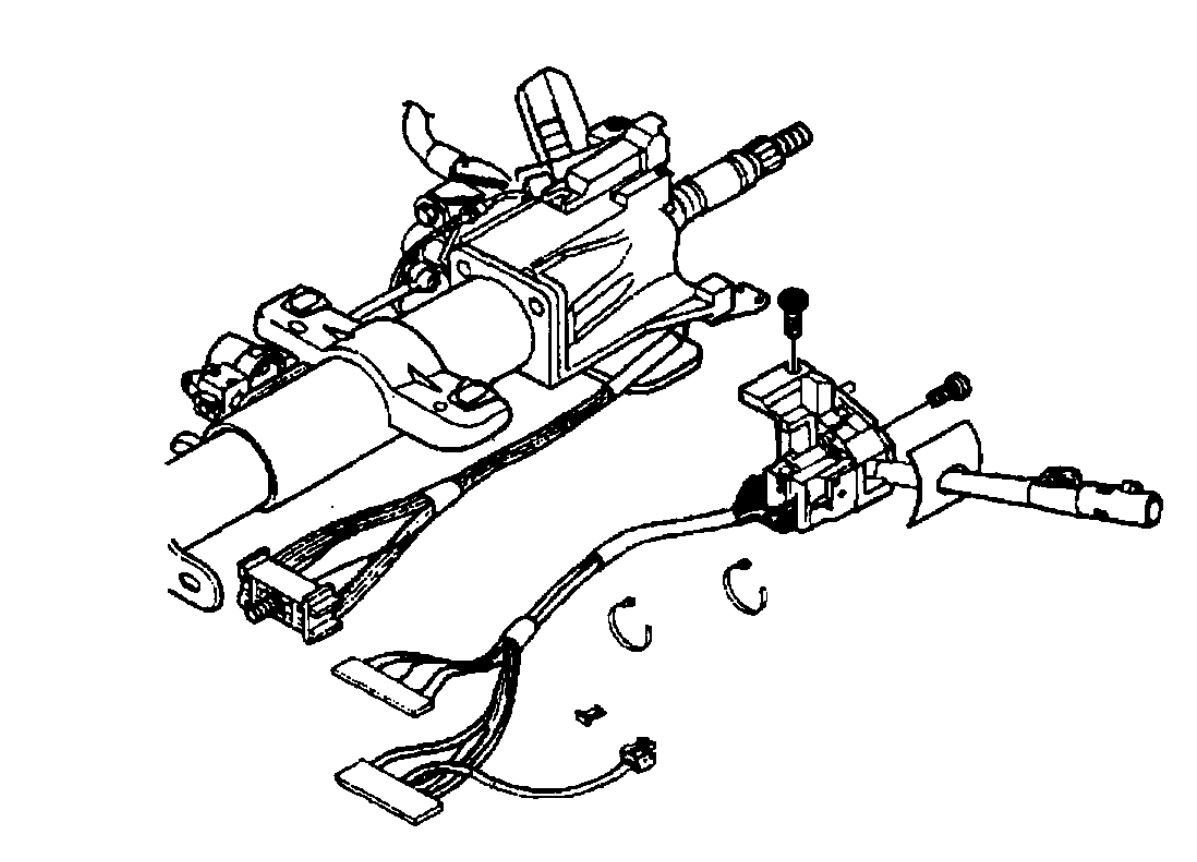
19. Remove the 2 TORX head screws from the switch.
20. Remove the multifunction turn signal/hazard switch.
Was this
answer
helpful?
Yes
No
Sunday, December 6th, 2020 AT 6:53 AM

Please login or register to post a reply.

Sponsored links