HEATER UNIT & HEATER CORE
CAUTION:Allow engine coolant to cool before removing radiator cap or attempting to drain coolant. Wrap a cloth around radiator cap when removing cap.
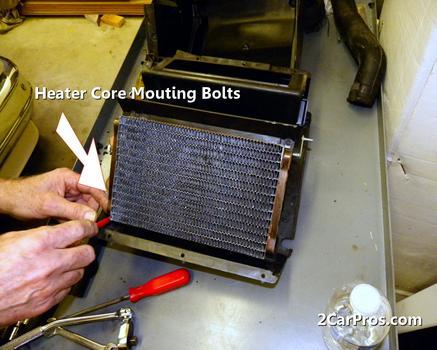
Removal & Installation
Open radiator drain cock and drain engine coolant. Disconnect heater hoses from heater core. Remove instrument panel. See INSTRUMENT PANEL.
Disconnect control cable from blower motor assembly. Disconnect 5 electrical connectors at bottom of blower motor assembly. Remove temperature control cable from heater unit servo. Remove blower motor housing. Remove heater core.
To install, reverse removal procedure. Tighten heater case retaining bolts to specification. See TORQUE SPECIFICATIONS. Ensure wiring is properly routed. Ensure cables operate freely and to their full stroke.
INSTRUMENT PANEL
CAUTION:Handle steering column carefully. Due to energy absorbing characteristics of steering shaft it is easily damaged when out of vehicle.
NOTE:In addition to driver-side and passenger-side air bags, Sportage models are equipped with a knee bolster air bag. Knee bolster air bag is mounted to "T" bar under steering column.
Removal
Disable air bag system. See AIR BAG SYSTEM SAFETY article in GENERAL SERVICING. Remove rear console cover, 2 screws from rear of console, and remove rear console. Remove knobs from shift lever and transfer lever (4WD lever). Remove 2 front console screws, slide boots over shift lever and transfer lever, and remove front console.
Remove data link connector from mounting bracket. Remove 4 square and 4 round mounting screw and nut trim covers from knee bolster panel. Remove 4 knee bolster air bag module mounting nuts. In order, remove 2 upper plastic mounting screws and then remove 2 lower plastic mounting screws. Discard plastic mounting screws.
Move knee bolster air bag module away from instrument panel enough to gain access to air bag connector. Disconnect air bag module connector and remove knee bolster air bag module from vehicle. Store knee bolster air bag module with knee bolster panel facing up.
Remove hood release cable handle and lower left cover. Remove "T" bar short section. Remove relay bracket. Remove 4 driver-side air bag module bolts. Remove driver-side air bag module and disconnect air bag connector. Ensure front wheels are pointed straight ahead. Remove steering wheel. Remove upper and lower steering column panels. Disconnect electrical connectors from steering column.
Remove left front pillar trim by manually pulling it away from installed position. Remove 2 mounting bolts from left side of "T" bar. Remove 3 mounting bolts from left side of instrument panel. Remove ashtray and center panel trim. Remove climate control panel. See CLIMATE CONTROL PANEL. Remove mounting bolt cover from center of instrument panel and remove center mounting bolt.
Remove glove box. Remove right front pillar trim by manually pulling it away from installed position. Remove lower right cover. Remove 3 mounting bolts from right side of instrument panel. Remove 2 mounting bolts from right side of "T" bar. Remove 2 instrument panel-to-steering column mounting bolts. Lower steering column assembly to floor. Remove 2 bolts under instrument panel-to-steering column mounting bolts. Disconnect all connectors between instrument panel and vehicle bulkhead electrical wiring harnesses. Remove instrument panel.
Installation
To install, reverse removal procedure. Ensure steering column is mounted correctly through "T" bar and that wire harnesses are in position before positioning instrument panel into place. Ensure heater controls operate freely and to their full stroke. Use NEW plastic mounting screws on knee bolster air bag module. Tighten mounting nuts and bolts to specification. See TORQUE SPECIFICATIONS.
Wednesday, April 29th, 2009 AT 9:08 PM