Sorry about that .. don't know where my head was the first post ?? LOL .. hope this makes up for it !! let me know
Disconnect and isolate the battery negative cable.
Using a trim stick or another suitable wide flat-bladed tool, gently pry the instrument panel top cover up and away from the instrument panel far enough to disengage the five snap clip retainers from their receptacles in the instrument panel structural support. See Fig. 76.
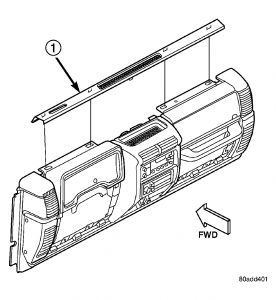
Fig. 76: Top Cover Remove/Install
Courtesy of DAIMLERCHRYSLER CORP.
1 - TOP COVER
Remove the top cover from the instrument panel.
CENTER BEZEL
REMOVAL
WARNING:ON VEHICLES EQUIPPED WITH AIRBAGS, DISABLE THE AIRBAG SYSTEM BEFORE ATTEMPTING ANY STEERING WHEEL, STEERING COLUMN OR INSTRUMENT PANEL COMPONENT DIAGNOSIS OR SERVICE. DISCONNECT AND ISOLATE THE BATTERY NEGATIVE (GROUND) CABLE, THEN WAIT TWO MINUTES FOR THE AIRBAG SYSTEM CAPACITOR TO DISCHARGE BEFORE PERFORMING FURTHER DIAGNOSIS OR SERVICE. THIS IS THE ONLY SURE WAY TO DISABLE THE AIRBAG SYSTEM. FAILURE TO TAKE THE PROPER PRECAUTIONS COULD RESULT IN ACCIDENTAL AIRBAG DEPLOYMENT AND POSSIBLE PERSONAL INJURY.
Disconnect and isolate the battery negative cable.
Remove the top cover from the instrument panel. (Refer to BODY/INSTRUMENT PANEL/TOP COVER - REMOVAL).
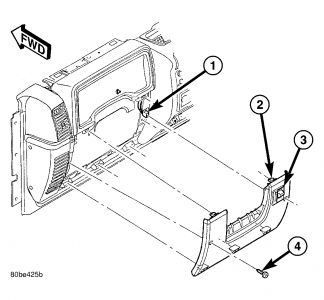
Fig. 63: Center Bezel
Courtesy of DAIMLERCHRYSLER CORP.
1 - BEZEL MAT
2 - TOP SCREWS (2)
3 - CENTER BEZEL
Remove the two screws that secure the top of the center bezel to the top of the instrument panel structural support. See Fig. 63.
Using a trim stick or another suitable wide flat-bladed tool, gently pry the lower edge of the center bezel away from the instrument panel.
Pull the lower edge of the center bezel away from the instrument panel far enough to disengage the four snap clip retainers that secure it to the receptacles in the instrument panel base trim.
Remove the center bezel from the instrument panel.
INSTALLATION
WARNING:ON VEHICLES EQUIPPED WITH AIRBAGS, DISABLE THE AIRBAG SYSTEM BEFORE ATTEMPTING ANY STEERING WHEEL, STEERING COLUMN OR INSTRUMENT PANEL COMPONENT DIAGNOSIS OR SERVICE. DISCONNECT AND ISOLATE THE BATTERY NEGATIVE (GROUND) CABLE, THEN WAIT TWO MINUTES FOR THE AIRBAG SYSTEM CAPACITOR TO DISCHARGE BEFORE PERFORMING FURTHER DIAGNOSIS OR SERVICE. THIS IS THE ONLY SURE WAY TO DISABLE THE AIRBAG SYSTEM. FAILURE TO TAKE THE PROPER PRECAUTIONS COULD RESULT IN ACCIDENTAL AIRBAG DEPLOYMENT AND POSSIBLE PERSONAL INJURY.
Position the center bezel onto the instrument panel.
Align the snap clips on the center bezel with the receptacles in the instrument panel base trim.
Using hand pressure, press firmly on the center bezel over each of the snap clip locations until each of the snap clips is fully engaged in its receptacle in the instrument panel base trim.
Install and tighten the two screws that secure the top of the center bezel to the top of the instrument panel structural support. Tighten the screws to 2 N.m (20 in. lbs.).
Reinstall the top cover onto the instrument panel. (Refer to BODY/INSTRUMENT PANEL/TOP COVER - INSTALLATION).
Reconnect the battery negative cable.
REMOVAL
WARNING:On vehicles equipped with airbags, disable the airbag system before attempting any steering wheel, steering column or instrument panel component diagnosis or service. Disconnect and isolate the negative battery (ground) cable, then wait two minutes for the airbag system capacitor to discharge before performing further diagnosis or service. This is the only sure way to disable the airbag system. Failure to take the proper precautions could result in accidental airbag deployment and possible personal injury or death.
Disconnect and isolate the battery negative cable.
Remove the center bezel from the instrument panel. (Refer to BODY/INSTRUMENT PANEL/INSTRUMENT PANEL CENTER BEZEL - REMOVAL) .
Remove the glove box from the instrument panel. (Refer to BODY/INSTRUMENT PANEL/GLOVE BOX - REMOVAL) .
Reach through the glove box opening and disconnect the two halves of the A/C-heater control vacuum harness connector. See Fig. 19.
Remove the two screws that secure the A/C-heater control to the instrument panel.
Fig. 19: A/C-Heater Control - Typical
Courtesy of DAIMLERCHRYSLER CORP.
1 - BLOWER MOTOR CONTROL
2 - TEMPERATURE CONTROL
3 - MODE CONTROL
4 - VACUUM HARNESS CONNECTOR
5 - MOUNTING SCREW LOCATIONS
Pull the A/C-heater control away from the instrument panel to access the connections on the back of the control.
Disconnect the three wire harness connectors from the back of the A/C-heater control and remove the control from the vehicle. See Fig. 20.
Fig. 20: A/C-Heater Control Connections - Typical
Courtesy of DAIMLERCHRYSLER CORP.
1 - A/C-HEATER CONTROL
2 - BLOWER MOTOR SWITCH
3 - BLOWER MOTOR SWITCH CONNECTOR
4 - TEMPERATURE/ILLUMINATION CONNECTOR
5 - MODE SWITCH CONNECTOR
6 - VACUUM HARNESS
7 - MODE SWITCH
INSTALLATION
Connect the three wire harness connectors to the back of the A/C-heater control.
Position the A/C-heater control onto the instrument panel and install the two retaining screws. Tighten the screws to 2 N.m (17 in. lbs.).
Reach through the glove box opening and connect the A/C-heater vacuum harness connector.
Install the glove box. (Refer to BODY/INSTRUMENT PANEL/GLOVE BOX - INSTALLATION) .
Install the center bezel. (Refer to BODY/INSTRUMENT PANEL/INSTRUMENT PANEL CENTER BEZEL - INSTALLATION) .
Reconnect the negative battery cable.
Feb 3, 2009 at 5:17 PM