IAC/PCM Replaced STILL P0505?

Tiny
BRONNE
  • MEMBER
  • 2000 JEEP CHEROKEE
  • 4 CYL
  • 4WD
  • AUTOMATIC
  • 154,000 MILES
We have poured money into this Jeep Cherokee Classic
since we purchased, in September, 2008. It is in beautiful condition, we look after it. Replaced A/C Everything! Catalytic Converter++ Fixed electrical problems in
'Alerts' on dash, separately, which were causing 'Check Engine' light to stay on. We have done Everything!
Check-Engine light came on again weeks ago, garages
told us it was, 'clogged catalytic converter', hadn't been 'welded properly causing a blockage, which, in turn, caused the the idle air control to malfunction.
I actually looked underneath the car when it was up at the garages
and I couldn't believe what I saw, the mechanics pointed out
the 'narrowing' and said to get it to a Good Cat shop, don't go back
to that place! Took it to Jeep Dealership because of distance/time/
Check Engine Code read, they couldn't figure it out!
Finally we had to get it towed to them, because car just cut out everywhere, you name it, Stop Signs, Traffic Lights and finally wouldn't start; towed! Jeep replaced the Idle Air Control Motor: $432.
Check engine light is back on again 2 days later!
Back to Jeep, they replaced the Jeep Computer: $674.
We've already had the sensor replaced for same problems. Since we had the Jeep back the A/C only blows on highest setting! We've had Everything
replaced on A/C System! Check Engine light
came back on again, 3 days after replacing PCM!
We are desperate that this Jeep doesn't put us under
a bridge! Initially it was reported --2 Auto Shops-- that it was ' clogged catalytic converter / wrong installation problem causing the Idle Air Control system to 'overcompensate'. Jeep Auto Shop said: No, it's in fine, which is Odd, because we have had to fix Cat. Problems forever, including a second weld job!
We 'limped through the week, Jeep failing at stop signs and traffic lights
due to hectic schedules. Made Another appointment with Jeep for
this Thursday:
UPDATE:
Donated: $5:00 on:
Sunday, May 9th, 2010:
05/08/2010:
Garage Check:
"Complete OBD II Computer Diagnosis:
Indicate A Fault Code # PO505 ( Idle Air Control System)
Customers has just had Idle Air Control Valve Replaced at Dealership
Prior to Arrival --Including New PCM." Cost: $70.00
Exactly Same Code Presenting prior to Installing
New Parts indicated++ on File.
After New PCM was installed a week ago!
Front Right Passenger Side Window Started Operating --Up&Down
[It never had since 2008, when Jeep Purchased] Also Rear Back.
Left & Right Passenger windows and the A/C Blower has not been
'misbehaving' --I.E, Attempting to Only Blow on Highest Settings!
We 'felt' all along this was a 'wiring' snafu? --Possibly
caused by previous owner 'tweaking' wiring to 'quick-sell' --Sure,
enough, along We came!
At this juncture:
Is this 'Related' to the Cat. Problem [Refer above] mentioned by three garages
prior to the Jeep Dealership's throwing expensive parts at us and Not
fixing the problem; by the way Jeep said Cat was "a good job"
Not true, we have had awful problems and spent a lot of time and money
fixing them, including two re-weld jobs that we have Now been told
are 'bizarre' and that it needs re-doing from scratch! --Also that
because of that Cat. Job Jeep will not pass the smog-test due this
September 2010!
We have had A/C done, So many parts replaced, we believed
all along were due to 'false' readings due to previous owner
'tweeking' wiring etc.
Check Engine light's still on, and Jeep's Idle is 'Worse' staggering
at left turns and stops and traffic lights [Feels as if 'trying to
Fail] after all night in garage, then
running high idle, i.E, 'Attempting to 'jump brakes' !
Looked all over on line:
Could be a short on 'tach' wire leading to PCM
Though we still believe related to Cat job causing IAC to
overcompensate [Creating back-pressure]
UPDATE;
05/10/2010:
Jeep towed off Freeway/Hired Car:
Garage says Right Engine Mount Broken and put pressure
on 'shroud' over Fan: Fan blades cut into shroud as it had
'shifted' [Reason we
had to pull over and call the Tow, because of the terrific
grinding noise!]
Tomorrow Garage troubleshooting Check Engine light which
is still on: CODE PO505 has remained a 'constant' through
New IAC Motor and PCM!
Any idea What's going on? - Thank you for your response.
Monday, May 10th, 2010 AT 6:12 PM
1 Reply

Tiny
KHLOW2008
  • MECHANIC
  • 41,815 POSTS
Hi Bronne,

Sorry for the delay in replying.

Since we had the Jeep back the A/C only blows on highest setting!
This problem is most likely a fault with the blower motor resistor or its wiring.

Front Right Passenger Side Window Started Operating --Up&Down

This could be a faulty with the door switch.

Check Engine light's still on, and Jeep's Idle is 'Worse' staggering at left turns and stops and traffic lights [Feels as if 'trying to Fail] after all night in garage, then running high idle, i.e., 'Attempting to 'jump brakes' !!
Looked all over on line: Could be a short on 'tach' wire leading to PCM Though we still believe related to Cat job causing IAC to overcompensate [Creating back-pressure]

Tomorrow Garage troubleshooting Check Engine light which is still on: CODE PO505 has remained a 'constant' through. New IAC Motor and PCM!
Any idea What's going on?

I don't see how the IAC compensating could trigger a trouble code. It could cause the surging but would not trigger the code. Since the IAC and PCM are new, unless either of the item is faulty, though new or you have a wiring circuit problem. I would suggest checking the wire harness for continuity and contaminations at connectors.

Here are the diagnostic procedures for the P0505.

DTC P0505: IDLE AIR CONTROL MOTOR CIRCUITS
NOTE:
If Powertrain Control Module (PCM) is replaced, PCM must be reprogrammed. After each repair procedure has been completed, reconnect all components.

Perform TEST VER-5 under VERIFICATION TESTS to ensure system is functioning properly.

Description
Idle Air Control (IAC) motor voltage is monitored immediately after ignition is turned on with battery voltage at more than 11.5 volts. DTC will set in Powertrain Control Module (PCM) memory when PCM senses a short to ground or battery voltage on any of the 4 IAC driver circuits while IAC motor is active. Possible causes for DTC to set are: defective IAC motor, defective PCM, defective connector or defective wiring.

Testing

1. Turn ignition on, with engine off. Using scan tool, read DTCs. If DTC SPECIFIC GOOD TRIP counter is displayed and displayed count is "0", go to step
3 . If DTC SPECIFIC GOOD TRIP counter is not displayed or displayed count is not "0", go to next step.

2. Turn ignition on with engine off. Using scan tool, read and record FREEZE FRAME data. Road test vehicle under conditions in FREEZE FRAME data, paying particular attention to fault setting conditions such as speed, temperature, load and MAP vacuum. Using scan tool, read DTCs. If DTC P0505: IDLE AIR CONTROL MOTOR CIRCUITS returns, go to next step. If DTC P0505: IDLE AIR CONTROL MOTOR CIRCUITS does not return, go to step 19 .

3. Turn ignition off. Disconnect IAC motor connector. Disconnect PCM connectors. PCM is located in engine compartment on left front fender, near radiator support. Inspect connectors for damaged pins, corrosion and loose terminals. Repair connectors as necessary. If connectors are okay, measure resistance between ground and Gray/Red wire at IAC motor connector. If resistance is 5 ohms or more, go to next step. If resistance is less than 5 ohms, repair short to ground in Gray/Red wire between IAC motor and PCM.

4. Measure resistance between ground and Yellow/Black wire at IAC motor connector. If resistance is 5 ohms or more, go to next step. If resistance is less than 5 ohms, repair short to ground in Yellow/Black wire between IAC motor and PCM.

5. Measure resistance between ground and Brown/White wire at IAC motor connector. If resistance is 5 ohms or more, go to next step. If resistance is less than 5 ohms, repair short to ground in Brown/White wire between IAC motor and PCM.

6. Measure resistance between ground and violet/Black wire at IAC motor connector. If resistance is 5 ohms or more, go to next step. If resistance is less than 5 ohms, repair short to ground in Violet/Black wire between IAC motor and PCM.

7. Reconnect PCM connectors. Start engine and allow it to idle. Ensure IAC motor is still disconnected. Measure voltage between ground and Gray/Red wire at IAC motor connector. If voltage changes to more than 5 volts at any time, go to next step. If voltage does not change to more than 5 volts at any time, go to step 18 .

8. With engine still idling, measure voltage between ground and Yellow/Black wire at IAC motor connector. If voltage changes to more than 5 volts at any time, go to next step. If voltage does not change to more than 5 volts at any time, go to step
17 .

9. With engine still idling, measure voltage between ground and Brown/White wire at IAC motor connector. If voltage changes to more than 5 volts at any time, go to next step. If voltage does not change to more than 5 volts at any time, go to step
16 .

10. With engine still idling, measure voltage between ground and Violet/Black wire at IAC motor connector. If voltage changes to more than 5 volts at any time, go to next step. If voltage does not change to more than 5 volts at any time, go to step
15 .

11. Turn engine off. Disconnect PCM connectors. Ensure IAC motor is still disconnected. Measure resistance between Gray/Red wire and Yellow/Black, Brown/White and Violet/Black wires at IAC motor connector. If any resistance reading is less than 5 ohms, Gray/Red wire is shorted to wire with resistance less than 5 ohms. Repair wiring as necessary. If all resistance readings are 5 ohms or more, go to next step.

12. Measure resistance between Yellow/Black wire and Brown/White and Violet/Black wires at IAC motor connector. If any resistance reading is less than 5 ohms, Yellow/Black wire is shorted to wire with resistance less than 5 ohms. Repair wiring as necessary. If all resistance readings are 5 ohms or more, go to next step.

13. Measure resistance between Brown/White and Violet/Black wires at IAC motor connector. If resistance is less than 5 ohms, Brown/White wire and Violet/Black wire are shorted together. Repair wiring as necessary. If all resistance is 5 ohms or more, go to next step.

14. At this time, IAC motor is assumed to be defective. Replace IAC motor.

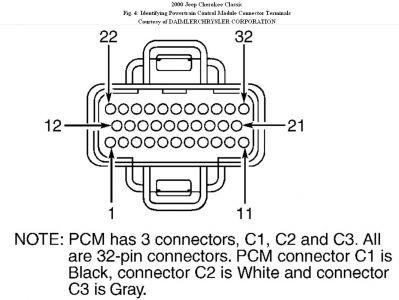
15. Turn ignition off. Ensure IAC motor is disconnected. Disconnect PCM connectors. Visually inspect connectors for corroded, damaged, pushed-out or miswired terminals. Repair connectors as necessary. If connectors are okay, measure resistance of Violet/Black wire between IAC motor connector and terminal No. 20 at PCM C1 connector. See Fig. 4 . If resistance is 5 ohms or more, repair open in Violet/Black wire. If resistance is less than 5
ohms, replace PCM.

16. Turn ignition off. Ensure IAC motor is disconnected. Disconnect PCM connectors. Visually inspect connectors for corroded, damaged, pushed-out or miswired terminals. Repair connectors as necessary. If connectors are okay, measure resistance of Brown/White wire between IAC motor connector and terminal No. 11 at PCM C1 connector. See Fig. 4 . If resistance is 5 ohms or more, repair open in Brown/White wire. If resistance is less than 5
ohms, replace PCM.

17. Turn ignition off. Ensure IAC motor is disconnected. Disconnect PCM connectors. Visually inspect connectors for corroded, damaged, pushed-out or miswired terminals. Repair connectors as necessary. If connectors are okay, measure resistance of Yellow/Black wire between IAC motor connector and terminal No. 10 at PCM C1 connector. See Fig. 4 . If resistance is 5 ohms or more, repair pen in Yellow/Black wire. If resistance is less than 5
ohms, replace PCM.

18. Turn ignition off. Ensure IAC motor is disconnected. Disconnect PCM connectors. Visually inspect connectors for corroded, damaged, pushed-out or miswired terminals. Repair connectors as necessary. If connectors are okay, measure resistance of Gray/Red wire between IAC motor connector and terminal No. 19 at PCM C1 connector. See Fig. 4 . If resistance is 5 ohms or more, repair open in Gray/Red wire. If resistance is less than 5 ohms, replace PCM.

19. Start engine and allow it to idle. Using scan tool, go to SYSTEM TESTS and select IAC WIGGLE TEST. While monitoring IAC motor operation, wiggle wiring harness from IAC motor to PCM. If IAC motor stops operating at any time while wiggling wiring harness, repair wiring harness where wiggling caused IAC motor to stop operating. If IAC motor does not stop operating at any time while wiggling wiring harness, no problem is indicated at this time. Test is complete.


https://www.2carpros.com/forum/automotive_pictures/192750_PCMConnector00CherokeeFig04_1.jpg


Was this
answer
helpful?
Yes
No
-1
Sunday, May 16th, 2010 AT 1:40 AM

Please login or register to post a reply.

Sponsored links