Sounds like the tranfer case first check to see if the linkage is set the wright way I'm not shure witch transfer case you have so I am attaching for all
ADJUSTMENTS
Range Control Linkage
NP-207 MODELS
See Figure 3
Place the range control lever in the 2WD position.
Insert a 1/8 in. (3mm) spacer between the gate and the lever.
Hold the lever in this position.
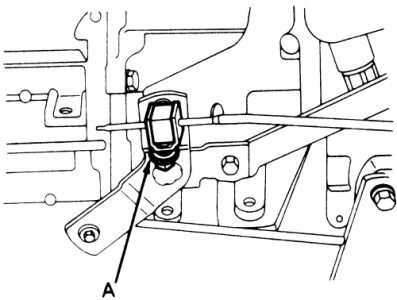
Fig. 3: NP-207 range control adjustment point (A)
Place the transfer case lever in the 2WD position.
Adjust the link, at the trunnion, to provide a free pin at the case outer lever.
NP-228 AND 229 MODELS
See Figure 4
Place the range control lever in the HIGH position.
Insert a 1/8 in. (3mm) spacer between the shift gate and the lever.
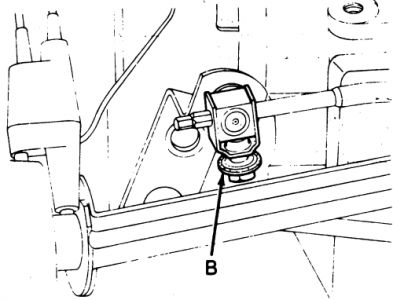
Fig. 4: NP-228/229 range control adjustment point (B)
Hold the lever in this position with tape.
Raise and support the vehicle safely.
Verify that the range lever is in the HIGH position.
Loosen the locknut and adjust the link, at the trunnion, to provide a free pin at the case outer lever. Tighten the locknut.
Lower the vehicle. Remove the spacer.
231 AND 242 MODELS
See Figure 5
Remove the shifter lever bezel.
Place the range control lever in the 4 LOW position.
Insert a 1/8 in. (4mm) spacer between the forward edge of the shift gate and the lever.
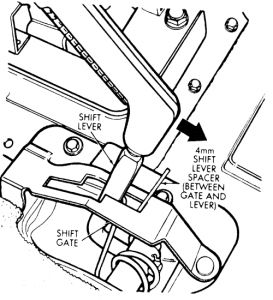
Fig. 5: Range control adjustment on the 231/242
Hold the lever in this position with tape.
Raise and support the vehicle safely.
Loosen the trunnion lock bolt. The linkage rod should now slide freely in the trunnion.
Position the linkage rod so it is free in the range lever. Then tighten the locknut.
Lower the vehicle. Remove the spacer.
NV/NP-249 MODELS
Place the range control lever in the N position.
Raise and support the vehicle safely.
Loosen the trunnion lockbolt. The linkage rod should now slide freely in the trunnion.
Verify the shift lever on the transfer case is centered in the N position.
Tighten the lockbolt to 96-180 inch lbs. (11-20 Nm).
Lower the vehicle. Remove the spacer.
Mode Rod
NP-228 AND NP-229 MODELS
See Figure 6
WARNING
If this adjustment is not properly made, the transfer case may not fully engage 2WD/HIGH and internal damage will result.
Fully engage the 2WD/HIGH position.
Refer to the accompanying illustration. The range lever and the mode lever must be aligned on the same centerline.
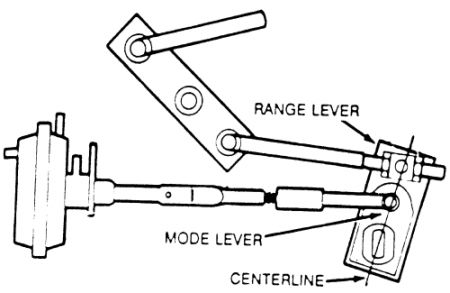
Fig. 6: Mode rod adjustment components
To correctly position the mode lever, it is sometimes necessary to rotate the transfer case output shaft. To do this, raise and support the rear end on jackstands and rotate the rear driveshaft, while applying a load on the mode lever. Doing this will help align the spline for full engagement of 2WD/HIGH.
Adjust the length of the mode rod (4) to approximately 6 in. (152mm), to eliminate all free play.
Make sure all vacuum lines are secure.
Drive the vehicle a short distance, shifting between 4WD and 2WD/HIGH.
Check the mode lever position. The lever should be aligned as explained in Step 2. If not, repeat Steps 3 through 5, increasing the length of the mode rod one turn, until proper alignment is achieved.
With the transfer case vacuum motor shift rod fully extended and the transfer case in 2WD/HIGH, adjust the mode rod so that the pin (6) moves freely in its hole.
Monday, January 12th, 2009 AT 7:58 PM