Welcome to 2CarPros.
The most common problem is the hard plastic vacuum hose they use. Often times, it will crack and create a leak that is unseen.
Now, there is one vacuum supply from the engine that runs to the control panel and then vacuum is distributed based on requirements. Here is a test that explains how to locate a vacuum leak in the HVAC system. The attached pictures correlate with these directions.
Let me know if this helps.
____________________________
Locating vacuum leaks
WARNING: on vehicles equipped with airbags, disable the airbag system before attempting any steering wheel, steering column, or instrument panel component diagnosis or service. Disconnect and isolate the battery negative (ground) cable, then wait two minutes for the airbag system capacitor to discharge before performing further diagnosis or service. This is the only sure way to disable the airbag system. Failure to take the proper precautions could result in an accidental airbag deployment and possible personal injury.
1. Disconnect the vacuum harness connector located between the a/c heater control and the HVAC housing under the instrument panel.
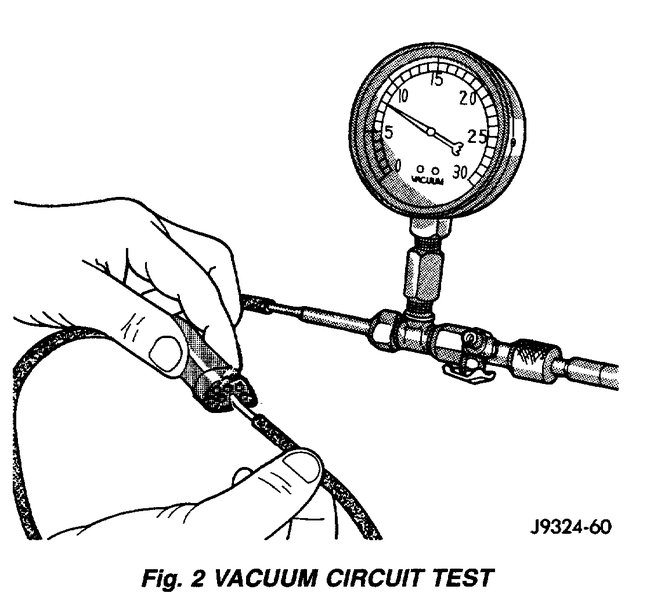
Fig.2 Vacuum Circuit Test
pic 1
2. Connect the test set vacuum hose probe to each port in the HVAC housing half of the vacuum harness connector, one port at a time, and pause after each connection. The test set gauge should return to the 27 kPa (8 in. Hg.) Setting shortly after each connection is made. If OK, replace the faulty a/c heater control. If not OK, go to step Step 3.
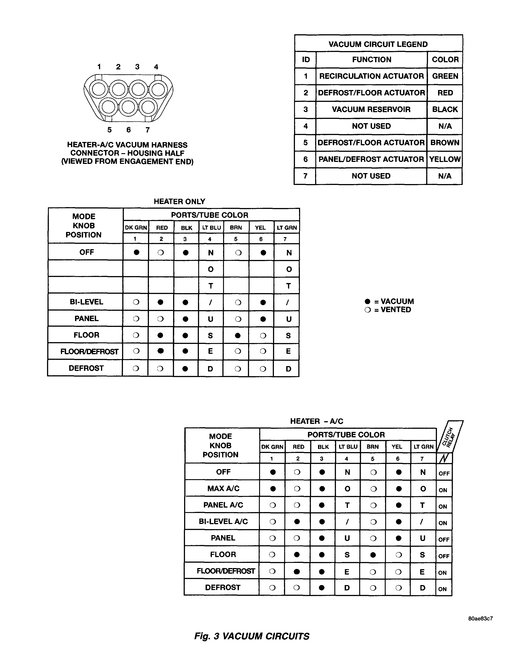
Fig.3 Vacuum Circuits
pic 2
3. Determine the vacuum line color of the vacuum circuit that is leaking. To determine the vacuum line colors, see the Vacuum Circuits chart.
4. Disconnect and plug the vacuum line from the component (fitting, actuator, valve, switch, or reservoir) on the other end of the leaking circuit. Instrument panel disassembly or REMOVAL may be necessary to gain access to some components. Refer to Instrument Panel System for the procedures.
5. Connect the test set hose or probe to the open end of the leaking circuit. The test set gauge should return to the 27 kPa (8 in. Hg.) Setting shortly after each connection is made. If OK, replace the faulty disconnected component. If not OK, go to Step 6.
6. To locate a leak in a vacuum line, leave one end of the line plugged and connect the test set hose or probe to the other end of the line. Run your fingers slowly along the line while watching the test set gauge. The vacuum reading will fluctuate when your fingers contact the source of the leak. To repair the vacuum line, cut out the leaking section of the line. Then, insert the loose ends of the line into a suitable length of 3 millimeter (0.125 inch) inside diameter rubber hose.
_______________________
Let me know if I can help.
Take care,
Joe
Images (Click to make bigger)
Saturday, June 29th, 2019 AT 7:33 PM


