Instruction manual on Replacing In-Cabin A/C Blower motor resistor

Tiny
1KONGFISH
  • MEMBER
  • 2002 MINI COOPER S
  • 121,000 MILES
I have a 2002 Mini Cooper S (John Cooper Edition)
Last 7 of vin# TD56071
Diagrams, do not show actual location of part, or what parts come off prior to the resistor to gain access to the part.
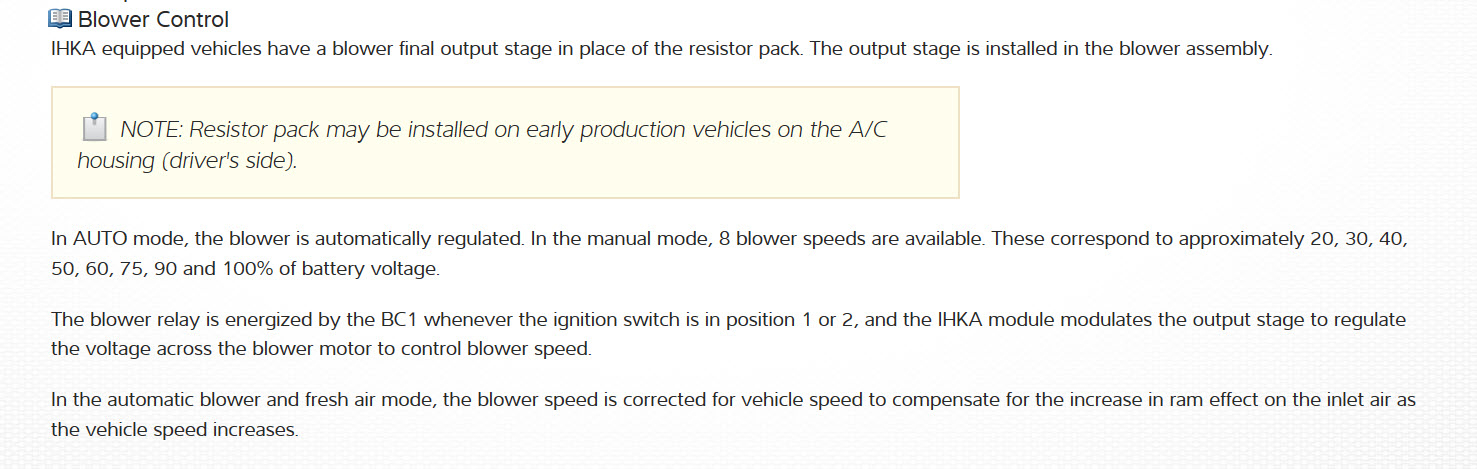
There are 2 different resistors listed for this car, based on your car having, or not having, the << Auto-Air/Climate Control feature.>>
AutoAir - YES
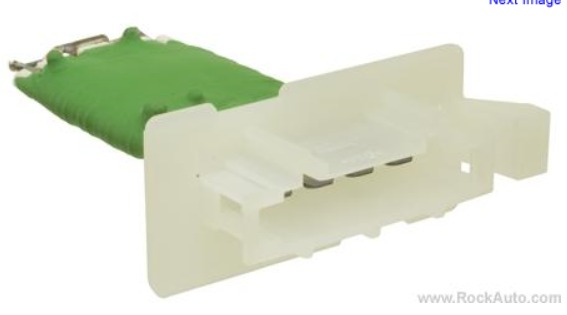
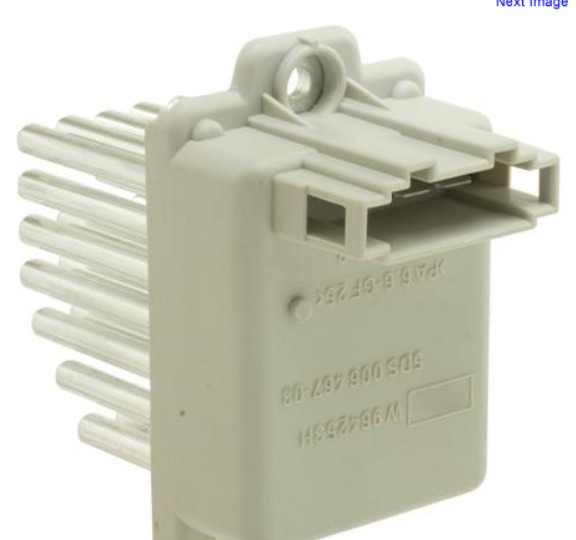
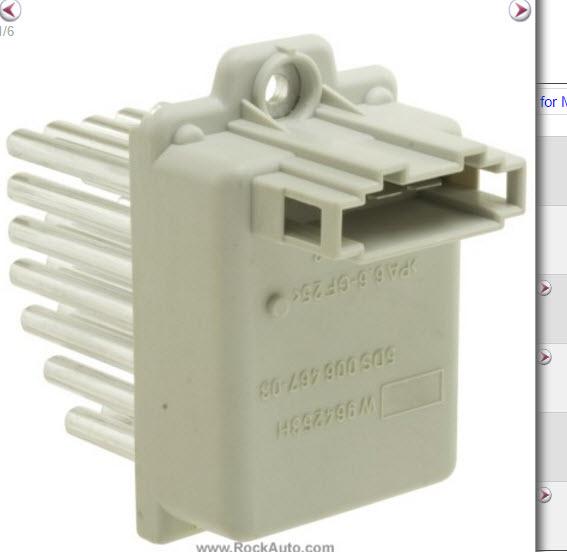
PART # 64111499122 (( (parts diagram Photo included )))
I need a step by step service manual DIY guide explaining the following;
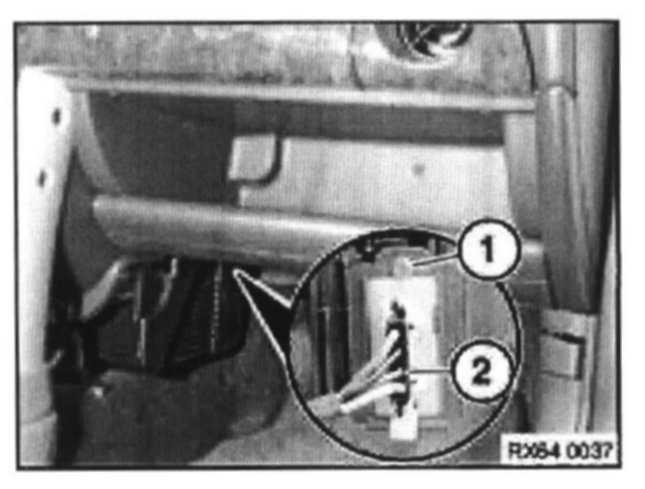
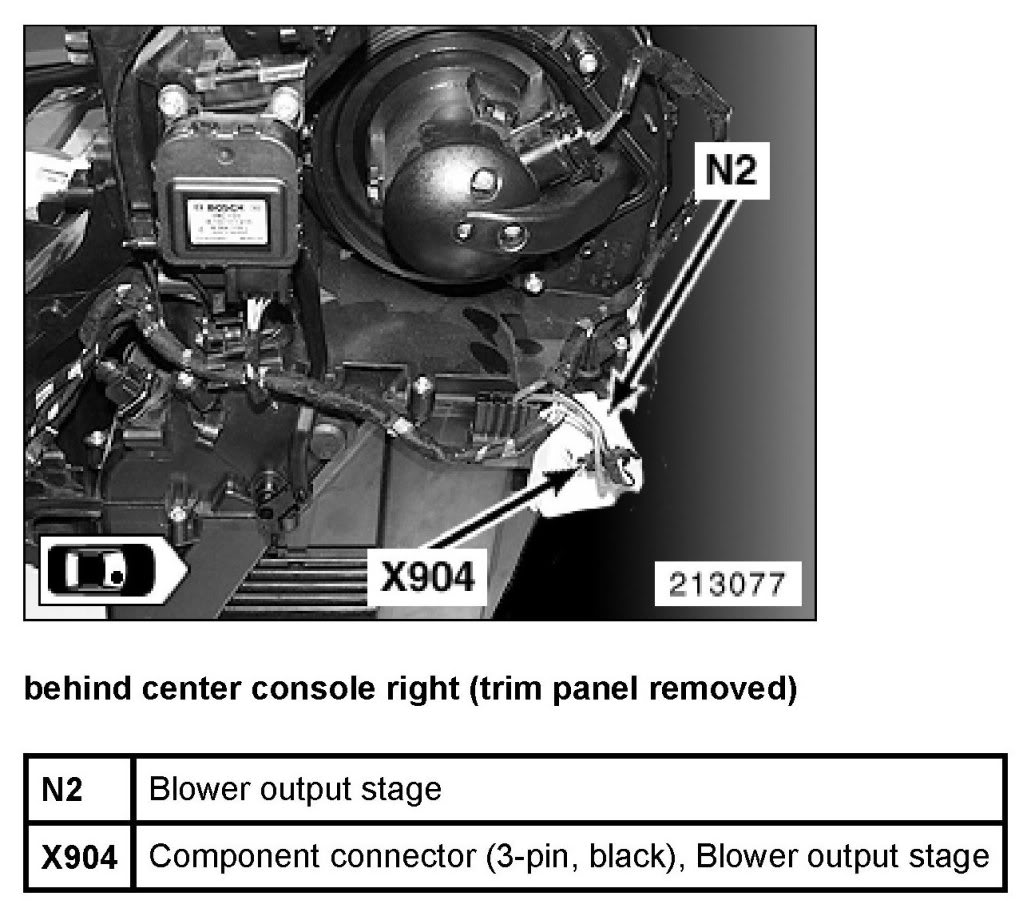
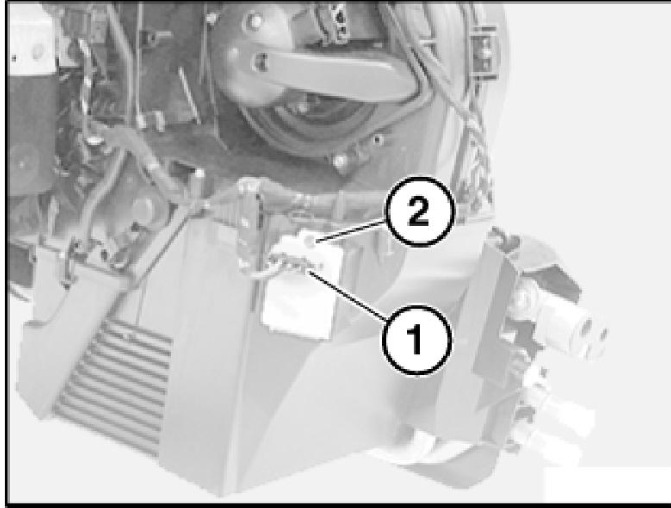
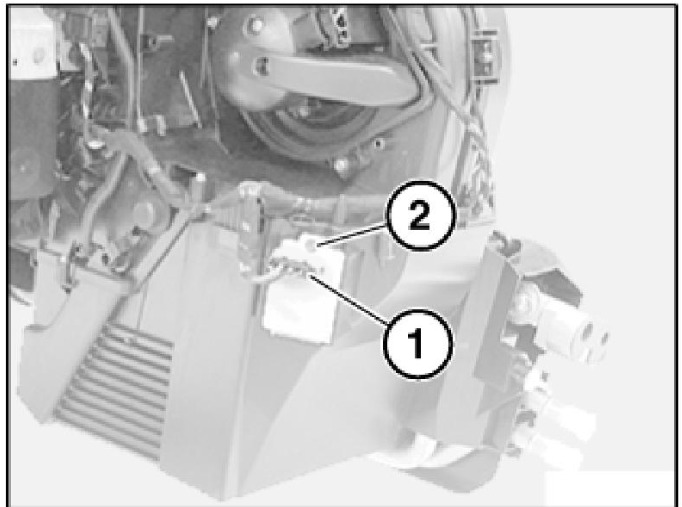
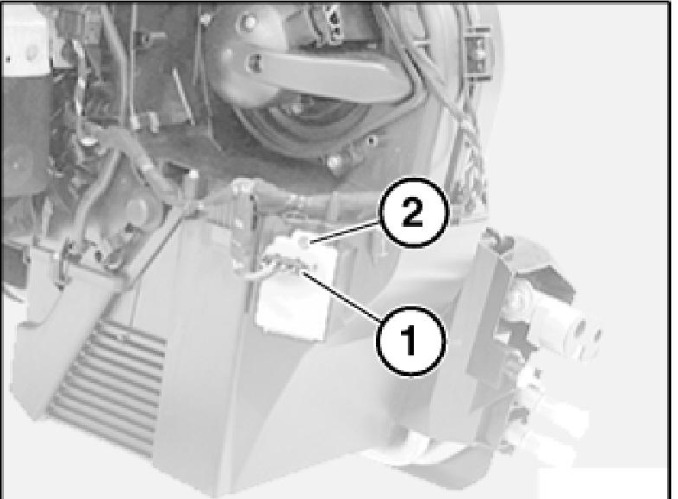
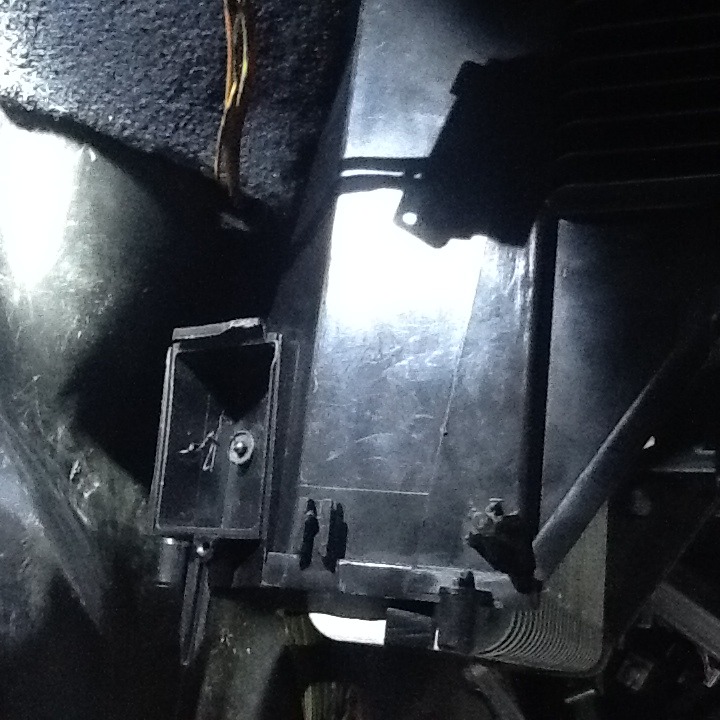
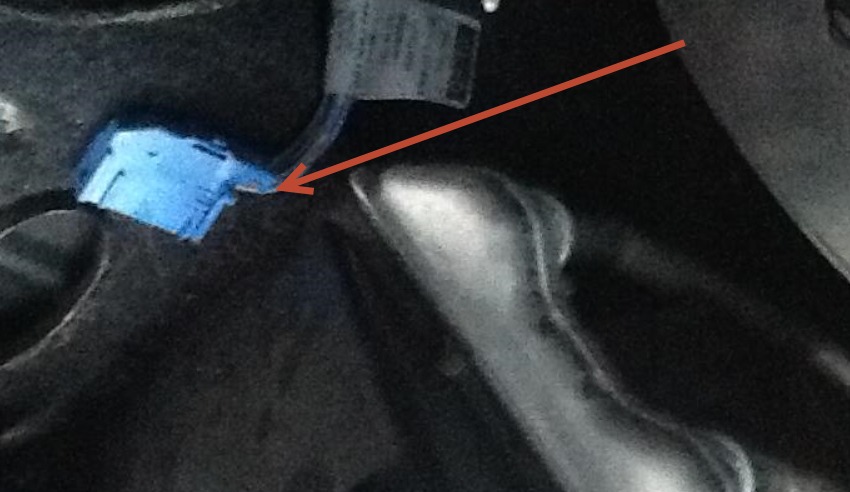
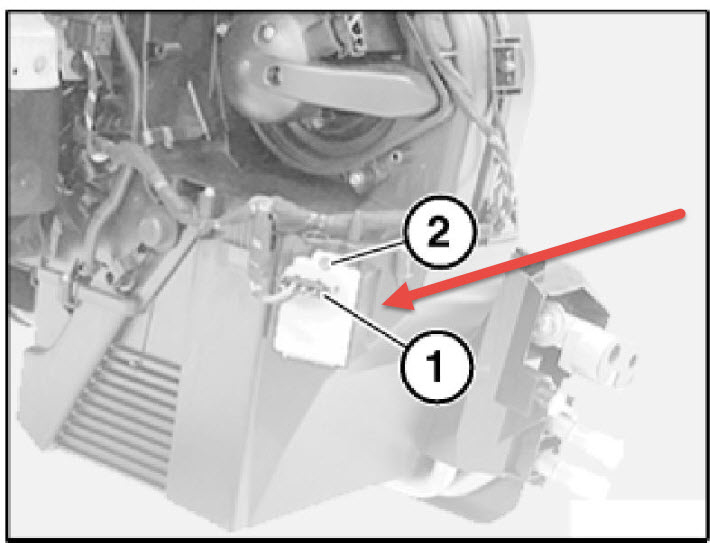
A.) The location of the A/C Blower motor resistor
B.) What parts need to be removed to be able to access the part to complete the repair.
Show me the accuracy, speed, & user friendly, your service is this first time,
And I will gladly use the donation button and pay you for assistance me with the 8-10 other repairs I need to make on this car.
Thanks,
Gary
Sunday, October 13th, 2013 AT 12:08 PM

26 Replies

Tiny
WRENCHTECH
  • MECHANIC
  • 20,758 POSTS
It's under the dash on the passenger side, held in by one screw.

https://www.2carpros.com/images/external/101683251.jpg
Was this
answer
helpful?
Yes
No
+9
Sunday, October 13th, 2013 AT 1:01 PM
Tiny
1KONGFISH
  • MEMBER
  • 12 POSTS
Wrench tech,
Thanks for the quick reply
If you will go back and read my question carefully, you will notice I included a photo of a parts Diagram. I also included the part number for the ("CORRECT") part. Part # > 64111499122
There are 2 options for 2 very different parts, that go in totally different locations for this repair based on the car having, or not having the ( AUTO-AIR ) Feature/Function.
The photo you provided me back, is of the other part # 64111499121 blower motor resistor WITHOUT the "AUTO-AIR "FEATURE/FUNCTION.
I need the instructions for part number# 64111499122
<<<<< PLEASE NOTE: in the photo of the parts Diagram, it shows part # 2 going there to the left, on the evap wall, either it goes there but, it is somehow located over or on the inside of the evap wall, or it is just showing the part in the wrong location all together. In several photos I have found, they all Say: part goes Here, with a arrow pointing to behind a, 3prong male 2 female plug, the plug is mounted to the evap wall with wires running over the top of the evap wall.
(iF THE 3PRONG PLUG is LEADING TOO the resistor it doesn't show INSTRUCTIONS ON how to get to it. Or how to remove the evap wall. Because ONLY the 3Prong plug itself is visible. The wires lead to it but you can not see, where they lead to, because of there location.
I will gladly pay you, if you can provide me with the correct instructions on replacing (This part) I will pre-pay you $10.00 when I ask my 2nd. Question, $5 for this answer, &. $5 for next answer. I have 8-10 questions if you can get this one right we will work on the next.
Thanks,
Gary
Was this
answer
helpful?
Yes
No
+1
Sunday, October 13th, 2013 AT 2:03 PM
Tiny
1KONGFISH
  • MEMBER
  • 12 POSTS
Ps; thats why I hesitated to pay up front. Everyone keeps giving me the wrong answer, same as your answer. But they were only forum postings, not pay per answer. But, if you can find me the correct location and DIY instructions & photos on doing this replacement correctly. I am proceed to questions 2- 10 on a Pre- pay per answer basis.
Was this
answer
helpful?
Yes
No
-1
Sunday, October 13th, 2013 AT 2:13 PM
Tiny
WRENCHTECH
  • MECHANIC
  • 20,758 POSTS
With auto temp control the resister is replaced by a blower speed control module which this manufacturer calls a "Blower output stage".
When you ask for a resistor, that's what you get..

Here is the component you are looking for.

https://www.2carpros.com/images/external/125396843.jpg
Was this
answer
helpful?
Yes
No
+3
Sunday, October 13th, 2013 AT 2:14 PM
Tiny
1KONGFISH
  • MEMBER
  • 12 POSTS
I wasn't talking down to you, sorry if it came over that way but, I am only trying to explain it to you in as much detail as I can. I am probably putting too much detail and being over detailed, because I am only trying to explain it in the best way I can because of what I am getting as a answer, ( my part name and number might be totally wrong, thats way I added the PS: message to let you know that all my information is coming from Free untrained sources on a forum site,
the BUZZZ wrong answer, was meant as "humor"
Maybe I use caps to infasize a word and your comprehending it as talking down, it's not, I am only trying to help you to understand what I am trying to communicate to you. That's probably the problem, I am typing or trying to type to you what I am saying to myself.
Was this
answer
helpful?
Yes
No
Sunday, October 13th, 2013 AT 2:25 PM
Tiny
1KONGFISH
  • MEMBER
  • 12 POSTS
Wrench tech,
The picture doesn't look like what I see when I remove the glovebox. I attempted to send a photo of a parts diagram along with my question,
By the way, if I am going off totally in the wrong direction, wrong part, and all by these guys that told me what they told me. That's why, I am willing to pay a professional < that being You, for the Correct information and instructions on how & what I need to complete the repair. So if I am wrong and out in left field with part names and numbers, let me know to scratch everything I have heard to this point and well start over
, If I sent it right and the image came through to you, could you look at the diagram and refer to part number #2 if I didn't send it right, let me know and I'll resend it.
Part # 1 & 2 are both blower motor resistors, according to info I got from the person I bought the car from, (they might have been feedin a line of BS, & I might be wrong, that's why I am deferring to you, and I am willing to pay for the correct answers I get from you. Like I said, I am only going off of internet searches, and if you can guide me through one repair of about ten I want to do on the car, ( I just bought it, & it has some things that need repaired)
But, in that photo, the part number #2 is for a 2002 Mini Cooper S with the AutoAir feature I got from www. Realoem. Com
Did the attached parts diagram photo of the evap, and the parts name come through to you? I am a amateur, not great with computers, so please bare with me. Also, my auto-correct spell feature on my iPad often changes a word and I don't catch it, so, I very well could have (without noticing it changed a words spelling) called you or said something that sounded condescending and not noticed. If I did it was unintentional,
What I see behind my glovebox matches that parts diagram photo I sent you. I bought part # 2 to install, do I have the correct part?
Was this
answer
helpful?
Yes
No
Sunday, October 13th, 2013 AT 3:29 PM
Tiny
1KONGFISH
  • MEMBER
  • 12 POSTS
Or maybe a better way to say it, is when I am looking at the same area in my car, the part that is marked X904. & N2 my car doesn't have anything but a plastic insert where your photo is showing the plug with the white around i, and the wires going up and over the horizontal wire harness mine is not like that.
Was this
answer
helpful?
Yes
No
Sunday, October 13th, 2013 AT 3:39 PM
Tiny
WRENCHTECH
  • MECHANIC
  • 20,758 POSTS
I have given you factory supplied pictures of both types of blower speed control for your exact vehicle. There are no pictures of yours showing up here either.
Was this
answer
helpful?
Yes
No
Sunday, October 13th, 2013 AT 3:45 PM
Tiny
1KONGFISH
  • MEMBER
  • 12 POSTS
Could the photo your showing me have the evap wall removed? Could that be where I am misinterpreting what I am seeing, because, when I look at that second photo, just to the left, of the wires that are up and inward, just to the left of the wires looks what appears to look like the part I have. But my main problem is I can't figure out how or what to disassemble to gain access behind the evap wall.
Was this
answer
helpful?
Yes
No
Sunday, October 13th, 2013 AT 4:00 PM
Tiny
WRENCHTECH
  • MECHANIC
  • 20,758 POSTS
That picture is looking up from below after the lower cover is removed. What you're looking for is far under the dash, near the firewall.
Was this
answer
helpful?
Yes
No
Sunday, October 13th, 2013 AT 4:06 PM
Tiny
1KONGFISH
  • MEMBER
  • 12 POSTS
What I see under and behind and to the left of the air filter box matches the parts photo I sent you
Maybe this will help me.
The air filter box on my car, at the top of it it is mounted with a thick round support that extends out from the upper top side, it is on the side facing toward the inside of the car. There is a horizontal steel bar that the extended round piece comin off the air box is seated into and sits in a steel cross bar. And the bar is snug on the back side of the airbag box. Do you know how it is removed? I if I could get the air filter box out I might be able to see things I can't see with it in the way?
Was this
answer
helpful?
Yes
No
Sunday, October 13th, 2013 AT 4:19 PM
Tiny
WRENCHTECH
  • MECHANIC
  • 20,758 POSTS
This is no where near as complicated as you are making it. Book time to change it is 40 minutes. It might be time to turn this job over to a competent shop.
Was this
answer
helpful?
Yes
No
Sunday, October 13th, 2013 AT 4:24 PM
Tiny
1KONGFISH
  • MEMBER
  • 12 POSTS
I know what you mean, I am just afraid to unplug anything in fear I will set off a airbag light I can't get turned off and the air filter box separates front and rear, and that big round support coming off the air filter box that mounts in the steel cross bar, you can't see if it is bolted or just sitting in the steel bar, because the airbag box mounts are covering up the whole area where that support bolt(if there is one bolting it in) and out of fear that by unplugging the airbag box and removing the airbag dash cover, & airbag box, then removing the air filter box
But, I'd rather be safe than sorry, if I can't do it with proper instruction. But I'll keep you in mind on the next repair. Keyless remote is next shouldn't be as bad.
But, I really appreciate you trying to help me.
Was this
answer
helpful?
Yes
No
Sunday, October 13th, 2013 AT 4:41 PM
Tiny
WRENCHTECH
  • MECHANIC
  • 20,758 POSTS
All you have to do is locate the blower motor and this part will be right next to it. The round thing in the picture is the blower motor.
Was this
answer
helpful?
Yes
No
+1
Sunday, October 13th, 2013 AT 4:46 PM
Tiny
1KONGFISH
  • MEMBER
  • 12 POSTS
  • 2002 MINI COOPER S
  • 1.6L
  • 4 CYL
  • 2WD
  • MANUAL
  • 122,323 MILES
Hi,
I had emailed you a while back with a question regarding the location of the final stage output, (blower motor resistor part# 64111499122 ) on a 2002 mini cooper S. With - IHKA Auto Air as a option
I wanted to follow up to see if you had come across where this part is located at on the car that we were looking for. I finally got the entire A/C unit out of the car today and broke it down to a box of parts and bolts. I was unable to find this part number # 64111499122 it's just not there.
I have the complete dash out and the heating & A/C unit out of the car and torn down. The wiring plug in that they show as going to the part, goes into the blower motor itself, but its not in there either, unless it is part of the blower motor itself.
I was just wondering if you had heard anything new on the location of this part on the car.
I am at the point now that finding this part has pissed me off so bad that, I have decided that this entire P.O.S. Will be broke down into buckets of bolts, and baskets of parts if thats what I have to do to find out where this part is located.
Have you had any further info come by you on this parts location?
Thanks,
Gary
Was this
answer
helpful?
Yes
No
Monday, January 7th, 2019 AT 5:32 PM (Merged)
Tiny
HMAC300
  • MECHANIC
  • 48,601 POSTS
.64 11 222 Replacing resistor for heater - A/C fan (IHKA)
NOTE:For purposes of clarity, illustration shows heater/air conditioner removed.

The resistor for the heater - A/C fan is located in the right footwell.
Unfasten plug connection (1) and disconnect.
Release screw (2).
Remove resistor for heater - A/C fan.
Fig. 13: Removing Plug Connection
Courtesy of BMW OF NORTH AMERICA, INC
Was this
answer
helpful?
Yes
No
Monday, January 7th, 2019 AT 5:32 PM (Merged)
Tiny
1KONGFISH
  • MEMBER
  • 12 POSTS
HMAC 300,
Thanks a ton for trying. But, your answer like everyone else before you is not coming from the right source. The answer may lie in a manual "Before revisions" now that I think of it? This could be the answer as to why everyone keeps referring me to this same incorrect parts diagram.
I have the car broken down to the point that, the dash and everything down to the A/C -Heater housing has been dissembled. I took some photos to email you of the location everyone keeps pointing to as the mounting location so you can see (the part is just not there) no wiring, inside or outside of the heater housing box, nothing. Its not in the blower motor itself either. If you care to see the photos I can email them to you if you email me.
I have been working on trying to replace this part for 3 weeks now. I am at the point that I am prepared to either turn this car into a BBQ, and cook hotdogs over it or just reduce it to a pile of parts & a bucket of bolts if I cant come up with the correct information on this part. If you do come across the correct mounting location for the following part I will be more than happy to pay the $10.00 suggested fee for correct information. I will include all the information I have acquired to date about it if that helps you to search out the correct mounting location for this part. Part number# 64111499122 names in the Bentley service manual= ( blower motor resistor, final stage, output stage, power stage, blower resistor pack)
2002 Mini Cooper S. Retro fitted JCW tuning kit. This car has the : "Auto Air optional feature" which is referred to as the; IHKA A/C & heating system. This is a important factor in which part is correct. There is also a IHKS A/C system which I don't have,
Thanks,
Kongfish
Was this
answer
helpful?
Yes
No
Monday, January 7th, 2019 AT 5:32 PM (Merged)
Tiny
HMAC300
  • MECHANIC
  • 48,601 POSTS
That is the one that is listed for that model however it may be wrong so i'll send the other one and look in a later and earlier year. Ok I'm sending a coupe of pics hopefully they will come through. The ihka resistor is supposed to be in the right foot well so it may be behind a kick panel or under the carpet towards the top. Im also sending pics of the two resistors that rock auto sells. One for manual and second for auto temp control which means you set the temp inside your car. Hopefully you can get this resolved. Otherwise the resistor may be in the control head.
Was this
answer
helpful?
Yes
No
+1
Monday, January 7th, 2019 AT 5:32 PM (Merged)
Tiny
MAXIMILIAM
  • ADMIN
  • 436 POSTS
Here are some photos of the heater A/C housing box totally disassembled down to the base.

In the photos I took, they are:

Photo -#1 is the right footwell location that the parts diagram shows as where the part shows to be mounted. But, as you can see from the photo, it clearly is not there.

Photo-#2 is from above looking down into the base of the heater housing box.

Photo-#3 is looking down into the empty cavity where the part would be seated, from inside, on the right side is where the part would be protruding through the wall. If the part was where the diagram shows it should be located, you would see all the long silver prong post over on the right side of the photo.

Photo-#4 is a view of the left side or drivers side of the heater housing box.
Any other possible location you might come up with would be something to look at.
My car has the IHKA AUTO AIR FEATURE on it. It is the part number 64111499122

Thanks for replying,

Gary
Was this
answer
helpful?
Yes
No
+1
Monday, January 7th, 2019 AT 5:32 PM (Merged)
Tiny
1KONGFISH
  • MEMBER
  • 12 POSTS
I sent some photos of the area where your parts diagrams show the part to be, as you can see in the photos I included in my previous email, the part is not where the parts diagrams show it should be. Any further information on this problem locating exactly where this part is mounted let me know,
Thanks,
Gary
Was this
answer
helpful?
Yes
No
Monday, January 7th, 2019 AT 5:32 PM (Merged)

Please login or register to post a reply.

Sponsored links