Hi,
Here is the complete procedure on remove and replace inner tie rod end.
I attached schematics for you to refer too and a basic video for you to watch. let us know if this information was helpful and if you need more information.
Thank you
Joe Terwilliger
REMOVAL - INNER TIE ROD
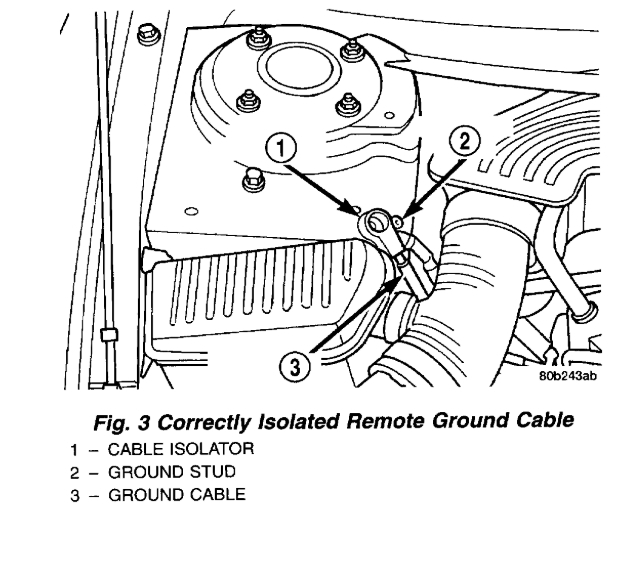
1. Remove the battery ground cable from the ground stud on the shock tower and isolate the ground cable by installing the cable isolator on the ground stud.
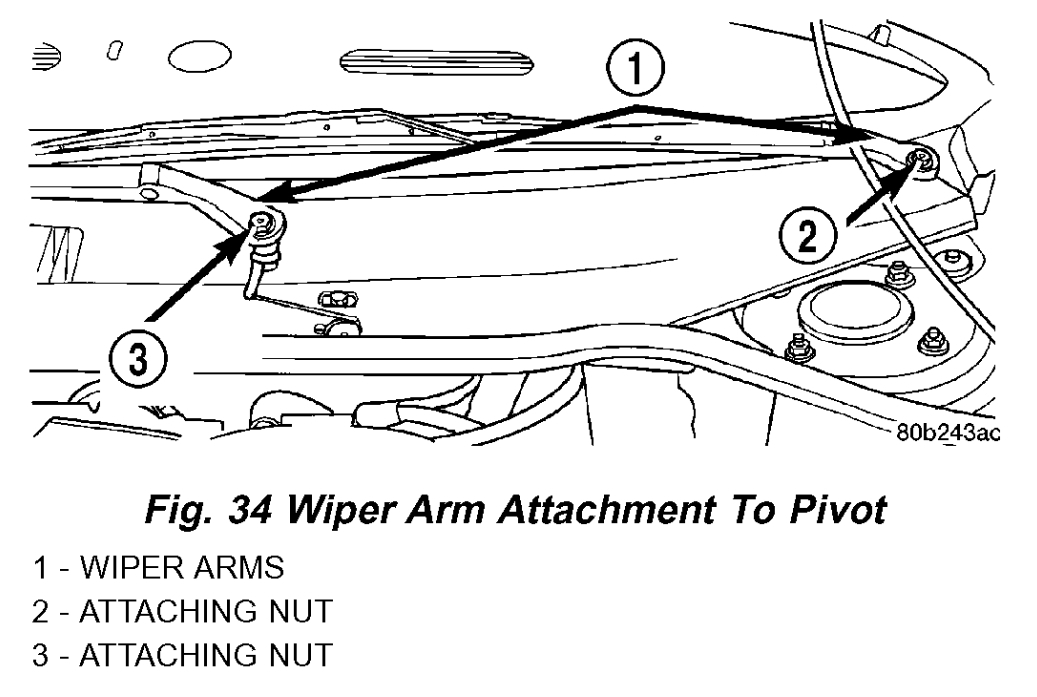
2. Remove caps from both wiper arms at the attachment to the pivots to expose the wiper arm attaching nut. Remove the nut attaching each wiper arm to its pivot.
3. Remove the wiper arms from the pivots. Wiper arms are removed from the pivots by rocking them back and force on the pivots until they can be pulled off the pivots.
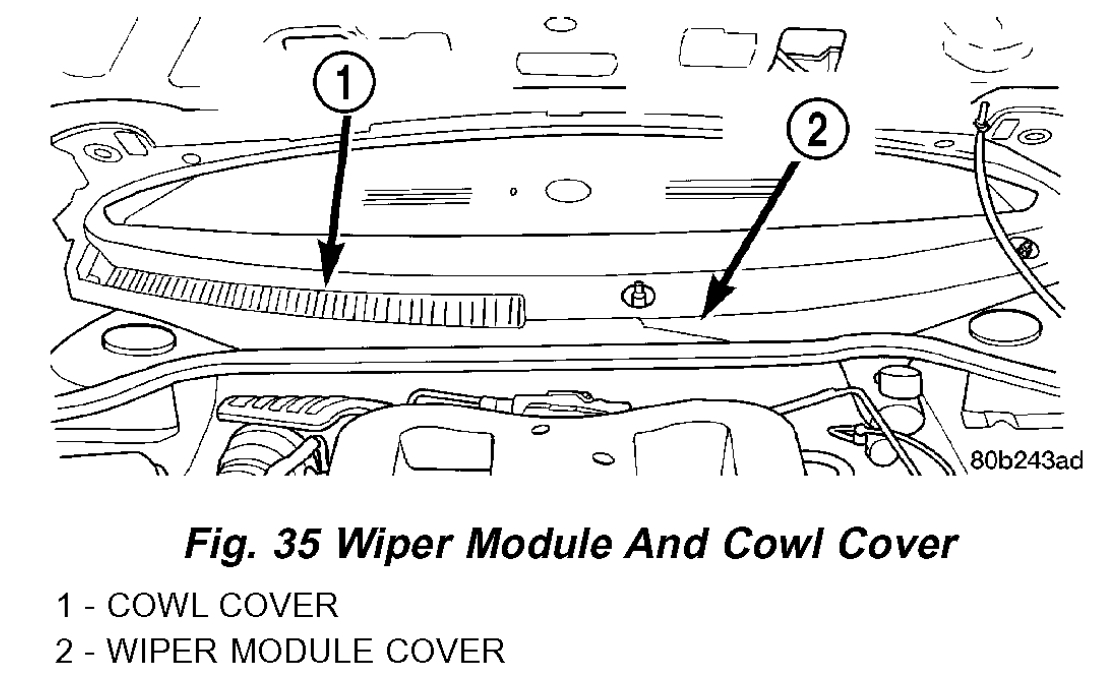
4. Remove the wiper module cover and cowl cover from the vehicle.
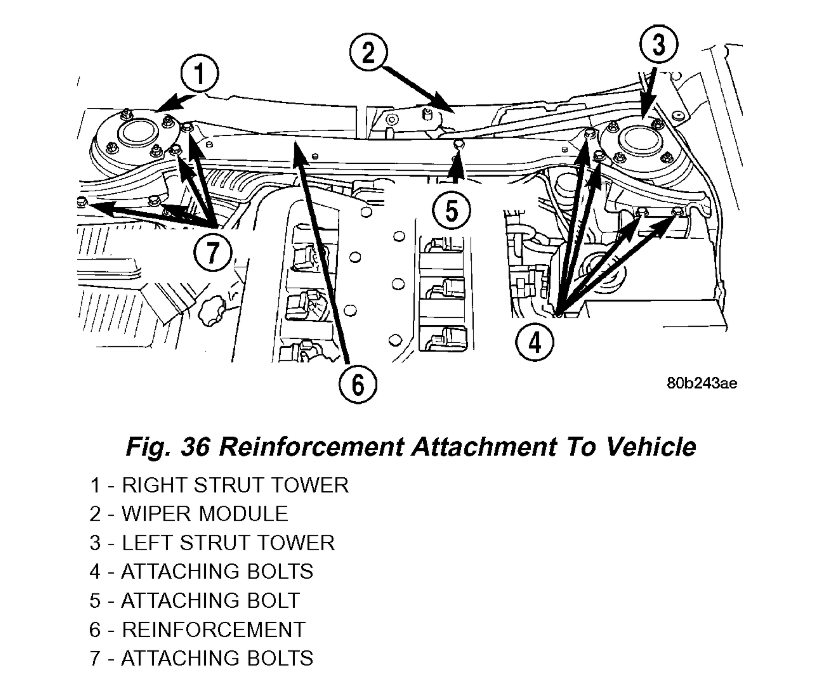
5. Remove the 8 bolts attaching the reinforcement to the strut towers and the 1 bolt attaching the wiper module to the reinforcement. Remove the reinforcement from the vehicle.
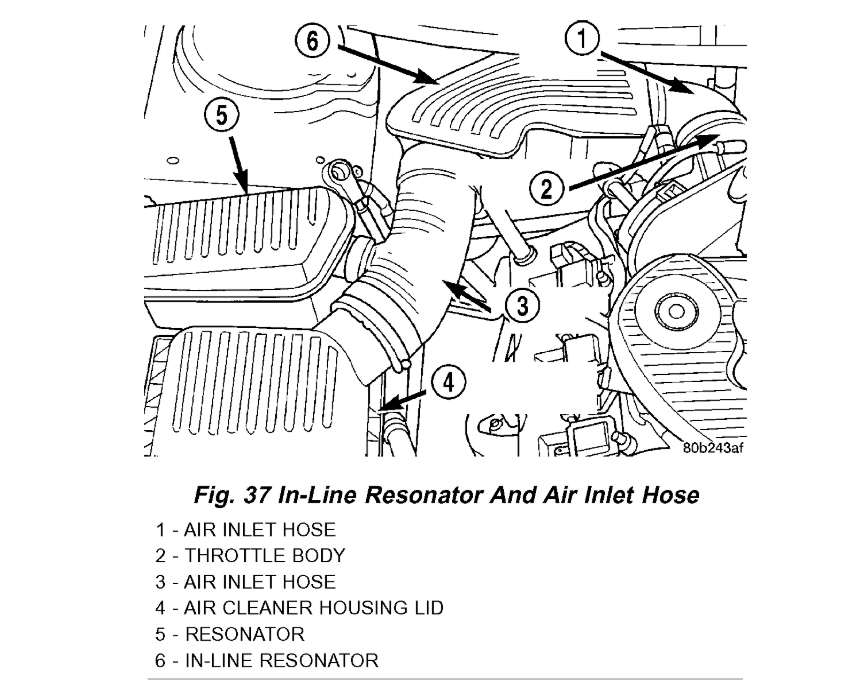
6. Remove the in-line resonator and inlet hose from the throttle body and air let hose coming from the lid of the air cleaner housing.
7. Raise the vehicle on a frame contact hoist until the front tires of the vehicle are just off the floor. See Hoisting in Lubrication And Maintenance.
8. Remove front wheel and tire assembly from side requiring repair.
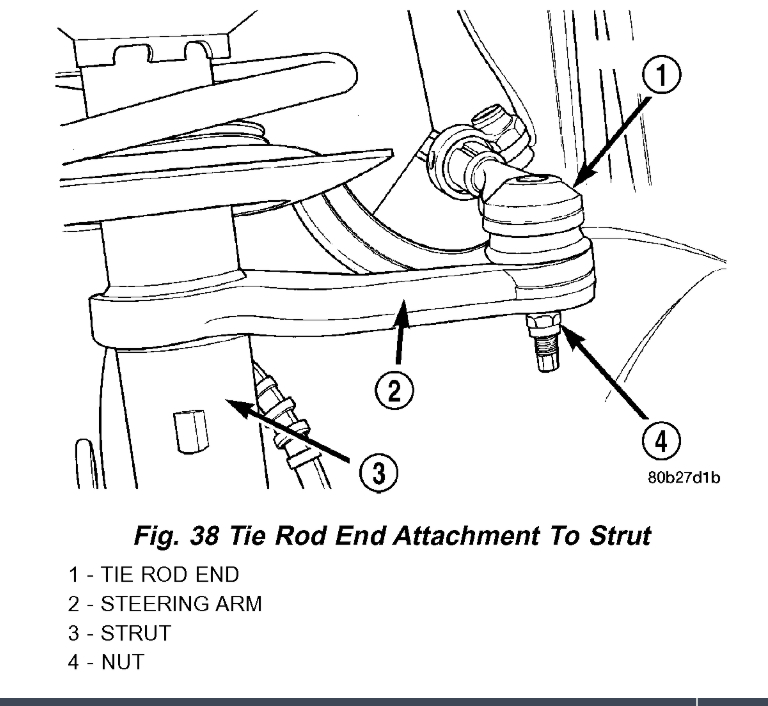
9. Remove the nut attaching the outer tie rod end to the steering arm on the strut.
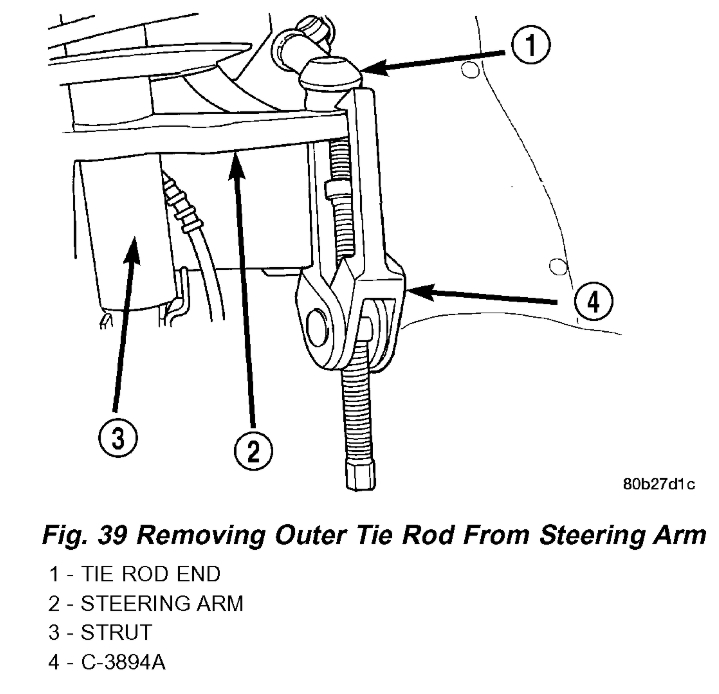
10. Remove the tie rod end from the steering arm of the strut using Puller, Special Tool C-3894-A.
11. Turn the steering wheel all the way to the full right position.
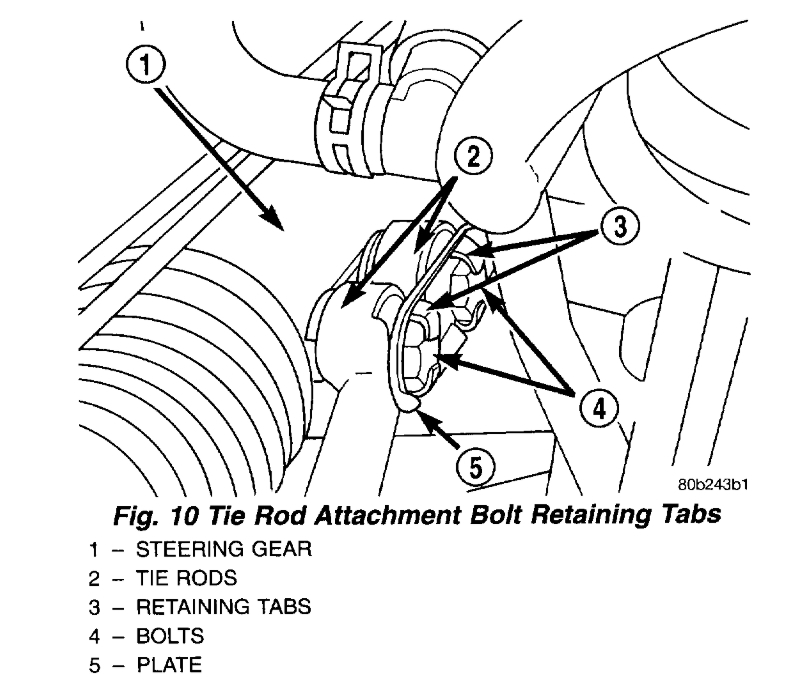
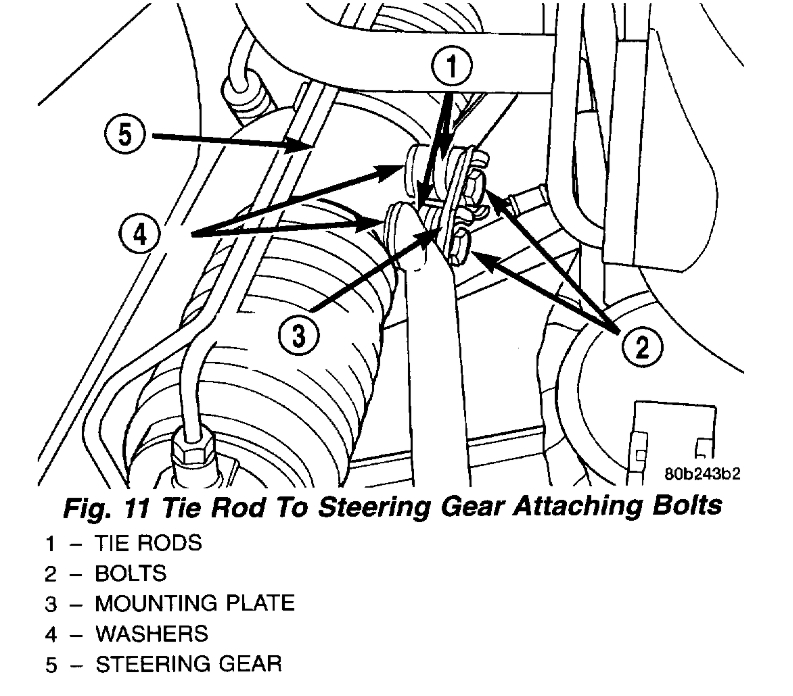
12. Bend back the retaining tabs on the mounting plate for the tie rod to steering gear mounting bolts.
13. Remove the bolt fastening the inner tie rod requiring service to the steering gear. Be careful not to loose the washer behind the tie rod.
14. Loosen the bolt fastening the opposite inner tie rod to the gear, but do not fully remove it.
15. Rotate the loose end of the mounting plate out of the way.
16. Remove the tie rod assembly from the vehicle through the wheel opening.
17. Loosen the pinch bolt at the outer to inner tie rod adjustment sleeve.
18. Remove outer tie rod from adjustment sleeve and inner tie rod.
INSTALLATION
1. Install the outer tie rod into the adjustment sleeve on the inner tie rod. Screw the tie rod in until the exposed thread length on the outer tie rod is equal to the exposed threads on the adjuster. Make sure no more than 20 mm thread length is exposed on either the tie rod or the adjuster sleeve. Do not tighten the adjustment pinch bolt at this time.
CAUTION: When setting the front Toe on the vehicle, the maximum dimension of exposed threads allowed on the adjuster and outer tie rod cannot exceed the distance shown in. If the maximum distance is exceeded, inadequate retention of either the adjuster or the outer tie rod can result. This condition can cause separation of the outer tie rod end from the inner tie rod. Ensure that adjustment sleeve pinch bolts are torqued to the required specification when Toe setting procedure is completed.
2. Install the tie rod assembly through the tie rod hole in the wheel opening inner fender.
3. Install the outer tie rod on the steering arm of the strut. Install the tie rod steering arm nut. Do not tighten the nut at at this time.
CAUTION: Before installing tie rod on steering gear be sure the tie rod spacer block inside the steering gear bellows (boot) is correctly aligned with the bolt holes in the rack of the steering gear and the steering gear bellows.
4. Align the inner tie rod with the mounting hole in the center take off on steering gear. Rotate the mounting plate into position over the tie rod. Install tie rod attaching bolt through tie rod and washer into steering gear. Be sure washer is installed between tie rod and steering gear as shown. Tighten both tie rod to steering gear bolts to a torque of 100 Nm (74 ft. lbs.)
5. Bend retaining tabs against heads of tie rod attaching bolts.
6. Place the front wheels in the straight-ahead position.
7. Tighten the outer tie rod steering arm nut to a torque of 37 Nm (27 ft. lbs.).
8. Install the wheel and tire assembly. Install and tighten wheel mounting stud nuts in proper sequence until all nuts are torqued to half specification. Then repeat the tightening sequence to the full specified torque of 135 Nm (100 ft. lbs.).
9. Lower the vehicle.
10. Install the in-line resonator and inlet hose on the throttle body and air inlet hose coming from the lid of the air cleaner housing.
11. Install the reinforcement on the vehicle. Install the 8 bolts attaching the reinforcement to the strut towers. Install the bolt attaching the wiper module to the reinforcement
12. Install the covers over the wiper module and the cowl. Install and securely tighten the attaching screws.
13. Install the wiper arms on the pivots. Install and securely tighten the wiper arm to pivot attaching nuts. Install the caps on the wiper arms covering the pivot nuts.
14. Install the battery ground cable onto the ground stud on the shock tower and install nut.
15. Adjust front toe.
https://www.2carpros.com/articles/tie-rod-end-replacement
Images (Click to make bigger)
Saturday, January 4th, 2020 AT 8:38 AM