Hi and thanks for using 2CarPros.
If you are replacing the steel brake line, it will unbolt at both ends. Simply unbolt it and carefully remove it. Now, I don't know what you are working with. Did you purchase steel replacement line that already has fittings or did you purchase a spool of steel line?
Once you remove the old steel hose, simply take the new and using the bender, try to match the bends in the old one without pinching the tubing shut.
Next:
If you purchased just steel line, you need to double flare each end and it has to be done right to prevent leaks. Here are directions for doing that:
Brake Pipe Replacement
^ Tools Required
- J 29803-A ISO Flaring Kit
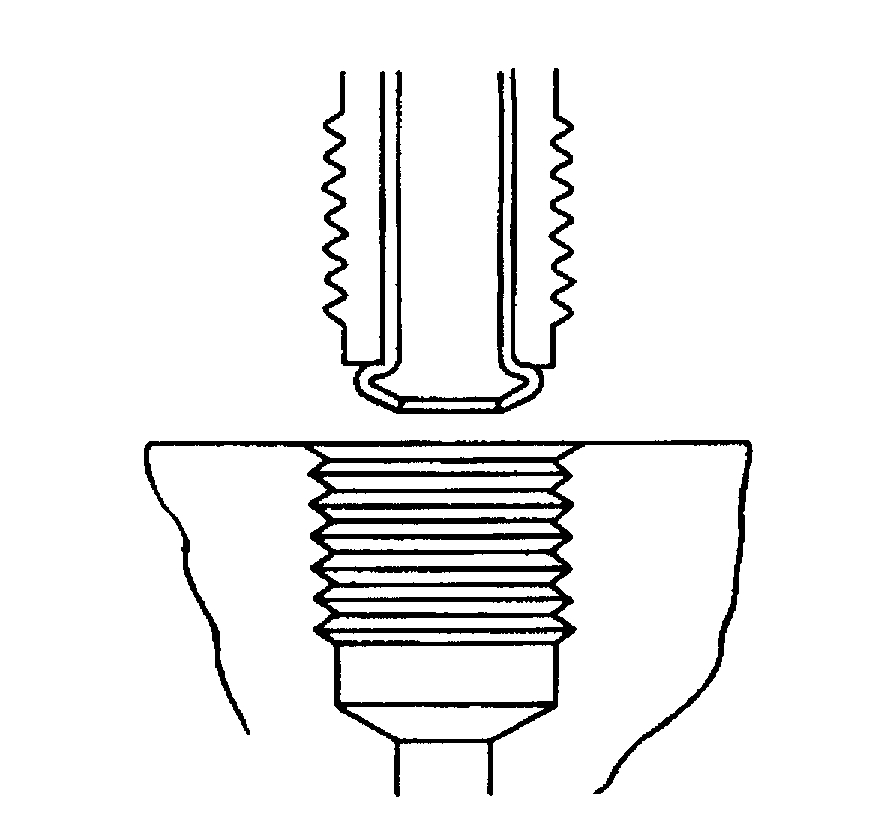
Picture 1
Caution: Always use double walled steel brake pipe when replacing brake pipes. The use of any other pipe is not recommended and may cause brake system failure. Carefully route and retain replacement brake pipes. Always use the correct fasteners and the original location for replacement brake pipes. Failure to properly route and retain brake pipes may cause damage to the brake pipes and cause brake system failure.
Notice: Do not use single lap flaring tools. Double lap flaring tools must be used to produce a flare strong enough to hold the system pressure. Using single lap flaring tools could cause system damage.
1. Obtain the recommended tubing and steel fitting nuts of the correct size. Outside diameter tubing is used in order to specify the size.
2. Cut the tubing to length. In order to determine the correct length, measure the old pipe using a string and adding 3 mm (1/8 inch) for each ISO flare.
3. Before starting the flare, install the fittings on the tubing.
4. Chamfer the inside and outside diameter of the pipe with the de-burring tool.
5. Remove all traces of lubricant from the brake pipe and the flaring tool.
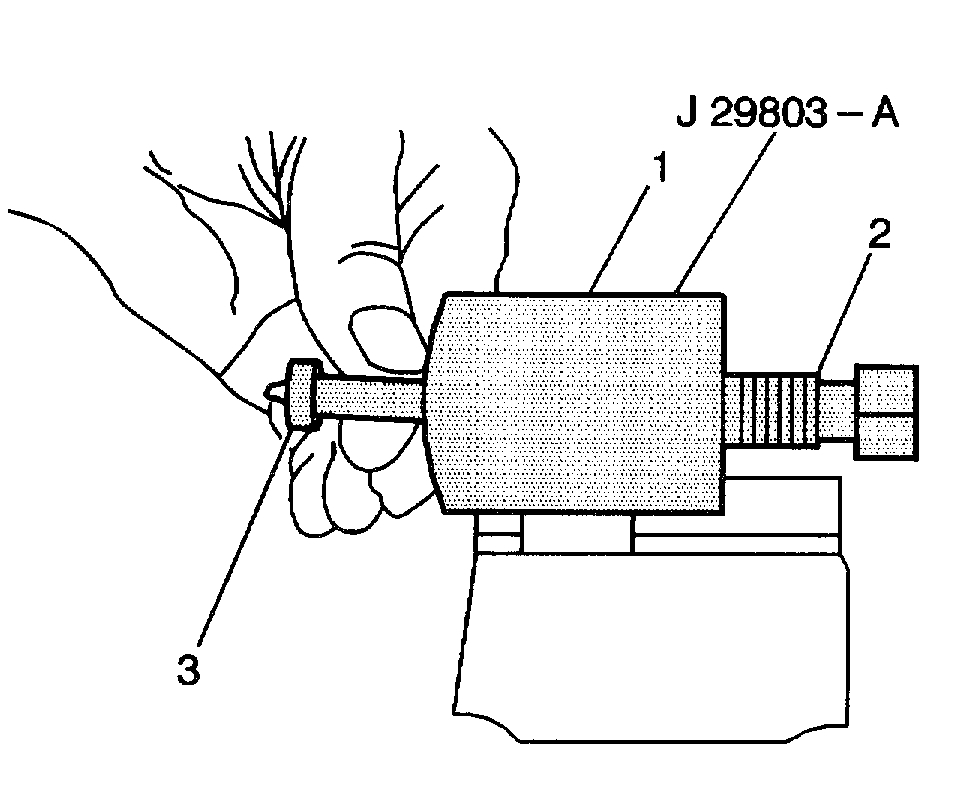
6. Clamp the J 29803-A ISO Flaring Kit. Tool body in a vise.
Picture 2
7. Select the correct size collet and forming mandrel (3) for the pipe size used.
8. Insert the proper forming mandrel into the tool body.
9. While holding the mandrel in place with a finger, thread the forcing screw until the screw makes contact with the forming mandrel and begins to move the forming mandrel.
10. When contact is made with the forming mandrel, turn the forcing screw back one complete turn.
Picture 3
11. Slide the clamping nut (1) over the brake pipe into the correct collet. Leave approximately 19 mm (3/4 inch) of tubing extending out the collet.
12. Insert the collet into the tool body. The brake pipe end must contact the face of the forming mandrel.
13. Tighten the clamping nut into the tool body very tight or the pipe may push out.
14. Wrench tighten the forcing screw until the screw bottoms. Do not over tighten the forcing screw or the flare may become over-sized.
15. Back the clamping nut out of the tool body.
16. Disassemble the clamping nut and collet. The flare is now ready for use.
17. Bend the pipe to match the old pipe. Maintain a clearance of 19 mm (3/4 inch) for all moving or vibrating components.
Once the new line is bent, attache where the old one was removed. Next, you will need to bleed the air from the system. Open the bleeder on the rear of the brake caliper in that side of the vehicle, fill the master cylinder, and allow the fluid to gravity flow until air stops. Next manually bleed that brake. Here is a link that shows how to bleed the system:
https://www.2carpros.com/articles/how-to-bleed-or-flush-a-car-brake-system
After that, it should be fine, but make sure there are no leaks and brakes are working properly before driving it and reconfirm the master cylinder is full.
I hope this helps. Let me know if you have other questions.
Take care,
Joe
Images (Click to enlarge)
Mar 13, 2019 at 6:42 PM