HOW TO LINE UP CAMSHAFT SPROCKET AFTER CAM GEAR REMOVAL

Tiny
CHIO916
  • MEMBER
  • 1990 MAZDA 929
  • 3.0L
  • V6
  • 2WD
  • AUTOMATIC
  • 94,000 MILES
BEFORE REMOVING MY TIMING BELT, I HAD ALL THE CAMS LINED UP WITH THE CRANK SHAFT. AFTER REMOVING THE CAMSHAFT SPROCKET, MY CAM SHAFT TURNED. DON'T KNOW WHICH WAY IT TURN TO, I NOW HAVE TO LINE UP EITHER THE A OR B. MY ENGINE IS A DUAL OVER HEAD CAM. I AM LOST. PLEASE HELP. CAN'T FIND THE CAM SPROCKET DOWEL MARKS ANYWHERE ONLINE. THANK YOU.
Do you
have the same problem?
Yes
No
Tuesday, May 27th, 2014 AT 3:23 PM

6 Replies

Tiny
HMAC300
  • MECHANIC
  • 48,606 POSTS
See pic, with the age of car and miles replace the tensioner and spacer as well.
Was this
answer
helpful?
Yes
No
+3
Tuesday, May 27th, 2014 AT 3:35 PM
Tiny
CHIO916
  • MEMBER
  • 4 POSTS
Mine is the dual over head cam. Its different to this one.
Was this
answer
helpful?
Yes
No
Tuesday, May 27th, 2014 AT 4:14 PM
Tiny
HMAC300
  • MECHANIC
  • 48,606 POSTS
Using flat washer to prevent damage to tensioner body plug, place automatic tensioner in vise or arbor press. Compress tensioner rod until a pin can be inserted into tensioner rod through hole in tensioner body. Install tensioner with pin installed.
CAUTION:DO NOT exceed 2200 lbs (1000 kg) pressure on tensioner rod.

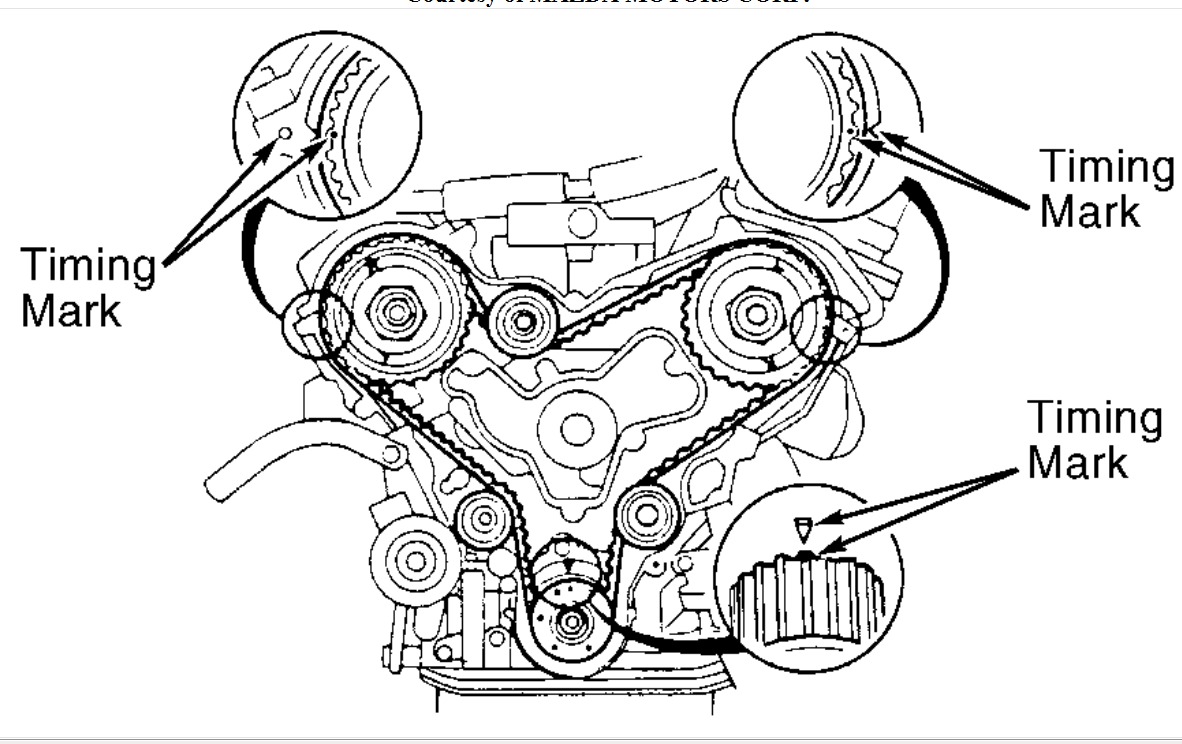
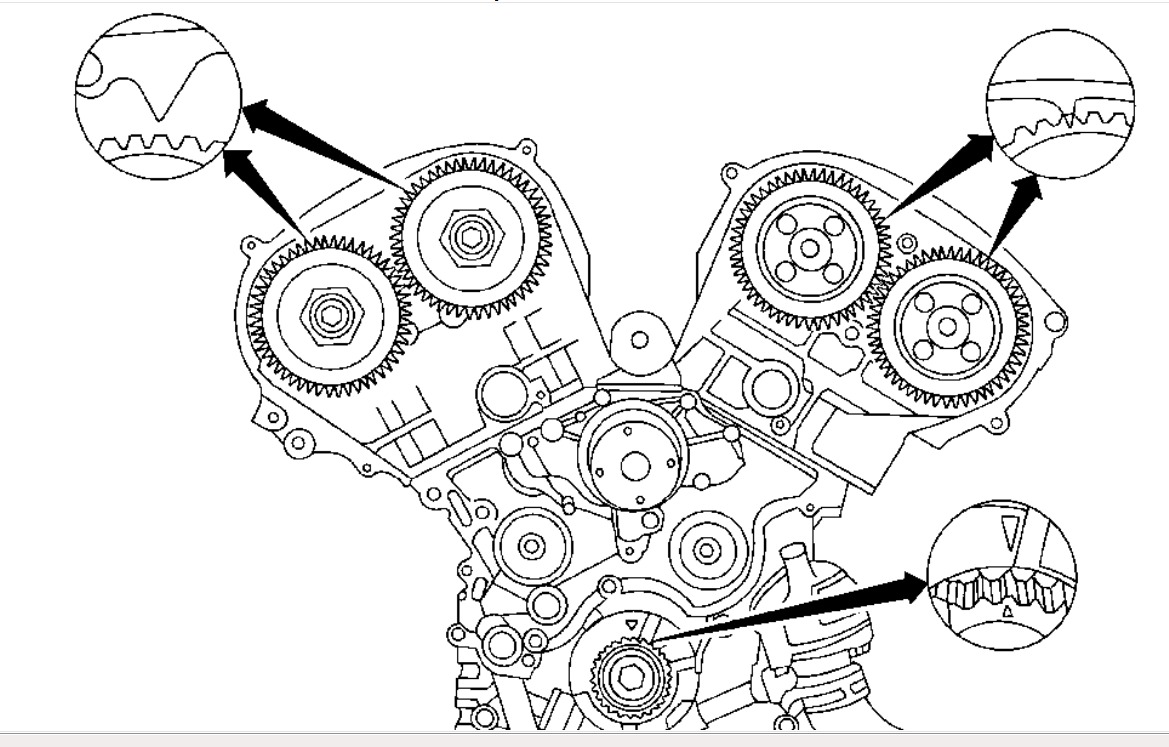
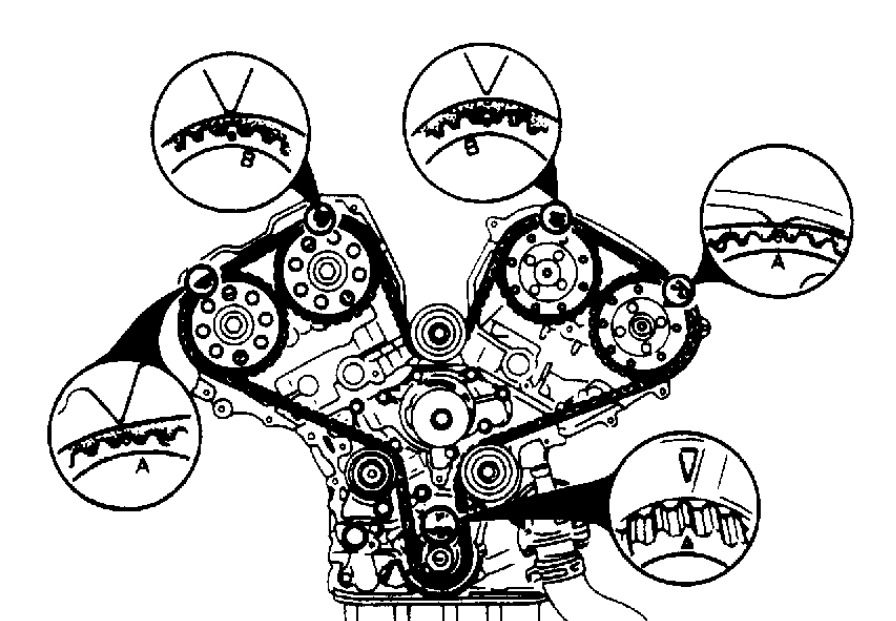
Ensure match marks on pulleys align with marks on heads. See Fig. 2. With upper idler pulley removed, install timing belt on pulleys. Keep slack toward automatic tensioner side. Install upper idler pulley. Rotate crankshaft twice in direction of rotation, and ensure match marks still align. Remove automatic tensioner pin, and repeat steps to confirm match marks are still in alignment.
Check timing belt deflection between right cam pulley and lower idler. Deflection should be. 20-. 28 "(5-7 mm) at 22 lbs. (10 kg). If deflection is not correct, repeat installation procedure. If deflection is still not correct, check for faulty automatic tensioner or stretched timing belt.
To complete installation, reverse removal procedure. Tighten fasteners to specification. See TORQUE SPECIFICATIONS. Adjust the drive belts to proper tension
Was this
answer
helpful?
Yes
No
+1
Tuesday, May 27th, 2014 AT 4:21 PM
Tiny
CHIO916
  • MEMBER
  • 4 POSTS
I know that part aswell. That thing is once you take the cam sprockets off the cam; either A marking or B marking fit in either direction with the camshaft it self. Thats where im off at. Im not sure if im 180 off timing
Was this
answer
helpful?
Yes
No
Tuesday, May 27th, 2014 AT 4:31 PM
Tiny
HMAC300
  • MECHANIC
  • 48,606 POSTS
Here is another pic that shows the dots for each cam I don't know why you took the sprocket off but you did so you'll have to guess or take it to a local guy.
Was this
answer
helpful?
Yes
No
-2
Tuesday, May 27th, 2014 AT 4:38 PM
Tiny
CHIO916
  • MEMBER
  • 4 POSTS
I had to take the sprocket off to replace the cam seals. Minute I turned around, I heard it snap. Thanks
Was this
answer
helpful?
Yes
No
+1
Tuesday, May 27th, 2014 AT 5:10 PM

Please login or register to post a reply.

Sponsored links