How do I align my steering wheel and column?

Tiny
SKYLINESE7EN
  • MEMBER
  • 2007 NISSAN PATHFINDER
  • 4.0L
  • 6 CYL
  • 4WD
  • AUTOMATIC
  • 211,800 MILES
I recently replaced my steering rack on my truck. I kept the wheels straight, but I inadvertently locked my steering wheel by turning it until it locked with the key out. I didn't think anything of it since it didn't rotate the intermediate shaft and I thought I read somewhere that someone else locked his the same way when replacing the rack.

I was able to successfully replace the rack but now, my steering wheel is way off center. Something like 90º–180º off. When I was driving it to get an alignment done, my VDC and SLIP lights come on and I can feel the traction control engaging preventing me from going above 15ish mph. I think I have a bad clock spring since my horn and steering buttons haven't been working for a while but I'm not sure replacing that will fix the VDC and SLIP lights. However, I have one on order and will be replacing it. My main concern is how bad the steering wheel is off and I'm afraid the alignment shop won't really fix it.

When I remove the airbag, I can see that the steering shaft mark and mark on the steering wheel are lined up with each other, but the whole wheel (and clock spring) and shaft are not pointing straight ahead. You can see in the image (I forgot to take a pic with the steering wheel still on, but trust me, the marks were in alignment). Any thoughts on how to align my steering wheel and shaft so that it points up?
Friday, June 13th, 2025 AT 11:00 AM

7 Replies

Tiny
CARADIODOC
  • MECHANIC
  • 34,206 POSTS
Normally all the steering shaft parts are keyed so they only go together one way. It sounds like you simply misadjusted the tie rod ends. Since we're past worrying about the clock spring, turn the steering wheel from lock to lock and count the turns, then return it exactly half way. The steering wheel should be straight now. Leave it there, then readjust each tie rod end to bring its wheels straight. These are very precise adjustments. What you're doing here is getting them close enough to allow you to drive the vehicle to the alignment shop. There, they will check the other angles, then the last step is to adjust the tie rod ends, (toe) precisely. An eighth of a turn on one of them is enough to send that wheel from "in-specs" to "out-of-specs".

It sounds like you understand clock springs, but for the benefit of others researching this topic, new ones come locked in the centered position. The locks release when the steering wheel is set in place. The wheels/ tires must be straight ahead, then the new clock spring can be installed.

Clock springs have a long, wound-up ribbon cable inside that is just long enough to accommodate the entire rotation of the steering wheel, lock-to-lock. If you start out with the steering wheel turned one revolution off-center, when you turn fully one way, that cable will either be too short, it will wind up, then tear off on one end, or it will unwind too far, fold over on itself, then crack apart after that happens multiple times.

I should mention too, when you have to make a big correction to a tie rod end to bring that wheel to straight ahead, there's a lot more friction in the ball joint and rack and pinion assembly than in the steering shaft, so as you make the adjustment, the steering wheel will usually rotate instead of the wheel and tire turning. During this part of the alignment, we use a locking tool that just sits on the seat and holds the steering wheel from rotating. You can do the same with a rubber strap to hold the steering wheel straight. Remember, this will not even be close to perfect alignment. This is to just get it close enough to allow you to drive comfortably to the alignment shop.
Was this
answer
helpful?
Yes
No
+1
Friday, June 13th, 2025 AT 12:05 PM
Tiny
SKYLINESE7EN
  • MEMBER
  • 6 POSTS
Hey there! Thanks for the explanation and solution! I really appreciate it.

So, you're saying the tie-rods are just way off. Okay, that makes sense. I did replace the outer tie-rods as well, so I think it's definitely worth giving it a go. When I removed the old tie-rods, I did count the rotations but it was on the old rack so everything could be different. I will try out your solution and report back with the results. Thanks again!
Was this
answer
helpful?
Yes
No
Friday, June 13th, 2025 AT 12:26 PM
Tiny
CARADIODOC
  • MECHANIC
  • 34,206 POSTS
You're right. No two tie rod ends are ever exactly the same. Plus, some rack and pinion assembly designs include slightly slotted mounting holes, so they can be shifted sideways a little compared to the old one. That's why they give us adjustments.

Of the three main alignment angles, an adjustment for "caster" has been eliminated on most front-wheel-drive models. Normally it affects pulling to one side on rear-wheel-drive vehicles, but not so much on front-wheel-drive models. "Camber" on the other hand, does affect pulling a real lot, and it's a big factor in tire wear patterns. That has to be set on both front wheels first because changes to camber cause changes to "toe", the direction the wheels are steering. Small adjustments to toe cause no change to camber, so those are always done last. As I described before, that last step involves holding the steering wheel perfectly straight, then adjusting each front wheel to also be pointing straight ahead. Those adjustments get pretty precise. An eighth of a turn to one inner tie rod can make a huge change in the reading.

When I replace just one outer tie rod end, or the rack assembly. I used to count the number of turns to get the parts apart, but that only got me close during the installation of the new part. When replacing multiple parts or when I forgot to count the turns, I run the outer tie rods on 27 turns and start from there. That gets me close enough that the alignment projectors can see each other when I start the alignment setup. To get closer so you can drive comfortably to the alignment shop, sight along the front and rear tires to see when you have the front ones adjusted close. Often the front wheels stick out a little further than the rear ones, but you can tell when all four are parallel, even if they aren't in line with each other.

All alignment computers can make a printout of the results. I saved a copy for myself, and I put one on the passenger's seat with anything I adjusted highlighted. Ask if they will provide a printout for you. If they do, you can post a photo of it, and I can interpret the numbers for you. The screen I'm interested in shows the "Before" and "After" readings. The "Before" readings show what the vehicle came in with before any adjustments were made. That will show how close you got with toe on your own. The rear wheels will be shown too, even if nothing is adjustable.
Was this
answer
helpful?
Yes
No
+1
Saturday, June 14th, 2025 AT 4:11 PM
Tiny
SKYLINESE7EN
  • MEMBER
  • 6 POSTS
Boom! Came back with no issues! Thanks again for your help!

Here's what I did for anyone else who might benefit. I got both front wheels off the ground and recentered the rack by counting the rotations from lock to lock the rotating the wheel back exactly half the amount. Now my wheels were pointing straight ahead but my steering wheel was pointing almost 90� off to the right. I tied a string line from the back wheel to a post in front and aligned the string so that the front wheels and back wheels registered as parallel. This was my reference line front to back. I happen to have two laser levels, so I taped each one down in front of each tire and using only the vertical laser, shined it on the treads. I marked the tire where the laser hit with a white paint pen on giving me a target reference. Then I went in and turned the steering wheel until it was pointing up and down. Now my wheels were pointing the left. So, I made a new white mark as another reference. I could now see that my wheels were about 3/4" off by looking at the two white marks (not sure how many degrees that is). Finally, I adjusted the inner tie rods two rotations at time, making sure to switch from left to right to keep them moving together. I would also check the steering wheel alignment marks to make sure it wasn't moving. After several turns, I got the laser line back to my original (straight) line while the steering wheel never moved. Success! Everything now was pointing straight. A quick test drive around the block and everything was working great. The VDC Off and SLIP lights turned off as well! My guess is the steering angle was coming back out of threshold telling the computer to turn on/off the traction control and SLIP lights. Drove it to the alignment shop and explained everything I did. They were able to get the front end aligned with zero issues!

I wish I would have taken some pics of my DIY garage alignment procedure but forgot. I did take a pic of the alignment results though. The left is the before, right is after. They weren't able to adjust the back all the way, but I plan to replace all the rear suspension components in the next 6 months or so.

Thanks again for your help!
Was this
answer
helpful?
Yes
No
Sunday, June 15th, 2025 AT 11:26 AM
Tiny
CARADIODOC
  • MECHANIC
  • 34,206 POSTS
Dandy news. The first thing that stands out with the alignment is they have their computer set to read to hundredths of a degree. I did that with mine too. That shows your mechanic values precision over speed. The computers can be set to read to just tenths of a degree, then it rounds off the numbers. You lose the precision, but the adjustments take less work to get them to turn green, (in specs).

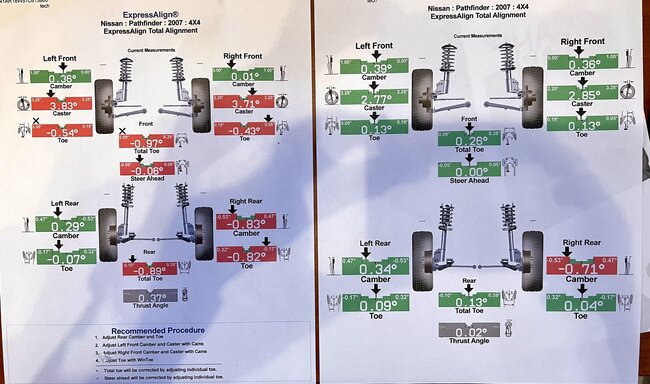
You came in with 0.01 degree "camber" on the right front. That wheel was standing perfectly straight, up and down. For reference, if you could imagine the wheel tipped out so far on top that it's laying flat on the ground, that would be 90.00 degrees. They tipped that wheel out a little, but not quite to perfect specs. I'd be very happy with that. I was the alignment specialist at a very nice family-owned Chrysler dealership through all of the 1990s, but I also aligned a lot of trade-in models. Chrysler's front-wheel-drive vehicles called for 0.30 degrees camber on the front, but there's a little more to the story. All roads slant to the right so water will run off. That "road crown" causes cars to drift to the right. One of two ways to make up for that is to make camber just a little higher on the left wheel. Tires want to roll in the direction they're leaning. I found that making the left wheel 0.06 degrees higher than the right one resulted in no complaints of pulling to either side. With old mechanical alignment equipment from the 1970s and back, the best you could hope for was to read camber to 1/8th, and maybe 1/16th of a degree. That's a far cry from today's computerized equipment that can read to 0.01 degree.

They left you with only 0.03 degree camber pull to the left, but it gets better. Caster can be very difficult to describe. Think of how the front fork of a bicycle is tilted rearward at the top. When you put weight on it, that makes the wheel squirt out straight ahead, and is what makes it possible to ride no-handed. On cars, the upper ball joint or the upper strut mount is rearward compared to the lower ball joint, as viewed from the side of the vehicle. Putting the vehicle's weight on it makes each wheel want to turn inward toward the center of the vehicle. They do that with so much force, you'd have a really hard time pulling one back straight by hand. It's when the two sides are connected by the steering linkage that the two forces offset each other.

Caster has very little effect on tire wear, but it is a pulling-to-one-side angle on all rear-wheel-drive vehicles and a few front-wheel-drive models. When it is a factor, they provide a means to adjust it, as they did on yours. The higher the caster, the harder it is to steer to one side, the faster the steering wheel returns to center on its own after going around a corner, and the less wander you get. As late as some 1960 models, especially heavy trucks, we used negative caster, meaning the upper ball joints were ahead of the lower ones, to make for very easy steering. The problem was it also caused a lot of steering wander which became a problem as we started driving faster on the better highways. That's why they went to positive caster, like a bicycle. Then, to make up for the much increased steering effort, they added power steering.

A few vehicles call for extremely high caster, as in around 11.00 degrees, but for the typical car, around 3.00 degrees is common. They lowered yours roughly a degree on each wheel to bring them into specs. You should find it easier to turn at low speeds now. But also notice the difference in caster, side-to-side, of 0.08 degrees. The right wheel wants to turn left just a fuzz harder than the left one wants to turn right. That very slight pull also offsets the effects of road crown. Caster pulls half as hard as does camber, so that's like having 0.04 degrees camber pull plus the original 0.03 degrees camber pull added together. It's very hard to get the settings that precise, so they must have spent a lot of time with this alignment. I'd call caster and camber "perfect".

"Total toe" is the sum of the toe readings on both wheels. You came in with minus 0.97 degrees. I had my computer set to read toe in inches, so my frame of reference will be off a little. I used to remember how the numbers related, but that's not important. The minus readings mean both front wheels were steering away from the vehicle's center. Left like that, the two front tires would develop a choppy pattern mainly on the inner edges of the tread. Think of holding a pencil upright with the eraser on the table. Press down a little, then drag it sideways. You'll see the "leading edge" scrubs and creates eraser crumbs, while the "trailing edge" bends and lifts up off the table, so no wear takes place there. That's what each block of the tire tread does with any toe out or too much toe-in.

Toe out also makes the vehicle overly sensitive to cross winds at highway speed. The wind pushes the car to the right, for example. That pushes more vehicle weight onto the right front tire. The car wants to follow the tire with the most weight on it, and the other one just scrubs along. Toe out means the right wheel is steering to the right a little and that's the way the vehicle will go. You have to constantly correct by steering to the left. That makes for a very tiring vehicle to drive.

The fact that you came in with toe almost exactly equal on both front wheels suggests your preliminary method worked rather well, but it also points out the front wheels or the rear wheels are a little further apart. That's a common design issue, not a defect. Since your reference tires are different, the string method often used on race cars, and your laser system, can't possibly make all four wheels perfectly parallel. Camber and toe readings are always live, and any changes show up on the screen instantly. Caster can only be calculated by taking two camber readings, one with the wheels turned left and one with them turned right. When brought back to straight ahead is when the computer does the calculation. At this point it has no idea where the steering wheel is. That comes later. The point of this part of the story is if your two toe readings were this close to equal on the drive to the shop, your steering wheel would have been pretty close to centered too.

Moving to the rear, I wouldn't get too excited about the negative 0.71 degrees for right camber. A lot of models with independent suspension do call for some negative camber. The bigger concern is the negative 0.89 degrees toe out. You're going to have some choppiness on those tires. As best as I can recall, one degree is the same as 0.33 inches. If I have that right, that isn't a real lot of toe out, but I'm happy they fixed that at the right wheel.

Also note toe is not equal on both rear wheels. It's very common to find it's very much different between wheels, especially on vehicles with solid rear axles. The difference is called "thrust angle", meaning that's the overall direction the rear wheels are steering the back of the vehicle. When it's really bad, you see that as dog-tracking on the car you're following. What most people don't understand when they're sold a "four-wheel-alignment", even when nothing is adjustable on the rear, is all alignment computers look at toe on both rear wheels as the last step in the procedure, to determine exactly where to adjust toe on the two front wheels. That is what insures a perfectly straight steering wheel. A way to visualize this is to imagine looking down on a car with all four wheels perfectly straight and parallel to each other. Perfect alignment and no tire wear. Now imagine lifting the body up, rotating it slightly, and setting it back down on the wheels. You'd be driving sideways, and maybe looking out the side window to see where you're going. During the alignment, the computer would tell us to turn the rear wheels to make them parallel to the body, but that would appear to make the rear steer to one side. You'd have to correct by turning the steering wheel until, again, the front wheels were parallel to the rear wheels. But the last step in the alignment looks at where the rear wheels ended up, then we adjust the front ones to be parallel to them. The point of all this is it is done while the steering wheel is held perfectly centered. It will be the same when driving.

To boil this down, in a four-wheel-alignment, the computer uses the rear toe readings as the reference for the front wheels. Old mechanical equipment at first couldn't do that, so we often ended up with an offset steering wheel. Later, some equipment could take the rear wheels into account, but it was very cumbersome and time-consuming.

The final step, the two front toe readings of 0.13 degrees is perfect. Even if there was a difference of a few hundredths of a degree, you'd never see that in the steering wheel. From what I can see here, you got a very good alignment.

To check for the choppiness I described, rub your fingertips around the tire near the edges. The blocks of rubber will be shaped like little ramps. One way your fingers will glide smoothly over them. The other way you'll feel them catch on the raised, sharp edges. Often you can feel the same pattern by running your fingertips across the tread. Toe wear always affects both tires equally on that axle, even when just one wheel is misadjusted. Camber causes accelerated wear on just the inner or just the outer edge of the tread, and only on that one tire. When you have objectionable camber and toe wear on one tire, it gets a little more confusing until you see the numbers on the alignment computer.
Was this
answer
helpful?
Yes
No
+1
Sunday, June 15th, 2025 AT 7:17 PM
Tiny
SKYLINESE7EN
  • MEMBER
  • 6 POSTS
Wow! Fantastic answer and super informative! It never occurred to me that a good alignment would take into consideration the slope of the road but makes total sense.

I plan to do the back suspension next as I've been getting severe inner tread wear on my back tires significantly reducing the life of those tires. Once I do that, I'd love to post here again and see if you have any other insights! Thanks again for all your help!
Was this
answer
helpful?
Yes
No
Saturday, June 21st, 2025 AT 10:10 PM
Tiny
CARADIODOC
  • MECHANIC
  • 34,206 POSTS
You're welcome. Inner edge wear on the rear tires can be caused by negative camber or total toe out. Total toe will affect both tires equally, even when just one is out of adjustment. Camber only affects that one tire, although camber can be too negative on both rear wheels.

Now to add another wrinkle to the story to be sure you're thoroughly confused. That has to do with chassis ride height. This isn't too critical with front strut suspension systems, but it was very important on older rear-wheel-drive vehicles that used the "long / short arm" (SLA) suspension system. Those were very heavy and expensive, but they provided the best ride quality of all the suspension systems because road forces from bumps and pot holes had to change direction multiple times as it passed through the various parts. Each direction change reduced how much of that force got transmitted into the passenger compartment. That system was also far superior for tire wear. The two control arms created two different arcs the ball joints traveled through as the chassis bounced up and down. Those arcs were designed to minimize tire scrubbing across the road as ride height changed due to bumps, but those arcs changed when the chassis sagged due to weak springs. The bottom line was we could realign the vehicle so all the numbers on the screen looked perfect, but tire wear would still be terrible. Most conscientious specialists won't align a vehicle with sagged ride height until that is corrected.

There's nothing that can be changed in the rear when you have a solid rear axle, and no need to change anything unless the housing is bent. Today most vehicles have some type of independent rear suspension with multiple control arms, and, like with the SLA system, those are part of the design that minimizes rear tire wear. When it comes time to work on the rear, measure the ride height first to see if new springs are warranted. Very often rear coil springs are rather easy to replace once other parts are removed or disconnected.

Any tire and alignment shop will have a small book that shows every year and model, what the height specs are, and where to take the measurements. They're usually happy to let you look at that because it shows you understand the importance of correct ride height. If that doesn't work out, here's the specs below.
Was this
answer
helpful?
Yes
No
Sunday, June 22nd, 2025 AT 6:15 PM

Please login or register to post a reply.