Hi,
Front brake pads and rotors really aren't too hard to do. If you do it yourself, make sure to purchase lifetime parts so you'll never have to pay for the parts again.
You can expect brake pads to last approximately 25,000 miles. However, that can change based on terrain and driving habits.
To start, here is a link that shows in general how it's done. You can use this as a guide:
https://www.2carpros.com/articles/how-to-replace-front-brake-pads-and-rotors-fwd
Here are the directions specific to your vehicle. The pics below correlate with the directions.
Removal
WARNING: Do not use any fluid other than clean brake fluid meeting manufacturer's specification. Additionally, do not use brake fluid that has been previously drained. Following these instructions will help prevent system contamination, brake component damage and the risk of serious personal injury.
WARNING: Carefully read cautionary information on product label. For emergency medical information seek medical advice. For additional information, consult the product Material Safety Data Sheet (MSDS) if available. Failure to follow these instructions may result in serious personal injury.
WARNING: Always install new brake shoes or pads at both ends of an axle to reduce the possibility of brakes pulling vehicle to one side. Failure to follow this instruction may result in uneven braking and serious personal injury.
NOTICE: Do not spill brake fluid on painted or plastic surfaces or damage to the surface may occur. If brake fluid is spilled onto a painted or plastic surface, immediately wash the surface with water.
1. Check the brake fluid level in the brake master cylinder reservoir.
- If required, remove the fluid until the brake master cylinder reservoir is half full.
2. Remove the wheel and tire. For additional information, refer to Section 204-04 See: Wheels and Tires > Mechanical > Wheels and Tires.
3. NOTICE: Do not pry in the caliper sight hole to retract the pistons as this can damage the pistons and boots.
NOTICE: Do not allow the brake caliper to hang from the brake hose or damage to the hose can occur.
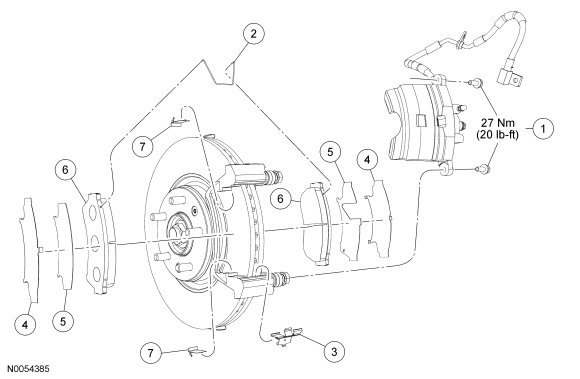
Remove the 2 brake caliper guide pin bolts and position the caliper aside.
- Support the caliper using mechanic's wire.
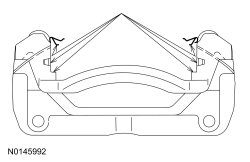
4. Remove the 2 brake pad retraction springs.
5. Remove the brake pads, brake pad shims and stainless steel shims.
- Inspect the brake pads and shims for wear or contamination.
6. Remove the brake pad slides.
7. Remove the 4 brake pad slide clips.
Installation
1. Install the 4 brake pad slide clips.
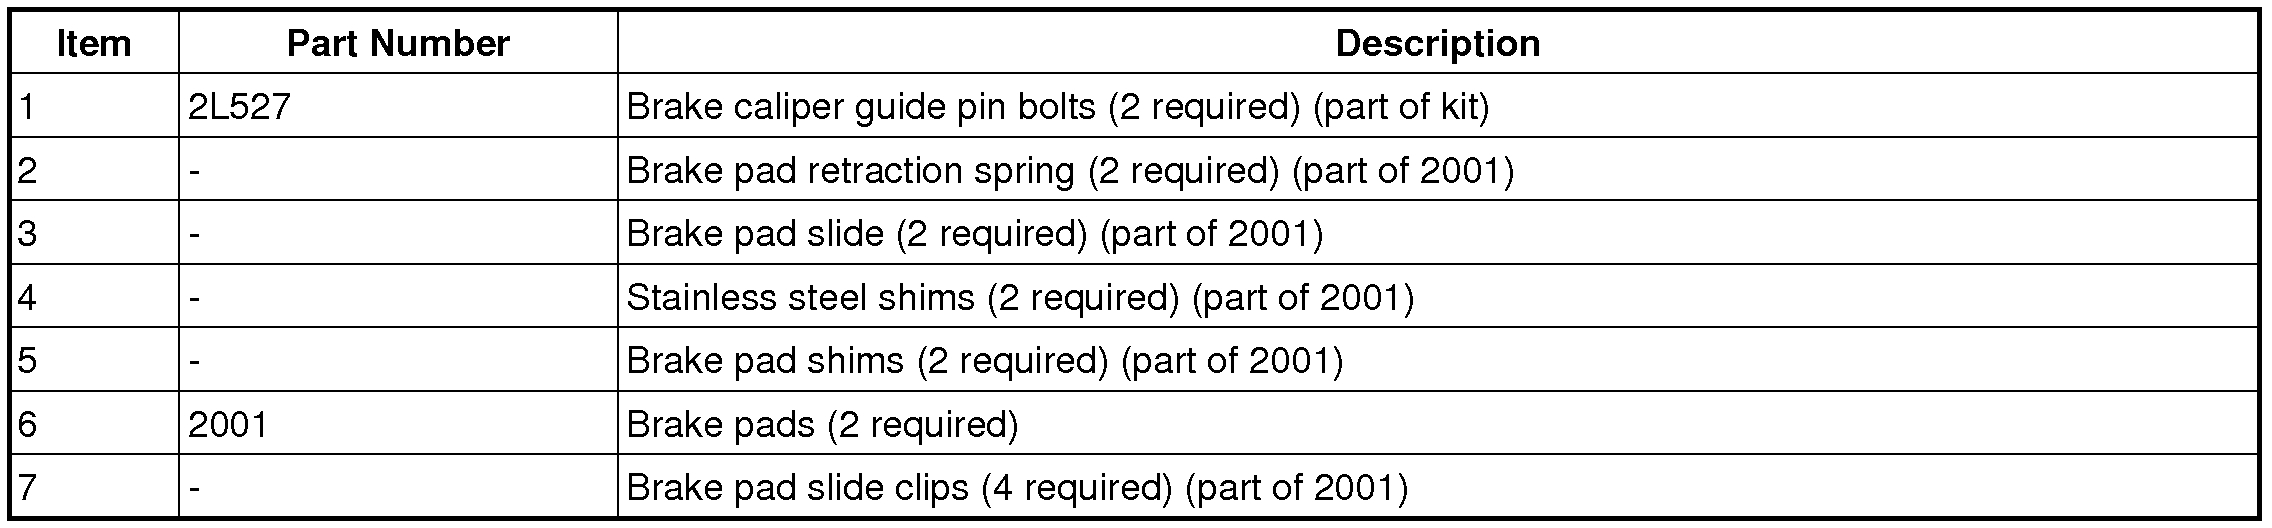
2. NOTICE: Protect the piston and boots when pushing the caliper piston into the caliper piston bores or damage to components may occur.
NOTICE: Make sure that the caliper guide pin boots are fully seated or damage to the caliper guide pin boots can occur.
If installing new brake pads, using a C-clamp and a worn brake, compress the disc brake caliper pistons into the caliper.
3. Install the brake pad slides.
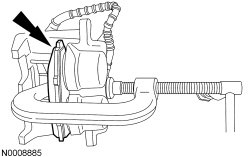
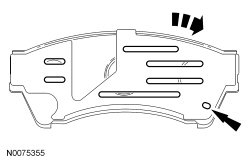
4. Apply the black grease (6E1-2L064-AA) that is supplied to the pad backing plate and shims in the areas indicated.
1. Apply grease to the back of the brake pad.
2. Apply grease to the inner piston side stainless steel shim.
3. Apply grease to the outer stainless steel shim.
5. Apply the white grease (6E1-2L064-BA) that is supplied to the brake pad retainer clips as indicated.
6. NOTE: LH inboard shim shown.
NOTE: The cut shim is directional and used on the inboard pad only. The cut is positioned toward the leading side. Correct installation can be verified if the shim hole is positioned on the bottom side.
Install the brake pad shims and the stainless steel shims to the brake pads.
7. Install the 2 brake pad retraction springs.
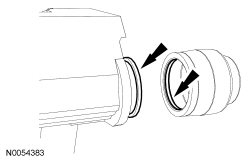
8. NOTICE: The caliper guide pin boots must be seated correctly on the anchor plate or the guide pins may become contaminated.
Inspect the guide pin boots and make sure they are seated on the anchor plate correctly. The boot has a lip that fits under the edge of the anchor plate extension.
9. NOTE: Make sure that the brake caliper hose does not become twisted.
Position the brake caliper and install the 2 guide pin bolts.
- Tighten to 27 Nm (20 lb-ft).
10. Fill the brake master cylinder reservoir with clean, specified brake fluid.
11. Install the wheel and tire. For additional information, refer to Section 204-04 See: Wheels and Tires > Mechanical > Wheels and Tires.
- Apply brakes several times to verify correct brake operation.
Rotor Replacement
Removal and Installation
1. Remove the wheel and tire. For additional information, refer to Section 204-04 See: Wheels and Tires > Mechanical > Wheels and Tires.
2. NOTICE: Do not allow the brake caliper to hang from the brake hose or damage to the hose can occur.
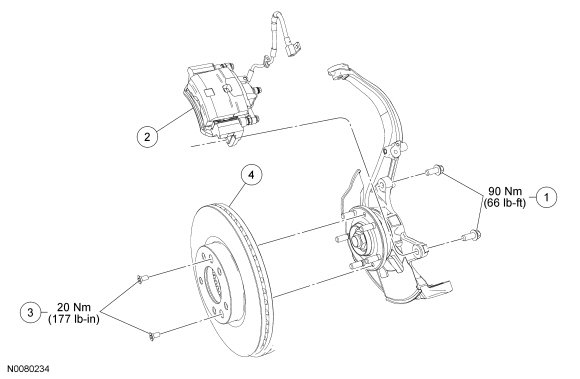
Remove the brake caliper anchor plate bolts and position the brake caliper, pads and anchor plate aside as an assembly.
- Support the caliper using mechanic's wire.
- To install, tighten the bolts to 90 Nm (66 lb-ft).
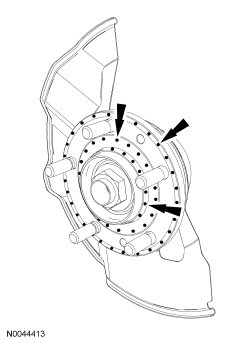
3. Remove the 2 brake disc screws.
- To install, tighten to 20 Nm (177 lb-in).
4. Remove the brake disc.
5. NOTE: During installation, make sure that the brake caliper hose does not become twisted.
NOTE: Make sure the brake disc-to-hub mounting surface is free of rust and foreign material before applying anti-seize lubricant.
NOTE: Do not allow anti-seize to make contact with the wheel studs.
To install, reverse the removal procedure.
- Using the specified brake cleaner, clean the mating surfaces.
- Apply specified lubricant as shown.
Check out the diagrams (Below). Please let us know if you need anything else to get the problem fixed.
Images (Click to enlarge)
Mar 16, 2021 at 5:51 PM