Hi and thanks for using 2CarPros.com. First, sorry for the delayed response. However, hopefully I can help with the problem. A rough shift can be the result of a few things. Keep in mind, although the transmission was recently serviced, it still could be low on fluid. That is the first thing I would confirm is correct.
If that is correct, there are pressure control solenoids. Here are the directions to check them:
CONVERSION CALCULATOR
2004 Acura RSX L4-2.0L
Vehicle » Powertrain Management » Transmission Control Systems » Pressure Regulating Solenoid » Testing and Inspection » A/T Clutch Pressure Control Solenoid Valve A Test
A/T CLUTCH PRESSURE CONTROL SOLENOID VALVE A TEST
Test
Remove the air cleaner housing.
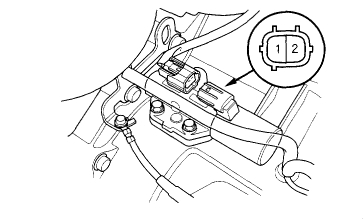
Disconnect the A/T clutch pressure control solenoid valve A connector.
Measure A/T clutch pressure control solenoid valve A resistance at the solenoid valve A connector. STANDARD: About 5 ohms
If the resistance is out of standard, replace the A/T clutch pressure control solenoid valve A.
Connect the battery positive terminal to the No. 1 terminal of the A/T clutch pressure control solenoid valve A connector, and connect the battery negative terminal to the No. 2 terminal. A clicking sound should be heard.
If no sound is heard, remove the A/T clutch pressure control solenoid valve A.
Check the fluid passage of the A/T clutch pressure control solenoid valve for dust or dirt.
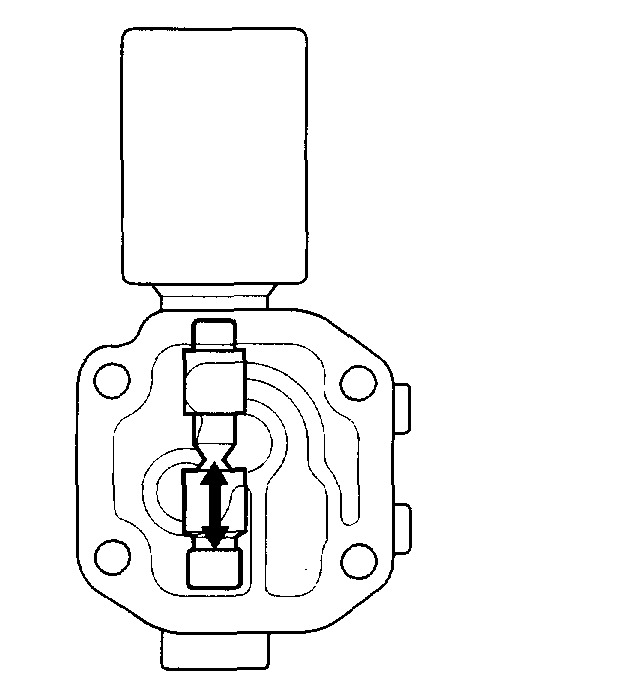
Connect the No. 1 terminal of the A/T clutch pressure control solenoid valve A connector to the battery positive terminal, and connect the No. 2 terminal to the battery negative terminal. Make sure the A/T clutch pressure control solenoid valve moves.
Disconnect one of the battery terminals and check for valve movement.
NOTE: You can see valve movement through the fluid passage in the mounting surface of the A/T clutch pressure control solenoid valve A body.
If the valve binds or moves sluggishly, or if the solenoid valve does not operate, replace the A/T clutch pressure control solenoid valve A.
______________________________________________________________________________
2004 Acura RSX L4-2.0L
Vehicle » Powertrain Management » Transmission Control Systems » Pressure Regulating Solenoid » Testing and Inspection » A/T Clutch Pressure Control Solenoid Valves B and C Test
A/T CLUTCH PRESSURE CONTROL SOLENOID VALVES B AND C TEST
Test
Remove the air cleaner housing.
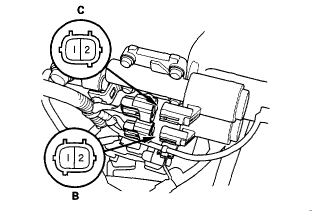
Disconnect the A/T clutch pressure control solenoid valves B and C connectors.
Measure A/T clutch pressure control solenoid valve B resistance at the solenoid valve B connector, and measure A/T clutch pressure control solenoid valve C resistance at the solenoid valve C connector. STANDARD: About 5 ohms
If the resistance of either A/T clutch pressure control solenoid valve is out of standard, replace the A/T clutch pressure control solenoid valves B and C.
Connect the battery positive terminal to the No. 1 terminal of the A/T clutch pressure control solenoid valves B and C connectors, and connect the battery negative terminal to the No. 2 terminal. A clicking sound should be heard.
If no sound is heard, remove the A/T clutch pressure control solenoid valves B and C.
Check the fluid passage of the A/T clutch pressure control solenoid valve for dust or dirt.
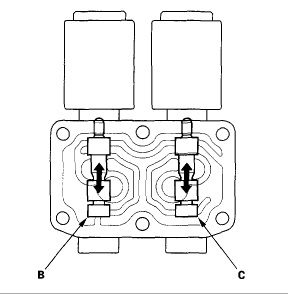
Connect the No. 1 terminal of the A/T clutch pressure control solenoid valves B and C connectors to the battery positive terminal, and connect the No. 2 terminal to the battery negative terminal. Make sure the A/T clutch pressure control solenoid valves B and C move.
Disconnect one of the battery terminals, and check valve movement.
NOTE: You can see valve movement through the fluid passage in the mounting surface of the A/T clutch pressure control solenoid valves B and C body.
If either valve binds or moves sluggishly, or if the solenoid valve does not operate, replace the A/T clutch pressure control solenoid valves B and C.
_________________________________________________________________________
If you determine one is bad, here are the directions for replacement.
2004 Acura RSX L4-2.0L
Vehicle » Powertrain Management » Transmission Control Systems » Pressure Regulating Solenoid » Service and Repair » A/T Clutch Pressure Control Solenoid Valve A Replacement
A/T CLUTCH PRESSURE CONTROL SOLENOID VALVE A REPLACEMENT
Replacement
Remove the air cleaner housing.
Disconnect the A/T clutch pressure control solenoid valve A connector.
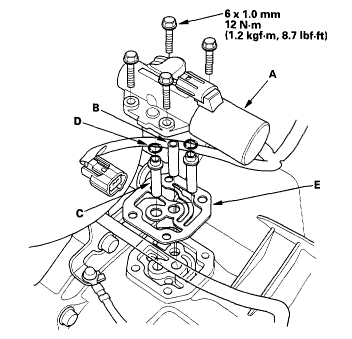
Remove the mounting bolts and the A/T clutch pressure control solenoid valve A.
Remove the ATF pipe (B), ATF joint pipes (C), O-rings (D), and gasket (E).
Clean the mounting surface and fluid passage of the A/T clutch pressure control solenoid valve A and transmission housing.
Install the new gasket on the transmission housing, and install the ATF pipe and ATF joint pipes.
Install the new O-rings over the ATF joint pipes.
Install the new A/T clutch pressure control solenoid valve A.
Check the A/T clutch pressure control solenoid valve A connector for rust, dirt, or oil, then connect it securely.
Install the air cleaner housing.
_______________________________________________________________________________________
CONVERSION CALCULATOR
2004 Acura RSX L4-2.0L
Vehicle » Powertrain Management » Transmission Control Systems » Pressure Regulating Solenoid » Service and Repair » A/T Clutch Pressure Control Solenoid Valves B & C Replacement
A/T CLUTCH PRESSURE CONTROL SOLENOID VALVES B & C REPLACEMENT
Replacement
Remove the air cleaner housing.
Disconnect the A/T clutch pressure control solenoid valves B and C connectors.
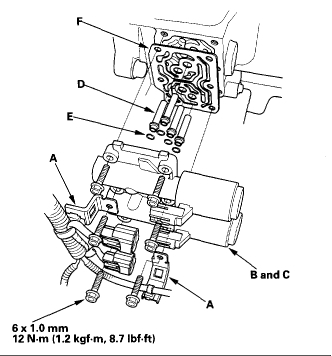
Remove the mounting bolts, harness clamp brackets (A), and the A/T clutch pressure control solenoid valves B and C.
Remove the ATF joint pipes (D), O-rings (E), and gasket (F).
Clean the mounting surface and fluid passages of the A/T clutch pressure control solenoid valves B and C and transmission housing.
Install the new gasket on the transmission housing, and install the ATF joint pipes.
Install the new O-rings over the ATF joint pipes.
Install the new A/T clutch pressure control solenoid valves B and C, and harness clamp brackets.
Check the A/T clutch pressure control solenoid valves B and C connectors for rust, dirt, or oil, then connect them securely.
Install the air cleaner housing.
I hope this helps. Let me know if you have other questions.
Take care,
Joe
Images (Click to enlarge)
Jun 1, 2018 at 8:13 PM