Replacement procedures for your vehicle's upper and lower ball joints are below.
REMOVAL:
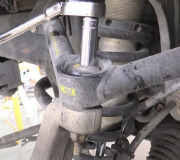
On 4WD vehicles both the upper and lower ball joints are removed in the same manner. Once the joint is separated from the steering knuckle the rivets are drilled and punched to free the joint from the control arm. Service joints are bolted into position with the retaining bolts threaded upward from beneath the control arm. In this manner, the joint is replaced in an almost identical fashion to the upper joints on 2WD vehicles.
Raise and support the front of the vehicle safely using jackstands.
Remove the tire and wheel assembly.
When removing the upper ball joint, unplug the wheel speed sensor wiring connector from the upper control arm.
Remove the cotter pin from the ball joint, then loosen the retaining nut.
Position a suitable ball joint separator tool such as J-36607, or equivalent, then carefully loosen the joint in the steering knuckle. Remove the tool and the retaining nut, then separate the joint from the knuckle.
After separating the steering knuckle from the upper ball joint, be sure to support the steering knuckle/hub assembly to prevent damaging the brake hose.
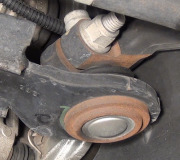
Remove the riveted ball joint from the control arm:
Drill a 1 / 8 in. (3mm) hole, about 1 / 4 in. (6mm) deep into each rivet.
Then use a 1 / 2 in. (13mm) drill bit, to drill off the rivet heads.
Using a pin punch and the hammer, drive out the rivets in order to free the ball joint from the control arm assembly, then remove the ball joint.
INSTALLATION:
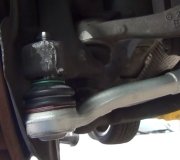
Position the joint in the control arm, then install the joint retaining nuts and bolts. Position the bolts threaded upward from under the control arm. Tighten the ball joint retainers to 17 ft. Lbs. (23 Nm).
Remove the support from the steering knuckle, then install the ball joint to the knuckle. Make sure the joint is seated, then install the stud nut and tighten both nuts to 70 ft. Lbs. (95 Nm) on 1994 models. On 1995-99 models tighten the lower nut to 79 ft. Lbs. (108 Nm) and the upper nut to 61 ft. Lbs. (83 Nm). Install a new cotter pin.
When installing the cotter pin, never loosen the castle nut to expose the cotter pin hole, but DO NOT tighten more than an additional1/6turn.
Use a grease gun to lubricate the upper ball joint.
If the upper ball joint was removed, attach the wheel speed sensor wiring connector to the upper control arm.
Install the tire and wheel assembly.
Remove the jackstands and carefully lower the vehicle.
Check and adjust the front end alignment, as necessary.
Thanks for using 2CarPros. Com!
Friday, March 27th, 2009 AT 4:00 PM