Hi and thanks for using 2CarPros.com.
Here are directions for tank removal specific to your vehicle. It discusses the components you mentioned and how they are removed. I have also attached pictures to help.
__________________________________________________
1993 Jaguar XJ-6 L6-4.0L
Vehicle » Powertrain Management » Fuel Delivery and Air Induction » Fuel Tank » Service and Repair
SERVICE AND REPAIR
CAUTION: Observe all fire hazard precautions detailed inFuel Systems / Service Precautions , when working on open fuel systems.
Fuel system MUST be depressurized before disconnecting any fueling component.
Refer to TSB #1929.
Jaguar recommends use of a special non-ferrous wrench, tool JD175, for removing fuel hose clamps located inside fuel tank. This is to eliminate the possibility of sparks being created.
REMOVE
Depressurize fuel system. See: Fuel Pressure Release
Disconnect battery.
Drain fuel tank into suitable container.
Lift car on hoist.
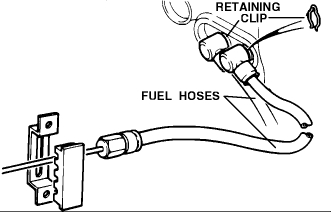
Fuel Tank Hose Connections
Remove clips securing fuel supply and return hoses and disconnect from fuel tank. Fit protective plugs to open hoses and tank.
Remove sealing rings from hoses and lower car.
Open trunk and remove spare tire.
Remove floor carpet, right liner, left liner, and front liner.
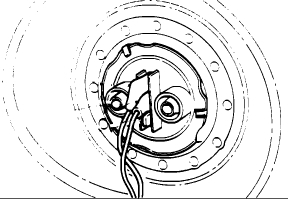
Fuel Tank Sending Unit Connections
Note position of wiring and disconnect from fuel tank sending unit.
NOTE: Top terminal is positive supply, center terminal is ground, bottom terminal is fuel warning light and should be blanked off with insulation cover preventing incorrect connection.
Remove bolts securing spare wheel mounting bracket and remove bracket.
Remove tank upper insulation pad.
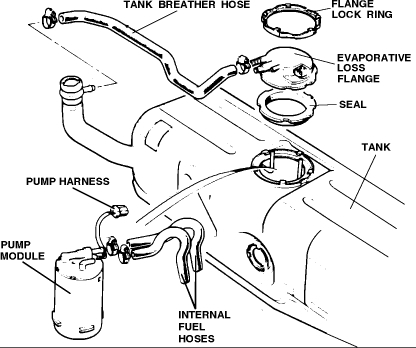
Disconnect fuel pump harness from evaporative loss flange connection.
Release harnesses attached to tank retaining straps and reposition harnesses downward.
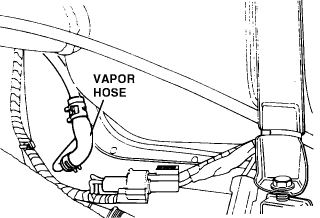
Vapor Hose
Disconnect vapor pipe assembly from underbody pipe.
Push back collars on quickfit connectors and remove vapor pipe and over-pressure pipe from evaporative loss flange port.
Remove bolts securing tank retaining straps.
Reposition straps upward for access.
Remove strap holding filler housing solenoid block connector to harness and disconnect connector.
Fuel Filler Aperture Seal
Disconnect drain tube from aperture seal.
Fuel Filler
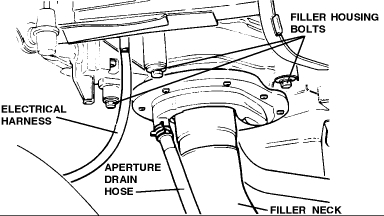
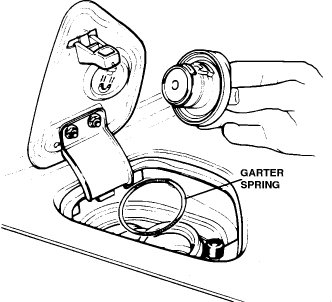
Open fuel filler cap and remove filler neck garter spring.
Remove filler housing bolts.
Displace filler housing from body opening. (It will remain on filler neck).
Remove fuel tank.
Fuel Tank And Pump Module
Remove hose from evaporative loss flange and filler neck. Bend weld tag upward to release hose.
Remove evaporative loss flange lock ring.
Lift flange from tank enough to disconnect fuel pump harness.
Remove flange and seal.
Inside tank, use Jaguar tool JD175 to loosen hose clamps and remove fuel hoses from fuel pump module.
Remove fuel pump module and mounting rubber. Note position of mounting rubber lugs.
Using Jaguar tool JD175, loosen hose clamps and remove two fuel hoses inside tank.
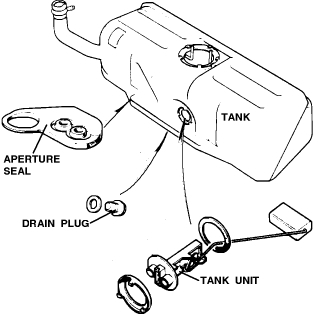
Remove tank sending unit.
Remove magnetic drain plug and clean plug.
Fuel Tank Sending Unit
___________________________
REFIT
Fit drain plug to new tank. Use new sealing washer.
Remove outlet pipe body aperture seal backing and fit to new tank. Use new aperture seal.
Remove retaining strap rubber strips and fit to new tank.
Refit sending unit using new sealing ring.
Refit fuel hoses to internal pipes. Be sure hoses are fully seated and tight, on pipes.
Refit fuel pump mounting rubber to tank.
NOTE: Be sure mount is positioned correctly. There are three large and one small locating holes in mount that mate with lugs on support bracket. There are also locating lugs and slots between mount rubber and pump module.
Refit fuel pump module to mounting rubber.
Reconnect fuel hoses to pump. Be sure hoses are fully seated and tight, on pump.
NOTE: Be sure hoses are not twisted and lower clamp on return hose does not foul tank sending unit float arm.
Fit a new evaporative loss flange seal to tank opening.
Reconnect fuel pump harness connector to flange and install flange to tank.
Be sure flange seal remains correctly seated and fit locking ring.
Fit breather hose to tank and reposition weld tag downward to secure hose.
Refit breather hose to tank and filler neck.
Fit tank assembly into position in trunk. Be sure no pipes, hoses, or harnesses are trapped by tank.
Connect sending unit wiring.
NOTE: Top terminal is positive supply, center terminal is ground, bottom terminal is fuel warning light and should be blanked off with insulation cover preventing incorrect connection.
Refit tank retaining straps.
Reconnect harness and hoses to evaporative loss flange. Be sure hoses are fully seated to prevent fuel leaks.
Refit filler neck aperture housing.
Reconnect filler cap solenoid connector and secure with strap.
Connect aperture drain tube to filler neck and secure with tie strap.
Place harnesses to tank retaining straps and secure with tie straps.
Refit upper sound insulation pad.
Refit spare tire mounting bracket.
Refit all carpet and liners.
Refit jack and spare tire.
Lift vehicle and remove plugs from fuel tank and hoses.
Use new sealing rings and reconnect fuel hoses to tank. Be sure hose retaining clips are seated.
Lower vehicle and refill fuel tank.
Check for leaks in trunk and under vehicle.
Reconnect battery.
I hope this helps. Let me know if you have other questions.
Take care,
Joe
Images (Click to enlarge)
Jun 9, 2018 at 9:44 PM