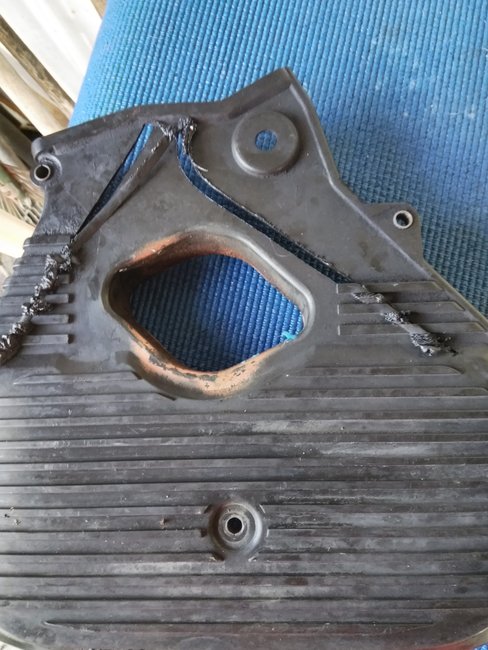
I noticed my timing belt housing had a groove cut in it

Tiny
JCLEMO
  • MEMBER
  • 2000 KIA SPORTAGE
  • 2.0L
  • 4 CYL
  • 2WD
  • 149,000 MILES
Lots of new parts.
Lady didn't know if the timing belt had been replaced so I tore it apart.
Looks like it was replaced. So I put it back together. After starting the engine
It was making a noise it was not making prior to my work. Was nothing that was critical so I've been driving around a couple months. So low and behold today I was checking under the hood and I noticed my timing belt housing had a groove cut in it in the entire top half of the housing and the bottom half was cracked in half. Oh no, I'm not believing this. So I bought a whole new housing. Now my plan is to take it apart again and redo the belt the tentioner and the other pulley as well. While I'm this far I'm replacing the front main seal. My question is how to get to it. Crank pulley comes off and then what? Where's the seal?
Water pump off as well. This is where I need help. A diagram would be great. Also the timing diagram would be very helpful. Timing belt has not been removed yet. I want to make sure I get the timing straight first before I remove the belt I know the crank sprocket and the cam sprockets have
Identifying marks as well as the backing plate But something to look at would be much safer in my opinion. So thanks in advance. I've gotten some really good tips and information from this site. And trust it more than any forum. Thanks, JC
Thursday, June 20th, 2019 AT 4:31 PM

14 Replies

Tiny
JACOBANDNICKOLAS
  • MECHANIC
  • 108,190 POSTS
Welcome to 2CarPros.

Are you sure you the timing cover wasn't just misaligned? Here are the directions you requested with diagrams below. I will start with timing belt replacement, then crank seal, then water pump. Keep in mind, these overlap each other. In other words, the crankshaft seal and water pump will be replaced while the belt is off.

TIMING BELT REMOVAL AND INSTALLATION
REMOVAL

1. Disconnect the negative battery cable.
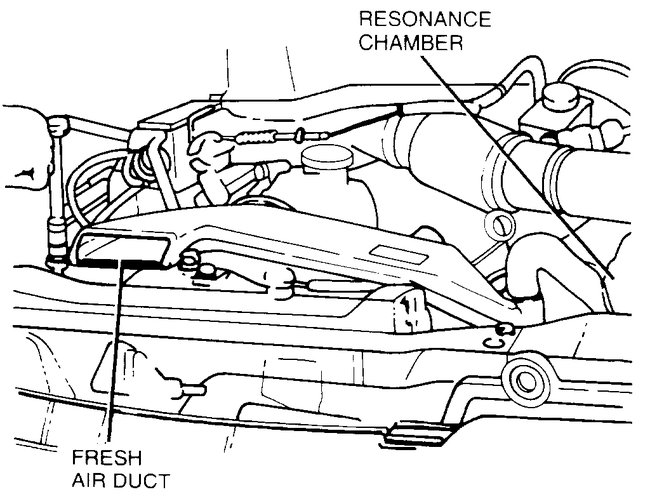
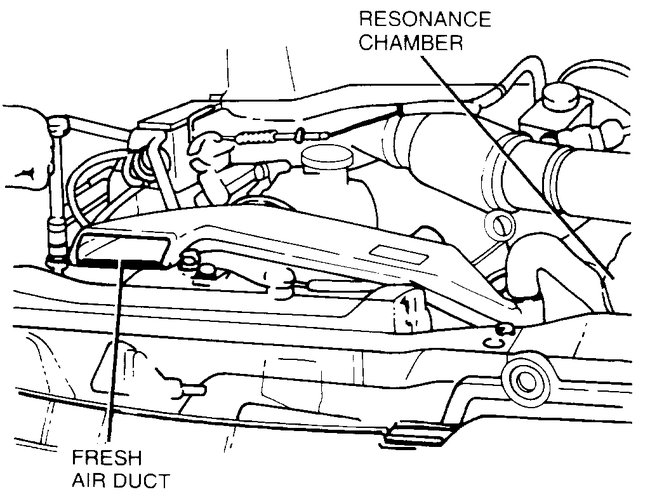
2. Remove the two fresh air duct mounting bolts on the radiator.
3. Loosen the fresh air duct clamp at the intake housing.
4. Remove the hose at the resonance chamber.

5. Remove the fresh air duct.

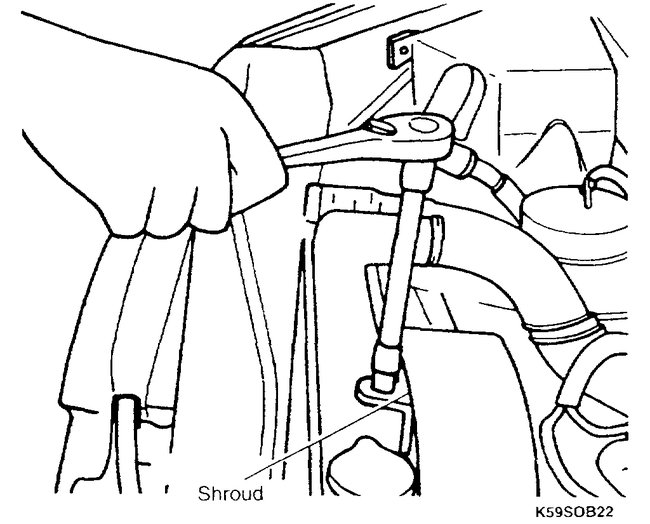
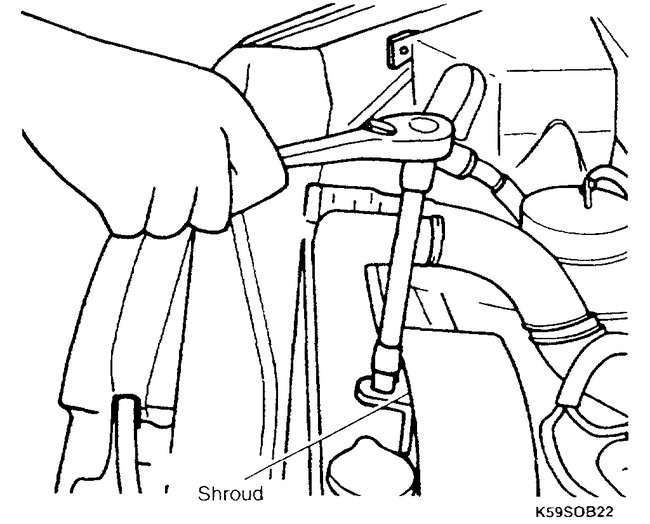
6. Remove the five cooling fan shroud bolts.
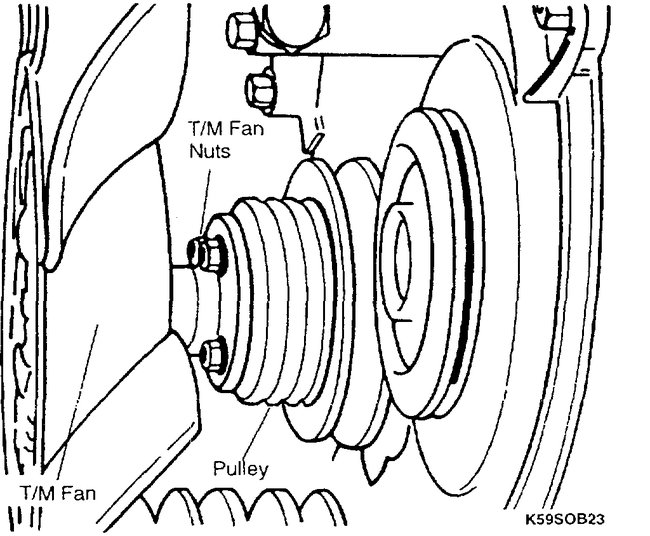
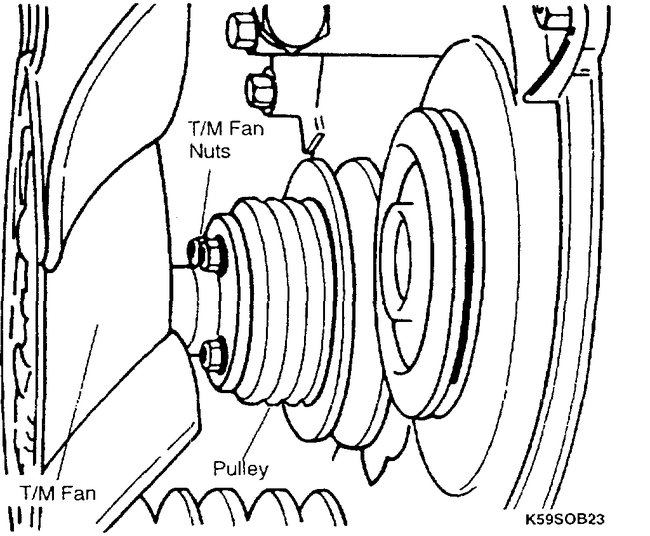
7. Remove the four thermo-modulated fan nuts.

8. Remove the thermo-modulated fan and cooling fan shroud at the same time.

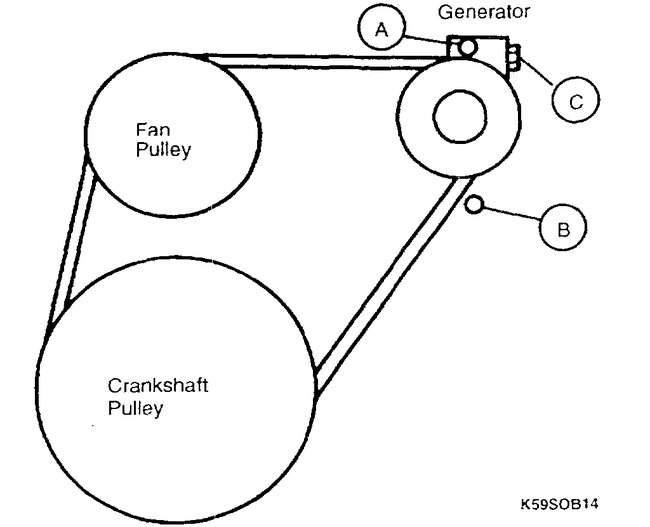
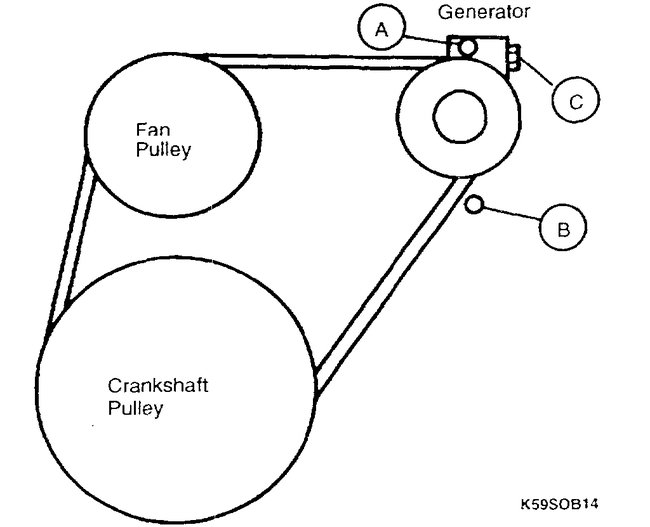
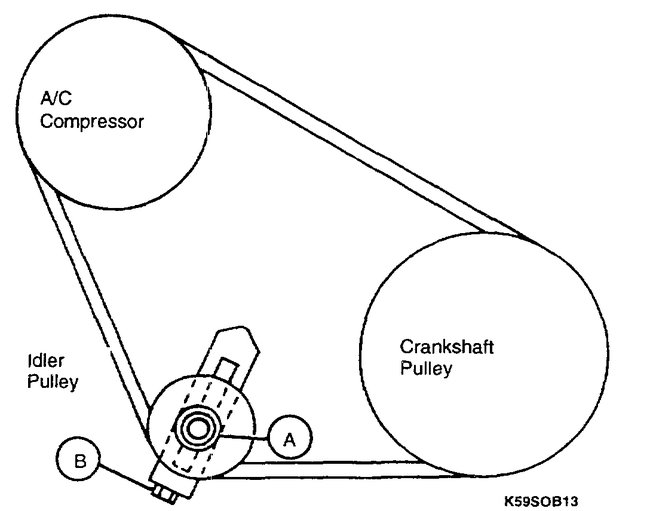
9. Loosen the two generator mounting bolts (A and B).
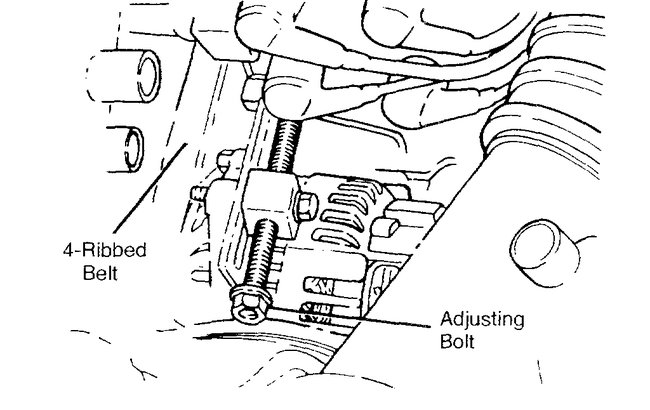
10. Loosen the generator drive belt from the generator by loosening the adjusting bolt (c).
11. Remove the generator drive belt.
12. Remove the fan pulley.
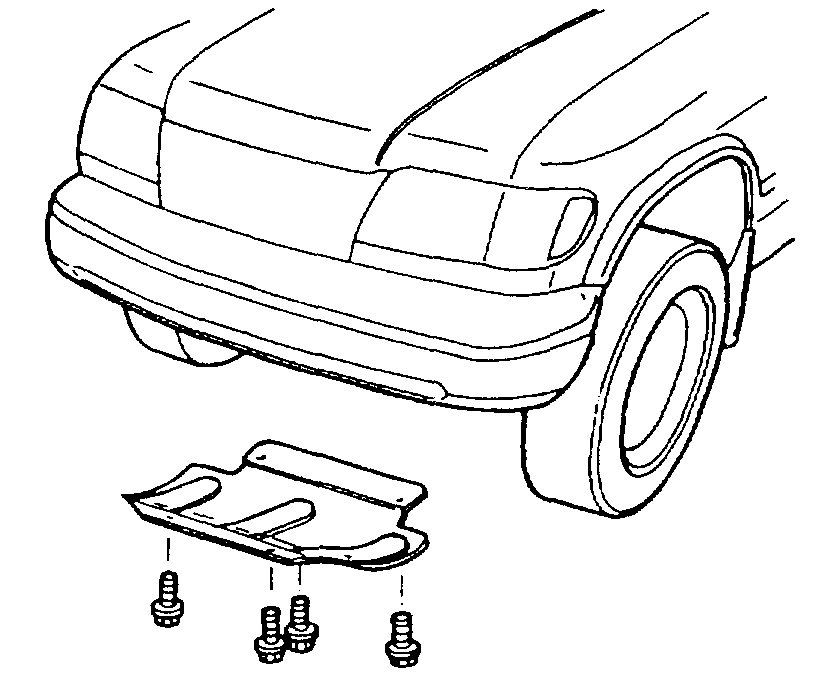
13. Remove the four splash guard mounting bolts and splash Guard.
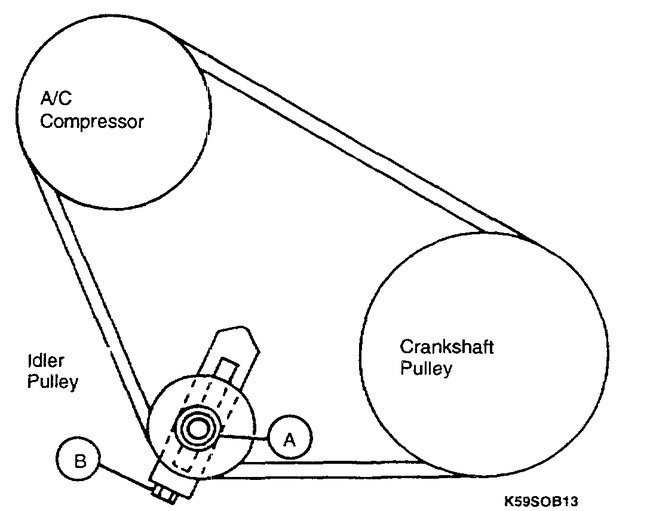
14. Loosen the A/C idler pulley nut (A).
15. Remove the A/C drive belt by loosening the adjusting bolt.
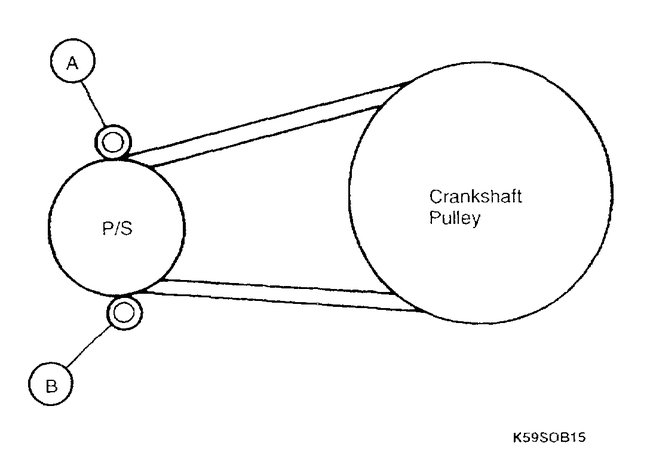
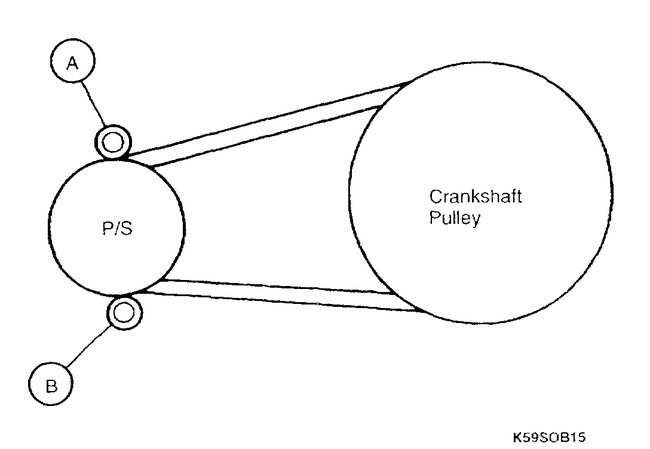
16. Loosen the power steering pump lock bolt and mounting bolt.
17. Remove the power steering belt.
18. Remove five bolts and the upper timing belt cover.
19. Remove two bolts and the lower timing cover.
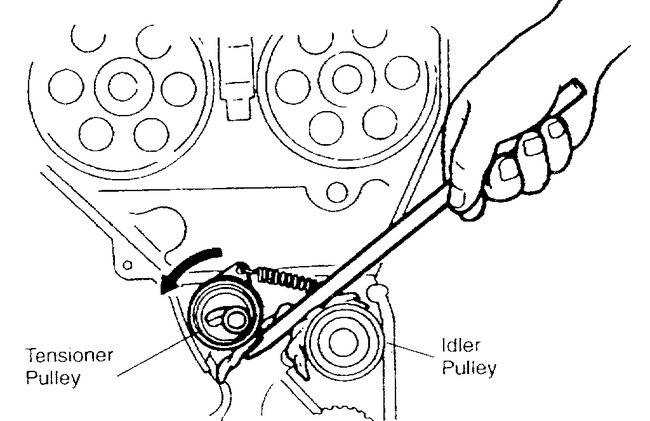
20. Loosen the tensioner lock bolt and pivot the tensioner pulley outward to remove the tension from the timing belt, then re-tighten the tensioner lock bolt.

Tightening Torque: 27 - 38 ft. Lbs. (37 - 52 Nm)

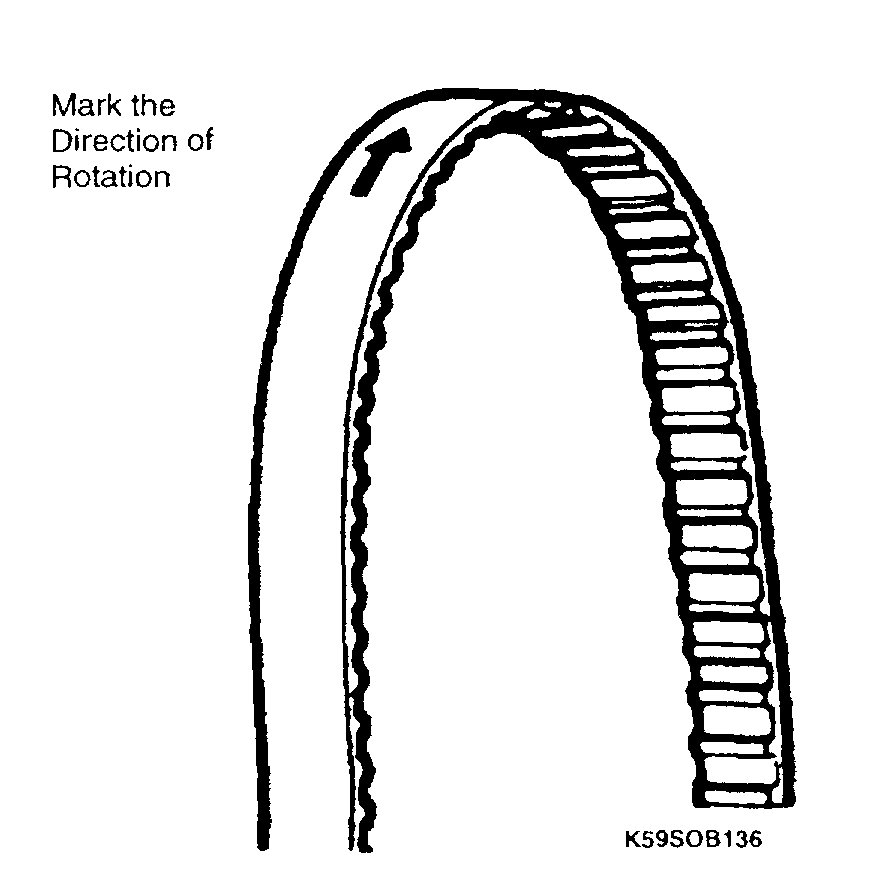
21. Mark the timing belt rotation for proper reinstallation if it is reused.

22. Remove the timing belt.

CAUTION: Be careful not to allow oil or grease on the belt.

INSTALLATION

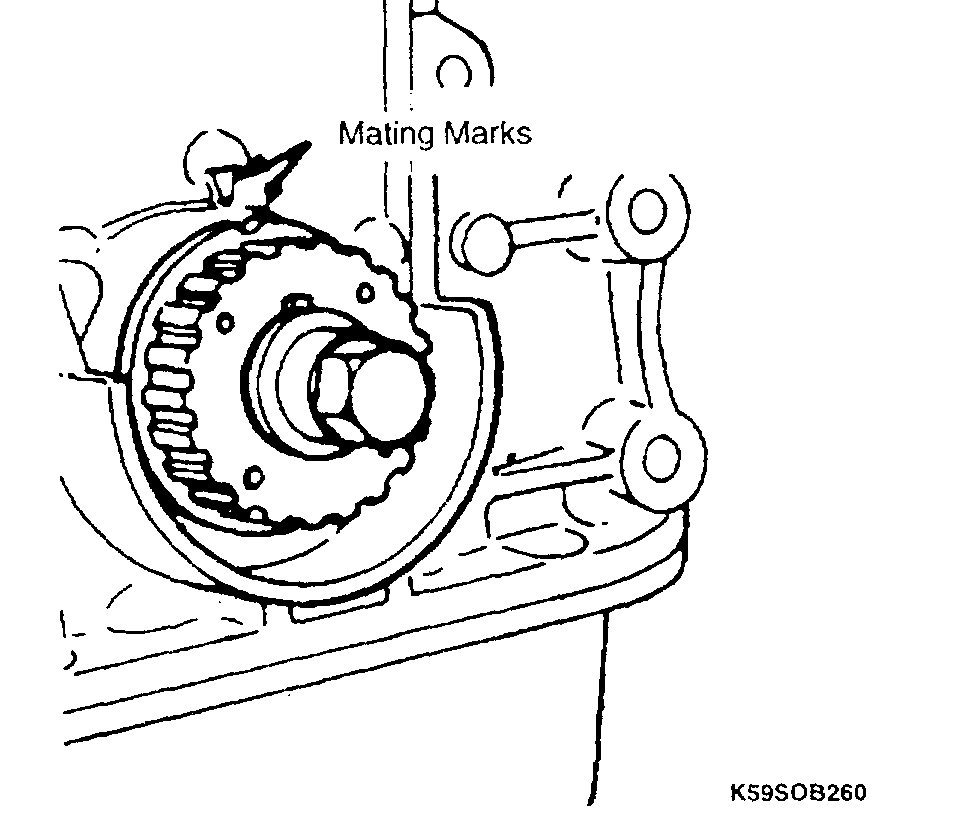
1. Align the timing belt pulley and the pump body alignment marks.

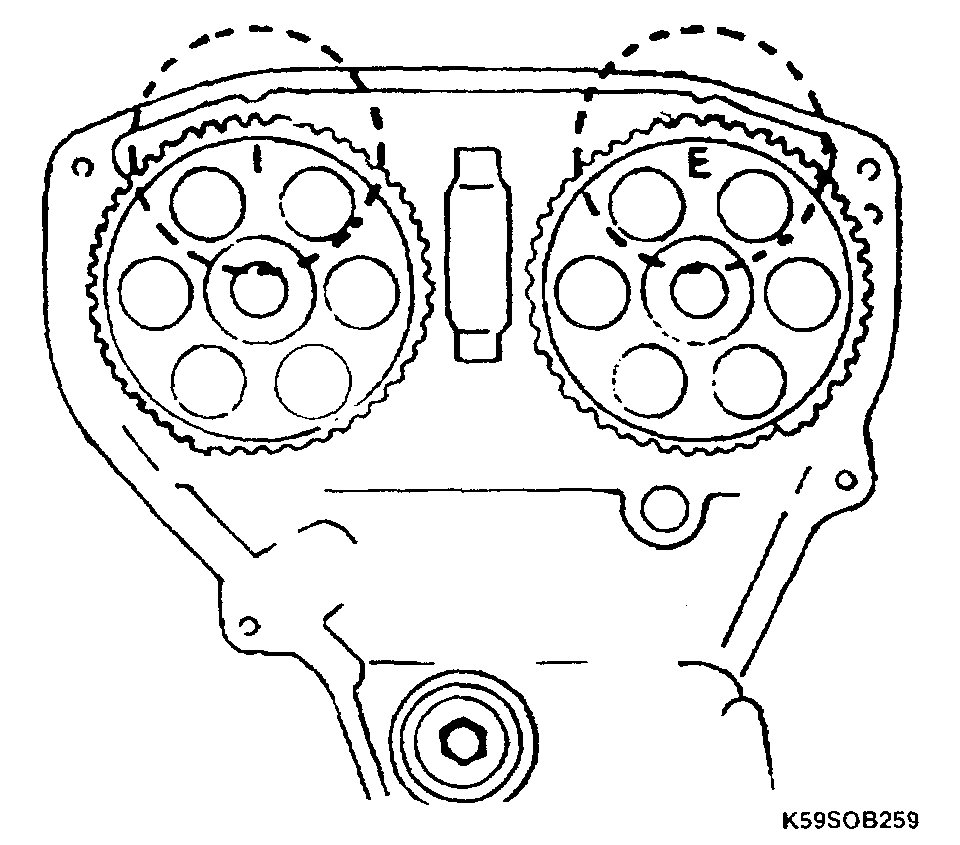
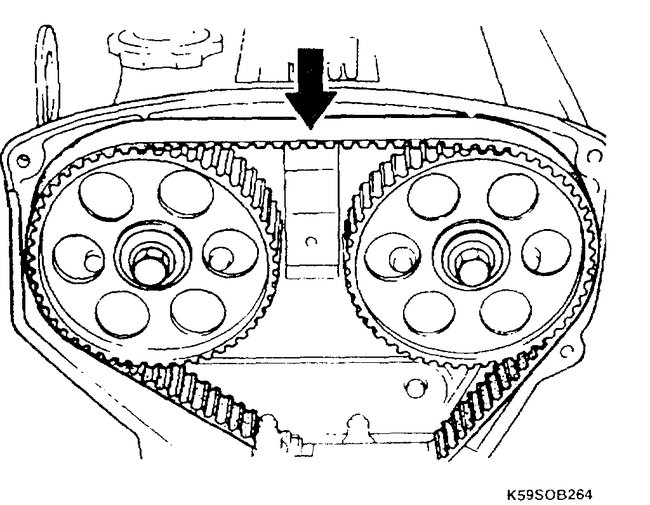
2. Align the mating marks on the camshaft pulleys with the alignment marks on the seal plate.

NOTICE:
- For intake side camshaft pulley, align I mark.
- For exhaust side camshaft pulley, align E mark.
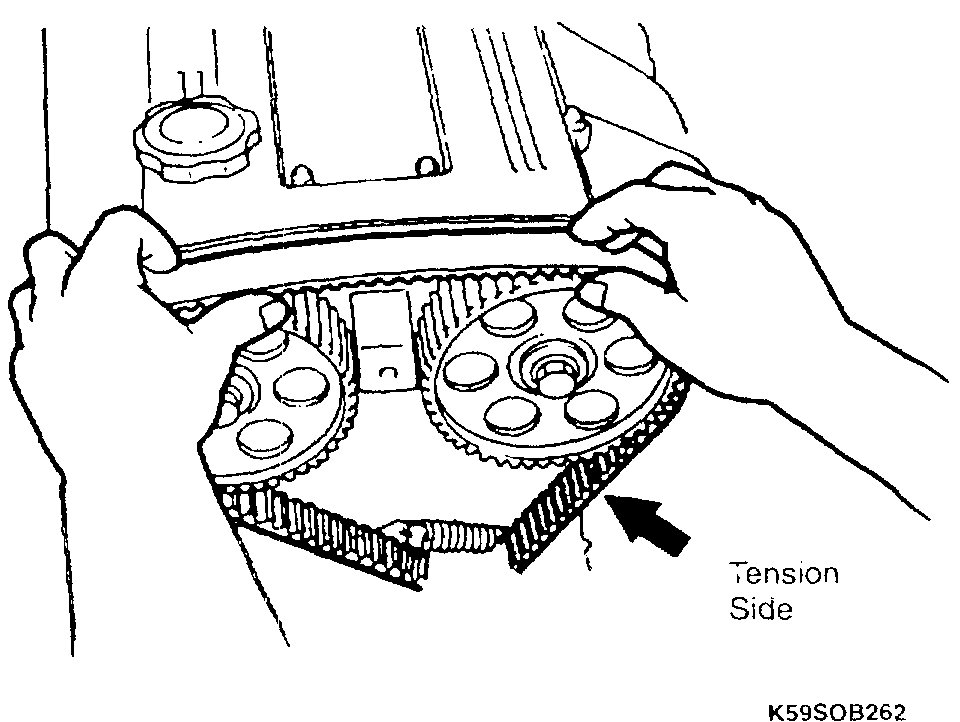
3. Install the timing belt so that there is no looseness at the tension side, and at the two camshaft pulleys.

CAUTION:
- If the timing belt is being reused, it must be reinstalled to rotate in the original direction.
- Check that there is no oil, grease, or dirt on the timing belt

4. Loosen the tensioner lock bolt.
5. Turn the crankshaft two complete revolutions in the direction of rotation.
6. Check that the mating marks are correctly aligned. If not aligned correctly, remove the timing belt and tensioner, and return to step 1.
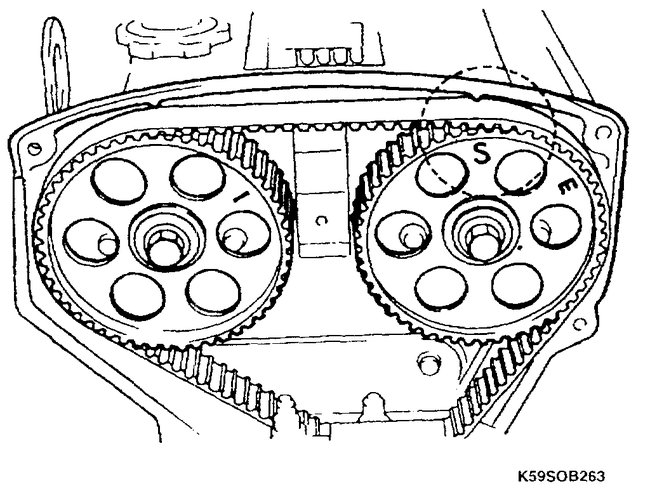
7. Turn the crankshaft to align the S mark of the exhaust camshaft pulley with the seal plate mating mark.
8. Tighten the timing belt tensioner lock bolt.

Tightening torque: 27 - 38 ft. Lbs. (37 - 52 Nm, 3.8 - 5.3 kg-m)

9. Check the timing belt deflection. If the deflection is not correct, loosen the tensioner lock bolt and repeat steps 5-7 above. Replace the tensioner spring if necessary.

Belt deflection: 0.30 - 0.33 inch (7.5 - 8.5 mm)/22 lbs. (98 N, 10 kg)

1O. Install the lower timing belt cover and two bolts.

Tightening torque: 61 - 87 inch lbs. (7 - 10 Nm)

11. Install the upper timing belt cover and five bolts.

Tightening torque: 61 - 87 inch lbs. (7 - 10 Nm)

12. Install the power steering drive belt and set belt deflection.

Power Steering Belt deflection:
New: 0.31 - 0.39 inch (8 - 10 mm)
Used 0.35 - 0.43 inch (9 - 11 mm)

13. Tighten the lock bolt (A) and mounting bolt (B).

Tightening torque: 27 - 34 ft. Lbs. (37 - 46 Nm)

14. Install the fan pulley.
15. Install the generator drive belt and adjust belt deflection by tightening adjusting bolt (c).

Generator Belt deflection:
New: 0.24 - 0.31 inch (6 - 8 mm)
Used: 0.27 - 0.35 inch (7 - 9 mm)

16. Tighten generator mounting bolts (A and B).

Tightening torque:
A: 16 ft. Lbs. (22 Nm)
B: 32 ft. Lbs. (45 Nm)

17. Install A/C drive belt and set belt deflection by tightening adjusting bolt (B).

A/C Belt deflection:
New: 0.27 - 0.35 inch (7 - 9 mm)
Used: 0.31 - 0.39 inch (8 - 10 mm)
18. Tighten the adjusting bolt (B) and idler pulley bolt (A).

Tightening torque: 23 - 25 ft. Lbs. (31 - 34 Nm)

19. Install the splash guard and tighten the four mounting bolts.
20. Install the fan and fan shroud.
21. Install the four fan bolts and tighten.

Tightening Torque: 24 ft. Lbs. (32.6 Nm)
22. Install the five fan shroud mounting bolts.

Tightening torque: 69 - 95 inch lbs. (7.8 - 11 Nm)

23. Install the fresh air duct.
24. Install the hose at the resonance chamber.
25. Install and tighten the clamp at the air intake housing.
26. Install the two fresh air duct mounting bolts and tighten.

Tightening torque: 69 - 95 inch lbs. (7.8 - 11 Nm)

27. Reconnect the negative battery cable.

Crankshaft seal

REMOVAL
1. Disconnect the negative battery cable.
2. Remove the four undercover bolts.
3. Remove the engine undercover.
4. Remove the timing belt.
5. Remove the timing belt pulley lock bolt.
6. Remove the timing belt pulley.

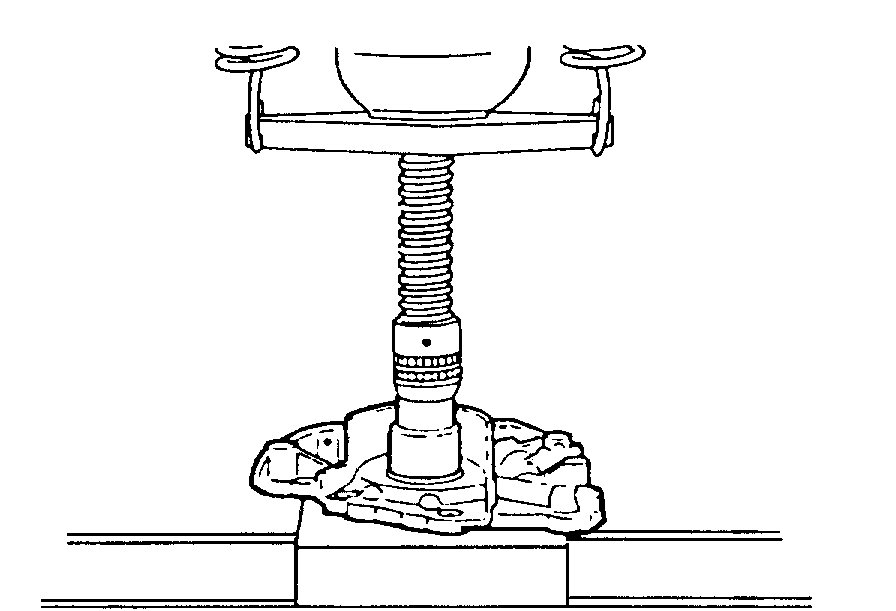
NOTICE: If necessary, remove the pulley with a steering wheel puller (commercially available).

7. Remove the pulley Woodruff key.
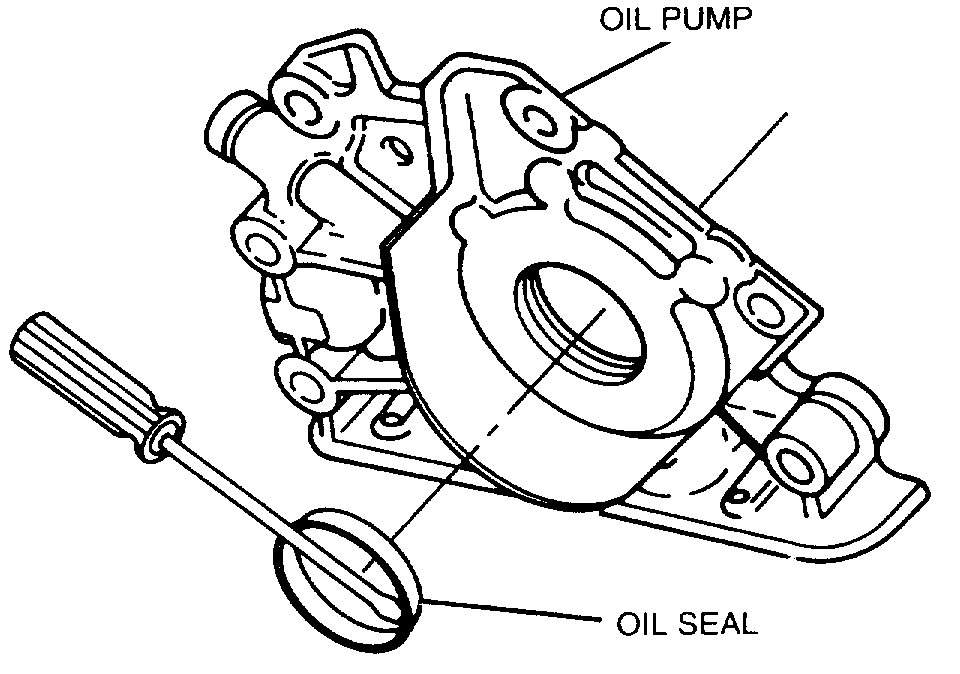
8. Cut the oil seal lip with a razor knife.
9. Remove the oil seal with a screwdriver protected with a shop rag.

INSTALLATION
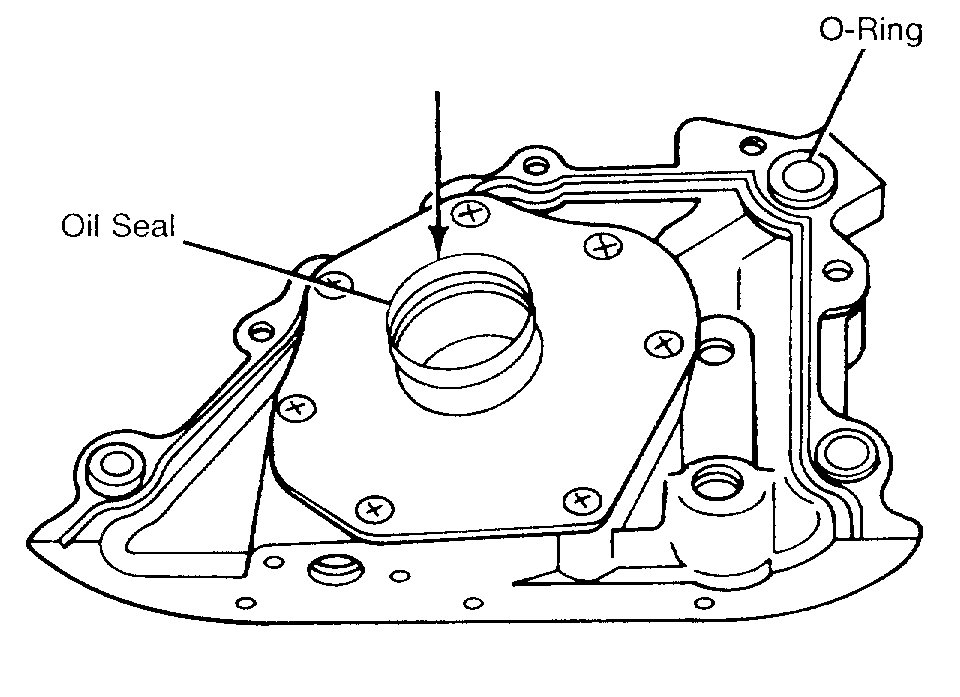
1. Apply a small amount of clean engine oil to the lip of a new oil seal.
2. Push the oil seal slightly in by hand.

NOTICE: The oil seal must be pressed in until it is flush with the edge of the oil pump body.
3. Install the oil seal into the oil pump body.
4. Install the timing belt pulley.
5. Install the pulley Woodruff key.
6. Install the pulley lock bolt.

Tighten the lock bolt to 116 - 123 ft. Lbs. (157 - 167 Nm)

7. Install the timing belt.
8. Install the undercover.
9. Install the four undercover bolts.

Tighten the four bolts to 18 ft. Lbs. (25 Nm)

10. Connect the negative battery cable.
11. Start the engine and check the ignition timing.

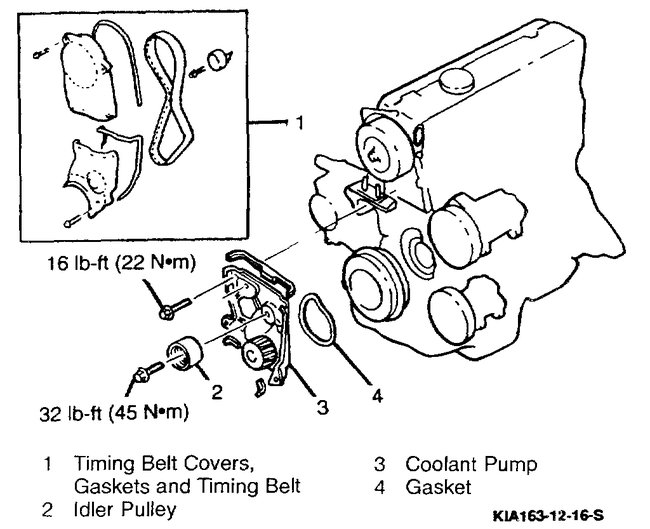
Check out the diagrams (Below). Please let us know if you need anything else to get the problem fixed.
Was this
answer
helpful?
Yes
No
+1
Wednesday, April 7th, 2021 AT 1:45 PM
Tiny
JCLEMO
  • MEMBER
  • 161 POSTS
Thank you so much.
It looks like the timing belt was touching the housing. But I don't see how that's possible. The belt itself had no evidence of rubbing the housing. Is it okay to start the engine up without the timing cover in place? So I can see how that belt is tracking on the sprockets? To see if it's riding on the outside edges of the sprockets? That's what it looks like to me. But the belt was not riding to the outside when I pulled the cover off. I'm going to send you a photo of the housing tomorrow. JC
Was this
answer
helpful?
Yes
No
Wednesday, April 7th, 2021 AT 1:45 PM
Tiny
JACOBANDNICKOLAS
  • MECHANIC
  • 108,190 POSTS
Happy to help. Let me know what you find or if you have questions. I will watch for your picture tomorrow.

Take care,
joe
Was this
answer
helpful?
Yes
No
Wednesday, April 7th, 2021 AT 1:45 PM
Tiny
JCLEMO
  • MEMBER
  • 161 POSTS
Okay Joe. I think it's going to send photo.
Was this
answer
helpful?
Yes
No
Wednesday, April 7th, 2021 AT 1:45 PM
Tiny
JCLEMO
  • MEMBER
  • 161 POSTS
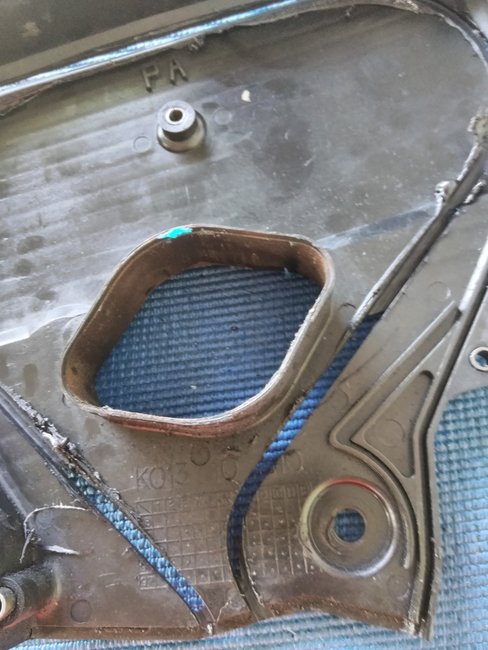
Top half Joe. 2.0 kia
Was this
answer
helpful?
Yes
No
Wednesday, April 7th, 2021 AT 1:45 PM
Tiny
JCLEMO
  • MEMBER
  • 161 POSTS
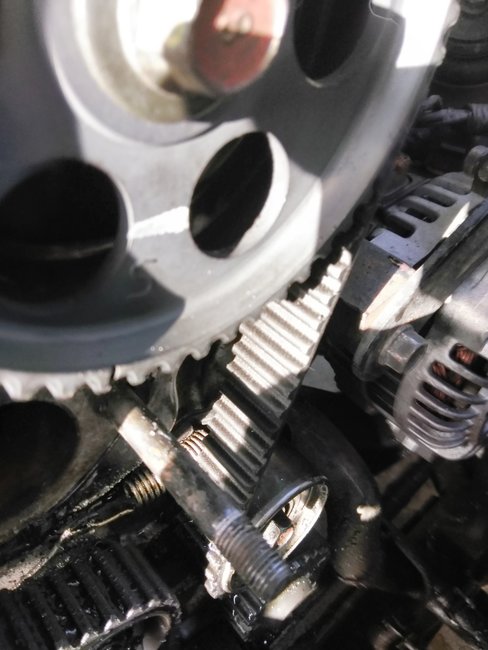
Check out the belt. How does it look to you?
Was this
answer
helpful?
Yes
No
Wednesday, April 7th, 2021 AT 1:45 PM
Tiny
JCLEMO
  • MEMBER
  • 161 POSTS
Hello, I pulled the belt today and I can see where the belt was wearing on the trailing edge of the belt the front edge was rubbing on something. I guess the housing due to groove worn completely through the housing. How could this happen? Just bought a new housing don't want to make the same mistake again. How can you tell when your tentioner is going bad? Any tell tale signs? I got the main seal out by the way. Thanks
Was this
answer
helpful?
Yes
No
Wednesday, April 7th, 2021 AT 1:45 PM
Tiny
JACOBANDNICKOLAS
  • MECHANIC
  • 108,190 POSTS
Welcome back:

Wow! That did wear a hole through it. When you first took it off when you got the car to check the belt, did anything fall? I'm wondering if there were small spacers in there that kept the cover far enough away. Also, when you reinstall the new one, make sure it is properly seated and not overlapping. And, if it makes noise, we now know what is happening.

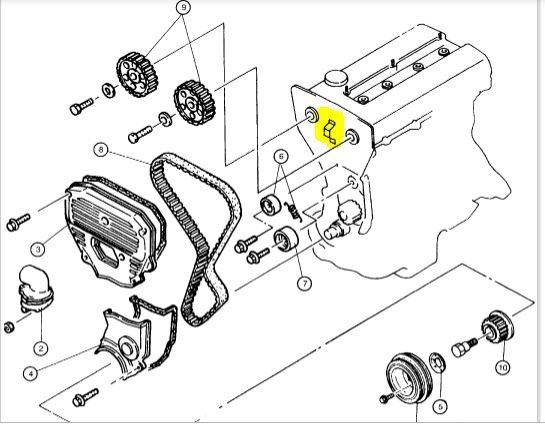
As far as the belt, it's hard to say from a picture, but it doesn't look bad. Now, if you plan to replace the belt, honestly, I would replace the tensioners and spring along with the idler pulley, closely inspect the cam and crank gears, and so on. It isn't a five minute job and you don't want to do it again in a month. If it helps, here is a list of checks for timing components. The attached pics correlate with the directions. It explains what to look for and how to check the components. The very last pic is an exploded view of everything. I highlighted a tab. Make sure that isn't bent allowing the belt to sit too far in.

__________________________________

COMPONENT TESTS AND GENERAL DIAGNOSTICS
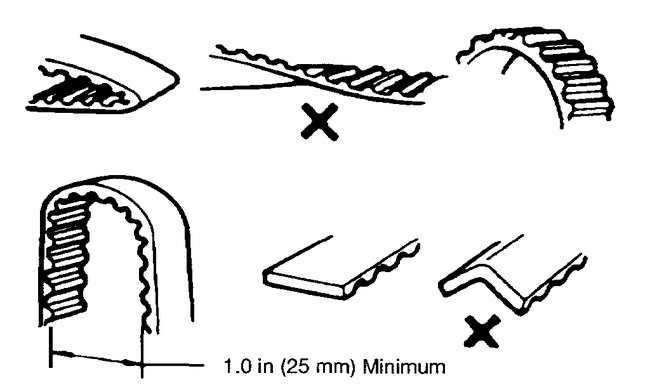
Timing Belt
1. Replace the timing belt if there is any oil or grease on it.

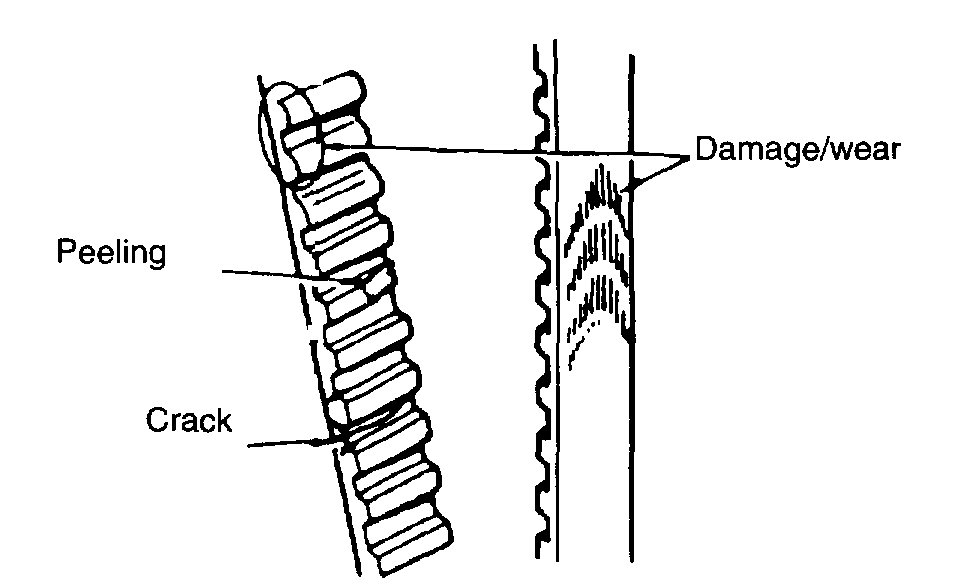
Pic 1

2. Check the timing belt for damage, wear, peeling, cracks, or hardening. Replace if necessary.

Pic 2

NOTICE:
- Never forcefully twist, turn inside out, or bend the timing belt.
- Be careful not to allow oil or grease on the belt.

Timing Belt Tensioner And Idler Pulley

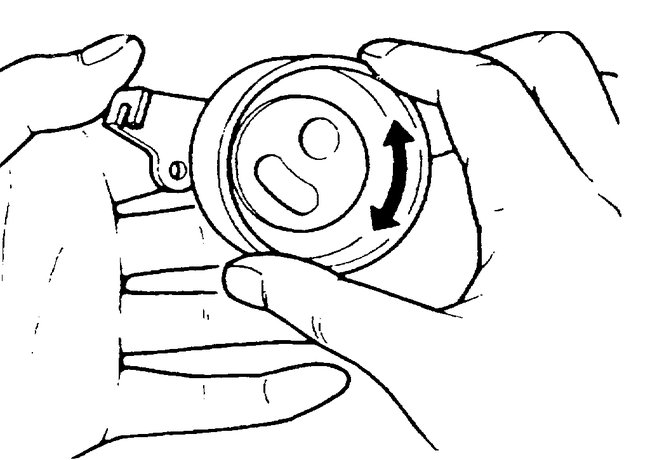
pic 3

1. Check the timing belt tensioner and idler pulleys for smooth rotation and abnormal noise. Replace if necessary.

NOTICE: Do not clean the tensioner pulley with cleaning fluids. If necessary, use a soft rag to wipe it clean, and avoid scratching it.

Timing Belt Tensioner Spring

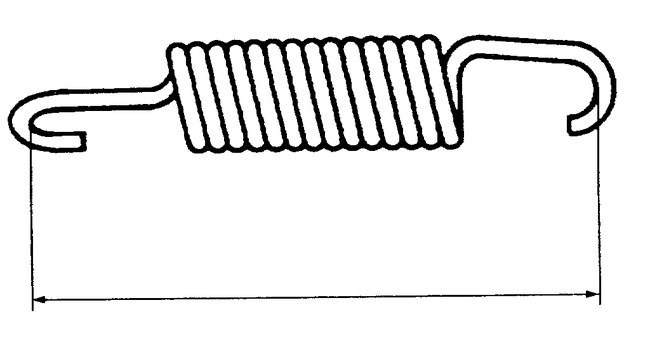
pic 4

1. Check the free length of the tensioner spring.
Replace if necessary.

Free length: 2.189 inch (55.6 mm) max.

Timing Belt Pulley and Camshaft Pulleys

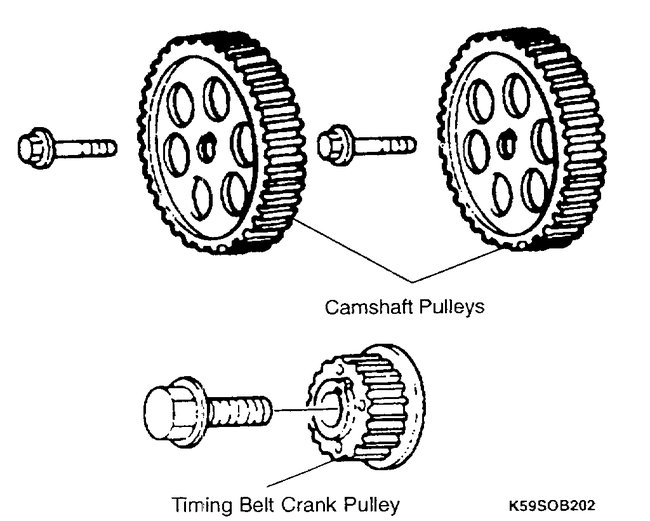
pic 5

1. Inspect the pulley teeth for wear, deformation, or other damage. Replace if necessary.

NOTICE: Do not clean the pulley with cleaning fluids. If necessary use a rag to wipe it clean.

Timing Belt Cover (Lower And Upper)
1. Inspect the timing belt covers for damage or cracks. Replace if necessary.

__________________________

Let me know if this helps, if you have questions, or need help.

Take care,
Joe
Was this
answer
helpful?
Yes
No
+1
Wednesday, April 7th, 2021 AT 1:45 PM
Tiny
JCLEMO
  • MEMBER
  • 161 POSTS
Is it okay to start the engine after installing a new timing belt before putting the cover back over the belt? So I can check to make sure the belt is centered on the pulleys okay?
Was this
answer
helpful?
Yes
No
Wednesday, April 7th, 2021 AT 1:45 PM
Tiny
JACOBANDNICKOLAS
  • MECHANIC
  • 108,190 POSTS
As long as you have everything connected and ready to go, it should be fine.

Let me know how this turns out for you.

Take care,
Joe
Was this
answer
helpful?
Yes
No
Wednesday, April 7th, 2021 AT 1:45 PM
Tiny
JCLEMO
  • MEMBER
  • 161 POSTS
I certainly will. And I'd like to know what's the purpose for turning the exhaust side cam gear to align the S after the belts been replaced? I. E. Cam gears. And crank gear at 12 o'clock. Then after installing all parts.
Rotate exhaust side cam gear to align the S at backing plate notch. What's the purpose of doing this? JC
Was this
answer
helpful?
Yes
No
Wednesday, April 7th, 2021 AT 1:45 PM
Tiny
JACOBANDNICKOLAS
  • MECHANIC
  • 108,190 POSTS
Welcome back:

I just looked at that and can honestly say, I have no idea. It doesn't make sense once everything is on properly. However, do it. It's there for a reason. Most likely deals with location related to tightening the tensioner.

Joe
Was this
answer
helpful?
Yes
No
+1
Wednesday, April 7th, 2021 AT 1:45 PM
Tiny
JCLEMO
  • MEMBER
  • 161 POSTS
Yes maybe it's to check the tension of the belt. I know about how much tension was on the old belt so I'm going to try and get it close to the way it was. I'm waiting on the rest of my parts probably next week before it gets finished the guy at eBay sent me the upper backing plate instead of the upper belt housing. Now I got to do a refund request and then reorder the cover. Stupid you got to watch these guys. Thanks for answering so fast I'll send you pictures when I get it together and start it up. JC
Was this
answer
helpful?
Yes
No
Wednesday, April 7th, 2021 AT 1:45 PM
Tiny
JACOBANDNICKOLAS
  • MECHANIC
  • 108,190 POSTS
Honestly, nothing ever seems to go easily. I've learned to spend a couple dollars more and have the responsibility on the parts stores. LOL

I will watch for your reply. Good luck!

Take care,
Joe
Was this
answer
helpful?
Yes
No
Wednesday, April 7th, 2021 AT 1:45 PM
Please login or register to post a reply.

Sponsored links