HEATER CORE
Removal
Disconnect negative battery cable. Remove 4 screws attaching center console top to center console assembly. Lift console top panel and remove electrical connector. Remove 2 screws attaching rear end of console panel support assembly. Remove 4 screws retaining center console assembly to center console front support.
Remove 4 screws attaching center console to instrument panel. Lift console assembly out. Remove instrument panel. See INSTRUMENT PANEL under REMOVAL & INSTALLATION in this article. Drain engine coolant from cooling system. Remove heater hoses from core and plug hoses.
Remove screw attaching air inlet duct and blower housing assembly support bracket to cowl top panel. Disconnect vacuum supply from check valve in engine compartment. Disconnect blower motor wire harness from blower motor resistor and blower motor.
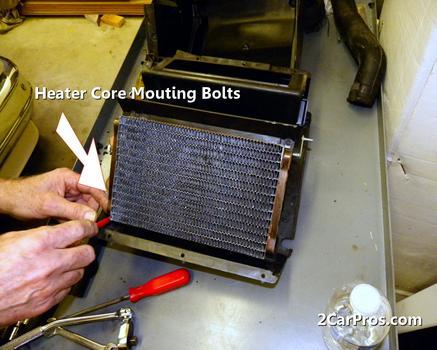
Remove 2 heater assembly retaining nuts from engine compartment firewall. Remove screw attaching heater assembly support bracket to cowl top. Remove one screw attaching bracket below heater assembly. Remove heater assembly. Remove 4 access cover screws from heater case. Remove heater core from heater case.
Installation
To install, reverse removal procedure. Fill radiator with coolant and start engine. Check system operation.
INSTRUMENT PANEL
Removal & Installation
Disconnect negative battery cable. Disconnect all underhood wiring connectors from main wiring harness. Disconnect rubber grommet seal from firewall. Push wiring harness through to passenger compartment.
Remove 3 bolts retaining steering column opening cover and reinforcement panel. Remove cover. Remove 2 bolts upper retaining steering column reinforcement. Remove 2 lower bolts retaining steering column reinforcement.
Remove 2 access covers at rear of center console. Remove 2 arm rest retaining bolts. Remove 4 screws attaching center arm rest to floor. Remove arm rest. On manual transmission models, remove shift knob. Remove gear shift lever opening finish panel.
Pull up emergency brake lever. Remove 4 retaining screws and lift panel up. Disconnect electrical connectors. Remove radio trim panel. Open glove box and drop door down. Remove 2 console to instrument panel bolts. Remove 4 screws retaining center console assembly to mounting bracket. Lift console assembly out.
Remove 2 nuts retaining hood release. Remove 4 nuts retaining steering column to lower brake pedal support. Lower steering column to floor. Remove steering column upper and lower shrouds. Disconnect wiring from multifunction switch. Remove brake pedal support nut.
Snap out defroster grill. Remove speaker covers. Remove front screws retaining right and left scuff plates at cowl sides. Disconnect right and left wiring at cowl sides. Remove right and left cowl side retaining bolts. Open glove box, flex glove box bin tabs inward and drop glove box door down.
Remove 5 cowl top screw attachments. Gently pull instrument panel away from cowl. Disconnect heater control cable, electrical connector and vacuum hoses. Disconnect speedometer cable and electrical connectors from instrument cluster. Remove any remaining electrical connectors. Carefully remove instrument panel from vehicle. To install, reverse removal procedure.
Wednesday, December 10th, 2008 AT 2:17 PM