Disconnect negative battery cable. Remove spark plugs. Disconnect PCV hose. Disconnect oil control solenoid connector. On early production models, remove appearance cover. Position accelerator and speed control cables aside. Remove front support isolator damper. Remove upper timing belt cover. Remove valve cover.
Disconnect heated oxygen sensor (HO2S) electrical connector. Loosen water pump pulley bolts. Remove accessory drive belt. Remove water pump pulley. Remove Crankshaft pulley. Remove lower timing belt cover. Support engine. Remove front engine support isolator bolt. Raise engine. Remove belt idler pulley. Remove middle timing belt cover. Remove catalytic converter.
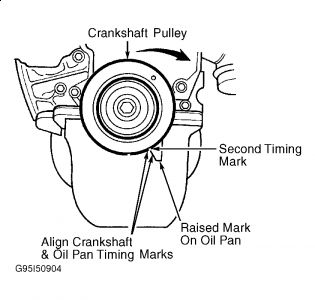
Rotate crankshaft to TDC of No. 1 cylinder. Cylinder No. 1 is at top dead center (TDC) when keyway is in 12 o'clock position. Remove stud bolt and install TDC Timing Peg (T97P-6000-A) in hole at lower right of block. See Fig. 1. Rotate crankshaft clockwise against timing peg. See Fig. 2.
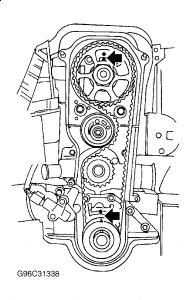
Loosen timing belt tensioning pulley bolt. Disconnect tensioner tab from timing cover back plate to relieve tension on timing belt. If reusing timing belt, mark direction of rotation before removal. Remove timing belt. Remove timing belt.
CAUTION:Do not use camshaft alignment tool to hold camshafts in place when removing or installing camshaft sprocket bolts, or damage to camshaft ears may result. Use open-end wrench to keep camshaft from rotating.
To loosen camshaft pulleys, hold camshaft by hexagon. Remove bolt and intake camshaft timing sprocket. Remove VCT oil plug, bolt and exhaust camshaft sprocket.
Fig. 1: Installing Crankshaft TDC Timing Peg
Courtesy of FORD MOTOR CO.
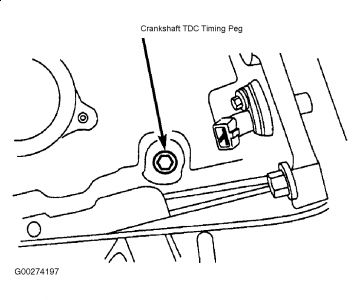
Fig. 2: Aligning Crankshaft Timing Marks
Courtesy of FORD MOTOR CO.
Installation
Ensure crankshaft pulley timing marks are aligned. See Fig. 2. Use Camshaft Alignment Timing Tool (T94P-6256-CH) to align camshafts. Install tool in slots on camshafts at rear of engine. See Fig. 3. Ensure camshafts are aligned. Install intake timing sprocket and loosely install bolt. Rotate oil control bushing one complete turn and check for binding. Position bushing with single hole in 12 o'clock position.
CAUTION:The VCT sprocket has a rectangular tab on the backside of the sprocket which must align with the hole on the front face of the thrust bushing. Failure to align may result in poor engine performance.
NOTE:Lug of belt tensioner should not be hooked in sheet metal cover during timing belt installation.
Install NEW exhaust sprocket "O" ring. Install exhaust sprocket. Ensure tab on sprocket engages hole in oil control bushing. Loosely install sprocket bolt. Loosely install timing belt tensioner. Starting from crankshaft timing belt pulley and working counterclockwise, position timing belt in place while keeping it under tension. See Fig. 4. Engage timing belt tensioner tab into upper timing cover backplate. Position hex key slot in tensioner adjusting washer to 4 o'clock position. Tighten attaching bolt enough to seat tensioner firmly against rear timing cover, but still allow tensioner adjusting washer to be rotated using a 6 mm hex key. Using hex key, rotate adjusting washer counterclockwise until notch in pointer is centered over index line on locating tab (pointer will move clockwise during adjustment). See Fig. 5. While holding adjusting washer in position, tighten bolt to 17-20 ft. lbs. (22-28 N.m).
NOTE:Camshaft must be held stationary with an open end wrench. DO NOT use alignment tool to hold camshaft in position, as damage to camshaft may occur.
Tighten intake camshaft sprocket bolt to 50 ft. lbs. (68 N.m). Tighten exhaust camshaft sprocket bolt to 36 ft. lbs. (50 N.m). Remove camshaft alignment tool and timing peg. Retighten exhaust camshaft sprocket bolt to 85-92 ft. lbs. (115-125 N.m). Install Variable Cam Timing (VCT) oil plug.
Position crankshaft just prior to TDC. Install TDC timing peg. See Fig. 1. Rotate crankshaft clockwise against peg. Install camshaft special alignment tool. If necessary, loosen timing pulleys and correct camshaft alignment.
When alignment is correct, complete installation by reversing removal procedure. When installing valve cover, clean gasket mating surfaces before installing NEW gasket. Install and tighten valve cover bolts in a diagonal pattern starting from the inside working outward. Tighten all nuts and bolts to specification.

Tuesday, February 23rd, 2010 AT 6:23 PM