Turn on the cruise control the speedometer quit working

Tiny
JEFF19
  • MEMBER
  • 1998 FORD ESCORT
  • 4 CYL
  • 2WD
  • AUTOMATIC
  • 120,000 MILES
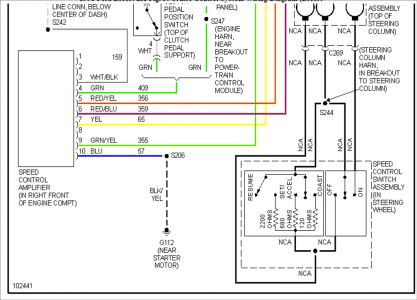
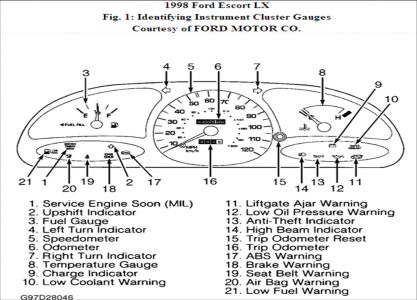
I have a 98 ford escort with 4 cylinder single cam engine. My issue is my speedometer, if I try and turn on the cruise control the speedometer will quit working.

It may stop working for an hour or so, or for good. My speedometer stop working for the first time when the cruise was on. It went 6, or 7 months without working then one day it started working.

It worked for a week or so then stopped on it's own. Over the period of two years it worked a couple times for a day or so but would always stop.

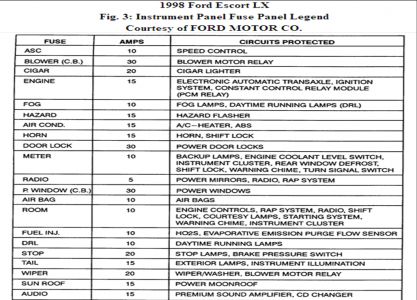
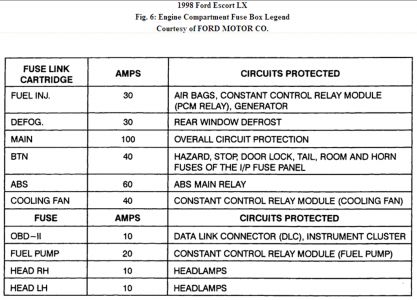
I just had to replace the head gasket so I had the repair guy replace the sensor with the gear on the transmission.

When I got the car back last week the speedometer worked. Today while taking a hour drive I went to engage the cruise control and what do you know the speedometer quit working again.

After going in the store to shop for an hour when on the drive back home it started working again. After I got home an hour or so later I went somewhere and it was working. About mid trip the speedometer stopped for about 5 seconds and started working again.

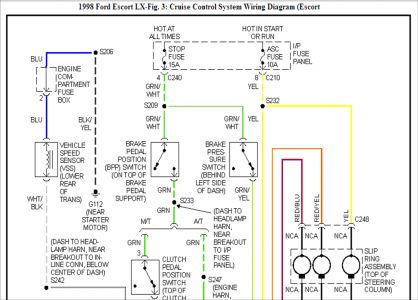
The speedometer was having no issue after I got it back from repair until I tried the cruise for the first time. The fact that it works, and didn't mess up until I tried the cruise tells me it's not the sensor, but the cruise messing up the speedometer.

I can live without the cruise control, but the speedometer I need to work. Any idea's what the problem sounds like? Has anyone ever had an issue like this before?

If there is a way to disconnect the cruise control if that is the issue to make the speedometer work for good i'am all for it.

I'am just sick thinking about it, because I know now the speedometer will be on and off again now, but would have been fine if I never tried the cruise. PLEASE help, thanks
Tuesday, March 10th, 2009 AT 10:18 PM

16 Replies

Tiny
IMPALASS
  • MECHANIC
  • 3,112 POSTS
Hello

To better assist you please tell me if your model is an LX, SE, or ZX2. Also please tell me your engine size in liter and the 8th digit of your VIN.

Next, please go to Auto Zone (AZ) or O'Reilly's (OR) and for FREE they can pull the codes to the car. Most important: Once they check your codes, if they find something and you don't get it fixed and need to get back with us, please make sure you tell us exactly what the code was, number and all. Example, if the code was E0568 O2 Sensor bad. Then make sure you give us all of that. While there for FREE also they can bring their tester out and check your battery and alternator.
Was this
answer
helpful?
Yes
No
Wednesday, March 11th, 2009 AT 6:20 PM
Tiny
JEFF19
  • MEMBER
  • 8 POSTS
My car is Lx. I took the car to autozone and there tester claims its the speed sensor, but it's brand new. I took it to a mechanic and he took the speed sensor back out and tested it for a signal and it had one.

He believes its the computer on the cruise control causing the problems. He said the speedometer travels through the cruise control which is how the cruise works.

He said autozones computer will show the speed sensor isn't working because the signal is being interfered with because of a fault in the cruise controls computer.

The ford parts center said the part is no longer made, and I'd have to find it in after market, or used. He said I should try and find a used one, and if that doesn't work he'd say it has to be the speedometer gauge itself.

He told me he would look for a wiring diagram and he could wire the speed sensor direct to the speedometer and bypass the cruise. What he's saying makes sense.

He told me to try and get a use speed control since which is what ford called it. I found an auto yard with one for 35 bucks. He wants me to try that first, because if it fixes the problem my cruise would work again for 35 bucks.

I just want my speedometer working at this point. So from what you know ImpalaSS, have you seen a faulty cruise keep the speedometer from working on a car before? Thanks.
Was this
answer
helpful?
Yes
No
Tuesday, March 24th, 2009 AT 5:44 PM
Tiny
IMPALASS
  • MECHANIC
  • 3,112 POSTS
Hello â€

Thanks for getting back with me. Also is your engine a ZETEC or 2.0L SPI

Does the odometer still work when the speedometer isn’t?

Do you have a tach?

On the troubleshooting chart I show a bad speedometer/odometer is a bad Speedometer, VSS, wiring, or printed circuit.

For the code from AZ †do your remember what code they said? If you can check that again and give me the code number I can check the manual. Sometimes the codes on the scanners are generic which is why I need to code number.

I am sorry, unless I am missing something I don’t show the cruise going through the speedometer.

Major components of the cruise control system are speed control switches, servo/actuator, vehicle speed sensor, Brake Pedal Position (BPP) switch, deactivator switch, Clutch Pedal Position (CPP) switch, and related wiring. This system does not require engine vacuum. An electronic servo/actuator actuates the throttle. All electronic control components are contained within the servo/actuator assembly.

I looked at the wiring and don’t see where they connect either.

As for the VSS part.......I show part number F7CZ17271AA for about $84.00. Auto Zone has it for about $53.00.

No I haven’t seen everything, but I have not seen a faulty cruise mess with the speedometer. As you saw from above, the components that would make the speedometer bad is a bad Speedometer, VSS, wiring, or printed circuit.

It is possible that when you select cruise there may be something on the circuit board that is shorting out the speedometer etc unless I am missing something.

I can send you some tests for the cluster etc....... But you will need an ohm meter. Do you have one and would you like the tests?

My suggestion is go through the troubleshooting chart I can send you... Do the checks with the ohm meter and track it down that way.

Your thoughts?
Was this
answer
helpful?
Yes
No
+1
Tuesday, March 24th, 2009 AT 8:42 PM
Tiny
IMPALASS
  • MECHANIC
  • 3,112 POSTS
Hello

By the way, it looks like you may have some recalls on your vehicle. The dealer may fix these for free. Please contact the dealer service department, give them the VIN number of your car and have them check on these to see if they apply to you.


https://www.2carpros.com/forum/automotive_pictures/248015_Recalls_13.jpg


Was this
answer
helpful?
Yes
No
Tuesday, March 24th, 2009 AT 8:48 PM
Tiny
JEFF19
  • MEMBER
  • 8 POSTS
My car is the 2.0 engine.I'am not a mechanic my self, but the guy working on this issue is a great mechanic, and has always been able to fix my cars in the past.

The problem is, we don't have a book on my car with a complete wiring diagram, with correct color code. He also doesn't have a computer. He said the speed sensor was some type of magnets and just emits some type of pulse to the speedometer.

He checked it with a volt meter and used a cordless drill to spin the speed sensor, and he said it was emitting a pulse, but without a wiring diagram with the specs he doesn't know what it's suppose to put out. He does know it's not dead.

He just doesn't want me to pay 60 bucks for another speed sensor and it not fix the problem. Autozone will not take returns on the item, once you buy the speed sensor it's yours, needed or not.

He said the plug that goes into the cruise control had wires from the speedometer, brakes, torq converter I believe, and something else.

What I do know is he installed a brand new speed sensor when I made this first post, and it worked PERFECT until I tryed the cruise control. AFter I tryed using the cruise it would work off and on, working most of the time. Today it stopped working at all it looks like. It did this before where it quit working once for 8 months, and one day started working again.

Once I tryed the cruise again it stopped working, so there is no question something in the cruise is causing the issue. What I don't know is if there is a short in the cruise unit and that is stopping the speedometer from working by blocking the signal, or if there is a short and its frying the speed sensor.

It may need another speed sensor, and as long as I don't ever use the cruise again it would be fine, but once I try using the cruise it may keep frying speed sensors, I don't know. If it's frying them, wouldn't they stop working for good, and not intermittently?

Like I said the cruise is causing the problems, just not sure if it's ruining the speed sensors, or if it's interfering with the signal?

He told me he would research it and try to find the problem. He isn't 100% what the issue is, but said it can only be a number of things. If he can find a diagram he wants to wire the speed sensor direct to the speedometer, and that would narrow it down to one or the other.

The main reason I believe the problem is something to do with the cruise is because, even after replacing the speed sensor the cruise never worked, and the speedometer acts the same as it did before replacing it.

Just remembered, no the odometer isn't working either.

My thought are, if it's the speedometer it's self, why did it only stop working after trying the cruise control if the two are not connected?

If it's the speed sensor, why does it only stop working after trying the cruise if the speedometer doesn't go through the cruise unit?

The root cause of the problem has to be the cruise, but how can it short out either if the speedometer doesn't go through the cruise as your book states?

Last thing, Autozone didn't tell me a code, just said it showed bad speed sensor, but the speed sensor id brand new.

Thanks so much for your time and research ImpalaSS, I just hope we can get this mess figured out, and I will let you know the final verdict given we get it sorted.

If this guy working on it had all the computers and and books with complete diagrams that the ford dealership had he'd fix it in a days time, but he just has to figure it out using his knowledge based on past experience.

He did say he's never seen a case either with the speedometer stop working after trying the cruise. Sorry for the long post, thanks again and please over look and miss types, or misspelling!
Was this
answer
helpful?
Yes
No
Wednesday, March 25th, 2009 AT 3:12 AM
Tiny
IMPALASS
  • MECHANIC
  • 3,112 POSTS
Hello

Well, it is nice to see you trust the guy I will research and attach all the tests I have with the wiring diagrams for you today. It will be this afternoon. Then you can give him all the info and take it from there.

Sound good?
Was this
answer
helpful?
Yes
No
Wednesday, March 25th, 2009 AT 5:47 AM
Tiny
JEFF19
  • MEMBER
  • 8 POSTS
I went to a salvage yard today and the people let me try the cruise control computer for free, sadly it did not fix the problem.

I trust the guy without question, I told him that didn't fix the issue. He said its possible that the new speed sensor went bad because of a short in the cruise system.

We're going to try another speed sensor, he has a friend with a salvage escort with the speed sensor, he'll call me when he has time to try it, that way I don't buy another unit and it still not fix the issue.

Thanks for the test results, I'd be happy to pass them on to him, as I wouldn't know how to read the results.

This guy replaced my head gasket, and all the freeze plugs with no issues. He also rebuild my transmission in a Monte Carlo SS I had back in high school, 1984 model.I wish I would have never sold my SS.I always wanted a 87 model with T-tops, because the back bumper was designed better after 86.

We talked today and he said electrical problems are very hard to track down sometimes, without the proper manuals and auto diagnostic computers.

Thanks for your time!
Was this
answer
helpful?
Yes
No
Wednesday, March 25th, 2009 AT 12:04 PM
Tiny
IMPALASS
  • MECHANIC
  • 3,112 POSTS
Hello -

Okay, here is what I have done. I first gave you all the info I have on troubleshooting the cruise control system.

I know I gave you more troubleshooting than what your problem is, but I figured while your mechanic is troubleshooting he may get into another area and not have it. So, I figured it is better to have too much info than not enough.

I attached the two Figures it refers to at the end.

You will have to copy paste and then blow up a little the wiring diagram. I split them so they would be bigger so you will have to tape them together. If they are still too small let me know and I will try something else.

DESCRIPTION & OPERATION

Major components of the cruise control system are speed control switches, servo/actuator, vehicle speed sensor, Brake Pedal Position (BPP) switch, deactivator switch, Clutch Pedal Position (CPP) switch, and related wiring. This system does not require engine vacuum. An electronic servo/actuator actuates the throttle. All electronic control components are contained within the servo/actuator assembly.

The system is operational only at speeds greater than 30 MPH. The system is activated when ON/OFF switch is switched on and SET/ACCEL button is pressed and released. Vehicle will maintain set speed until new speed is set, brake pedal is pressed, clutch pedal is pressed, or ON/OFF switch is switched off. If system has been deactivated by pressing brake pedal or clutch pedal, set speed can be regained by pressing and releasing RESUME button. When brake pedal or clutch pedal is pressed, a signal from switch is sent to the servo to deactivate the system. A deactivator switch acts as a redundant brake signal.

ADJUSTMENTS
SERVO/ACTUATOR CABLE

NOTE: The speed control servo/actuator cable is not adjustable on vehicles equipped with ZETEC engine. Cable adjustment is for vehicles equipped with 2.0 L SPI engine only.
Disconnect speed control servo/actuator cable from throttle control lever. Remove speed control servo/actuator cable adjuster clip from cable adjuster. Ensure throttle is fully closed. Adjust speed control servo/actuator cable until freeplay is .04-.12" (1-3 mm). Install speed control servo/actuator cable adjuster clip. Ensure throttle linkage operates freely and smoothly.

SYSTEM TESTING

TEST A: SPEED CONTROL IS INOPERATIVE

1. Check For Power & Ground To Speed Control Servo/Actuator - Turn ignition off. Disconnect speed control servo/actuator connector C177 (located on left front side of engine compartment). Turn ignition switch to RUN position. Using a voltmeter, check voltage between speed control servo/actuator connector C177 terminals No. 7 and 10. See Fig. 1 . If voltage is more than 10 volts, go to step 4). If voltage is 10 volts or less, go to next step.

2. Check Fuse - Turn ignition off. Check instrument panel fuse block fuse No. 1 (10-amp). If fuse is okay, go to next step. If fuse is not okay, replace fuse and retest system operation. If fuse fails again, check for short to ground in Yellow wire between instrument panel fuse block and speed control servo/actuator. Repair as necessary and retest system operation.

3. Check Speed Control Servo/Actuator Ground Circuit - Using an ohmmeter, check resistance between ground and speed control servo/actuator connector C177 terminal No. 10. See Fig. 1 . If resistance is less than 5 ohms, repair open in Yellow wire between instrument panel fuse block and speed control servo/actuator. Retest system operation. If resistance is 5 ohms or more, repair open in Blue wire between speed control servo/actuator and ground.

4. Check Stoplight Operation - Check stoplight operation while pressing brake pedal. If stoplights operate properly, go to next step. If stoplights do not operate properly, see appropriate EXTERIOR LIGHTS wiring diagram in SYSTEM WIRING DIAGRAMS article in the WIRING DIAGRAMS section to continue diagnosis.

5. Check Brake Circuit - Using an ohmmeter, check resistance between speed control servo/actuator connector C177 terminals No. 4 and 10. If resistance is less than 20 ohms, go to step 8). If resistance is 20 ohms or more and vehicle is equipped with M/T, go to next step. If resistance is 20 ohms or more and vehicle is equipped with A/T, repair Green wire between speed control servo/actuator and Brake Pedal Position (BPP) switch. Retest system operation.

6. Check Clutch Pedal Position (CPP) Switch - Ensure ignition is off. Disconnect CPP switch connector C292 (located on top of clutch pedal support). Using an ohmmeter, check resistance between CPP switch terminals (switch side). If resistance is less than 5 ohms, go to next step. If resistance is 5 ohms or more, replace CPP switch and retest system operation.

7. Check Green Wire For Open - Ensure ignition is off. Disconnect BPP switch connector C245 (located on top of brake pedal support). Using an ohmmeter, check resistance in Green wire between CPP switch connector C292 and BPP switch connector C245. If resistance is less than 5 ohms, repair White or Green wire between speed control servo/actuator and CPP switch. Retest system operation. If resistance is 5 ohms or more, repair open in Green wire between CPP switch and BPP switch. Retest system operation.

8. Check Deactivator Switch Input To Speed Control Servo/Actuator - Ensure ignition is off. Using a voltmeter, check voltage between speed control servo/actuator connector C177 terminals No. 9 and 10. See Fig. 1 . If voltage is 10 volts or less, go to next step. If voltage is more than 10 volts, go to step 11).

9. Check Deactivator Switch - Ensure ignition is off. Disconnect deactivator switch connector C208 (located on top of brake pedal support). Using an ohmmeter, check resistance between deactivator switch terminals (switch side). If resistance is less than 5 ohms, go to next step. If resistance is 5 ohms or more, replace deactivator switch and retest system operation.

10. Check For Power To Deactivator Switch - Using a voltmeter, check voltage between ground and deactivator switch connector C208 Green/White wire terminal. If voltage is more than 10 volts, repair Green/Yellow wire between deactivator switch and speed control servo/actuator. Retest system operation. If voltage is 10 volts or less, repair Green/White wire between instrument panel fuse block and deactivator switch. Retest system operation.

11. Check Red/Yellow Wire For Short To Power - Ensure ignition is off. Using a voltmeter, check voltage between speed control servo/actuator connector C177 terminals No. 5 and 10. See Fig. 1 . If voltage is indicated, go to next step. If no voltage is indicated, go to step 14).

12. Check For Stuck Speed Control Switch - Disconnect speed control switch connector C269 (located in steering wheel, under air bag module). Turn ignition switch to RUN position. Using a voltmeter, check voltage between speed control servo/actuator connector C177 terminals No. 5 and 10. See Fig. 1 . If voltage is indicated, go to next step. If no voltage is indicated, replace speed control switches and retest system operation.

13. Check Red/Yellow Wire For Short To Power - Ensure ignition is off. Disconnect air bag sliding contact connector C248 (located under steering wheel). Turn ignition to RUN position. Using a voltmeter, check voltage between speed control servo/actuator connector C177 terminals No. 5 and 10. See Fig. 1 . If voltage is indicated, repair short to power in Red/Yellow wire between air bag sliding contact and speed control servo/actuator. Retest system operation. If no voltage is indicated, replace air bag sliding contact and retest system operation.

14. Check Speed Control Switch SET/ACCEL Operation - Using an ohmmeter, check resistance between speed control servo/actuator connector C177 terminals No. 5 and 6 while pressing speed control SET/ACCEL switch. If resistance is 640-720 ohms, go to next step. If resistance is not 640-720 ohms, go to step 16).

15. Check Speed Control Switch ON Operation - Turn ignition switch to RUN position. Using a voltmeter, check voltage between speed control servo/actuator connector C177 terminals No. 5 and 6 while pressing speed control ON switch. If voltage is more than 10 volts, go to step 19). If voltage is 10 volts or less, replace speed control switch and retest system operation.

16. Check Red/Yellow Wire For Open - Ensure ignition is off. Disconnect air bag sliding contact connector C248 (located under steering wheel). Using an ohmmeter, check resistance in Red/Yellow wire between air bag sliding contact connector C248 (male side) and speed control servo/actuator connector C177 terminal No. 5. If resistance is less than 5 ohms, go to next step. If resistance is 5 ohms or more, repair open in Red/Yellow wire and retest system operation.

17. Check Red/Blue Wire For Open - Using an ohmmeter, check resistance in Red/Blue wire between air bag sliding contact connector C248 (male side) and speed control servo/actuator connector C177 terminal No. 6. If resistance is less than 5 ohms, go to next step. If resistance is 5 ohms or more, repair open in Red/Blue wire and retest system operation.

18. Check Air Bag Sliding Contact - Disconnect speed control switch connector C269 (located in steering wheel, under air bag module). Using an ohmmeter, check resistance between speed control switch connector C269 (female side) terminals No. 1 and 2 while pressing speed control SET/ACCEL switch. See Fig. 2 . If resistance is 640-720 ohms, replace air bag sliding contact and retest system operation. If resistance is not 640-720 ohms, replace speed control switch and retest system operation.

19. Check Speedometer Operation - Test drive vehicle and observe speedometer operation. If speedometer operates properly, go to next step. If speedometer does not operate properly, see appropriate INSTRUMENT PANELS article to continue diagnosis.

20. Check Speed Control Servo/Actuator Cable & Throttle Body Linkage - Ensure ignition is off. Remove speed control servo/actuator cable from speed control servo/actuator. Inspect cable by pulling end of cable and observing throttle movement. Replace cable if broken or binding. Retest system operation. If cable is okay, replace servo/actuator and retest system operation.
Fig. 1: Speed Control Servo/Actuator Connector

C177 Terminals

Courtesy of FORD MOTOR CO.
Fig. 2: Speed Control Switch Connector C269 Terminals
Courtesy of FORD MOTOR CO.

TEST B: SET SPEED FLUCTUATES

1. Check Speed Control Servo/Actuator Cable & Throttle Body Linkage - Ensure ignition is off. Disengage speed control servo/actuator cable from from servo/actuator. Inspect cable by pulling end of cable and observing throttle movement. If cable is okay, go to next step. Replace cable if broken or binding and retest system operation. Repair throttle body linkage if necessary, and retest system operation.

2. Check Speedometer Operation - Drive vehicle and observe speedometer operation without using speed control. If speedometer needle fluctuates, see appropriate INSTRUMENT PANELS article to continue diagnosis. If speedometer needle does not fluctuate, replace speed control servo/actuator and retest system operation.

TEST C: SPEED CONTROL DOES NOT DISENGAGE WHEN BRAKES ARE
APPLIED

1. Check Stoplight Operation - Press brake pedal and observe stoplight operation. If stoplights operate properly, go to next step. If stoplights do not operate properly, see appropriate wiring diagram in EXTERIOR LIGHTS article to continue diagnosis.

2. Check Brake Circuit - Ensure ignition is off. Disconnect speed control servo/actuator connector C177 (located on left front side of engine compartment). Using an ohmmeter, check resistance between speed control servo/actuator connector C177 terminals No. 4 and 10. See Fig. 1 . If resistance is less than 20 ohms, replace speed control servo /actuator and retest system operation. If resistance is 20 ohms or more and vehicle is equipped with M/T, go to next step. If resistance is 20 ohms or more and vehicle is equipped with A/T, repair Green wire between speed control servo/actuator and BPP switch. Retest system operation.

3. Check Clutch Pedal Position (CPP) Switch - Ensure ignition is off. Disconnect CPP switch connector C292 (located on top of clutch pedal support). Using an ohmmeter, check resistance between CPP switch terminals (switch side). If resistance is less than 5 ohms, go to next step. If resistance is 5 ohms or more, replace CPP switch and retest system operation.

4. Check Green Wire For Open - Ensure ignition is off. Disconnect BPP switch connector C245 (located on top of brake pedal support). Using an ohmmeter, check resistance in Green wire between CPP switch connector C292 and BPP switch connector C245. If resistance is less than 5 ohms, repair White or Green wire between speed control servo/actuator and CPP switch. Retest system operation. If resistance is 5 ohms or more, repair open in Green wire between CPP switch and BPP switch. Retest system operation.

TEST D: SPEED CONTROL DOES NOT DISENGAGE WHEN CLUTCH IS
APPLIED

1. Check Clutch Pedal Position (CPP) Switch - Ensure ignition is off. Disconnect CPP switch connector C292 (located on top of clutch pedal support). Using an ohmmeter, check resistance between CPP switch terminals (switch side) while pressing clutch pedal. If resistance is more than 10 k/ohms, go to next step. If resistance measurement is 10 k/ohms or less, replace CPP switch and retest system operation.

2. Check Green Wire & White Wire For Short To Ground - Ensure ignition is off. Disconnect speed control servo/actuator connector C177 (located on left front side of engine compartment). Using an ohmmeter, check resistance between ground and speed control servo/actuator connector C177 terminal No. 4. See Fig. 1 . If resistance is more than 10 k/ohms, replace speed control servo/actuator and retest system operation. If resistance is 10 k/ohms or less, repair short to ground in Green wire or White wire. Retest system operation.

TEST E: COAST SWITCH IS INOPERATIVE
Check COAST Switch

Ensure ignition is off. Disconnect speed control servo/actuator connector C177 (located on left front side of engine compartment). Using an ohmmeter, check resistance between speed control servo/actuator connector C177 terminals No. 5 and 6 while pressing speed control COAST switch. See Fig.

1 . If resistance is 114-126 ohms, replace speed control servo/actuator and retest system operation. If resistance is not 114-126 ohms, replace speed control switches and retest system operation.

TEST F: SET/ACCL SWITCH IS INOPERATIVE
Check SET/ACCL Switch

Turn ignition off. Disconnect speed control servo/actuator connector C177 (located on left front side of engine compartment). Using an ohmmeter, check resistance between speed control servo/actuator connector C177 terminals No. 5 and 6 while pressing speed control SET/ACCL switch. See Fig. 1 . If resistance is 646-714 ohms, replace speed control servo/actuator and retest system operation. If resistance is not 646-714 ohms, replace speed control switches and retest system operation.

TEST G: RESUME SWITCH IS INOPERATIVE
Check RESUME Switch

Turn ignition off. Disconnect speed control servo/actuator connector C177 (located on left front side of engine compartment). Using an ohmmeter, check resistance between speed control servo/actuator connector C177 terminals No. 5 and 6 while pressing speed control RESUME switch. See Fig. 1 . If resistance is 2090-2310 ohms, replace speed control servo/actuator and retest system operation. If resistance is not 2090-2310 ohms, replace speed control switches and retest system operation.

TEST H: OFF SWITCH IS INOPERATIVE
Check OFF Switch

Turn ignition off. Disconnect speed control servo/actuator connector C177 (located on left front side of engine compartment). Using an ohmmeter, check resistance between speed control servo/actuator connector C177 terminals No. 5 and 6 while pressing speed control OFF switch. See Fig. 1 . If resistance is less than 5 ohms, replace speed control servo/actuator and retest system operation. If resistance is 5 ohms or more, replace speed control switches and retest system operation.


https://www.2carpros.com/forum/automotive_pictures/248015_Fig_1_4.jpg


https://www.2carpros.com/forum/automotive_pictures/248015_Fig_2_2.jpg


https://www.2carpros.com/forum/automotive_pictures/248015_Wiring_1_2.jpg


https://www.2carpros.com/forum/automotive_pictures/248015_Wiring_2_2.jpg


https://www.2carpros.com/forum/automotive_pictures/248015_Fuse_panel_2.jpg


https://www.2carpros.com/forum/automotive_pictures/248015_Fuse_Panel_2_2.jpg


Next I have attached info on the instrument panel. . .. . .figures at the end

DESCRIPTION & OPERATION

WARNING: Deactivate air bag system before performing any service operation. See AIR BAG RESTRAINT SYSTEM article. DO NOT apply electrical power to any component on steering column without first deactivating air bag system. Air bag may deploy.

Instrument cluster contains a speedometer/odometer, tachometer (if equipped), fuel gauge, temperature gauge and various warning lights placed in groups at bottom of instrument cluster. See Fig. 1 and Fig. 2 .

Instrument cluster gauge amplifier is part of low fuel level warning/anti-slosh module and provides delay in fuel gauge to prevent fluctuation in fuel gauge pointer as a result of fuel movement in tank. The module is a small printed circuit board which latches into a pocket on back of instrument cluster. See Fig. 3 . There are no provisions for calibration or adjustment of low fuel level warning/anti-slosh module.


https://www.2carpros.com/forum/automotive_pictures/248015_PFig1_2.jpg


https://www.2carpros.com/forum/automotive_pictures/248015_PFig2_2.jpg


https://www.2carpros.com/forum/automotive_pictures/248015_PFig3_2.jpg


TEST D: SPEEDOMETER/ODOMETER INACCURATE

1. Turn ignition off. Connect scan tool and retrieve Diagnostic Trouble Codes (DTC) following manufacturer's instructions. If no DTCs are present, go to next step. If DTCs are present, see appropriate TESTS W/CODES article in the ENGINE PERFORMANCE section. Repair DTCs as necessary, then retest system.

2. Using scan tool, observe Vehicle Speed Sensor (VSS) output Parameter Identification (PID) while assistant drives vehicle over range of speeds on various road surfaces. If VSS PID varies smoothly with vehicle speed, go to next step. If VSS PID does not vary or is erratic, see appropriate TESTS W/CODES article in the ENGINE PERFORMANCE section to diagnose VSS.

3. Remove and check OBDII 10-amp fuse in engine compartment fuse box. If fuse is okay, reinstall fuse and go to step 5). If fuse is blown, go to next step.

4. Turn ignition off. Remove instrument cluster. See INSTRUMENT CLUSTER under REMOVAL & INSTALLATION. Disconnect instrument cluster electrical connectors. Measure resistance between ground and instrument cluster harness connector C252 terminal No. 12 (Green wire). See Fig. 6 . Measured resistance should be more than 10 k/ohms. If resistance is more than 10 k/ohms, replace OBDII 10-amp fuse and go to next step. If resistance is less than 10 k/ohms, repair Green wire between instrument cluster harness connector and fuse. See WIRING DIAGRAMS.

5. Turn ignition off. Remove instrument cluster. See INSTRUMENT CLUSTER under REMOVAL & INSTALLATION. Disconnect instrument cluster electrical connectors. Measure voltage between ground and instrument cluster harness connector C252 terminal No. 12 (Green wire). See Fig. 6 . Voltage should be more than 10 volts. If voltage is more than 10 volts, go to next step. If voltage is less than 10 volts, repair Green wire between instrument cluster harness connector and fuse. See WIRING DIAGRAMS.

6. Turn ignition off. Disconnect Vehicle Speed Sensor (VSS) harness connector. Measure resistance of Blue wire between VSS harness connector and instrument cluster harness connector C252 terminal No. 7. See Fig. 6 . Measure resistance of White/Black wire between VSS harness connector and instrument cluster harness connector C252 terminal No. 9. Resistance in both tests should be less than 5 ohms. If resistances are as specified, go to next step. If resistances are not as specified, repair wire in question. See WIRING DIAGRAMS.

7. Measure resistance between ground and instrument cluster harness connector C252 terminal No. 9 (White/Black wire). Resistance should be more than 10 k/ohms. If measured resistance is more than 10 k/ohms, go to next step. If resistance is less than 10 k/ohms, repair short in White/Black wire.

8. Turn ignition on. Measure voltage between ground and instrument cluster harness connector C252 terminals No. 8 and 4 (Black/Yellow wire). See Fig. 6 . Voltage should be more than 10 volts. If voltage is more than 10 volts, go to next step. If voltage is less than 10 volts, repair Black/Yellow wire between instrument cluster connector and fuse. See WIRING DIAGRAMS.

9. Turn ignition off. Visually inspect instrument cluster printed circuit for damage, cracks or hot spots. If instrument cluster printed circuit is okay, replace speedometer. If instrument cluster printed circuit is damaged, replace printed circuit and gauge contact clips. See PRINTED CIRCUIT under REMOVAL & INSTALLATION.


https://www.2carpros.com/forum/automotive_pictures/248015_PFig6_2.jpg


https://www.2carpros.com/forum/automotive_pictures/248015_PWire1_2.jpg


https://www.2carpros.com/forum/automotive_pictures/248015_PWire2_2.jpg


Okay let me know if this works for you

Was this
answer
helpful?
Yes
No
Wednesday, March 25th, 2009 AT 4:42 PM
Tiny
JEFF19
  • MEMBER
  • 8 POSTS
Today I installed a new gauge cluster, I now have the speedometer with the tachometer but my speedometer still doesn't work.

I unhooked the cruise control switches in the steering wheel, still nothing. The speedometer will work off and on, so I called the mechanic and we think it has a short in one of the wires, or the new speed sensor has already stopped working.

Considering it's doing the same thing it did with the old speed sensor, I have to assume it's a short wire now.I don't have a test meter, so I'll have to wait until he has time to test the wires step by step like in your instructions.

The speed sensor is brand new, and I have tryed another speedometer and still the problem is there. So I'd have to assume we have to track down a short someone where, which would make sense why it works off and on.

The only thing that puzzles us both at this point, is why the cruise control has any affect on it at this point. Like I said if the speedometer starts working again, the second you try and engage the cruise it will stop working EVERYTIME.

Thanks so much for the trouble shooting steps.

Why do you think the speedometer stops working when trying to apply the cruise control?
Was this
answer
helpful?
Yes
No
Thursday, March 26th, 2009 AT 8:23 PM
Tiny
IMPALASS
  • MECHANIC
  • 3,112 POSTS
Hello

Thanks for getting back with me.

Sorry for the delay in getting back with you.I encountered some technical difficulties.

Well, I am a little stumped like you and your mechanic unless there is a wire shorting out against another wire it is hard to say. The only place I see them connect is at the cluster.

You could follow the wiring from the VSS up to the cluster to see if one is shorting. Then from the cruise connector in the engine bay and check the wiring.

Please do me a favor pull fuse 15 amp at the IP panel and see if your speed o works okay.

Then keep that out but then pull the fuse 10amp and see what happens then. If it works, put the Engine fuse back in.

Let me know.
Was this
answer
helpful?
Yes
No
Friday, March 27th, 2009 AT 9:52 PM
Tiny
JEFF19
  • MEMBER
  • 8 POSTS
My car will not start with the engine fuse pulled!
Was this
answer
helpful?
Yes
No
Sunday, March 29th, 2009 AT 8:23 PM
Tiny
IMPALASS
  • MECHANIC
  • 3,112 POSTS
Install and then tell me what happens with the ASC fuse pulled.
Was this
answer
helpful?
Yes
No
Sunday, March 29th, 2009 AT 10:09 PM
Tiny
JEFF19
  • MEMBER
  • 8 POSTS
I tryed pulling that fuse, still doesn't work.
Was this
answer
helpful?
Yes
No
Monday, March 30th, 2009 AT 5:10 PM
Tiny
IMPALASS
  • MECHANIC
  • 3,112 POSTS
Hello -

Okay, well, I am stumped like you all are. I tried to work backwards on a couple of wiring diagrams to see anywhere where the cruise and speedo come in contact. They do on these fuse lines but. Obviously so does EVERYTHING else.

My suggestion is to check all the wiring from the VSS up to the dash. The same with the speed control area for the cruise. There may be wires shorted to each other. You have replaced the cluster so that rules out solder joints melting together on that.

If you mechanic would like other wiring diagrams let me know.
Was this
answer
helpful?
Yes
No
Monday, March 30th, 2009 AT 9:06 PM
Tiny
JEFF19
  • MEMBER
  • 8 POSTS
Click this link,and help me understand what wire the grounded,seems to be the same issue I'am having.

https://www.2carpros.com/forum/1998-ford-escort--petrol-leak/98-escort-speedometer-vt10302.html

I tryed grounding every black wire on the cluster,on the plug from the picture you posted.I cut about 7 wires and grounded them to a screw on the fender.My he's talking about a wire I never tryed.I also tryed a bigger black wire with a red strip on a different plug.
Was this
answer
helpful?
Yes
No
Tuesday, March 31st, 2009 AT 6:07 PM
Tiny
SSXT
  • MEMBER
  • 8 POSTS
Yes. Old post, but I think what I did is a common issue. This only applies if you do not have a DTC (CODE) and the service engine soon soon light is not on. If a code specifically the VSS P0500 is present it may be the vehicle speed sensor and this is not relevant.

Check and clean the ground block attached to negative terminal on battery. I had sever corrosion on the wires (not just the terminal) that attached to the negative terminal (1999 Ford Escort). I cut the wires, reattached with a ring terminal to the negative battery terminal and it fixed my speedometer and speed control/cruise issues. Thanks
Was this
answer
helpful?
Yes
No
Sunday, May 27th, 2018 AT 3:05 PM

Please login or register to post a reply.

Sponsored links