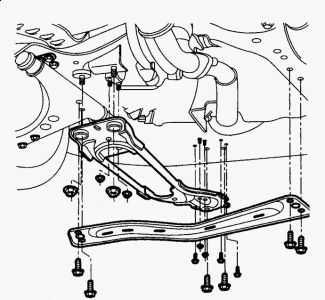
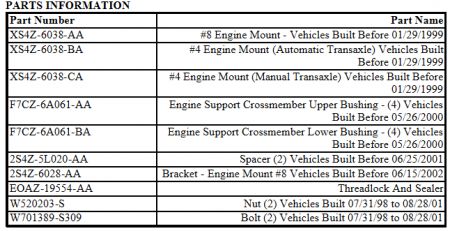
Here's the info, if you still need it: 2.0L SPI OR ZETEC - IDLE VIBRATION TECHNICAL SERVICE BULLETIN Reference Number(s): 03-15-15, Date of Issue: August 4, 2003 Superceded Bulletin(s): 00-5-9, Date of Issue: March 6, 2000, 02-21-12, Date of Issue: October 28, 2002 Related Ref Number(s): 00-5-9, 02-21-12, 03-15-15, 99-5-6, 99-6-9 ARTICLE BEGINNING DESCRIPTION DRIVEABILITY - IDLE VIBRATION - VEHICLES EQUIPPED WITH 2.0L SPI OR ZETEC ENGINE ONLY ENGINE - IDLE VIBRATION - VEHICLES EQUIPPED WITH 2.0L SPI OR ZETEC ENGINE ONLY ISSUE This TSB article is being republished to assist in diagnosing idle vibration. ACTION Diagnose and repair idle vibration conditions by referring to the following idle vibration Service Procedures. SERVICE PROCEDURE PROCEDURE FOR 2003 ESCORT ZX2 1. Neutralize engine mounts only. Refer to appropriate model year Noise, Vibration and Harshness (NVH) Workshop Manual Section 100-04. PROCEDURES FOR 1997-2002 ESCORT, ESCORT ZX2 AND TRACER FORD: 1997-2002 ESCORT; 1998-2003 ESCORT ZX2 MERCURY: 1997-1999 TRACER NOTE: This article supersedes TSB's 00-5-9 and 02-21-12. NOTE: THE PROCEDURE CONTAINED IN THIS TSB ARTICLE MAY NOT COMPLETELY ELIMINATE ALL VIBRATION FROM THE VEHICLE. SOME VIBRATION IS INHERENT IN I-4 ENGINE DESIGNS, SUCH AS THE SPI AND ZETEC 2.0L. THIS PROCEDURE IS DESIGNED TO REDUCE THE AMOUNT OF VIBRATION EXPERIENCED BY THE CUSTOMER. Page 1 of 5 2.0L SPI OR ZETEC - IDLE VIBRATION -1998 Ford Escort LX 1. Shift the transaxle into Neutral and apply the parking brake. 2. Remove battery and battery tray. 3. Support engine with Three-Bar Engine Support Tool (Rotunda 303-D063) and Lifting Brackets (Rotunda 303-050). 4. Raise vehicle. Refer to the appropriate model year Workshop Manual, Section 100-02. 5. Remove the rear lower cross-member (attached with four (4) bolts ( Fig. 1 )). 6. Remove the engine support cross-member that runs from front to rear of the engine (Belly Band). This can be accomplished by removing the front two (2) attaching bolts, the rear two (2) attaching nuts and the four (4) Engine Mount #1 and #2 nuts ( Fig. 1 ).
7. Modify the Belly Band on the two rear attaching Engine Mount #1 holes by slotting the holes approximately 1/4" (6mm) in a front to rear direction. Use a Drill Bit ( Fig. 7 ).
NOTE: DISCARD THE TWO ENGINE MOUNT #1 FLAT WASHERS FOR VEHICLES BUILT PRIOR TO 12/03/2001 ONLY. NOTE: STEP 7 MODIFICATIONS ARE FOR VEHICLES BUILT PRIOR TO 07/15/02 ONLY.
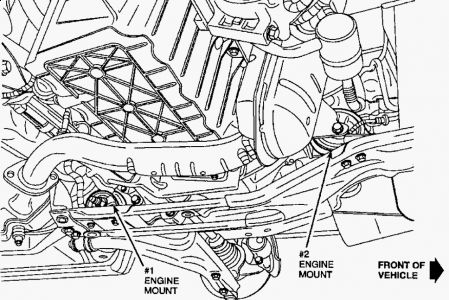
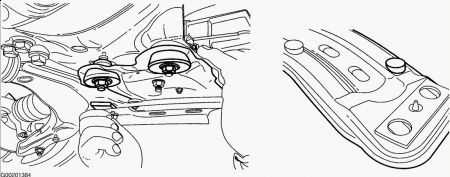
8. Loosen the center bolt on the #1 (rear) lower Engine Mount ( Fig. 4 ). 9. Loosen the center bolt on the #2 (front) lower Engine Mount ( Fig. 4 ). 10. Remove original front and rear engine support cross-member bushings ( Fig. 3 ).
NOTE: STEP 10 IS FOR VEHICLES BUILT PRIOR TO 05/26/2000 ONLY.
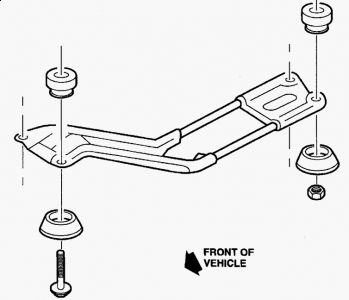
10. Remove original front and rear engine support cross-member bushings ( Fig. 3 ). a. Modify two (2) new Front-Upper Engine Support Cross-Member Bushings only (F7CZ- 6A061-AA) by removing approximately 1/4" (6mm) of material from two (2) sides of the upper bushing. Use a utility knife or hack saw to achieve desired shape ( Fig. 2 ). b. Reinstall front attaching point of engine support cross-member with the original two (2) bolts, two (2) new Lower Bushings (F7CZ-6A061-BA), and two (2) new Upper Bushings (F7CZ-6A061-AA) that were modified in Step A ( Fig. 3 ). Apply 2-3 drops of threadlocker (EOAZ-19554-AA) to the bolts. c. Reinstall rear attaching point of engine support cross-member using new Bushings (F7CZ-6A061-BA and F7CZ-6A061-AA) and original nuts ( Fig. 3 ). Both rear position upper bushings must be installed in "AS IS" condition (UNMODIFIED). d. Torque the retaining nuts and bolts to 64-89 N.m (47-65 ft-lb.). 11. Reinstall the front attaching points of the Belly Band with the original two (2) bolts. Apply 2-3 drops of threadlocker (EOAZ-19554-AA) to the bolts ( Fig. 1 ). 12. Reinstall rear-attaching points of the Belly Band with original two (2) nuts ( Fig. 1 ). 13. Torque the retaining nuts and bolts to 64-89 N.m (47-65 ft-lb.). 14. Install the Engine Mount #1 and #2 retaining nuts, do not tighten at this time. ( Fig. 8 ). 15. Lower the vehicle.
NOTE: THE ENGINE MOUNT REPLACEMENT DIRECTIVE APPLIES ONLY TO 1997-1999 MY VEHICLES BUILT PRIOR TO 01/29/1999.

16. Remove the #3 Engine Mount and damper ( Fig. 5 ). 17. Vehicles built prior to 6/15/02, remove the #3 Engine Mount bracket and replace with a new bracket (2S4Z-6028-AA) ( Fig. 10 ). Torque the retaining bolts to 16-22 N.m (12-17 ft-lb.). Do not paint bracket, install as received.
NOTE: ENGINE MOUNT #3 BRACKET REPLACEMENT DIRECTIVE APPLIES ONLY TO VEHICLES BUILT PRIOR TO 06/15/2002.
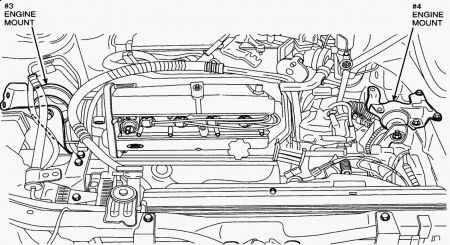
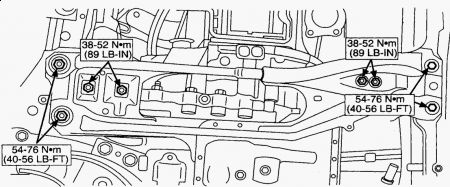
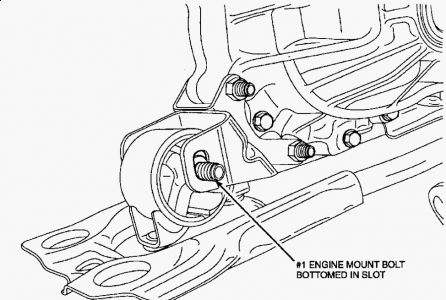
16. Remove the #3 Engine Mount and damper ( Fig. 5 ). 17. Vehicles built prior to 6/15/02, remove the #3 Engine Mount bracket and replace with a new bracket (2S4Z-6028-AA) ( Fig. 10 ). Torque the retaining bolts to 16-22 N.m (12-17 ft-lb.). Do not paint bracket, install as received. Removal ï¬ Raise vehicle on hoist. ï¬ Remove power steering bracket bolt to frame. ï¬ Lower vehicle. ï¬ Remove power steering - A/C bracket nuts and power steering bracket bolt, and position aside. ï¬ Raise engine using 3-bar support. ï¬ Remove retainers for engine mount bracket and remove bracket. Installation ï¬ Install bracket and install retainers. Torque to 16-22 N.m (12-17 ft-lb.). ï¬ Lower engine using 3-bar support. ï¬ Position back lines and install power steering A/C bracket nuts and power steering bracket. Torque to 8-10 N.m (71-89 in-lb.). ï¬ Raise vehicle. ï¬ Install power steering bolt to frame. Torque to 8-10 N.m (71-89 in-lb.). ï¬ Lower vehicle. 18. Vehicles built after 1/29/1999 , reinstall the original #3 Engine Mount and leave the center through-bolt loose. 19. Vehicles built prior to 1/29/1999 , install a new #3 Engine Mount (XS4Z-6038-AA) and leave the center through-bolt loose. 20. Vehicles built prior to 1/29/1999 , remove the #4 Engine Mount ( Fig. 5 ) and replace with either (XS4Z-6038-BA) for automatic transmissions or (XS4Z-6038-CA) for manual transmissions. Fasten the mount to the vehicle frame (4 fasteners) first and torque to 44-60 N.m (32-44 ft-lb.). Next fasten to the transaxle (3 fasteners) and torque to 67-93 N.m (50-68 ft- lb.). 21. Remove the Three-Bar Engine Support Tool and lifting brackets. 22. Install the battery tray and battery and restore battery connections. 23. Manual Transaxle Vehicles: Start the engine with the vehicle on the ground. Rev the engine; allow the vehicle to move slightly forward and reverse in a normal manner. Allow the engine to assume a neutral position in the mounts. Turn off the engine. This allows the engine to establish a neutral position. Automatic Transaxle Vehicles: Start the engine with the vehicle on the ground. Engage the transaxle from Neutral to Reverse, Reverse to Neutral, Neutral to Drive and Drive to Neutral. Turn off the engine. This allows the engine to establish a neutral position. 24. Torque the center through-bolt of the #3 Engine Mount to 67-93 N.m (50-68 ft-lb.). 25. Lift the vehicle. 26. Torque the Engine Mount #1 and #2 retaining nuts to 38-52 N.m (26-38 ft-lb.). 27. Torque the #2 (front) Engine Mount center bolt to 67-93 N.m (50-68 ft-lb.). 28. Torque the #1 (rear) Engine Mount center bolt to 67-93 N.m (50-68 ft-lb.). Be sure the bolt is positioned to the bottom of the slot (for automatic transmission vehicles only) using a pry bar, then torque to specs ( Fig. 6 ). The bolt must not be cocked.
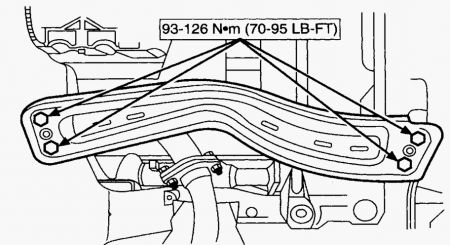
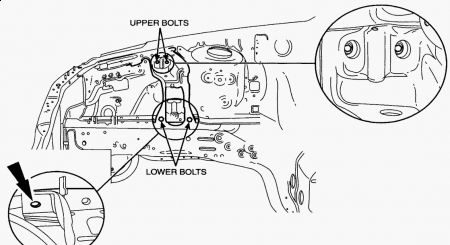
29. Reinstall the rear lower cross-member. Torque the retaining bolts to 93-126 N.m (70-95 ft-lb.). ( Fig. 1 ). GRILL OPEN REINFORCEMENT (GOR) LOWER ATTACHING BOLTS PROCEDURE FOR HEADLIGHT SHAKE - VEHICLES BUILT FROM 07/31/98 TO 08/28/01 ONLY 1. Remove the front bumper cover (Fascia). Refer to the appropriate model year Workshop Manual, Section 501-19. 2. Install the grill open reinforcement lower attaching Bolts and Nut spacer (W520203-S nuts (2) and W701389-S309 bolts (2)). Torque the bolt to 5.3-7.3 N.m (46.9-64.6 in-lb.). Refer to appropriate model year Workshop Manual, Section 501-02. ( Fig. 11 ).
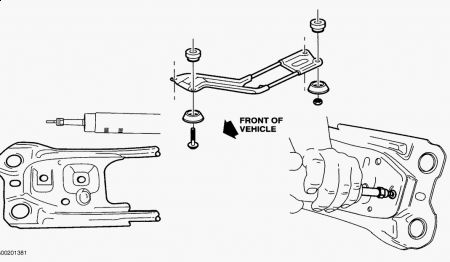
NOTE: INSTALL TWO (2) NEW SPACERS (2S4Z-5L020-AA) BETWEEN THE LOWER CROSS-MEMBER AND THE FRAME FOR VEHICLES BUILT PRIOR TO 06/25/2001 ONLY (Fig. 9 ).
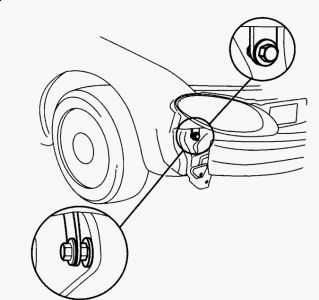
29. Reinstall the rear lower cross-member. Torque the retaining bolts to 93-126 N.m (70-95 ft-lb.). ( Fig. 1 ). GRILL OPEN REINFORCEMENT (GOR) LOWER ATTACHING BOLTS PROCEDURE FOR HEADLIGHT SHAKE - VEHICLES BUILT FROM 07/31/98 TO 08/28/01 ONLY 1. Remove the front bumper cover (Fascia). Refer to the appropriate model year Workshop Manual, Section 501-19. 2. Install the grill open reinforcement lower attaching Bolts and Nut spacer (W520203-S nuts (2) and W701389-S309 bolts (2)). Torque the bolt to 5.3-7.3 N.m (46.9-64.6 in-lb.). Refer to appropriate model year Workshop Manual, Section 501-02. ( Fig. 11 ). 3. Reinstall the front bumper cover (Fascia). Refer to the appropriate model year Workshop Manual, Section 501-19. PARTS INFORMATION 29. Reinstall the rear lower cross-member. Torque the retaining bolts to 93-126 N.m (70-95 ft-lb.). ( Fig. 1 ). GRILL OPEN REINFORCEMENT (GOR) LOWER ATTACHING BOLTS PROCEDURE FOR HEADLIGHT SHAKE - VEHICLES BUILT FROM 07/31/98 TO 08/28/01 ONLY 1. Remove the front bumper cover (Fascia). Refer to the appropriate model year Workshop Manual, Section 501-19. 2. Install the grill open reinforcement lower attaching Bolts and Nut spacer (W520203-S nuts (2) and W701389-S309 bolts (2)). Torque the bolt to 5.3-7.3 N.m (46.9-64.6 in-lb.). Refer to appropriate model year Workshop Manual, Section 501-02. ( Fig. 11 ). 3. Reinstall the front bumper cover (Fascia). Refer to the appropriate model year Workshop Manual, Section 501-19. PARTS INFORMATION
Apr 23, 2009 at 2:35 PM
