Bogging down with uphill acceleration or when accelerating

Tiny
JIMMYCASS64
  • MEMBER
  • 2001 CHEVROLET VAN
  • 5.7L
  • V8
  • 2WD
  • AUTOMATIC
  • 38,000 MILES
I bought this Express 3500 van last May, it had 6,500 miles on it. Prior to my purchase, it sat for ten years. Last June I experienced the above problem, had the fuel pump replaced, and all was fine. Two weeks ago, the problem began again. This week I replaced the fuel filter. Then I cleaned the MAF sensor. No improvement. I did a fuel pressure test. Key on 60psi, engine on 50psi with no fluctuation. Next I changed the distributor cap and rotor button, and this morning the spark plugs and wires. Van starts easily. No stalls. Chilton book has pressure specs as 60-66 key on, not sure about idle spec. Mechanics I have spoken with have all told me my pressure is fine. Would appreciate any assistance. Thanks, Jim
Thursday, May 10th, 2018 AT 12:25 PM

18 Replies

Tiny
JACOBANDNICKOLAS
  • MECHANIC
  • 108,179 POSTS
Hi and thanks for using 2CarPros.com. First, it sounds like you have already done a lot and have eliminated many possible problems. The fuel pressure you indicated is correct, so that is not the problem. Since the problem seems to be under a load, the fuel pressure is correct, and the engine is properly tuned, that makes me question back pressure in the exhaust. My first questions is the catalytic converter being partially plugged.

Here is a video related to checking a catalytic converter:
https://youtu.be/kNXh1Lphzr4

Here is a list of symptoms:
https://www.2carpros.com/articles/bad-catalytic-converter-symptoms

General directions:
https://www.2carpros.com/articles/catalytic-converter-replacement

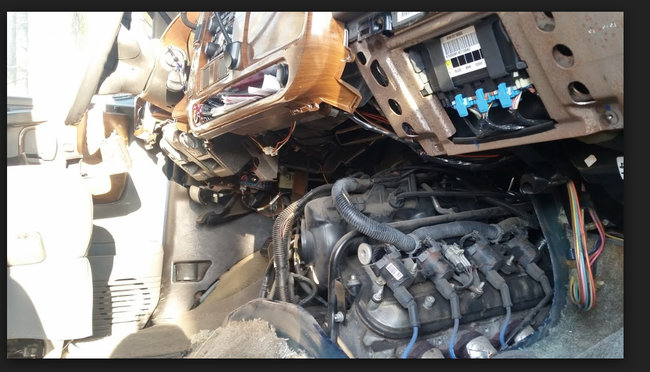
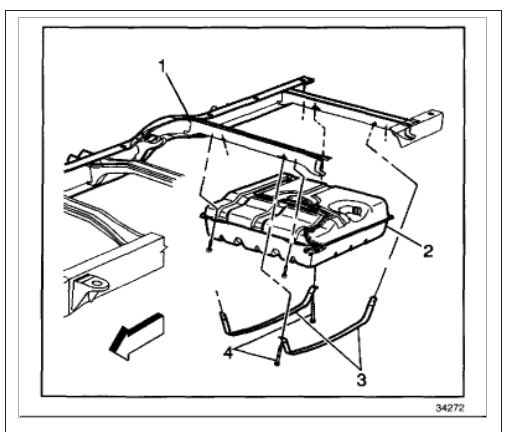
If you determine the converter is a problem, the following are the directions for removal and replacement specific to your vehicle. I have also attached pictures to help guide you.

Removal Procedure

Raise the vehicle. Refer to Vehicle Lifting.
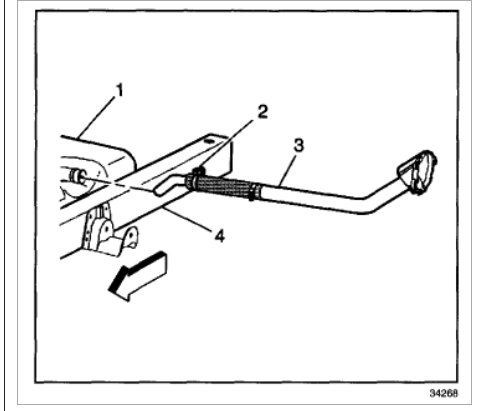
Remove the transmission support.
Disconnect the Oxygen Sensors (02S) and Heated Oxygen Sensor (H02S) electrical connections from the wiring harness.
Caution: Refer to Exhaust Service Caution in Service Precautions.

Caution: Refer to Protective Goggles and Gloves Caution in Service Precautions.

Important: If equipped with dual catalytic converter pipes, and removing only the right catalytic converter, the left catalytic converter does not require removal. If removing the left catalytic converter both catalytic converters require removal.

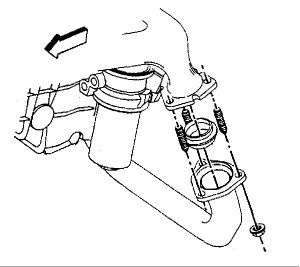
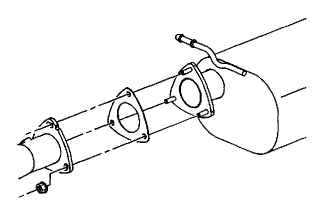
Remove the nuts and the seals retaining the catalytic converter pipes to the exhaust manifolds.

If equipped with single catalytic converter pipe, remove the nuts retaining the catalytic pipe to the muffler. Depending on the vehicle configuration the flange may be a 2 bolt or 3 bolt flange.
Remove the catalytic converter pipe flange gasket.
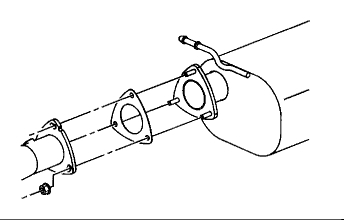
Remove the catalytic converter pipe from the vehicle.

If equipped with 2 catalytic converter pipes, loosen the clamp securing the right catalytic converter at the front of the muffler.
Remove the right catalytic converter pipe from the muffler and the vehicle.
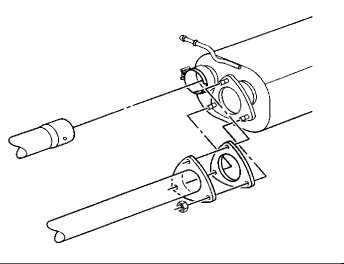
Remove the left catalytic converter pipe retaining nuts and gasket from the muffler flange connection.
Remove the left catalytic converter pipe from the vehicle.
If replacing the catalytic converter, remove the oxygen sensors as necessary.
Installation Procedure

If removed, install the oxygen sensors as necessary.
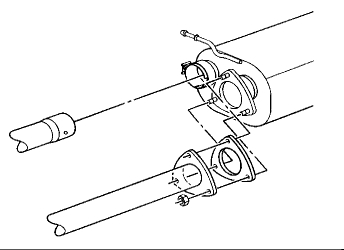
If equipped with 2 catalytic converter pipes, install the left catalytic converter and gasket to the muffler flange.
Install the nuts for left catalytic converter to muffler. Do not tighten the flange nuts.
Install the right catalytic converter into the muffler.
Install the right catalytic converter clamp. Do not tighten the clamp.

If equipped with a single catalytic converter pipe, install the pipe with a new gasket to the muffler flange. Do not tighten the flange nuts.

Install a new seal and the catalytic converter pipe to the exhaust manifolds.
Notice: Refer to Fastener Notice in Service Precautions.

Install the nuts retaining the catalytic converter pipes to the exhaust manifolds.
Tighten the catalytic converter pipe to exhaust manifold nuts to 65 Nm (48 ft. lbs.) .
Verify that the exhaust system is properly aligned and tighten the right catalytic converter clamp to 54 Nm (40 ft. lbs.) .
Tighten the catalytic converter to the muffler nuts to 48 Nm (35 ft. lbs.) .

Connect the Oxygen Sensor (02S) electrical connection.
Install the transmission support.
Notice: Refer to Exhaust System Inspection Notice in Service Precautions.

Verify the exhaust system for proper clearance and the alignment of all components.
Lower the vehicle.

I hope this helps.

Cheers,
Joe
Was this
answer
helpful?
Yes
No
-1
Thursday, May 10th, 2018 AT 7:32 PM
Tiny
JIMMYCASS64
  • MEMBER
  • 9 POSTS
Hi Joe. I entered a reply prior to this, but do not see that it is posted. I will reiterate a bit. I tried the 'shake method', nothing heard or felt. Went and bought the IR thermo and tested this evening. Results: R in 332F, out 415F; L in 340, out 420. This was after driving forty miles at an avg speed of forty six mph. I waited until just after sunset to perform the test. Subsequent to that, I had my brother in law rev it to 2,500 rpm's for five minutes, checked for color, no changes. No cherry and what seem to be acceptable in/out temperature. Variations make me wonder. I have been chucking money at this, and am therefore reticent about plunking down the money for the exhaust back pressure gauge. Cannot rent one here locally. Do the above results help to rule out the 'catalytic converter'? I am pretty sure that if I put this thing in a shop I am going need to put a kidney on eBay for the bill. Thanks for your help.
Was this
answer
helpful?
Yes
No
Friday, May 11th, 2018 AT 6:34 PM
Tiny
JACOBANDNICKOLAS
  • MECHANIC
  • 108,179 POSTS
LOL, do not sell any organs. I needed that laugh tonight. Anyway, if you want to check, I have simply removed o2 sensors to help eliminate back pressure. If the catalytic converter is partially plugged, it will be able to breath easier.
Was this
answer
helpful?
Yes
No
Friday, May 11th, 2018 AT 9:04 PM
Tiny
JIMMYCASS64
  • MEMBER
  • 9 POSTS
I reckon that will not be too tough. I am guessing you mean pre and post catalytic converter on the pipes. Anyway, we will give it a try and advise on result.
Was this
answer
helpful?
Yes
No
+1
Saturday, May 12th, 2018 AT 5:26 AM
Tiny
JIMMYCASS64
  • MEMBER
  • 9 POSTS
Removed all four sensors. Did not notice any improvement with driving. I thought with O2 sensors disconnected, it would trip a light, but it did not.
Was this
answer
helpful?
Yes
No
+1
Saturday, May 12th, 2018 AT 8:03 AM
Tiny
JACOBANDNICKOLAS
  • MECHANIC
  • 108,179 POSTS
Interesting. I thought that may be the issue. If fuel pressure is good, it us tuned properly, and there is no check engine light coming on, That leads me to ignition timing. I realize the ignition timing is not adjustable and is controlled by the PCM, but I question if it is doing its job. If you have a live time scanner, drive the vehicle and watch ignition timing to make sure it is advancing. Keep in mind, the crankshaft and camshaft sensors play a big role in ignition timing and fuel delivery. Everything you have told me leads me to believe it is a fuel related issue, but everything checks good.

I have attached pictures of both sensors and locations. I am starting to question if the pump, even though checks good when tested, cannot keep up with the demand under a load. When you replaced it, it ran good for a short time. I am going to ask the owner of the site for his opinion. Maybe he has a different idea.

Expect a reply from him. I am going to send him this link.

Joe
Was this
answer
helpful?
Yes
No
+1
Saturday, May 12th, 2018 AT 8:00 PM
Tiny
JACOBANDNICKOLAS
  • MECHANIC
  • 108,179 POSTS
After thought. Make sure nothing is obstructing the air intake system. I am confident you already did that, but just wanted to make sure.
Was this
answer
helpful?
Yes
No
Saturday, May 12th, 2018 AT 8:01 PM
Tiny
KEN L
  • MASTER CERTIFIED MECHANIC
  • 42,895 POSTS
Can I ask you say ignition rotor but this engine does not have one? Is there a different engine in this van?
Was this
answer
helpful?
Yes
No
-1
Sunday, May 13th, 2018 AT 11:09 AM
Tiny
JIMMYCASS64
  • MEMBER
  • 9 POSTS
Hi Ken, if this question is addressed to me, I am confused. The only mention of rotor I have written is the one under the distributor cap. Engine is 5.7l vortec.
Was this
answer
helpful?
Yes
No
Sunday, May 13th, 2018 AT 2:51 PM
Tiny
KEN L
  • MASTER CERTIFIED MECHANIC
  • 42,895 POSTS
Here is a picture of the engine in a 2001 Chevrolet van no distributor. I just want to make sure we are working on the right engine.
Was this
answer
helpful?
Yes
No
+1
Monday, May 14th, 2018 AT 9:47 AM
Tiny
JIMMYCASS64
  • MEMBER
  • 9 POSTS
Now I understand. Definitely different. I had to remove my front tires to change my spark plugs. I met with a mechanic this morning, and he suggested I do another fuel pressure test, and this time while driving. I did. Key on 58 psi, idle 50 psi. Accelerating up hill 54psi, dropping to 52, then 50 once I was off gas. Steep hill 54 dropping to 53, and again 50 off gas pedal. Level terrain, hard gas from 10mph, baseline 50psi up to 52, dropping to 49, then 50 off gas.
Hoping this makes some sense. Jim
Was this
answer
helpful?
Yes
No
Monday, May 14th, 2018 AT 11:11 AM
Tiny
KEN L
  • MASTER CERTIFIED MECHANIC
  • 42,895 POSTS
Yes, it sounds like the pump is fading under load. It should be at 55 - 60 psi. Does the van have 38,000? little premature but not surprising because GM had a problem with the pumps I installed two in my truck 2000 Z71. Here is a guide to help you see what you are in for when doing the job:

https://www.2carpros.com/articles/how-to-replace-an-electric-fuel-pump

Here are diagrams to help you see what it is like on your van.

Check out the diagrams (below). Let us know what happens and please upload pictures or videos of the problem.

Cheers, Ken.
Was this
answer
helpful?
Yes
No
Tuesday, May 15th, 2018 AT 11:02 AM
Tiny
JIMMYCASS64
  • MEMBER
  • 9 POSTS
Ken, Thanks for the link. I need all the help I can get. And yes, 38,000 is the mileage. Fuel pump was replaced ten months ago.
Was this
answer
helpful?
Yes
No
Tuesday, May 15th, 2018 AT 12:49 PM
Tiny
KEN L
  • MASTER CERTIFIED MECHANIC
  • 42,895 POSTS
Can I ask if they used an AC Delco unit? Aftermarket pumps do not work. Also, have you replaced the fuel pump relay? I have also seen the connector at the pump melt and heat up they have an updated wiring harness for this.
Was this
answer
helpful?
Yes
No
-1
Tuesday, May 15th, 2018 AT 5:49 PM
Tiny
JIMMYCASS64
  • MEMBER
  • 9 POSTS
Current pump is aftermarket. Have not replaced relay. I appreciate the diagrams you included. Any chance you could forward the corresponding depicted part names shown?
Was this
answer
helpful?
Yes
No
Wednesday, May 16th, 2018 AT 4:02 AM
Tiny
KEN L
  • MASTER CERTIFIED MECHANIC
  • 42,895 POSTS
Here are the instructions:

Disconnect the negative battery cable.
Relieve the fuel system pressure. Refer to Fuel Pressure Relief Procedure.
Drain the fuel tank. Refer to Fuel Tank Draining Procedure.
Remove the fuel tank.

Remove the fuel sender assembly.
Note the position of the fuel strainer (2) on the fuel sender.
Support the fuel sender assembly with one hand, and grasp the strainer with the other hand

Pull the strainer from the fuel sender.
Inspect the strainer. Replace a contaminated strainer and clean the fuel tank. Discard the strainer after inspection.

Disconnect the fuel pump electrical connector (5).
Remove the electrical connector retaining clip (6) from the fuel level sensor.
Disconnect the electrical connector (7) from the fuel level sensor under the fuel sender cover.

Remove the retaining clip (4) from the fuel level sensor.
Squeeze the locking tangs, and remove the fuel level sensor (3).
Remove the fuel pressure sensor (1).

Install the fuel pressure sensor (1).
Install the fuel level sensor (3).
Install the retaining clip (4) to the fuel level sensor.
Connect the electrical connector (7) to the fuel level sensor.
Connect the electrical connector retaining clip (6).
Connect the fuel pump electrical connector (5).
IMPORTANT: When you replace the fuel tank fuel pump module, always install a new fuel strainer

Let me know, Ken
Was this
answer
helpful?
Yes
No
Thursday, May 17th, 2018 AT 10:09 AM
Tiny
JIMMYCASS64
  • MEMBER
  • 9 POSTS
Hi Ken. Thanks for all your assistance in this matter. Unfortunately, with the equipment and skill set I possess, could not get it done. Bottom line: Auto shop 1, jimmycass64 0. Good news is that it seems to have assuredly been the pump. Bad news is I am out nearly $750.00.
Oh well, glad I could help the economy.
Was this
answer
helpful?
Yes
No
Tuesday, June 5th, 2018 AT 1:14 PM
Tiny
KEN L
  • MASTER CERTIFIED MECHANIC
  • 42,895 POSTS
It is common for the pumps to go out. Glad you could get it fixed though. Use 2CarPros anytime, we are here to help. Please tell a friend.

Cheers, Ken
Was this
answer
helpful?
Yes
No
Wednesday, June 6th, 2018 AT 10:09 AM

Please login or register to post a reply.

Sponsored links