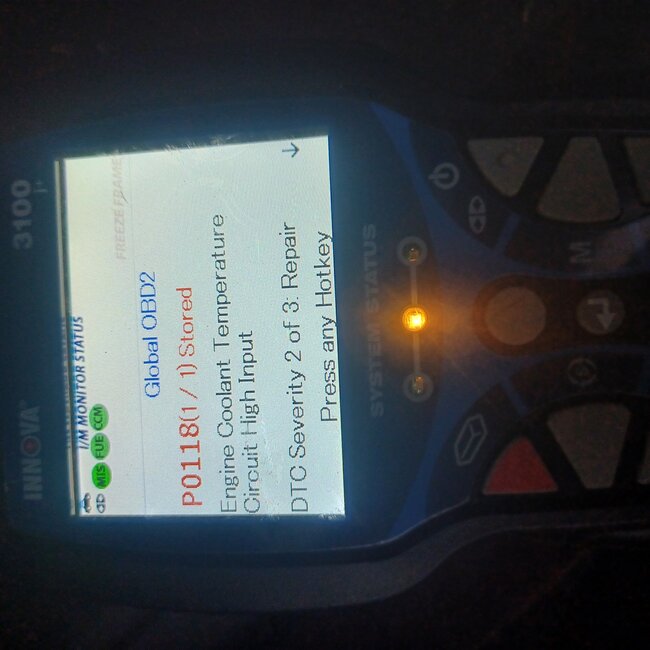
Dandy. The Engine Computer feeds that sensor with 5.0 volts, then the circuit draws that down to less. The acceptable range is 0.5 volts to 4.5 volts. When there's a break in the circuit, that 5.0 volts doesn't get pulled down. It stays at 5.0 volts, and since that is not within the acceptable range, it sets the code for voltage too high. (That 5.0 volts is "seen" inside the computer where that circuit originates).
By far the most common cause of this is a stretched or corroded terminal in the sensor's connector. Next would be a break in the 5.0 volt feed wire or a break in the ground wire. Both of those have a very small area in the circuit to develop this problem. Most of those two wires also go to other sensors. If there was a break in a section they all have in common, there would be more codes set for other sensors. The sensor is the least likely suspect for this code because it has just one rather reliable part inside.
This is the same condition that occurs when the sensor is unplugged while the ignition switch is on. The Engine Computer doesn't know true coolant temperature, so it defaults to turn the radiator fan on in case the engine is running too hot. It's also a quick test we use to check fan operation. Once the plug is reconnected, we have to erase that fault code so it doesn't confuse someone with a new problem in the future. If we don't erase that code, the Check Engine light will go off when the plug is reconnected, or at the next ignition switch cycle. If no break occurs again, the fault code will self-erase after fifty engine starts.
There's two ways to approach this. The easiest is if you're using a scanner, or if your code reader can display live data, find the screen that shows coolant temperature sensor voltage and watch that while you wiggle the sensor connector. If you see the voltage change erratically, those terminals must be repaired.
The second way is with voltage readings from a digital voltmeter, but there's one important point. The readings are only valid when taken with everything connected and plugged in. You must back-probe the terminals through the rubber weather seals alongside each wire. Start with the tan / black wire. That one must have 0.5 to 4.5 volts. If you find 0.0 volts, that wire has a break in it between that terminal and the splice where it goes to other sensors. That should mean roughly a foot or two of wire.
If you do find between 0.5 and 4.5 volts, the circuit is working at this time. Erase the fault code, then it shouldn't come back right away. If it comes back later, there's an intermittent problem we have to find. For that, any testing will have to wait until the problem is occurring.
If you find 5.0 volts, that wire is okay. The break is after that point. Measure the voltage on the black / blue wire. Normally that one will have 0.2 volts. If you find 5.0 volts on this one, the break is in that wire, again, between the connector and the splice that goes to other sensors. If you find 0.2 volts, (0.0 volts for all practical purposes), along with 5.0 volts on the first wire, one of those connector terminals is spread, or, less likely, the sensor is open. We can verify a bad sensor with a resistance test if that becomes necessary.
For the ignition switch test, the most common causes for it to not work is you went too far and the starter engaged, or "off" and "run" weren't reached three times within five seconds. I've also run into trouble when I didn't start from "off". I started with the switch already on. Turning it all the way to "crank", even for just an instant, is the signal for the Engine Computer to exit that test mode. On most models, if you think you didn't catch all the numbers, the sequence will read out again from the beginning if you turn the ignition switch back to "off", then back to "run", just one time. If the odometer display goes blank, it's preparing to display the code numbers, but you may have to wait a few seconds for it to start.
Let me know what you find for voltage readings.
Nov 26, 2025 at 12:54 PM