EGR valve code keeps coming back

Tiny
BADDOG03
  • MEMBER
  • 2007 LINCOLN TOWN CAR
  • 4.6L
  • V8
  • 2WD
  • AUTOMATIC
  • 400,000 MILES
I replaced the EGR valve about 2 years ago because the check engine light came on and when I read the code it said it was the EGR valve. I put a new one in and that fixed the problem. Until now. Same problem code stated it was the EGR valve. I bought a new one cleared the code ran it for about two days and the engine light came back ! How would I check the Elec. Connector or the valve? Please help
Do you
have the same problem?
Yes
No
Wednesday, October 14th, 2020 AT 3:01 PM

20 Replies

Tiny
KASEKENNY
  • MECHANIC
  • 18,907 POSTS
There are a number of things that can cause any one code so we need to start with the actual code. Can you provide the actual code and then we can figure out next steps? Thanks

https://www.2carpros.com/articles/checking-a-service-engine-soon-or-check-engine-light-on-or-flashing
Was this
answer
helpful?
Yes
No
-1
Wednesday, October 14th, 2020 AT 3:29 PM
Tiny
BADDOG03
  • MEMBER
  • 10 POSTS
I will have to get back to you tomorrow with the code information.
Was this
answer
helpful?
Yes
No
-2
Wednesday, October 14th, 2020 AT 3:39 PM
Tiny
KASEKENNY
  • MECHANIC
  • 18,907 POSTS
Okay. That is great. Thanks for the update. We will be here when you get to it. Thanks
Was this
answer
helpful?
Yes
No
Wednesday, October 14th, 2020 AT 6:39 PM
Tiny
BADDOG03
  • MEMBER
  • 10 POSTS
Okay, I have some of the answers you asked for. There are 2 codes P0402 and P0403. I also did a test with a multimeter. Here are the readings starting from the top left wire first 1, 9.4. Second 1, 4.9. Third 1, 4.4. Bottom row left first 1, 9.4. Second 1, 2.2. Last wire no reading! I did not see any letters as to A, B, C, D, E to follow any sequence.
Was this
answer
helpful?
Yes
No
-2
Thursday, October 15th, 2020 AT 7:48 AM
Tiny
KASEKENNY
  • MECHANIC
  • 18,907 POSTS
Okay. That helps. Can you confirm that your vehicle has the EGR module and not just a valve? The fact that you have 6 wires I am sure you do but I need you to look at the connector and tell me what these wires have for voltage. I understand you said top left but I am not sure if you had it plugged in or which way you were looking at it so can we match up the wires and tell me what pin 1-6 had according to this connector view?

Once we get this, I will run through the testing and let you know if we have another issue or provide more guidance. Plus I will know which testing to send over once we get this info.
Was this
answer
helpful?
Yes
No
Thursday, October 15th, 2020 AT 7:44 PM
Tiny
BADDOG03
  • MEMBER
  • 10 POSTS
Yes, I believe that it is a Module. I saw the attachments you sent me. The connector that is shown is the same as mine. I just didn't have my numbers configured as the picture. So I am sending you the number I got with multimeter the way that your attachment shows. #3, 9.4 #2, 4.9 #1, 4.4 #6, 9.4 #5, 2.2 #4, No reading. When I tested it the car was in the KOEO Mode. I did not test it with the car running. I want to let you know that the car does not run rough when running. It Purrs like a kitten. I also want to say I do have a problem with comprehension when read. But I am mechanically inclined. I am more of a hands on type person. So please bare with me. I how what I have sent you is helpful.
Was this
answer
helpful?
Yes
No
-1
Friday, October 16th, 2020 AT 6:25 AM
Tiny
KASEKENNY
  • MECHANIC
  • 18,907 POSTS
Okay. We have some digging to do with this because some of those don't sounds correct namely the 9.4 volts. However, pin 4 cannot be 0 so we need to start there. Fuse 21 in the battery junction box is what we need to check and go from there. Let me know if this fuse is okay and if it is we are going to need to jump 12 volts to this pin and retest the operation.
Was this
answer
helpful?
Yes
No
-1
Friday, October 16th, 2020 AT 6:39 PM
Tiny
BADDOG03
  • MEMBER
  • 10 POSTS
Okay. This is where we are: I pulled out and checked the fuse with a continuity tester they tested fine and looked fine. I retested all the pine and these are the reading. #3, 12.0 #2, 4.9 #1, 4.4 #6 12.0, #5 2.2, #4, no reading. #3 wire is a brown/pink, #2 is black/white, #1 is blue or teal/red, #6 is red/yellow, #5 is brown/ teal or blue, #4 grey/red. Now there was a big problem when I put a jump wire pin #4 because you stated it needed to have 12 volts. Well that was wrong information. The jump wire turned red hot and the coating on the wire was ready to melt. And that was only for a second when I had to pull it off before it caused some real damage! Not sure what the gage of the wire I used was. But I don't think it was the right thing to do. That is where it stands as of now. The check engine light is back with the same codes as before. I had rest them and they came back after driving the car. I don't know if this new EGR valve is any good now or was ever any good. But putting that 12 volts to it might not of helped it any.
Was this
answer
helpful?
Yes
No
-1
Sunday, October 18th, 2020 AT 7:30 PM
Tiny
KASEKENNY
  • MECHANIC
  • 18,907 POSTS
Just to clarify, you jumped 12 volts to the EGR module or you put 12 volts to the connector with it unplugged? That circuit is the voltage supply circuit that is a 12 volt supply from fuse 21 in the battery junction box.

If you put 12 volts to the EGR module and it almost burned up the wire then that may be the issue. You need 12 volts on that wire so if your jumper almost melted then that wire from the fuse may have melted as well. A short to ground will cause the wire to melt.

As you can see in the wiring diagram that fuse splices off and feeds other things as well. So we need to check for a short to ground on that wire and the EGR. You do that by unhooking the connector and put your meter on continuity or ohms and then put one lead on that pin and the other on the negative battery terminal. It should be an open circuit or the meter should say OL.
Was this
answer
helpful?
Yes
No
-1
Monday, October 19th, 2020 AT 6:16 PM
Tiny
BADDOG03
  • MEMBER
  • 10 POSTS
Just to Clarify. I spliced into #4 wire on the Connector with a wire Then I plugged the Connector into the Modulator, Then I hooked the wire to the + side of the battery. That is when the wire got red hot so I Pulled it off. I see from your Schematic that you are showing the wire color to be Red/ Yellow and it is showing the wire to be # 5. Just to Clarify. The wire that I am Not getting any reading is #4 on the connector in my car and the Color of That wire is Grey/ Red. According to the configuration of the connector that you sent me in a previous attachment. I also sent you in my last message the colors of the wires in my car that are in the configuration of the connector of your attachment. I am not that good a following Schematics, But I looked at the 3rd page of your attachment and the Colors with the Numbers beside them DO NOT Correspond with the Color or Numbers with the Ones that I sent You That I keep referring back to, that are in the Configuration of the Connector of the picture in the attachment you sent me. We need for both of us to be on the same page here ! The Colors and Number on the 3rd page of your Schematic attachment are #2 Brn/Wht, #6 Gry/Red, #4Red/Yel, #5 Brn/ Lt Grn, #3 LtBlu/Red, #1Brn/Pink. This might be the reason the wire you asked me to attach to 12 volts got so HOT. Just saying. As I said we need to be on the same page and make sure that we are not doing more harm than good. I had also looked at a few YouTube videos and they only talked about and showed only checking 5 wires and talked about A B C D & E. There wasn't anything about "D". I am not saying that the letters Coincide with #s being 1, 2, 3.4. 5 with the connector or anything else. But when we first started this conversation about my problem I stated the numbers being a as such. I look forward to you reply and resolving the problem because my Emissions is coming up soon and the Colder weather is starting to settle in. I don't have a garage to work in.
Was this
answer
helpful?
Yes
No
-1
Tuesday, October 20th, 2020 AT 5:47 AM
Tiny
KASEKENNY
  • MECHANIC
  • 18,907 POSTS
We need to make sure we are in the correct cavity of the connector. There is no question that there needs to be 12 volts on terminal 4 as it is labeled as the power wire. When you are looking at the diagram below this is showing the connector disconnected. So you are looking at the inside of the connector and then number 4 should on the lower right corner. If you are looking at this from the back side of the connector, you would actually be looking at number 6 in the lower right corner which would be a grey/red wire. I think you jumped 12 volts to the signal return which is a 5 volt reference circuit and would make sense why the wire got hot.

Can you get a picture of the connector as you are looking at it? I think that is why we are not on the same page.

Once we straighten that out, we need to find out why we don't have 12 volts on pin 4 so we need to test for a short to power and ground.
Was this
answer
helpful?
Yes
No
Tuesday, October 20th, 2020 AT 8:36 PM
Tiny
BADDOG03
  • MEMBER
  • 10 POSTS
Okay, Just to clarify. I have and have been testing the connector connected to the EGR Modulator from the back of the Connector. Not the inside of the connector. From the beginning when started talking to you I thought it was odd that the numbers were left to right instead of right to left. So just to clarify all the voltage numbers I gave you were as I gave them from the back of the connector. #1, 4.4 #2, 4.9 #3, 12.0 #4, 12.0, #5 2.2, #6, no reading. So in actuality #4 has 12 volts and #6 which a grey/red wire there isn't any reading. I don't need to take a picture all of my testing are from left to right and all the wire colors are also left to right from the back of the connector. I guess I misread the attachment of the wire connector that you has sent me. As I said I thought it was odd the numbers were going from right to left. So now that is all straight, we can proceed with the problem of the codes p0402 and p0403 and engine light be on!
Was this
answer
helpful?
Yes
No
Wednesday, October 21st, 2020 AT 4:15 AM
Tiny
KASEKENNY
  • MECHANIC
  • 18,907 POSTS
Okay. Glad we got that figured out. Here is the testing for these codes. It is lengthy but will take us through to the solution.
Was this
answer
helpful?
Yes
No
-1
Wednesday, October 21st, 2020 AT 7:08 PM
Tiny
BADDOG03
  • MEMBER
  • 10 POSTS
You only made everything more complicated. Because 1 I don't have all of the equipment that requires to do all of these tests that are repetitive. And after reading all that crap that most of it I don't understand (maybe because I am not ASE certified and I don't have a Large Diagnostic Computer to tell me where the exactly where the problem is and what needs to be done to fix it) But the one thing that caught my eye at the end of all the reading was (Buy a new EGR valve!) So I think sending me all 20 pages of what to try. Was a way of say we can't help you anymore. At Least until I buy a(Large Diagnostic Computer to tell me where the exactly what and where the problem is.
Was this
answer
helpful?
Yes
No
Thursday, October 22nd, 2020 AT 4:10 AM
Tiny
KEN L
  • MASTER CERTIFIED MECHANIC
  • 42,544 POSTS
I have seen this problem I would remove the EGR valve and check the ports leading up to and going into the intake manifold I have seen them clog up which causes this issue. An easy way to do this is too remove the EGR and start the car, it should be loud then stall quickly if the passages are open. Here is how to remove the intake to be hot tanked or replaced if this is the problem. Check out the diagrams (below). Please let us know what you find. We are interested to see what it is.
Was this
answer
helpful?
Yes
No
Thursday, October 22nd, 2020 AT 1:05 PM
Tiny
KASEKENNY
  • MECHANIC
  • 18,907 POSTS
Sorry if that did not help. Unfortunately we have no way of knowing what your level of expertise is so we can only supply the information and answer the questions as best as possible. Unfortunately not all vehicle issues are as simple as putting a part on it and do require diagnostic work to figure it out.

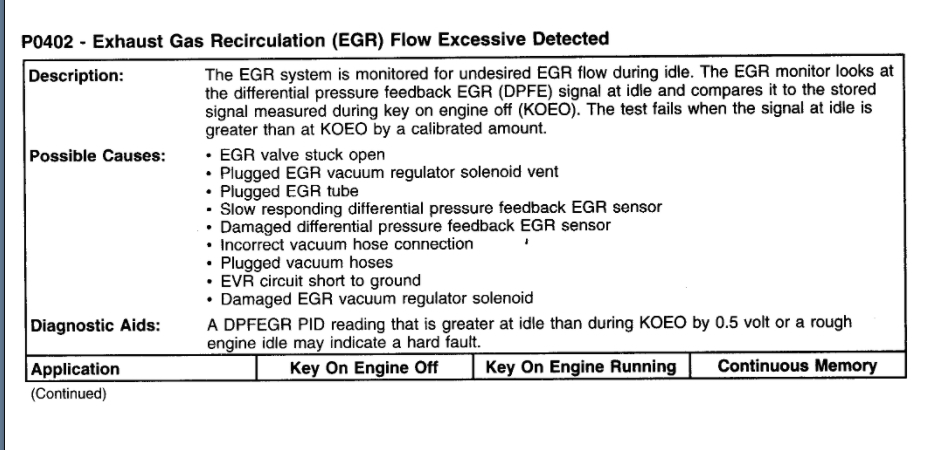
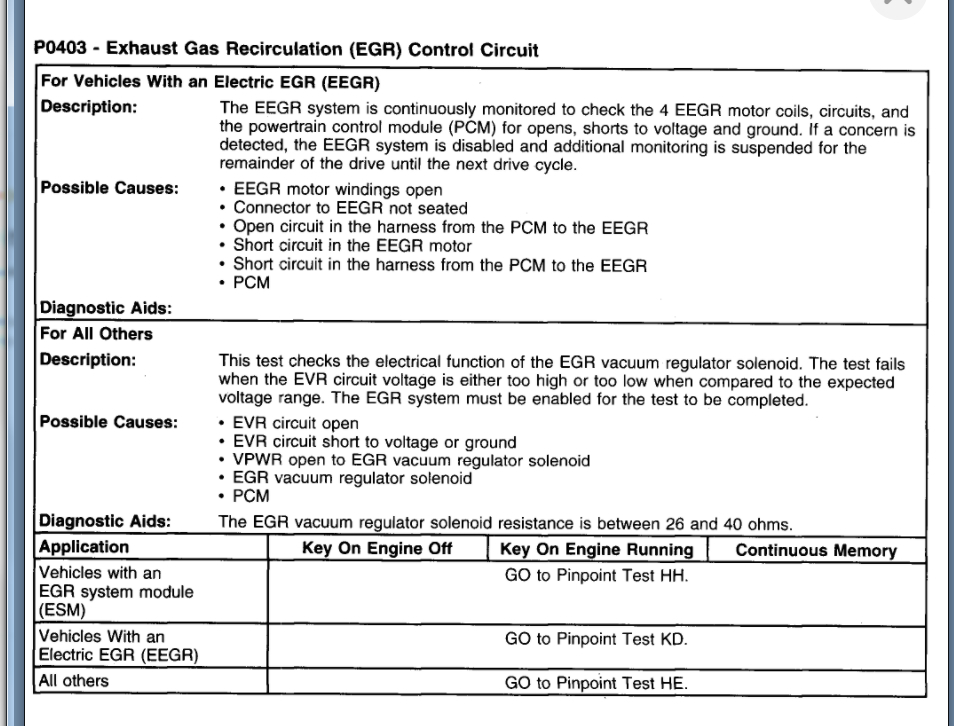
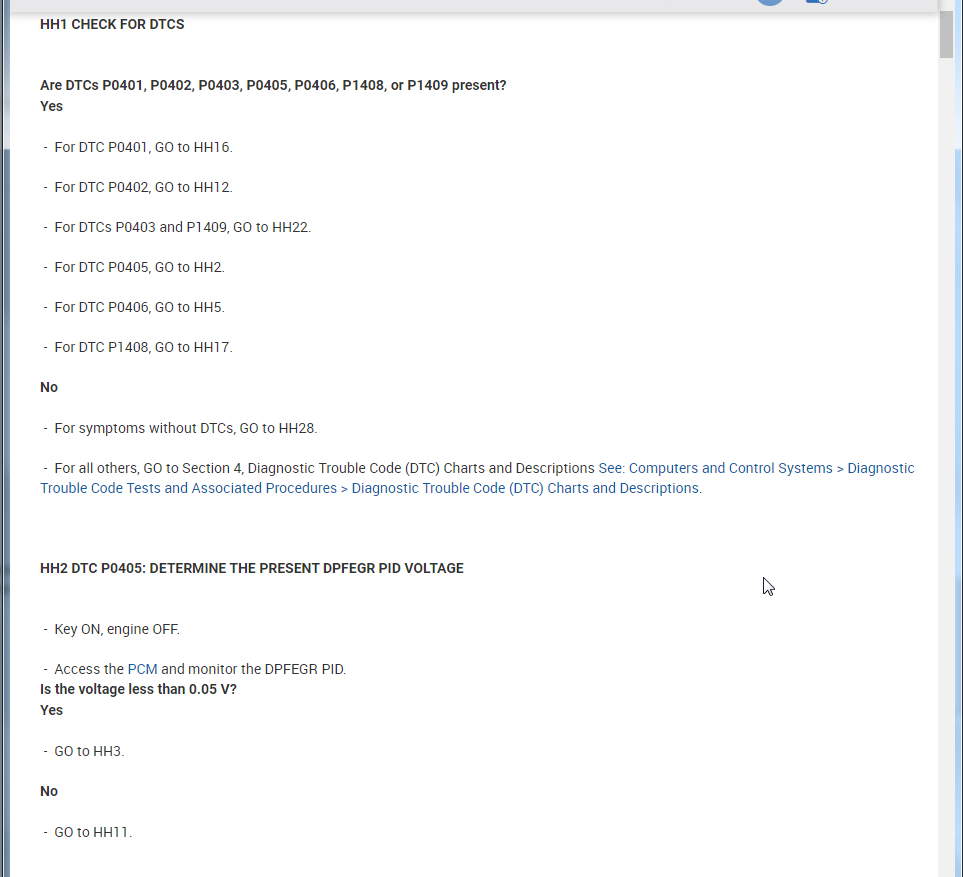
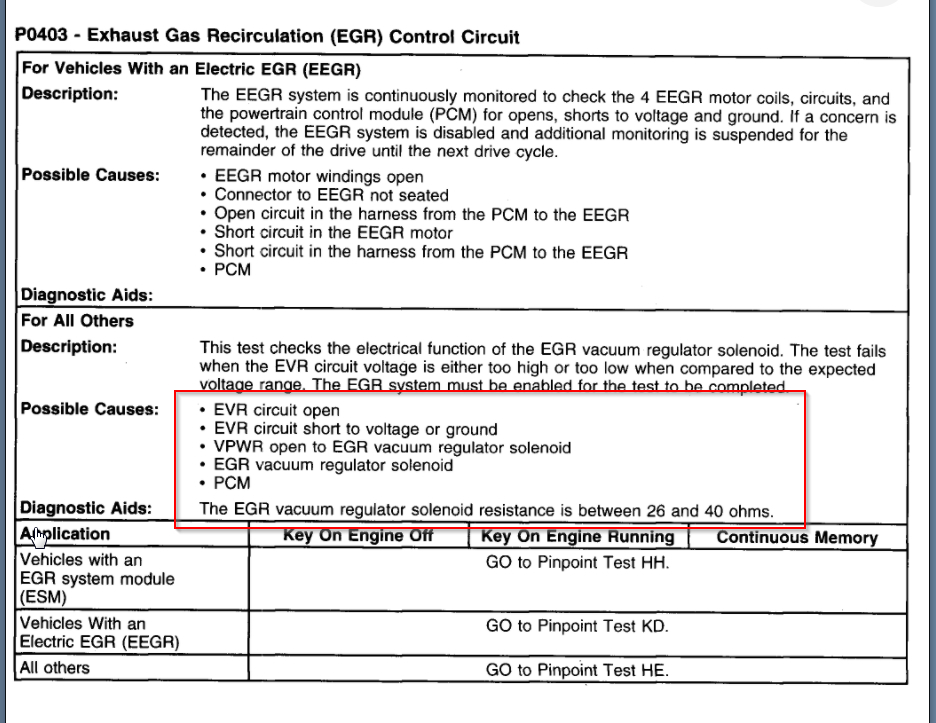
So let's walk through this testing to see if we can figure something out. Your codes are 0402 and 0403. As you can see on step one that sends you to HH12 for the P0402 and HH 22 for P0403.

Let's start with HH12.

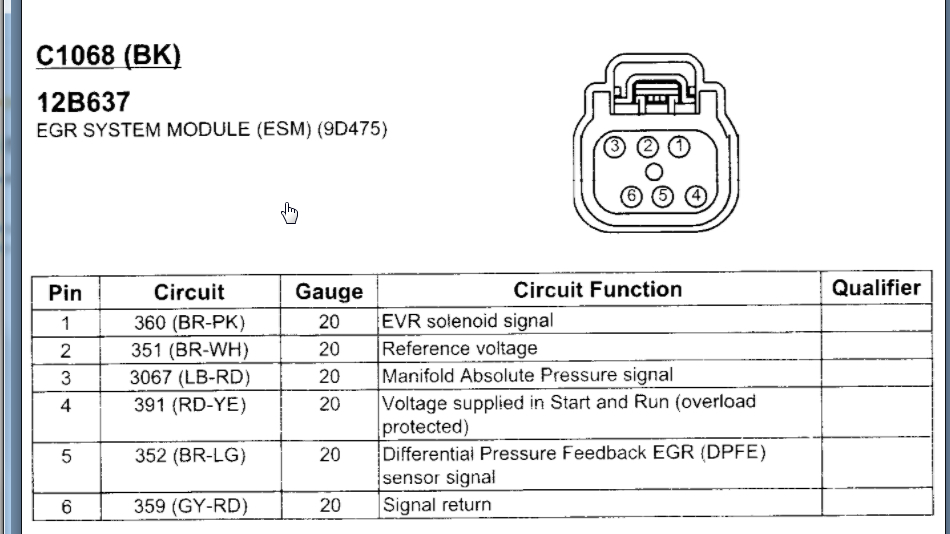
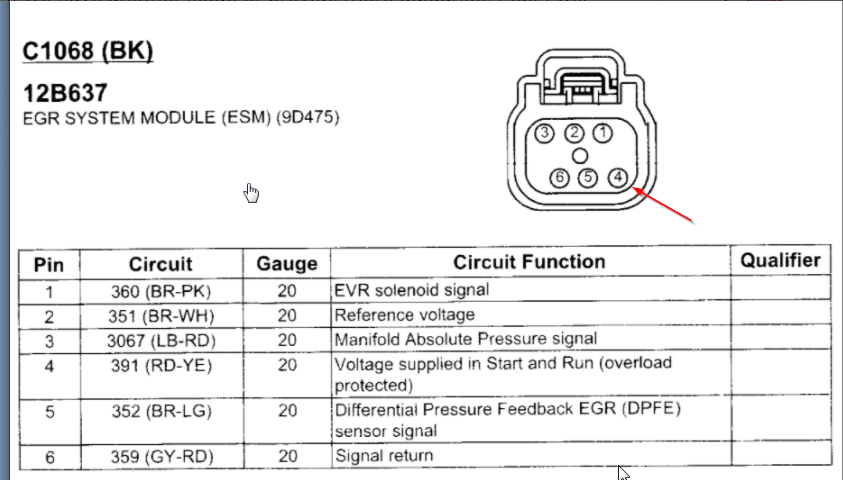
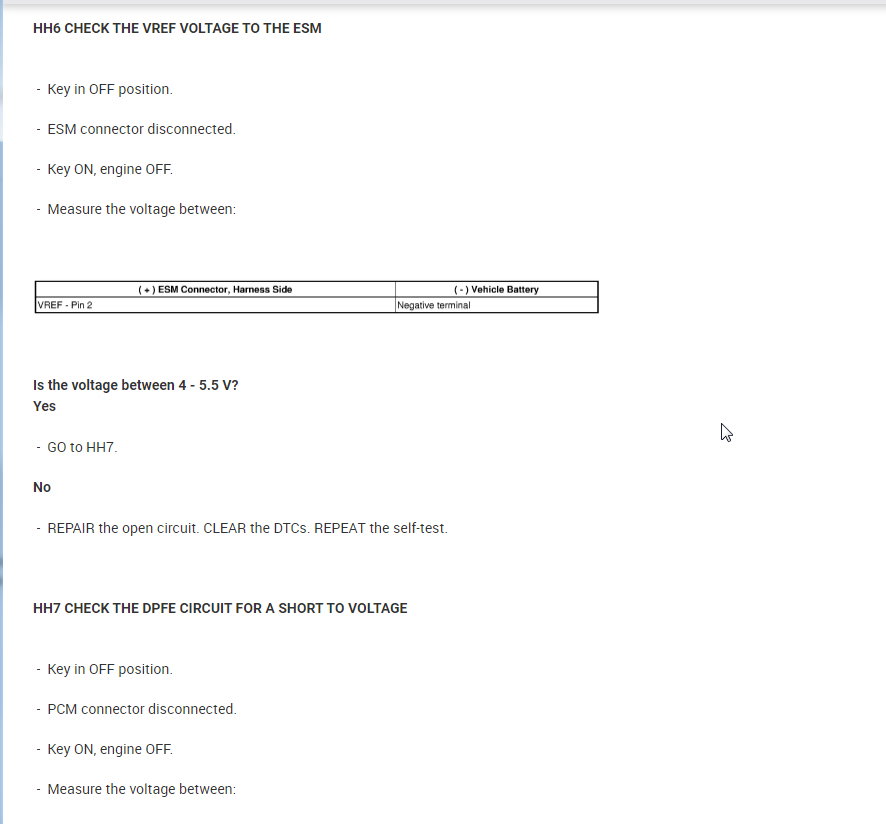
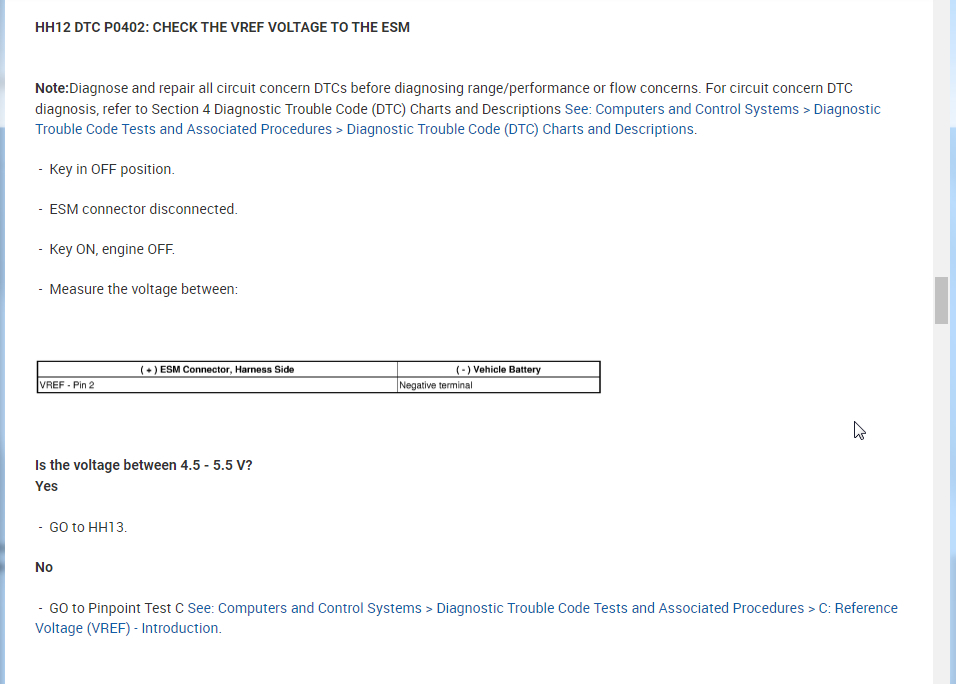
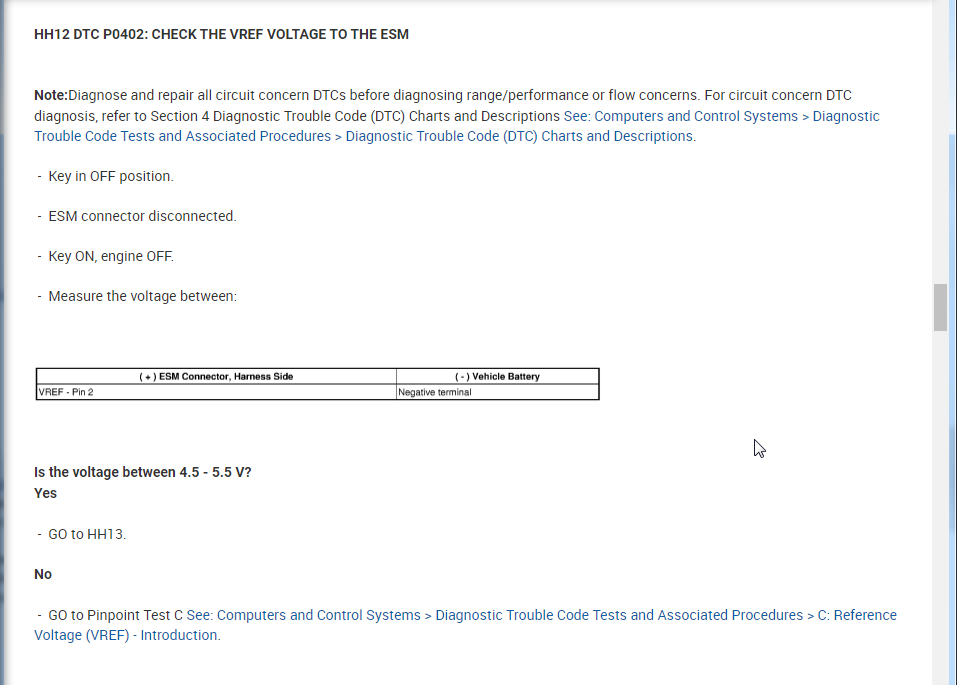
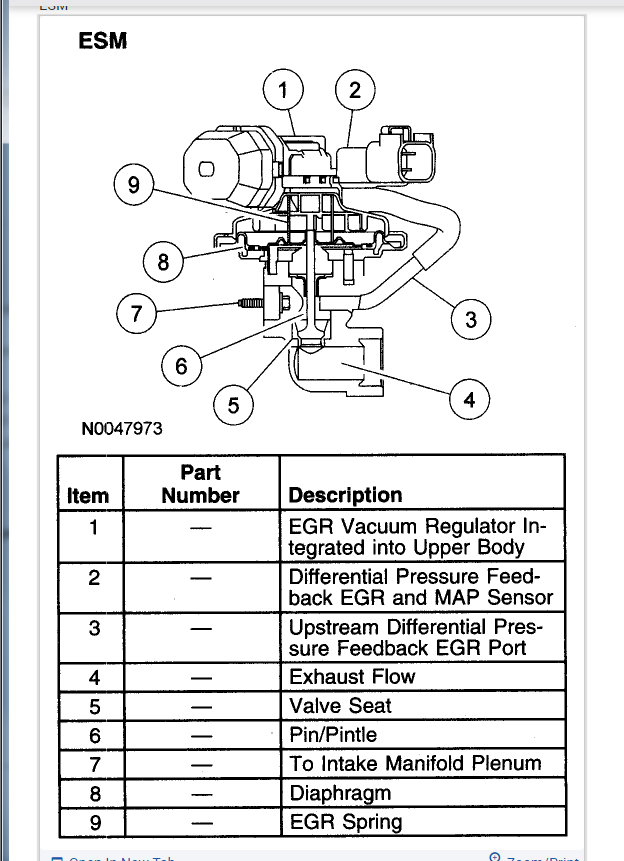
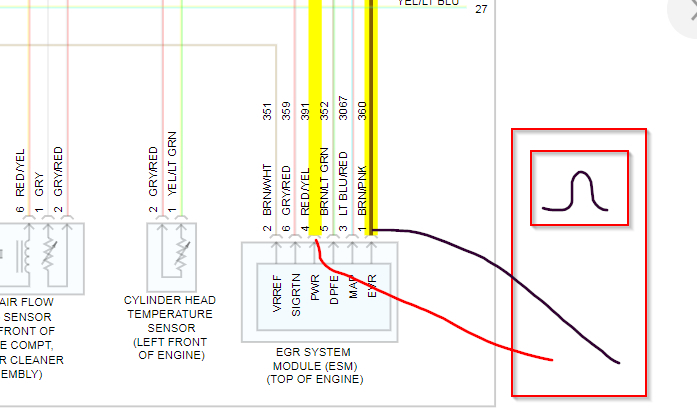
HH12 tells you to disconnect the EGR module (ESM) and check voltage on pin 2. Based on what you said it was 4.9v. It then asks you if it is between 4.5-5.5v. The answer is yes so you go to HH13.

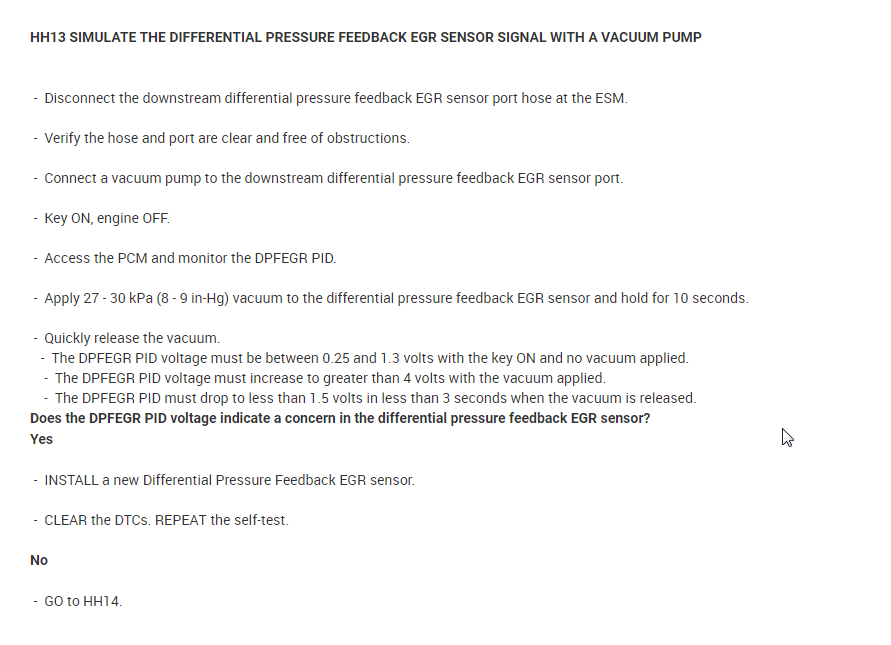
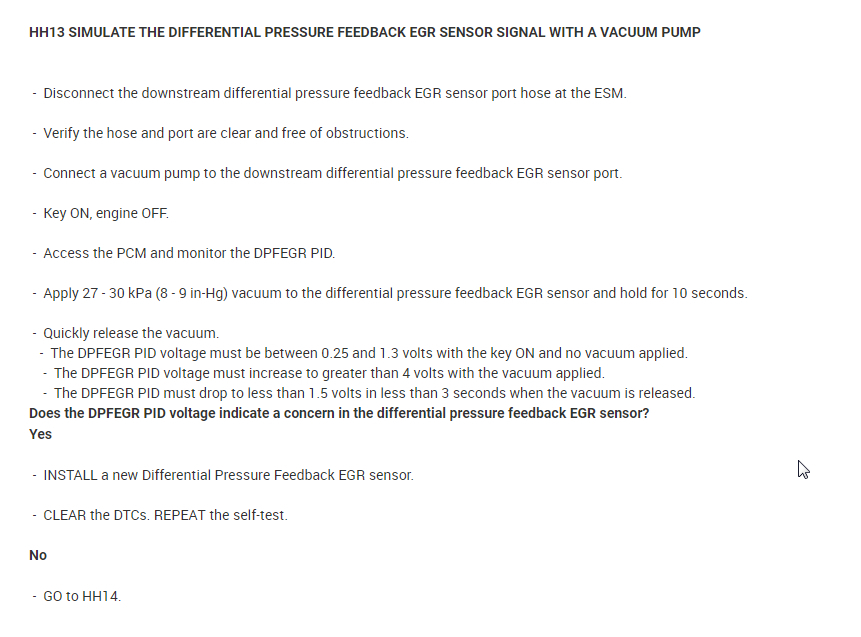
HH13 says to monitor the data in the PCM with a scan tool. If you don't have that then you can monitor the voltage on the DPFE and get the same info. You will need a vacuum gauge/hand pump so that you can pull it into a 8-9 inch of mercury vacuum as it asks. Let's say it passes that and you move to HH14. If it did not then you replace the DPFE.

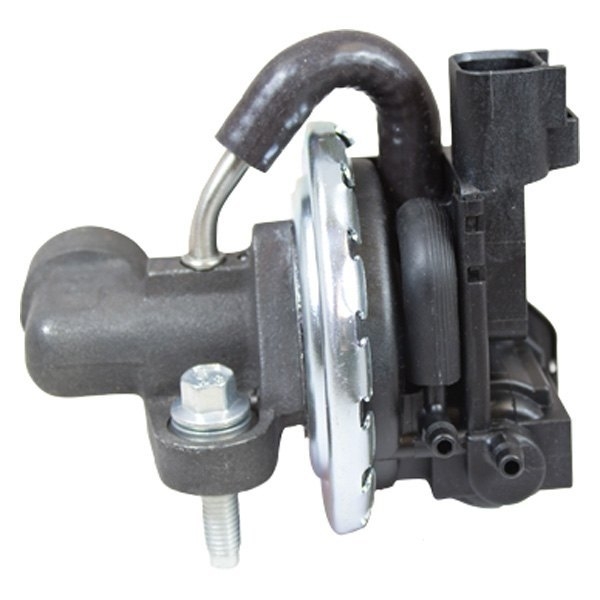
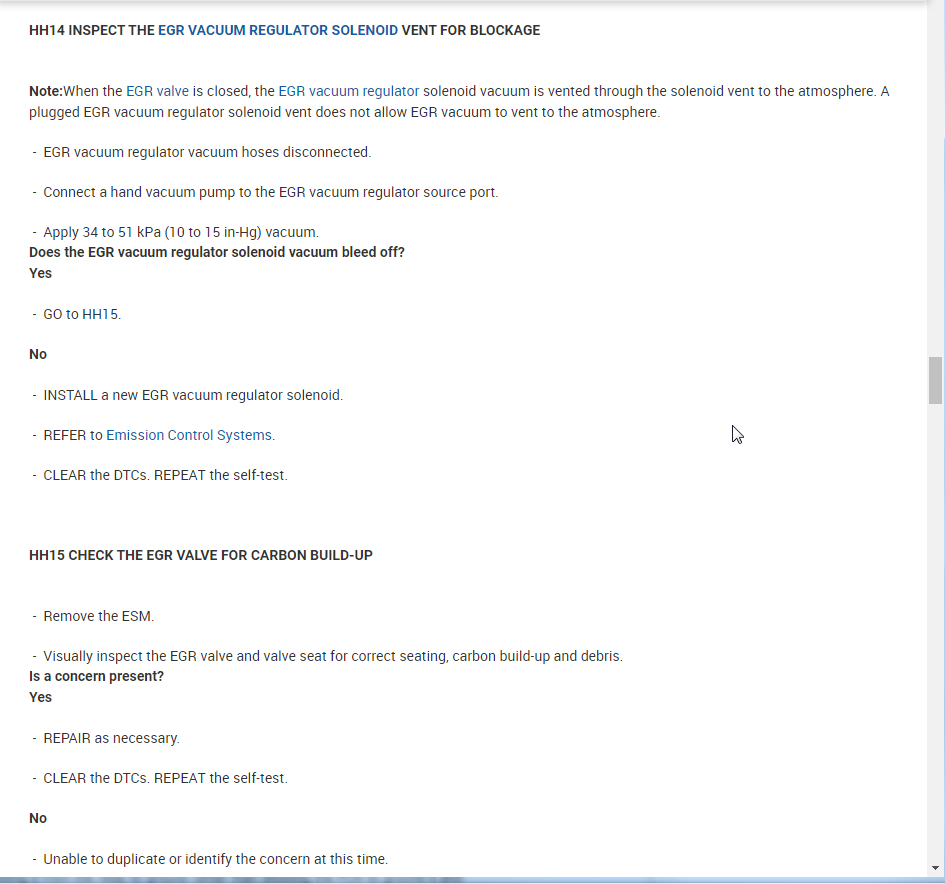
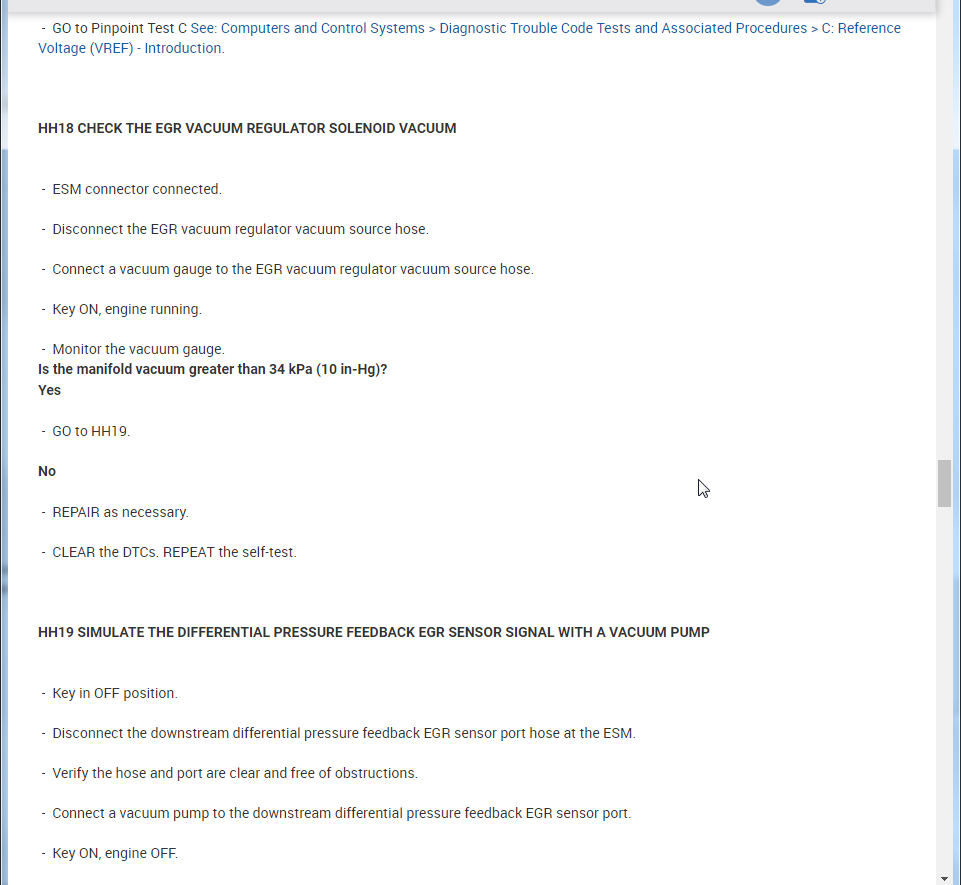
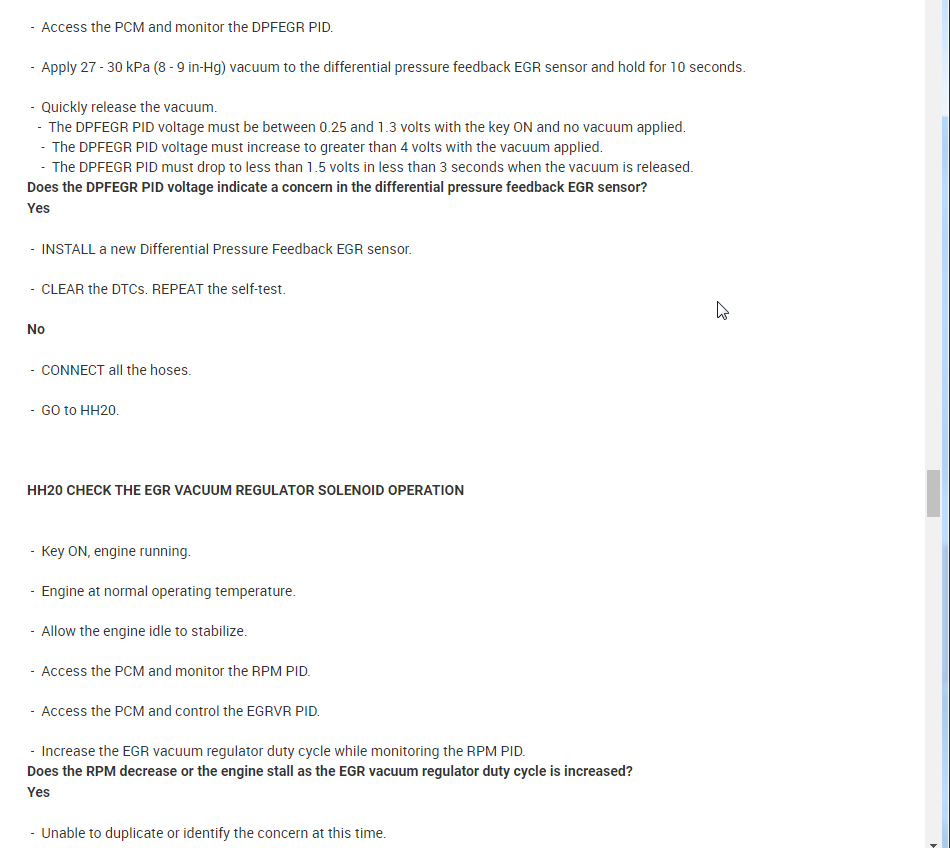
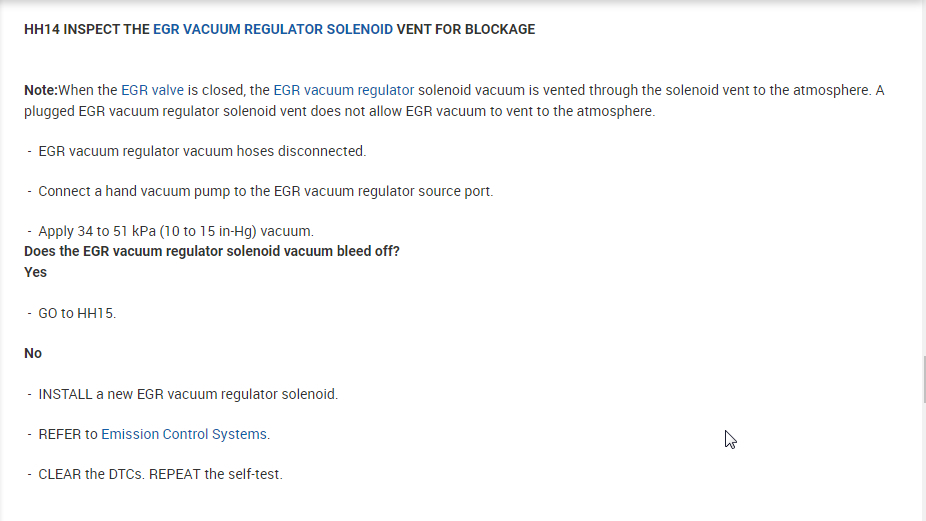
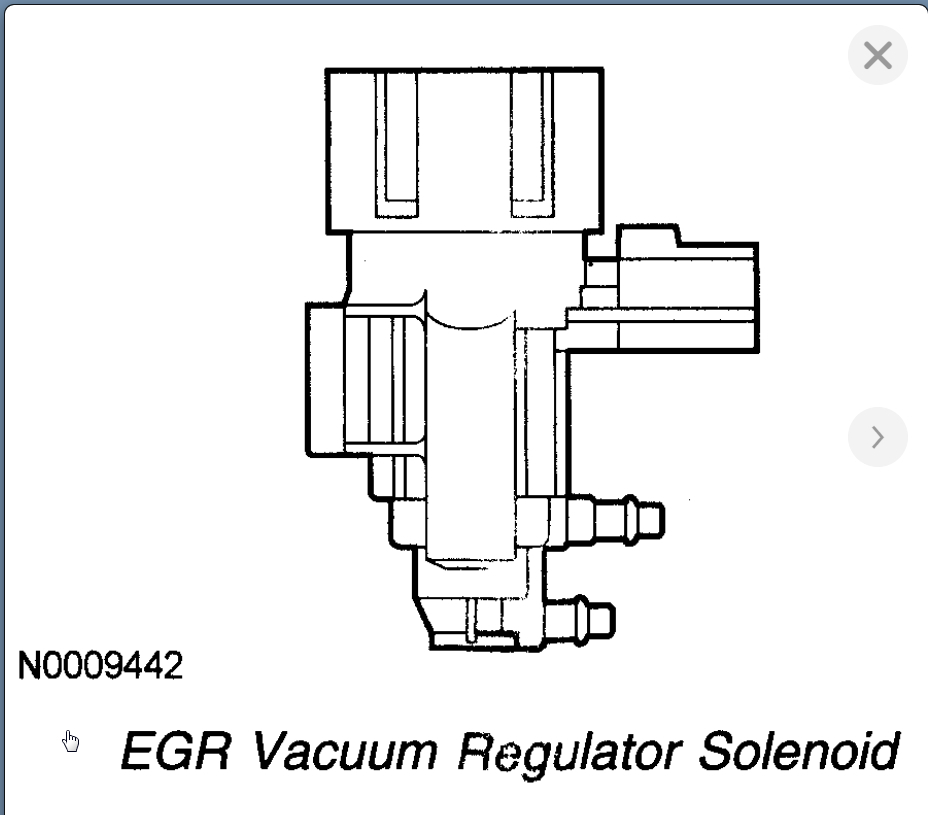
HH14 asks you to check for a blockage in the EGR regulator solenoid. Again, you need the vacuum hand pump again to pull it into a 10-15 in-hg vacuum. If this does not bleed off then you need a new EGR vacuum regulator solenoid. Let's say that passed and you move onto HH15.

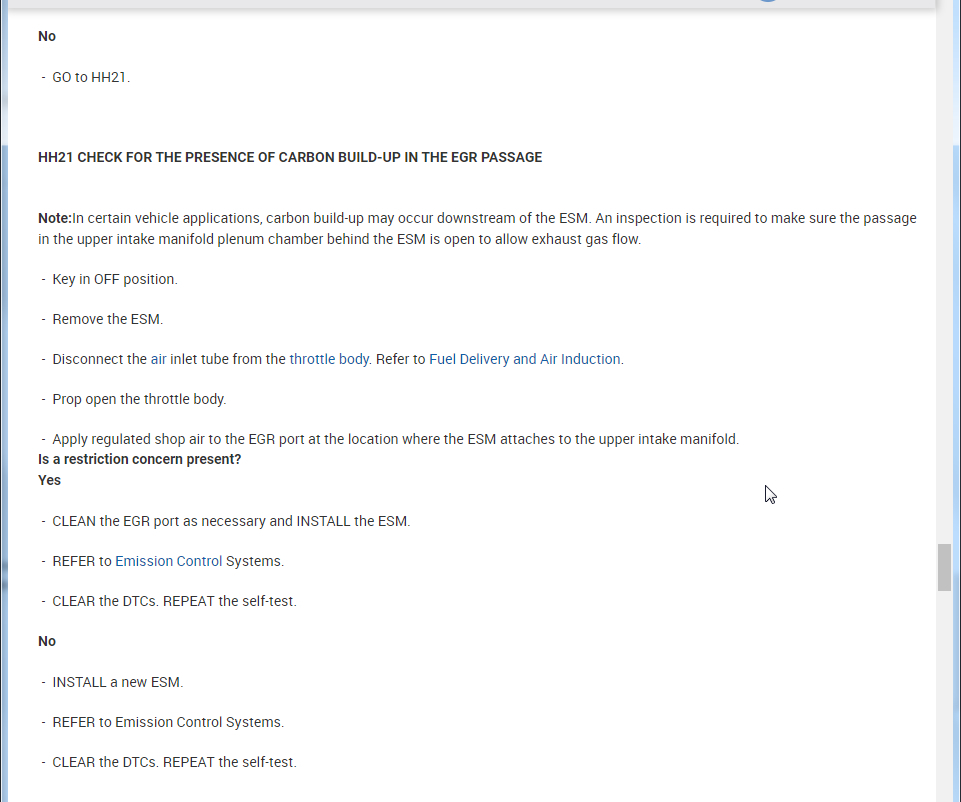
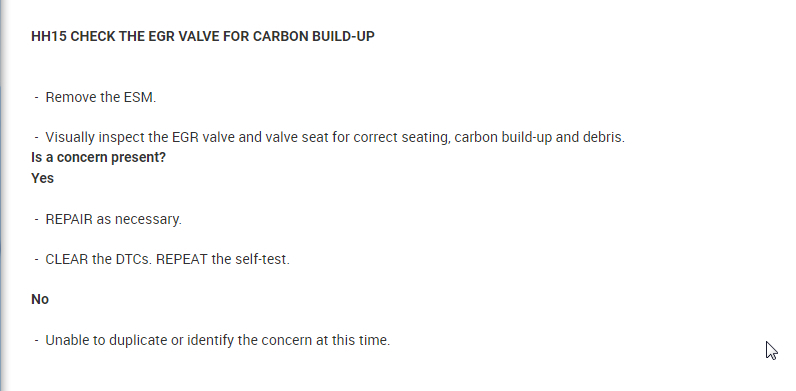
HH15 is asking you to inspect the EGR valve for carbon build up. If you find it, you can clean it or replace it. If there is none then the issue is not currently present.

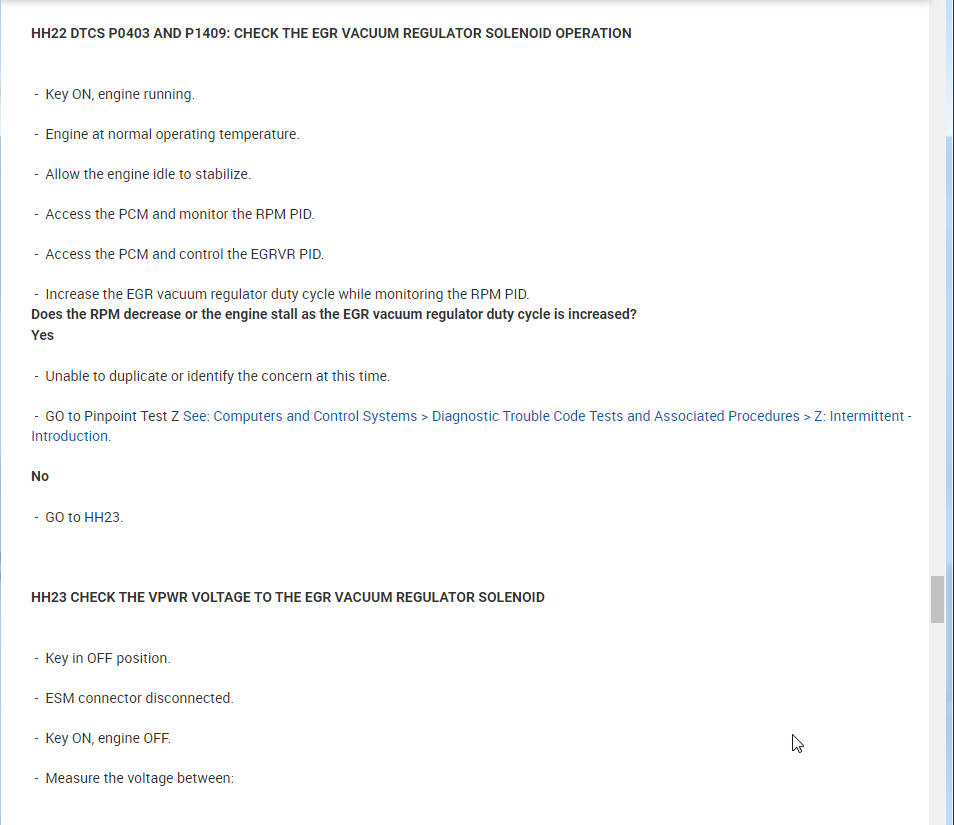
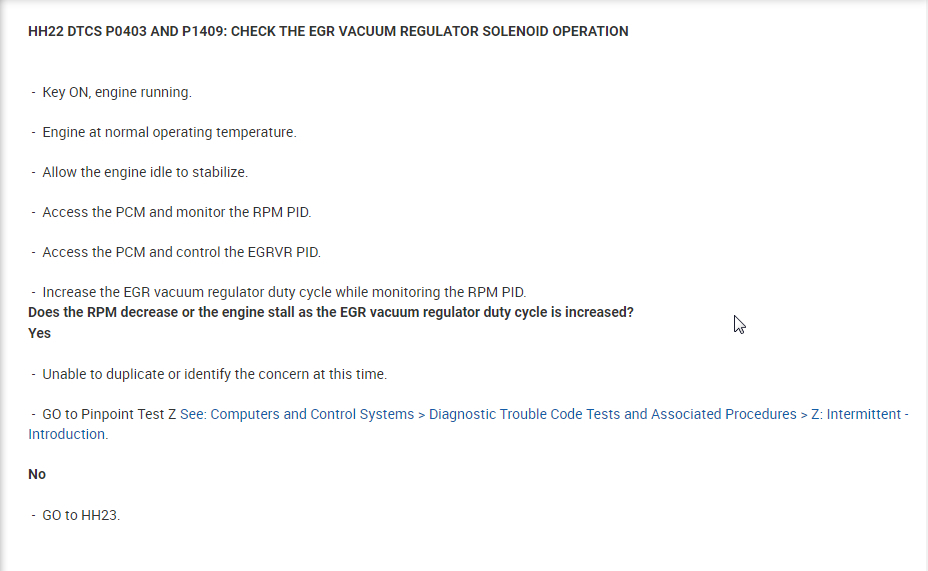
For P0403 you start at HH22. This is asking you to check the operation of the EGR by using a scan tool. You don't have one so let's assume it does not stall when you perform this test because if it does then the issue is not present at this time so let's assume it is currently broken so it would answer this question as "No" and you go to HH23.

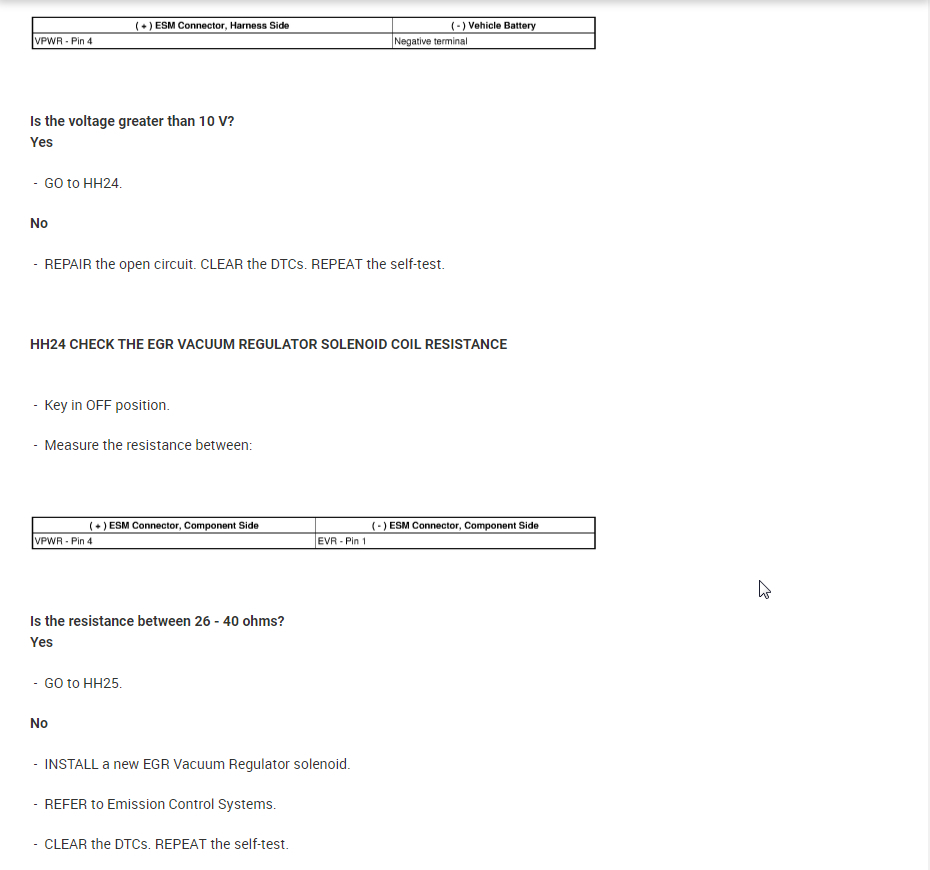
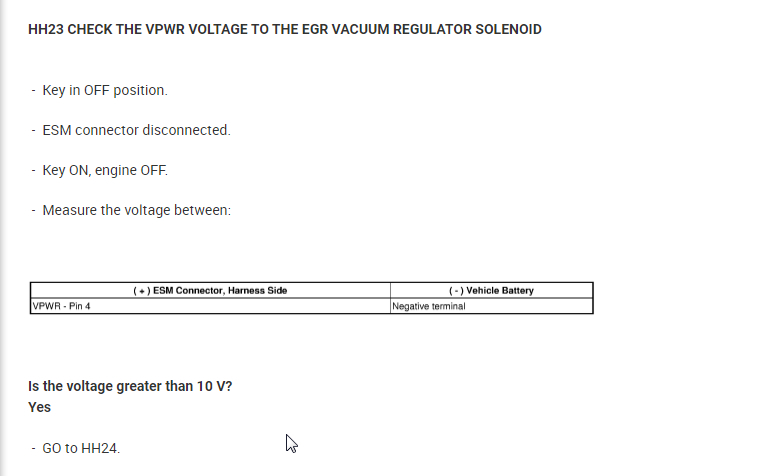
HH23 is asking you to check voltage from the EGR module (ESM) for voltage and based on your reading of 12 volts, you would answer yes that it is greater then 10v. Go to HH24

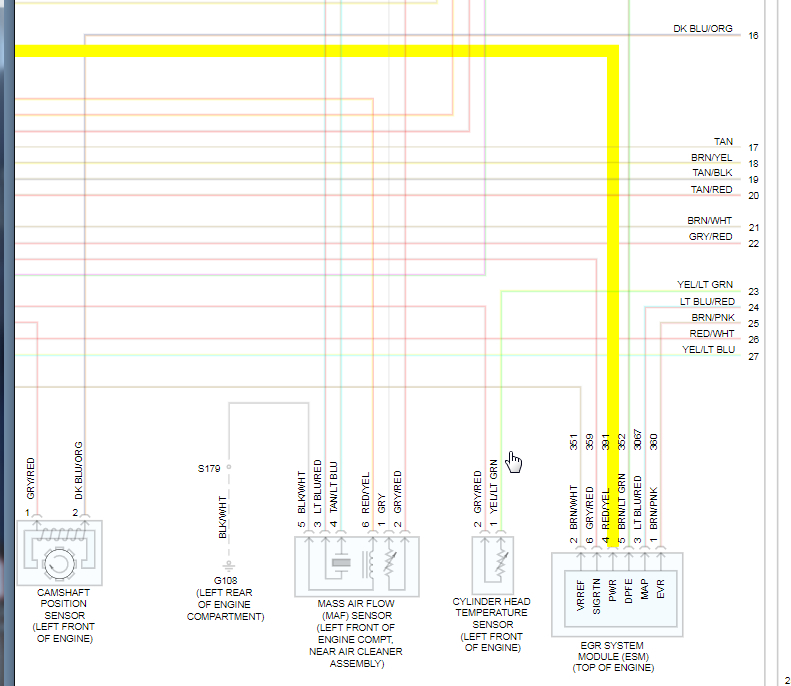
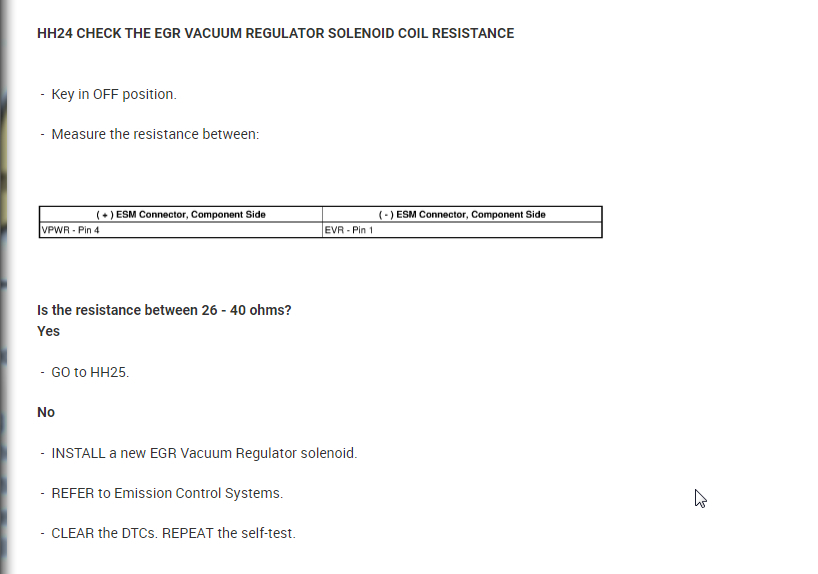
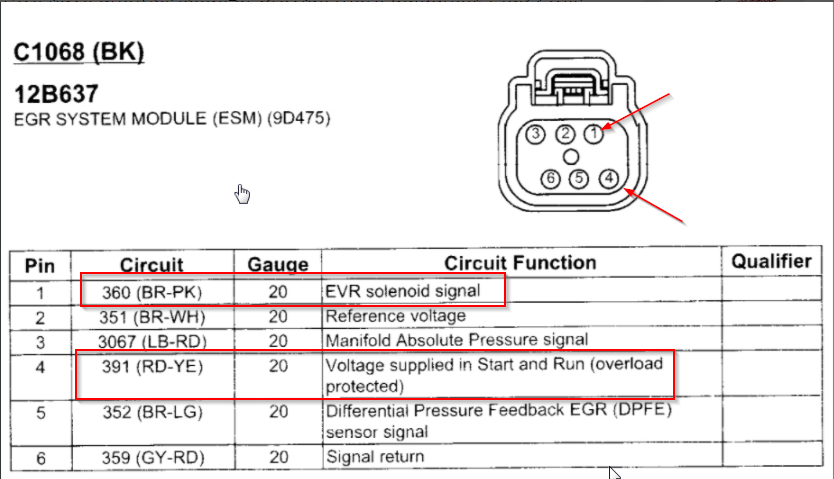
HH24 needs you to check the EGR coil and you do this by disconnecting the connector and measure resistance between pin 4 and pin 1. What is the resistance reading? Is it between 26-40 ohms? If it is not then you replace the EGR vacuum regulator solenoid. Let's assume it is and you go to HH25

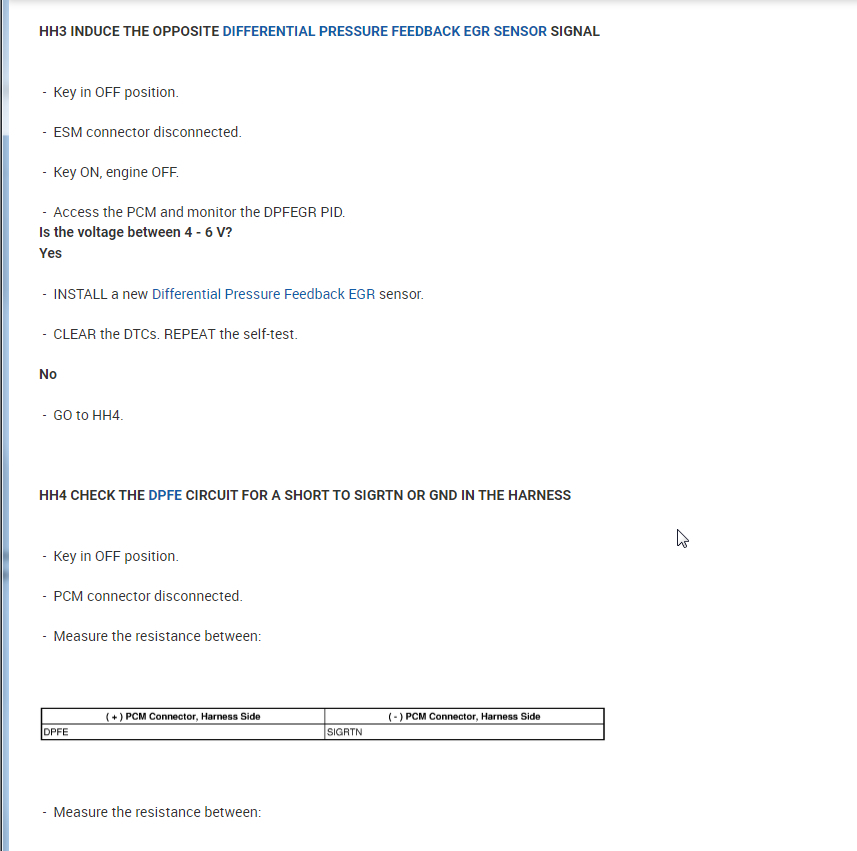
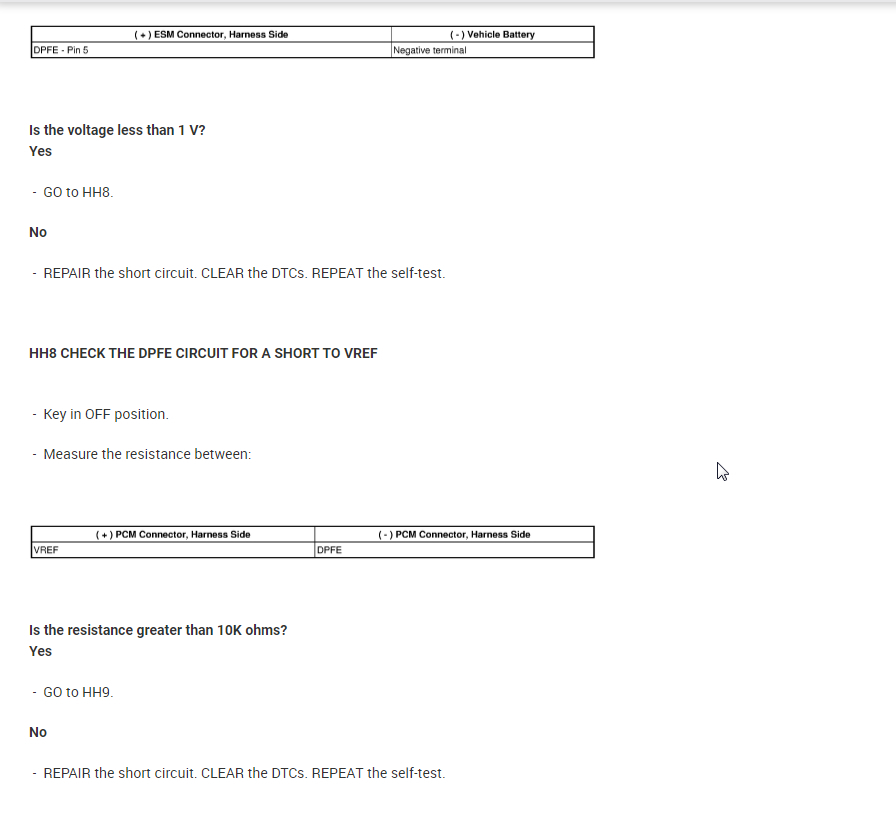
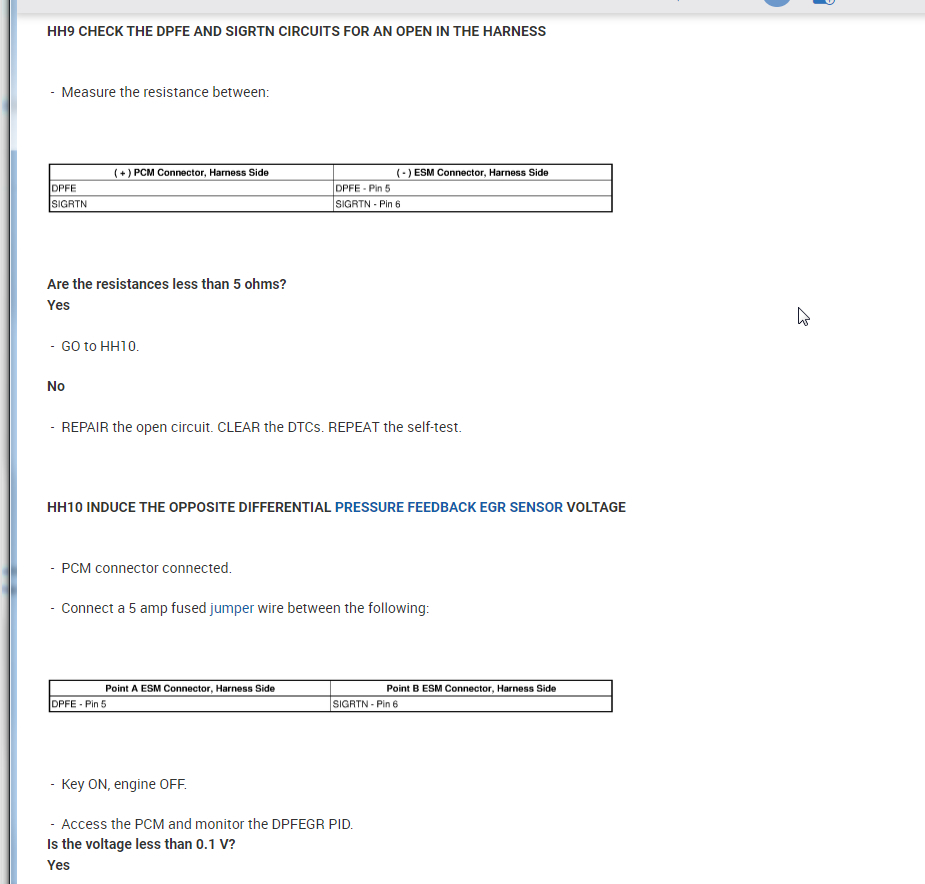
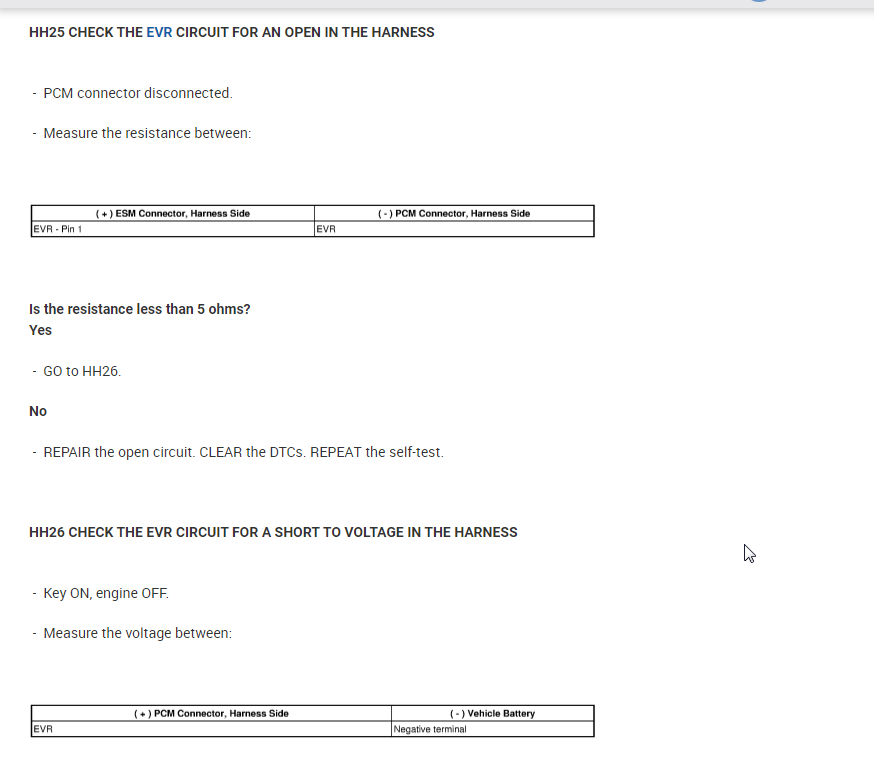
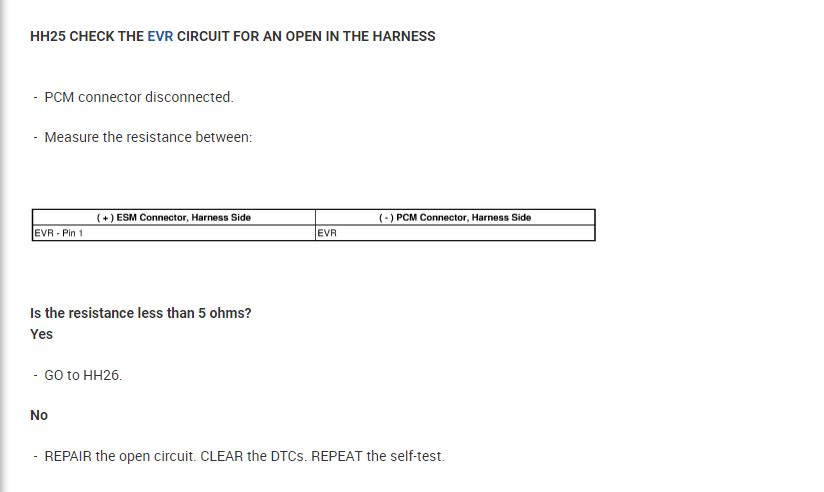
HH25 is asking you to check the harness for an open circuit. You need to disconnect the EGR Solenoid and the PCM and check resistance on that wire. The chart shows where to put your leads but basically you need to be on both ends of the wire. Let's assume it is less then 5 ohms. If not you have an open or high resistance and need to repair that wire.

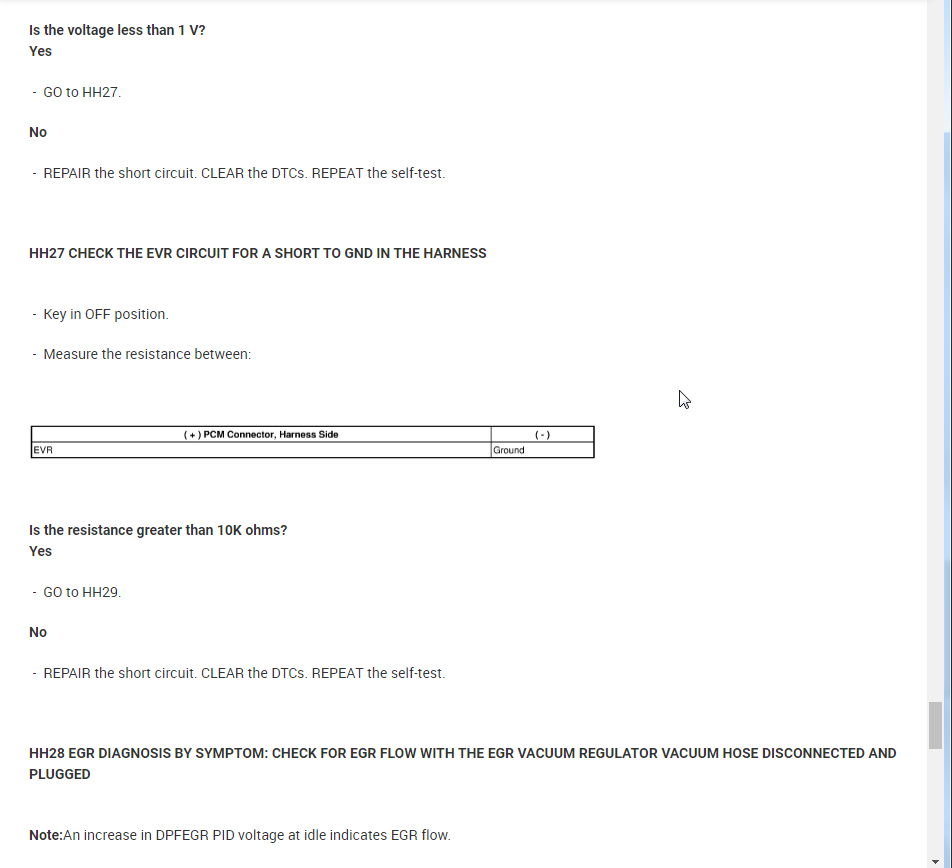
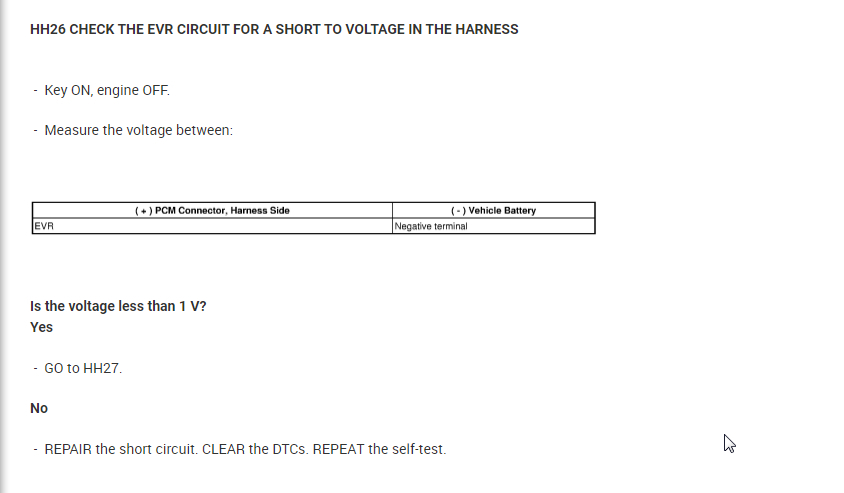
HH26 is asking to check the harness for a short to voltage. Put the leads as it says in the chart. Repair the wire if there is more the 1 volt on it.

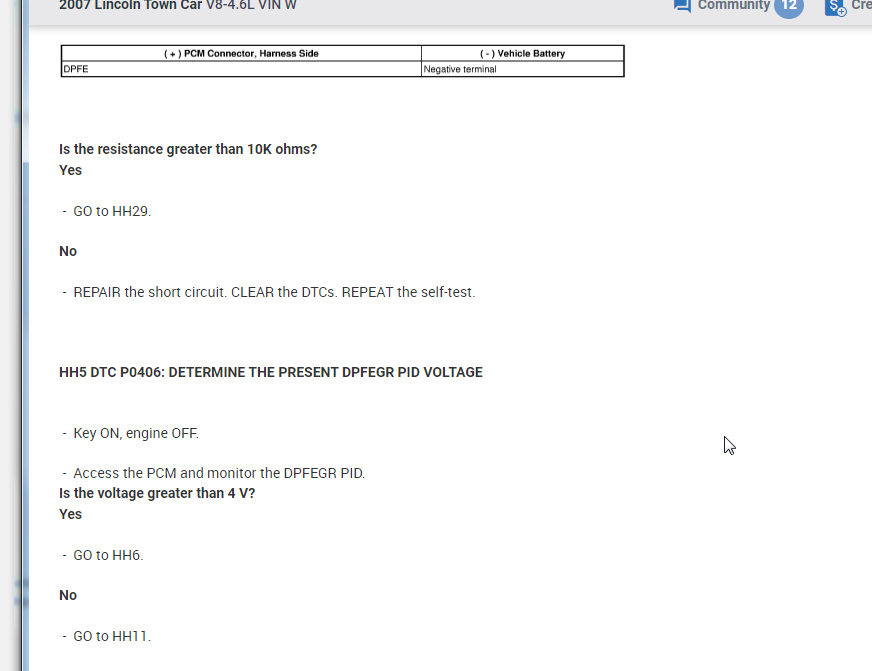
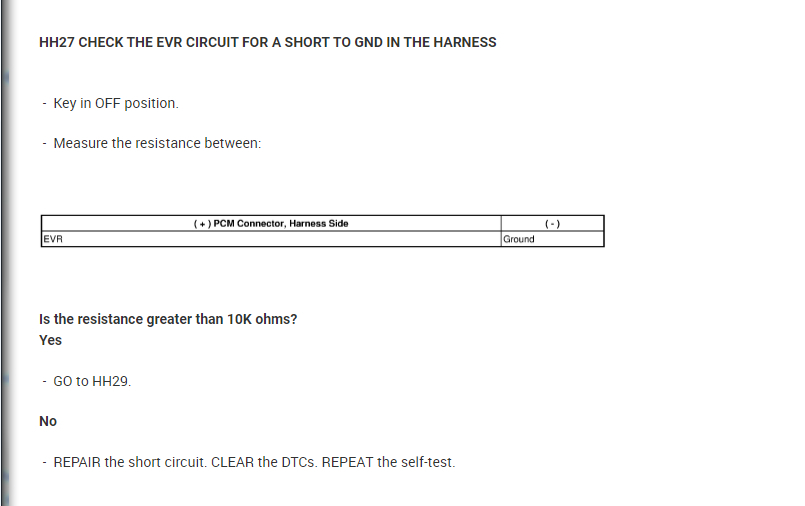
HH27 is asking to test for a short to ground. Again put your leads where it asks and do you have more then 10k ohms of resistance? If yes, then you have no continuity to ground which is good. If you do then you need to repair that wire. Proceed to HH29 if it passed.

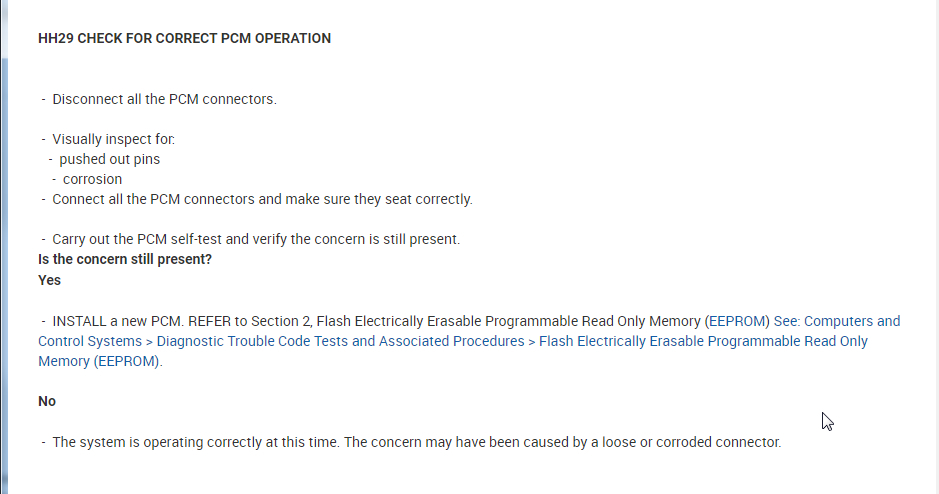
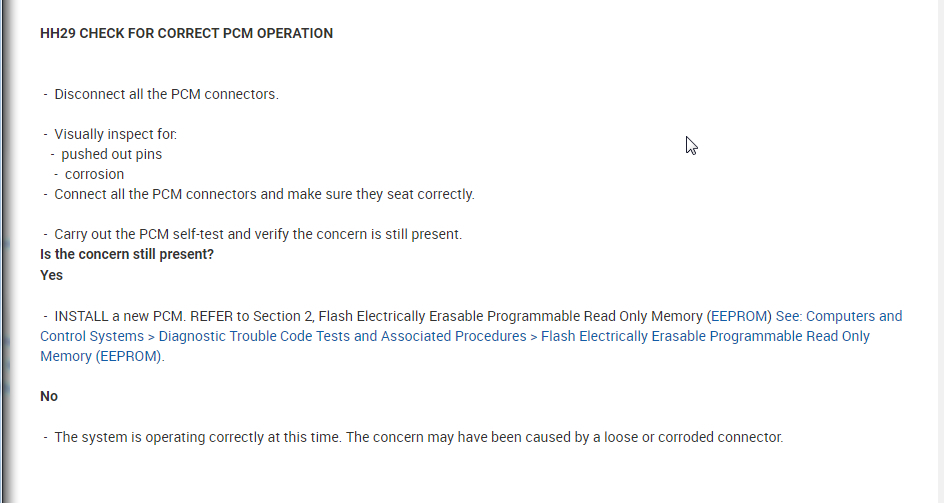
HH29 is telling you to inspect the PCM for any visual issues like corrosion or pin/terminal issues. If not, put a PCM in it.

So this means you could just replace these parts and if that does not fix it you will need to replace the wiring harness.

1. DPFE
2. EGR regulator solenoid
3. ESM
4. PCM
5. Wiring issue

Again, based on these codes I cannot just tell you what parts to replace. We must go through this testing in order to figure out what to do or your guess is as good as mine. Hopefully this helps.
Was this
answer
helpful?
Yes
No
Thursday, October 22nd, 2020 AT 1:34 PM
Tiny
BADDOG03
  • MEMBER
  • 10 POSTS
Okay, I still don't think we are on the same page. I sent you a picture of my EGR Modulator. It is a 1 piece unit. There are not separate parts to replace. As your directions are stating in your attachments. I am also having a issue with understanding what these Mean 1. DPFE,
3. ESM, 4. PCM. I need to understand what they are before I can Check them. It sure make it easier for me to understand better with a Simple Drawing than me reading all of these attachment. It just gets too Confusing for me to grasp it. I thought I explained that to you in my previous messages. Scholar or a ASE Mechanic. I do appreciate your help. I did do a few test of my own which were, I Blew Air through the vacuum hole and where the filter is on the unit. (Air passes through) I also poured Fluid in the Inlet pipe connection hole and it did not leak out. I do have a hand vacuum pump but I don't have the right size hose to do the test at this time to see if the Diaphragm opens or has a leak.I need to look into that. So I can do that test.
Was this
answer
helpful?
Yes
No
Friday, October 23rd, 2020 AT 4:21 AM
Tiny
KASEKENNY
  • MECHANIC
  • 18,907 POSTS
As I said in my response, ESM means EGR System Module. It is the assembly that you showed prior and what I attached below. Also, DPFE is part of this assembly and detailed in the attachment. So if you replaced this years ago and just replaced it again and the codes are still there, then we have one of the other issues.

I understand it is frustrating that I can't just tell you what to replace but unfortunately we need to go through the testing to know for sure what the issue is. Otherwise we can just start replacing parts and hope one of them fixes it. This gets expensive and even more frustrating. You are attempting to perform pretty heavy diagnostic work and I understand you are not a mechanic but that is just going to complicate things as there is not a basic level of understanding that is needed to do this heavy of diagnostic work.

However, let's try to simply this, if you have replaced the ESM and the codes are still there, I suspect the P0403 is the cause of this. Take a look at the third attachment. This lists the possible causes of this code. As you can see it is saying the wiring is the issue or the EGR solenoid, which is part of what you replaced, and finally a PCM (Powertrain Control Module).

This means we need to perform the wiring testing that I attached in those documents and spelled out in my response.

So we need to start at HH 22. Let's assume it passed. Go to HH23. Your reading you told me for that was 12 volts. That passes so we go to HH24. You need to take this reading. Take a look at attachment 4 of this post. You need to measure resistance between pin 1 and 4 of the connector of the ESM. So disconnect that connector and use the diagram of the connector (attachment 5) to check the resistance. What is this number from your meter?

Once we know the result here we can take the next step.
Was this
answer
helpful?
Yes
No
Friday, October 23rd, 2020 AT 7:53 AM
Tiny
BADDOG03
  • MEMBER
  • 10 POSTS
Okay, I just want to make something a little clearer. In my working years. I was a machine repair mechanic and a machinist since I was about 20 years old. I have done all kinds of auto repairs through my life. From pulling engines and installing them to brakes, radiators, mufflers, alternators, rear axles, front wheel bearing, speed control sensors, CV axles, water pumps, transmissions, welding, brazing, etc. To name a few. What I am not is a electronics, wiring type of person. I know a little and I am not ashamed to emit that. So please don't think I don't know what day it is. Electronics is my weak suit! And as I said I am not AES certified. But I can hold my own and have more knowledge than most so call mechanics. So with this electronics stuff is not really my thing. Oh and I am 66 years old and retired now. I will need some time to try some of these thing that you are asking me to do. Because the car is not here all the time. And the nights are getting shorter. Thank you for your help it is appreciated.
Was this
answer
helpful?
Yes
No
Friday, October 23rd, 2020 AT 12:29 PM
Tiny
KASEKENNY
  • MECHANIC
  • 18,907 POSTS
Sounds like you have more then enough ability to do this. Let's just go step by step and based on the results we will get it figured out. Let me know the resistance whenever you can and we will go from there. Thanks
Was this
answer
helpful?
Yes
No
Friday, October 23rd, 2020 AT 2:05 PM

Please login or register to post a reply.

Sponsored links