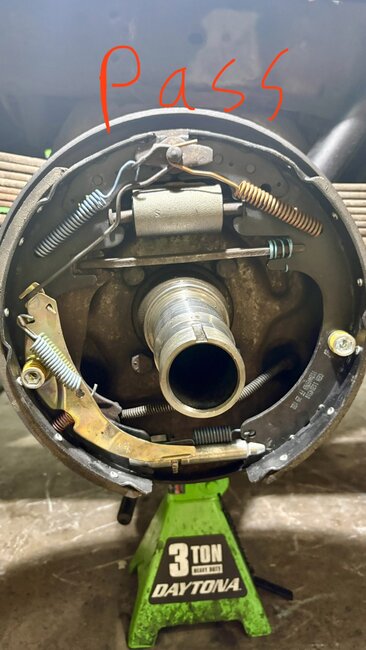
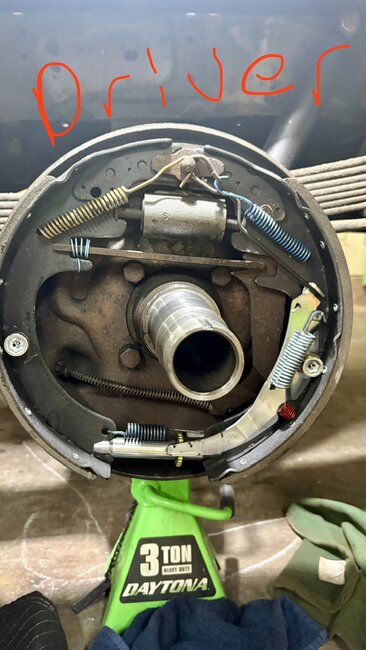
Dandy photos. Look at the parking brake lever on the right side and see how far back it is, hidden behind the rear shoe.
On the left side, it's pulled forward all the way to the fully-applied position. That's what took up the free play in the strut bar. Also notice on top, the rear, or "trailing" shoe is not touching the anchor pin on top. If you push that shoe up to that pin, you'll see the front, or "leading" shoe move away from the pin. Another sign of an applied parking brake.
I also noticed the star-wheel adjusters on both sides are turned down, or shortened almost as far as possible. Even with new shoes and new drums, they're normally adjusted out roughly a 1/4" of threads showing. With worn drums, and even more so with drums that have been machined, those adjusters will be extended a lot more. Shortening them as much as you have is in response to the tops of the shoes being held out too far. That's the only way to get the drums on.
On most vehicles there's three parking brake cables we're concerned with. Those are the two rear cables, one going into each backing plate, and the front one coming down from the parking brake pedal. There's also, at a minimum, one intermediate, or connecting cable that ties all the other three together. We don't worry about that connecting cable unless it's broken. It isn't in a casing so it can't stick. With the two rear cables, first look at the front end where the casing is snapped into a metal bracket welded to the frame. If this sticking is fairly new, right where the cable comes out of the casing, you'll see about an inch long section that's shiny, or cleaner than the rest of that cable. That shiny area shows the part that's supposed to be retracted back into the casing. Use a pry bar on the driver's side to force the parking brake lever back behind the rear shoe, to its retracted position. If you can't do that, that cable is rusted tight and must be replaced. Another clue to a rusted rear cable is if you flex the casing by hand, you'll see the parking brake lever move back and forth a little. It's doing that because the cable is not free to slide around inside the casing.
On the right side, grab that cable ahead of the casing, where it's exposed, and tug on that. What should happen is the parking brake lever gets pulled forward, then it retracts under spring pressure when you release the cable. If that movement takes place freely, that cable is okay.
If you're able to pry the left lever back to its retracted position, look at the right lever now. If it is still retracted, as in your photo, the intermediate cable was likely drooping, and now it's tight. More likely, if forcing the left lever back causes the right lever to move forward, there's too much tension on those cables. Either the front cable is sticking, in which case the parking brake pedal would not retract on its own, or the cable adjustment is too tight.
The cable coming down from the parking brake pedal can become tight too. The only thing pulling it up is the four brake shoe return springs. Check that front cable by working the pedal. If it doesn't return, have a helper hold up on the release lever while you work the cable from underneath.
If all the cables appear to be working freely, but the pedal doesn't return completely, the shoe return springs may be weak. All of the hardware comes as a complete kit for both wheels. You'll usually have springs left over. There will be two or three variations for some applications. Use the replacement springs of the same color. Those colors denote the springs' tension. With those extra springs, one kit covers a number of different variations such as drum diameter and body type, (truck, station wagon, sedan, etc.).
Another common complaint when the parking brake cable is sticking is extremely easy rear wheel lockup and tire skidding under rather light brake pedal pressure. The rear brake doesn't apply smoothly and gradually like it should.
For the benefit of others researching this topic, another common mistake has to do with where each shoe is installed. In most cases the right and left pairs will be identical, but the leading and trailing shoes are different. The leading shoe has a shorter lining. It's only job, when driving forward, is to grab the drum and try to rotate with it. As it does, it pushes on the star-wheel adjuster which pushes the bottom of the rear shoe into the drum. At the same time, the piston on the wheel cylinder pushes the top of the rear shoe into the drum. This common setup is called a "duo-servo" design. Two forces are pushing the rear shoe into the drum. That rear shoe does almost all of the stopping, so it has a longer lining. The common mistakes are someone will pair up the identical shorter linings and put them on one side, and the two with longer linings on the other side. That can cause an elusive brake pull. Another mistake is to put both longer linings on the front in the misguided thought they do more of the stopping. In fact, the shorter linings on the rear will wear out very quickly. In your photos, you can see the length difference in the linings at the top. You have the shoes installed correctly.
One notable exception to the shoes being identical has to do with older rear-wheel-drive Chrysler vehicles. They used a pin for the self-adjuster lever that had to be tapped into each rear shoe. If you had to install the pins provided, the two rear shoes were identical. If the new shoes came with those pins already pressed in, you had to put them on the proper sides.
Another common exception, before someone gets excited, is a lot of smaller cars do not use this duo-servo design. They often have a fixed anchor at the bottom of the backing plate. Going forward, only the leading shoe does the stopping. The trailing shoe sees very little wear as it only does its thing when backing up. The nice thing with these is the leading and trailing shoes are usually identical. When the leading shoes are almost worn out, the two shoes on each side can be switched to get double the life out of the set.
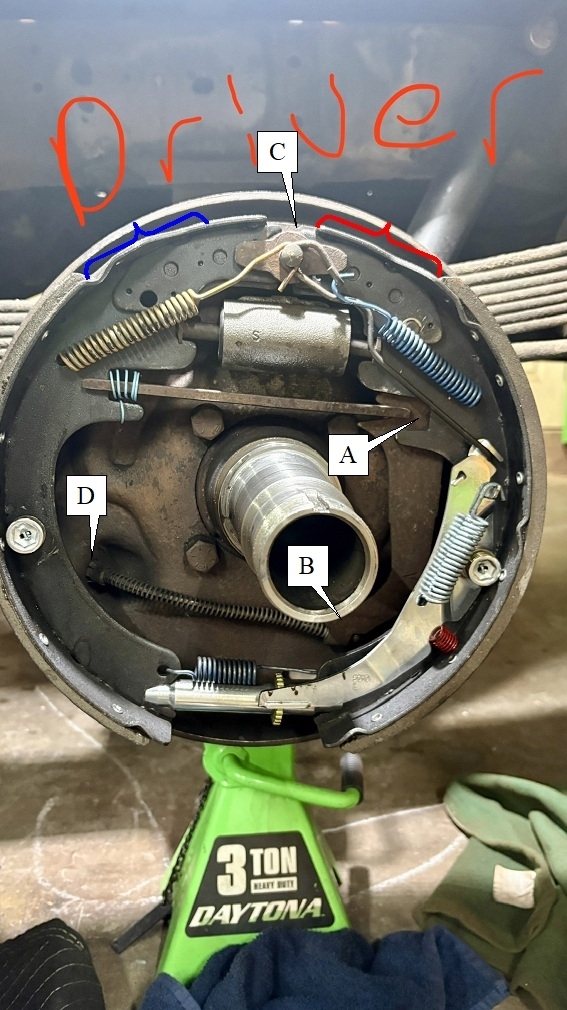
To add to the excitement, I added some callouts to your left photo to help me explain this better. If it's too difficult to see, copy and paste it into a typing program where it can be expanded. I use MS Word for this.
"A" shows the gap between the end of the strut bar and the frame of the rear shoe. It's much larger on the left brake, indicating that parking brake is applied.
"B" shows the same condition. The lever is pulled as far forward as possible.
"C" shows where the rear shoe hasn't retracted back to the anchor pin. They can't move out any further on top, so under hard braking, the bottoms of the shoes get pushed out which activates the self-adjuster. That makes that brake self-adjust up too high until the shoes are dragging.
I added "D" in case you need to replace a cable. There's three or four tangs that must be squeezed in to let the cable be pulled out of the backing plate. If the cable is being replaced, it's faster and easier to just bend those tangs to break them off. To access those in back, use a pair of pliers behind the backing plate to rotate the casing until you can get to them.
The red and blue brackets at the top are the same length. The red one shows how much shorter that lining is on the shoe toward the front of the truck, (leading shoe).
Let me know what you find with these cables. The rest of the job looks fine.
Dec 20, 2025 at 5:01 PM