Hi,
It does sound like something is loose. Have you checked to make sure the connection at the headlight switch is good? It could also be the switch itself going bad. The next time they don't work, play around with the switch to see if you can get them to turn on. If they do, then replace the switch.
If you want, I have the diagnostic flow chart for testing the switch. It is a little involved, but if you want it, let me know.
Here are directions for removal and replacement of the switch. The attached pictures correlate with the directions.
___________________________________________________________
2012 Dodge or Ram Truck Durango 4WD V6-3.6L
Headlamp Switch - Removal
Vehicle Sensors and Switches Sensors and Switches - Lighting and Horns Headlamp Switch Service and Repair Removal and Replacement Headlamp Switch - Removal
HEADLAMP SWITCH - REMOVAL
REMOVAL
WARNING: To avoid serious or fatal injury on vehicles equipped with airbags, disable the Supplemental Restraint System (SRS) before attempting any steering wheel, steering column, airbag, seat belt tensioner, impact sensor or instrument panel component diagnosis or service. Disconnect and isolate the battery negative (ground) cable, then wait two minutes for the system capacitor to discharge before performing further diagnosis or service. This is the only sure way to disable the SRS. Failure to take the proper precautions could result in accidental airbag deployment.
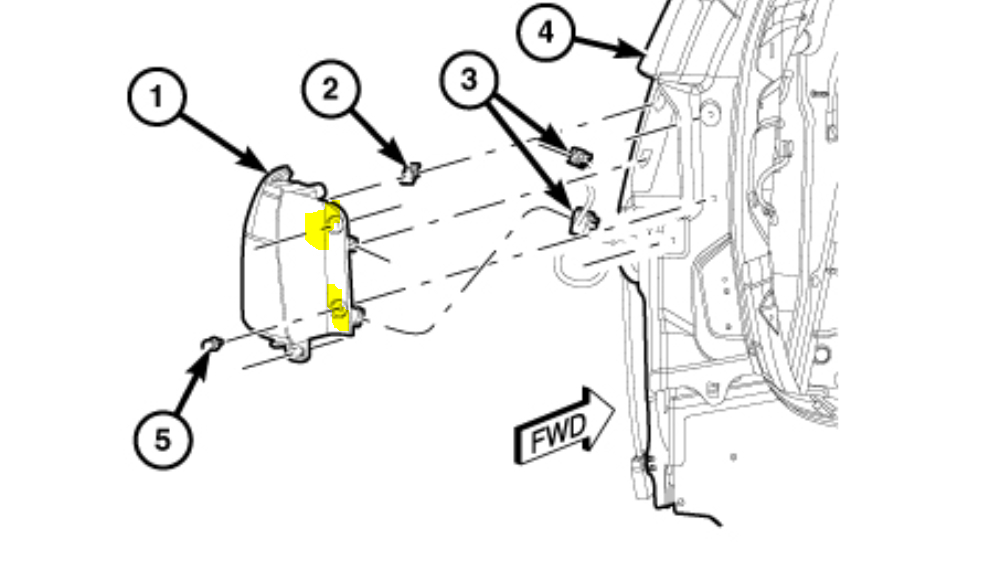
Pic 1
1. Disconnect and isolate the battery negative cable.
2. Place the headlamp switch (1) rotary knob (4) in the OFF (O) position.
3. Push in on the rotary knob to engage the switch retainer (2) retractor mechanism.
4. Still holding the switch rotary knob depressed, rotate the knob clockwise toward the park lamps ON position to retract the two switch retainers. The retainers will be fully retracted before the rotary knob actually reaches the park lamps ON position.
5. With the switch rotary knob still in the retainer retractor position, pull the switch out of the cylinder-like mounting hole far enough to access and disconnect the instrument panel wire harness connector from the connector receptacle (3) on the back of the switch housing.
6. Remove the headlamp switch from the instrument panel.
__________________________________________________________-
2012 Dodge or Ram Truck Durango 4WD V6-3.6L
Headlamp Switch - Installation
Vehicle Sensors and Switches Sensors and Switches - Lighting and Horns Headlamp Switch Service and Repair Removal and Replacement Headlamp Switch - Installation
HEADLAMP SWITCH - INSTALLATION
INSTALLATION
WARNING: To avoid serious or fatal injury on vehicles equipped with airbags, disable the Supplemental Restraint System (SRS) before attempting any steering wheel, steering column, airbag, seat belt tensioner, impact sensor or instrument panel component diagnosis or service. Disconnect and isolate the battery negative (ground) cable, then wait two minutes for the system capacitor to discharge before performing further diagnosis or service. This is the only sure way to disable the SRS. Failure to take the proper precautions could result in accidental airbag deployment.
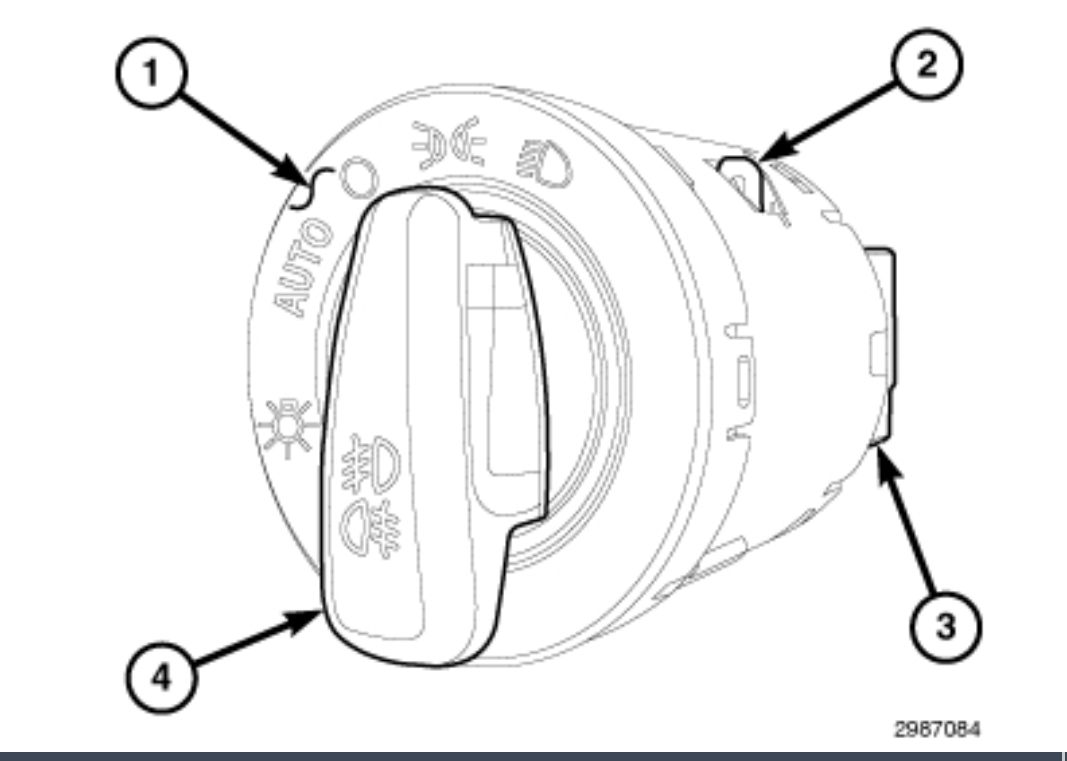
Pic 2
NOTE: Before attempting to install the headlamp switch (1), be certain that both pawl-like retainers (2) are extended outward from the body of the switch. If the retainers are in the retracted position, rotating the headlamp switch rotary knob (4) to the OFF (O) position should disengage the retainer retractor mechanism causing the retainers to spring outward from the switch body.
1. Position the headlamp switch (1) close enough to the cylinder-like switch mounting hole in the instrument panel to reconnect the instrument panel wire harness connector to the connector receptacle (3) on the back of the switch housing.
2. Position and align the switch in the center of the switch mounting hole of the instrument panel.
3. Using hand pressure, press the switch firmly and evenly into the mounting hole until it is fully seated. An indication that the switch is fully seated will be a light audible click as each of the two pawl-like retainers (2) snap into place within the mounting hole.
4. Reconnect the battery negative cable.
___________________________________
Let me know if you want the chart.
Take care,
Joe
Images (Click to make bigger)
Monday, December 30th, 2019 AT 10:35 PM