Good evening,
Do you have any idea about the location?
You need to do a pressure test to determine the failure. THis video will help
https://youtu.be/W8kra65m15c
and
https://www.2carpros.com/articles/radiator-pressure-test
and
https://www.2carpros.com/articles/car-is-leaking-coolant
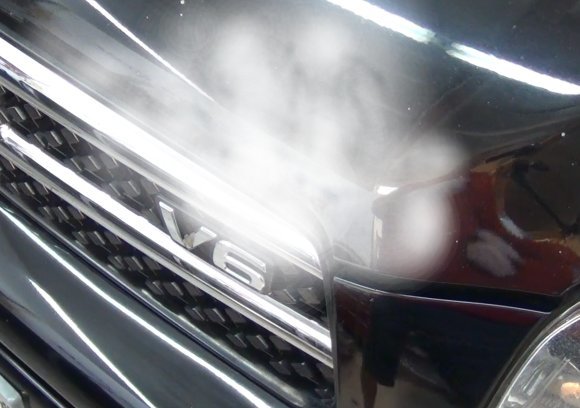
Can you upload a picture of the area?
Roy
Engine Cooling
Component Tests
Cooling System Pressure Test
WARNING: Always allow the engine to cool before opening the cooling system. Do not unscrew the coolant pressure relief cap when the engine is operating or the cooling system is hot. The cooling system is under pressure; steam and hot liquid can come out forcefully when the cap is loosened slightly. Failure to follow these instructions may result in serious personal injury.
NOTE: Vehicles have the pressure relief cap on the degas bottle and no radiator cap.
1. Turn the engine OFF.
2. Check the engine coolant level. Adjust the coolant level as necessary.
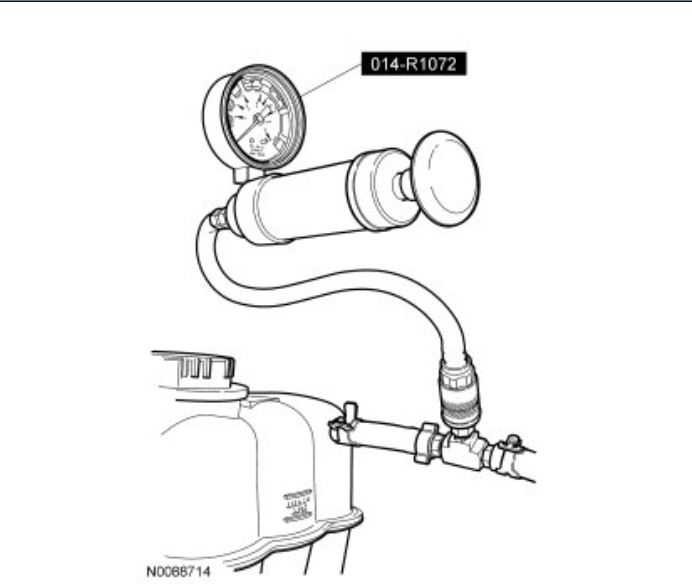
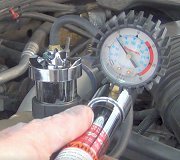
3. Attach the Pressure Tester to the degas bottle nipple and overflow hose. Install a pressure test pump to the quick connect fitting of the test adapter.
imageOpen In New TabZoom/Print
4. NOTICE: Do not pressurize the cooling system beyond the maximum pressure listed in the specifications table or cooling system components may be damaged.
NOTE: If the plunger of the pressure tester is pressed too fast, an erroneous pressure reading will result.
Slowly press the plunger of the pressure test pump until the pressure gauge reading stops increasing and note the highest pressure reading obtained. If the pressure reading exceeds the maximum cap pressure listed in the specifications table, install a new pressure relief cap.
5. If the system does not hold pressure, remove the pressure relief cap and wash in clean water to dislodge all the foreign material from the gasket. Check the sealing surface in the filler neck of the degas bottle for nicks or cuts. Install the pressure relief cap.
6. Pressurize the engine cooling system as described in Step 4 above. Observe the gauge reading for approximately 2 minutes. Pressure should not drop during this time. If the pressure drops within this time, inspect for leaks and repair as necessary.
7. If no leaks are found and the pressure drops. the pressure relief cap may be leaking. Install a new pressure relief cap and retest the system.
8. If no leaks are found after a new pressure relief cap is installed, and the pressure drops, the leak may be internal to the engine. Inspect the coolant for engine oil and the engine oil for coolant. See: Engine > Testing and Inspection to diagnose the engine.
9. Release the system pressure by loosening the pressure relief cap. Check the coolant level and adjust as necessary.
Thermostat
Install a new thermostat only after the following tests and checks have been carried out:
Pinpoint Test A, B or C
Thermostat Visual Inspection
Thermostat Visual Inspection
1. Remove the thermostat.
2. Examine the thermostat for signs of damage including:
Valve not fully seated (light visible through the valve)
Foreign material lodged in the main valve
Bent or broken frame or flange
Bent or broken spring
Bent or broken valve or valve stem
Wax leaking from wax reservoir or a bulge in the reservoir
Any other damage or distortion
3. NOTE: If no damage is found during the inspection, do not attempt to open the thermostat using hot water or other heat sources. This method is not an accurate means to test the function of the thermostat and may damage the thermostat.
If damage is found during the inspection, remove any foreign material or broken pieces and install a new thermostat.
4. If no damage is found during the inspection, continue troubleshooting the system concern. Go to the Symptom Chart for further instructions. See: Cooling System > Symptom Related Diagnostic Procedures > Engine Cooling
Radiator Leak Test, Removed From Vehicle
NOTICE: Never leak test an aluminum radiator in the same water that copper/brass radiators are tested in. Flux and caustic cleaners may be present in the cleaning tank and they will damage aluminum radiators.
NOTE: Clean the radiator before leak testing to avoid contamination of tank.
1. Leak test the radiator in clean water with air pressurized to the maximum pressure listed in the Specifications.
Images (Click to make bigger)
Sunday, January 19th, 2020 AT 5:44 PM