Brake pedal very low?

Tiny
GOOD2NANA
  • MEMBER
  • 2005 DODGE NEON
  • 4 CYL
  • AWD
  • MANUAL
  • 55,000 MILES
What can cause my brake pedal to go to the floor?
Do you
have the same problem?
Yes
No
Thursday, January 22nd, 2009 AT 6:57 PM

16 Replies

Tiny
JACOBANDNICKOLAS
  • MECHANIC
  • 108,005 POSTS
Hi,

Either a leak in the system or a bad brake master cylinder can cause this. First, take a look through this link:

https://www.2carpros.com/articles/brake-pedal-goes-to-the-floor

The first thing to check is the brake fluid level. If it is low, check under the vehicle to see if there are any leaks. If there are none, the master cylinder is likely the issue.

Here is a link that shows in general how to replace a brake master cylinder. You can use this as a guide.

https://www.2carpros.com/articles/how-to-replace-a-brake-master-cylinder

Here are the directions specific to your vehicle. The pics below correlate with the directions. Note that the new master cylinder will need to be bled. I will start with those directions and then provide the removal and replacement directions.

__________________________________

2005 Dodge Neon L4-2.0L VIN C
Master Cylinder Bleeding Procedure
Vehicle Brakes and Traction Control Hydraulic System Brake Master Cylinder Service and Repair Procedures Master Cylinder Bleeding Procedure
MASTER CYLINDER BLEEDING PROCEDURE
STANDARD PROCEDURE - MASTER CYLINDER BLEEDING
1. Clamp the master cylinder in a vise.
2. Refer to one of the following depending on whether the master cylinder is a non-ABS unit Step a: or an ABS unit Step b:

pic 1

a. Attach four Master Cylinder Bleed Tubes, Special Tool 8358-1, to the four ports of the master cylinder and tighten each in place (Fig. 92). The bleed tubes for the ports pertaining to the rear brakes are made to attach to the proportioning valves screwed into the master cylinder. Position the other end of the tubes into the master cylinder reservoir so their outlets are below the surface of the brake fluid in the reservoir when filled.

pic 2

b. Attach Master Cylinder Bleed Tube, Special Tool 8358-1, to the primary port of the master cylinder and tighten in place (Fig. 93). Attach Master Cylinder Bleed Tube, Special Tool 8358-2, to the secondary port of the master cylinder and tighten in place. Position the other end of the tubes into the master cylinder reservoir so their outlets are below the surface of the brake fluid in the reservoir when filled.
3. Fill the brake fluid reservoir with fresh Mopar brake fluid, or equivalent conforming to DOT 3 specifications.
4. Using a wooden dowel as a pushrod (Fig. 92) (Fig. 93), press the pistons inward slowly applying brake pressure, then release the pressure, allowing the pistons to return to the released position. Repeat this several times until all air bubbles are expelled out of the tubes and master cylinder bore.
5. Remove the bleed tubes from the master cylinder and plug the outlet ports.
6. Install the fill cap on the reservoir.
7. Remove the master cylinder from the vise.

_____________________

Install

2005 Dodge Neon L4-2.0L VIN C
Lhd Without ABS
Vehicle Brakes and Traction Control Hydraulic System Brake Master Cylinder Service and Repair Procedures Master Cylinder Removal and Installation Installation Lhd Without ABS
LHD WITHOUT ABS
INSTALLATION - LHD WITHOUT ABS

NOTE: The master cylinder must be bled before installing it on the vehicle.

1. If removed, install the proportioning valves in their master cylinder ports. The valves are identical, so they can be installed in either master cylinder port going to the rear brakes. Make sure the O-rings on the proportioning valves are new.
2. Bleed the master cylinder before installing it on the vehicle.
3. Inspect and wipe clean the O-ring vacuum seal on the master cylinder rear mounting flange to ensure a good vacuum seal once installation is complete. Replace as necessary.
4. Wipe the face of the power brake booster clean where the master cylinder seal comes in contact when it's installed. Do not get any cleaner or debris inside the booster.
5. Position the master cylinder on the studs of the power brake booster, aligning the push rod of the power brake booster with master cylinder piston push rod. Carefully push the master cylinder onto the studs until it contacts the face of the booster.
6. Install the two master cylinder mounting nuts and tighten each to a torque of 18 Nm (160 inch lbs.).

pic 3

7. Connect the four brake tubes to the master cylinder and proportioning valve ports (Fig. 96). Tighten all tube nuts to a torque of 17 Nm (145 inch lbs.).
8. Connect the brake fluid level switch wiring connector.
9. Install the battery and clamp it in place.
10. Connect the positive, then the negative (ground) cable on the battery.
11. Fill the master cylinder to the proper level.
12. Pump the brake pedal several times, then check brake fluid level in master cylinder reservoir. Adjust brake fluid level as necessary.

CAUTION: It will be necessary to bleed the entire base hydraulic system if the brake system has been open to air for an excessive amount of time or air is present in the lines.

13. Check for leaks.
14. Road test the vehicle to ensure proper operation of the brakes.

__________________

I hope this helps. Let me know if you have other questions.

Take care and God Bless,

Joe
Was this
answer
helpful?
Yes
No
Friday, March 5th, 2021 AT 11:14 PM
Tiny
JULIE HOWIE
  • MEMBER
  • 2 POSTS
  • 2000 DODGE NEON
  • 4 CYL
  • AUTOMATIC
  • 100,000 MILES
We just changed the rear wheel bearings and went for a ride and the brake pedal goes all the way to the floor and no brakes. What went wrong?
Was this
answer
helpful?
Yes
No
Thursday, March 11th, 2021 AT 1:55 PM (Merged)
Tiny
CARADIODOC
  • MECHANIC
  • 33,699 POSTS
I would suspect there is air in the lines. These guides can help you fix it.

https://youtu.be/w7gUsj2us0U

and

https://youtu.be/WDxvEQrMkBg

and

https://www.2carpros.com/articles/brake-pedal-goes-to-the-floor

Please run down these guides and report back.
Was this
answer
helpful?
Yes
No
Thursday, March 11th, 2021 AT 1:55 PM (Merged)
Tiny
CARADIODOC
  • MECHANIC
  • 33,699 POSTS
Possibly something was reassembled incorrectly, but my best guess is the shoes were too far out-of-adjustment. They will eventually self-adjust, but there is a problem that can show up on any car over about a year old. Because the shoes have to travel so far to contact the drums, you have to push the brake pedal much further than normal. Crud and corrosion build up in the lower halves of the bores in the master cylinder where the pistons don't normally travel. The first time you push the brake pedal further than normal, you run the rubber lip seals over that crud and they are likely to be torn. That results in internal leakage which often takes two or three days to show up. It can start out as a slowly-sinking brake pedal, but more often / eventually the brake fluid bypasses those seals so no brake fluid is being pushed. The fix for that is a rebuilt master cylinder and to adjust the shoes.

This problem will not occur with a master cylinder that is less than about a year old because that corrosion hasn't formed yet. When professionals do anything related to the brakes, like bleeding the system or replacing parts, they never push the brake pedal more than about halfway to the floor.
Was this
answer
helpful?
Yes
No
+1
Thursday, March 11th, 2021 AT 1:55 PM (Merged)
Tiny
JULIE HOWIE
  • MEMBER
  • 2 POSTS
Okay, thank you.
Was this
answer
helpful?
Yes
No
Thursday, March 11th, 2021 AT 1:55 PM (Merged)
Tiny
LNOSKA
  • MEMBER
  • 1 POST
  • 1999 DODGE NEON
Brakes problem
1999 Dodge Neon 4 cyl Front Wheel Drive Automatic 105k miles

I have just changed all 4 wheel brake cylindersand master brake cylinder but still cannot get any pedal. I have bled all wheels and cannot figure out why the power brakes don't work?

I have good brake fluid level and have all of the air out of the system but still nothing.
Was this
answer
helpful?
Yes
No
Thursday, March 11th, 2021 AT 1:57 PM (Merged)
Tiny
AUTOZONEBRAKESEXPERT
  • MECHANIC
  • 47 POSTS
Hi, I'm Randy. I reviewed your question, and wanted to provide information that might help.

If it still seems to take a long time to stop the car when applying the brakes, where you have to push the pedal down hard to come to a complete stop:
* This condition is often due to †brake fade, ’ which occurs when the linings become too hot. It may be caused by linings that are too thin or brakes that are overworked.
* This condition may also be caused by air in the hydraulic system, a fluid leak in master cylinder, a hose or line leak in system, and/or if the brakes misadjusted.
* This may also be an indication that the rear (or front) brakes that are not operating as designed. This requires the front brakes to work harder resulting in overheating and longer stopping distances.

Thank you for the opportunity to discuss your question. Please let me know if you have any further questions.
Was this
answer
helpful?
Yes
No
Thursday, March 11th, 2021 AT 1:57 PM (Merged)
Tiny
LUVMYHOSS
  • MEMBER
  • 1 POST
  • 1997 DODGE NEON
  • 98,000 MILES
I purchased a 1997 Dodge Neon. I put 2 new tires (they put them on the rear) new struts, tie end rods then 2 new front calipers & brake pads. Then a new master cylinder. I have no brakes. I've torn my ACL it feel like, pumping the brakes while my x husband bleeds all 4 tires, starting at the rear right. The rear right brake won't release all the way to the floor or the front driver's side, when I would pump 3 times then hold the brake peddle. I've already returned 1 new driver's side caliper, thought maybe I was sold a bad one but it's the same. 50% braking power. What can I do? My X husband is a mechanic. He has a vacuune pump for the bleeding but keeps making excuses. Should I pay a mechanic to try to fix my brakes or is it a simple fix? If I have to bleed the brakes 1 more time I think I'll scream.
But the car is getting 30-34 MPG!
Was this
answer
helpful?
Yes
No
Thursday, March 11th, 2021 AT 1:57 PM (Merged)
Tiny
KHLOW2008
  • MECHANIC
  • 41,815 POSTS
Check the brake pedal to booster push rod adjustment. There should be minimal free play. If the push rod is not correctly adjusted, brake fluid cannot return therefore you are not able to bleed the system correctly. If vehicle is equipped with ABS, the modulator might need attention.

The brake pedal not releasing to the floor means the wheel that you are bleeding are the onnes causing the problem.
Was this
answer
helpful?
Yes
No
Thursday, March 11th, 2021 AT 1:57 PM (Merged)
Tiny
SANDRAMILLS
  • MEMBER
  • 3 POSTS
  • 1997 DODGE NEON
  • 4 CYL
  • FWD
  • MANUAL
  • 231,000 MILES
I changed the front brake pads. Now, when I step on the pedal, it goes all the way to the floor. Car does stop abruptly, but slowly. This was not a problem before I changed the pads. Any reason why it does this? Thank you.
Was this
answer
helpful?
Yes
No
Thursday, March 11th, 2021 AT 1:57 PM (Merged)
Tiny
LEGITIMATE007
  • MECHANIC
  • 5,121 POSTS
I think you have air in the system, did you let your brake fluid level get a little low at one point before you filled it up? Also, when you change your pads, before you drive the car you should pump your brakes until they get hard again, because, remember, you pushed the piston in when you changed them so that you could get them on the rotor again.
Was this
answer
helpful?
Yes
No
+1
Thursday, March 11th, 2021 AT 1:57 PM (Merged)
Tiny
SANDRAMILLS
  • MEMBER
  • 3 POSTS
Thank you for the response. I did pump the brakes. Quite a bit. And they are still going all the way to the floor. I do not recall ever having the fluid level low, then filling it. Should I just bleed the system to see if that helps?
Was this
answer
helpful?
Yes
No
Thursday, March 11th, 2021 AT 1:57 PM (Merged)
Tiny
LEGITIMATE007
  • MECHANIC
  • 5,121 POSTS
Yes I suggest that you do. Atleast we can rule that out. Be sure that you dont have a pinhole leak in your brake line too.
Was this
answer
helpful?
Yes
No
+1
Thursday, March 11th, 2021 AT 1:57 PM (Merged)
Tiny
CARADIODOC
  • MECHANIC
  • 33,699 POSTS
REAL common problem would not happen to most professionals with proper training.

You had to push the pistons into the calipers to make room for the new thicker pads. You pushed brake fluid back up to the reservoir, so the level never went low. (This is also why professionals never add brake fluid if it's low when they check fluids as part of an oil change. There needs to be room left in the reservoir for that fluid).

After service, you pumped the pedal to push the pistons back out so the pads contacted the rotors. When you pushed the pedal all the way to the floor, you ran the two lip seals through the lower half of their bores where all the crud and corrosion builds up. They don't normally travel through that area. By doing so, the seals were ripped, so now the fluid is leaking internally. The only fix is a new or rebuilt master cylinder.

With a new master cylinder, you CAN push the pedal to the floor without doing any damage because no corrosion has built up yet. There is a very simple trick I show my students that allows you to not have to bleed the hydraulic system at the wheels. You might want to bleed some of the old moisture-laden fluid out anyway, but you can still do that without pushing a bunch of air through the lines.

Next time you replace pads, never push the brake pedal down more than half way to the floor. If you want to replace the master cylinder yourself, holler back and I'll share my secret that can make it a 20 minute job.

Caradiodoc
Was this
answer
helpful?
Yes
No
+2
Thursday, March 11th, 2021 AT 1:57 PM (Merged)
Tiny
SANDRAMILLS
  • MEMBER
  • 3 POSTS
Well I bled the system and I still have the problem. Pedal goes to the floor and car has very, very little braking power. I will replace the master cylinder per caradiodoc's suggestion. How do I make that a 20 minute job? Should I buy a new master cylinder? Or pick one up from the junk yard? I really have no mechanical experience so I would not want to attempt to rebuild one. Although, I am good at reading instructios and could probably do it. I assume it is cheaper? Thank you!
Was this
answer
helpful?
Yes
No
Thursday, March 11th, 2021 AT 1:57 PM (Merged)
Tiny
CARADIODOC
  • MECHANIC
  • 33,699 POSTS
Don't waste your money on a used master cylinder because you don't know its history. Any of a number of things could have damaged it the same way as your old one. Removing front calipers, disconnecting the power booster, or anything else that allowed the pedal to go down too far could damage the seals. If a cover was left loose, moisture would be drawn into the fluid increasing the corrosion and likelihood of seal damage. Sometimes people taking a car to the junkyard purposely damage things. One way to destroy EVERY part in the hydraulic system that has rubber parts is to add just a little petroleum product to the fluid. Evidence of this is the rubber seals under the caps ballooning up so you can't reinstall the caps. Also, if someone removed a part from the hydraulic system, the fluid would have drained out. The dry seals will deteriorate very quickly and will wear out from rubbing on the dry surface in the master cylinder bore.

Also, in quite a few cases, the rebuild kit costs more than the rebuilt unit with a warranty. When you do rebuild a master cylinder, you will notice that these are made from aluminum to lessen vehicle weight. To prevent rapid wear and corrosion, the complete body and bore is protected with an anodized coating, usually light blue. You must absolutely not scratch this coating in the bore. That means no cylinder hones, sandpaper, or picks like we used to use on older cast iron master cylinders in the past. Cleaning chemicals and lint-free rags are the only things allowed in the bore.

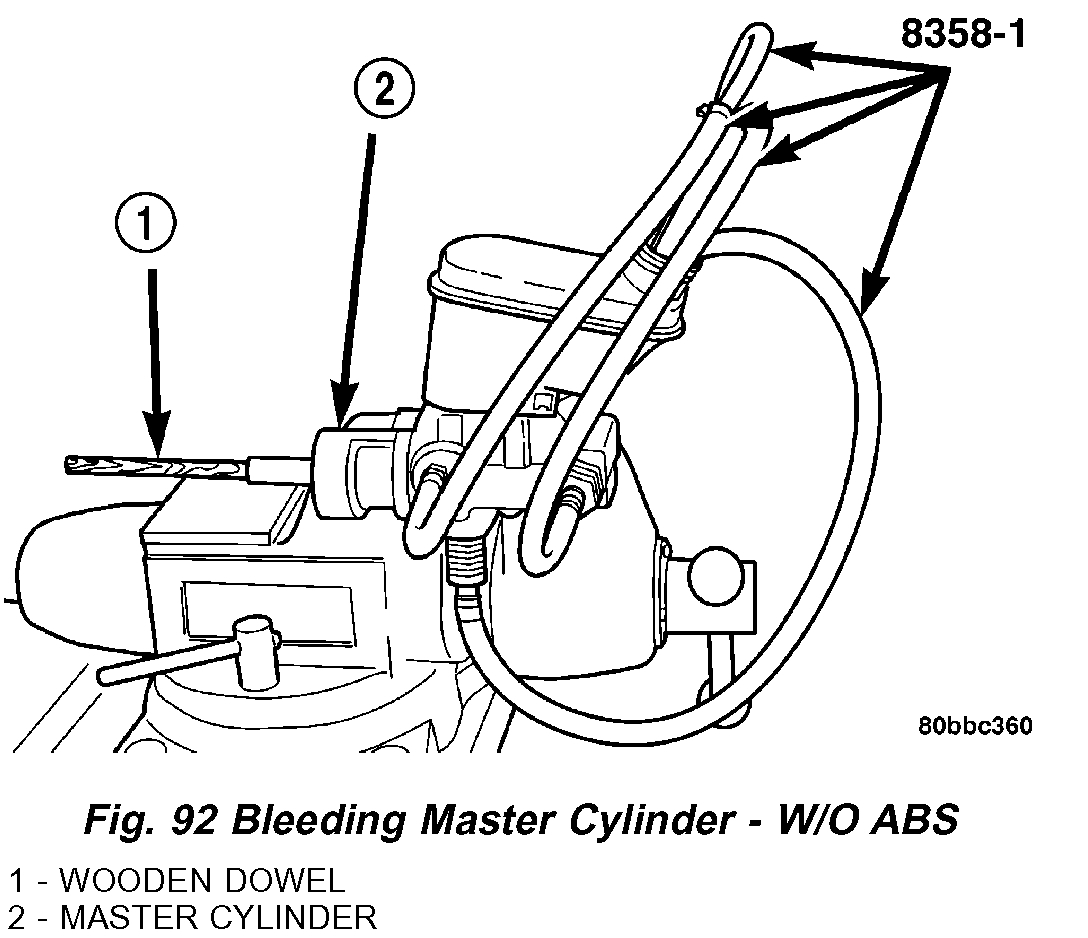
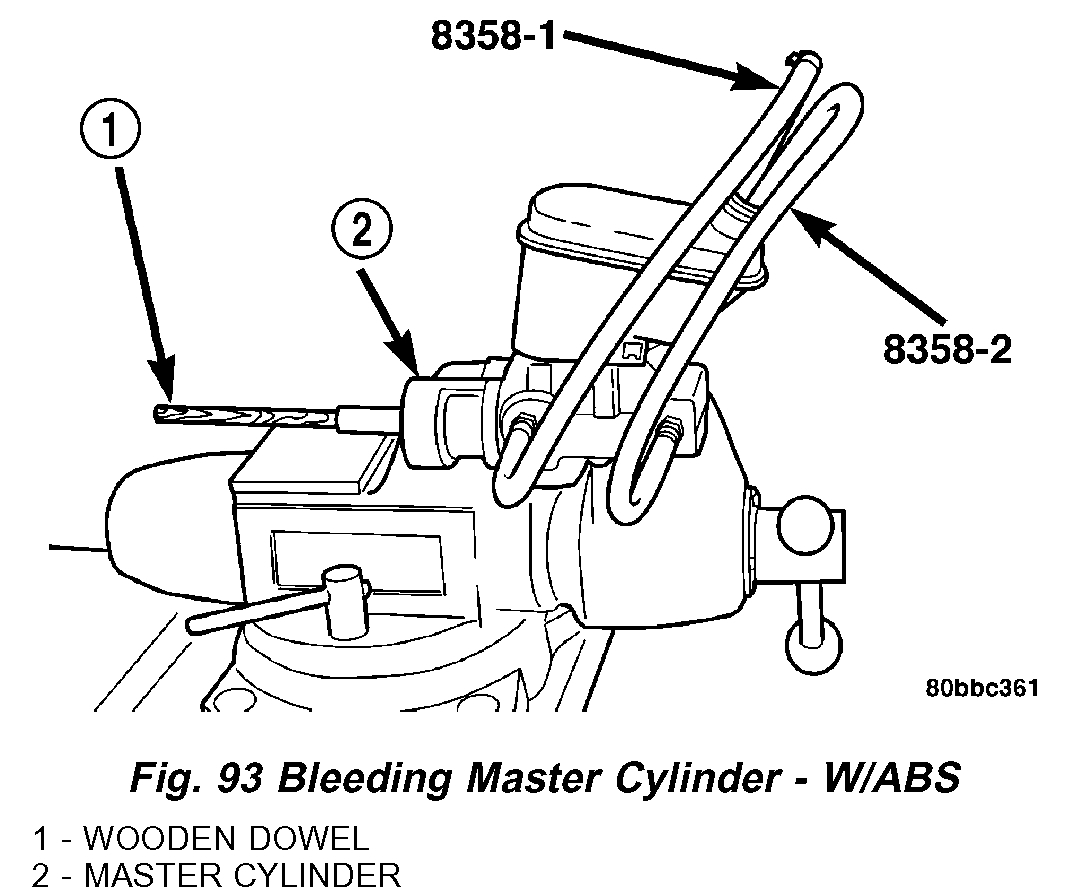
Regardless of whether you rebuild your old master cylinder or buy a rebuilt unit, be sure you understand how to bench bleed it before you install it. Most come with the bleeding kit which consists of two short hoses, the two proper fittings, and instructions. Some fittings, (with holes on the sides of the outlet nipple), form check valves that prevent fluid from flowing back in the port when you release the piston. If the holes are on the ends of the fittings, like most are, you will need to push the piston in with a stick or screwdriver, then pinch the hoses when you release the piston, to prevent just moving air back and forth as you stroke the piston.

You will never get rid of all the air during bench bleeding because a little sneaks back in by the threads of the fittings when you release the piston. A little fluid will seep out there too. Not much you can do about that. It's a messy job. In this case, you CAN push the piston all the way in without damaging the seals because there is no corrosion in there yet.

Leave the hoses connected and pinched off as you install the unit on the car. This will reduce dripping. Brake fluid will damage paint so wash any off right away if it gets on the body.

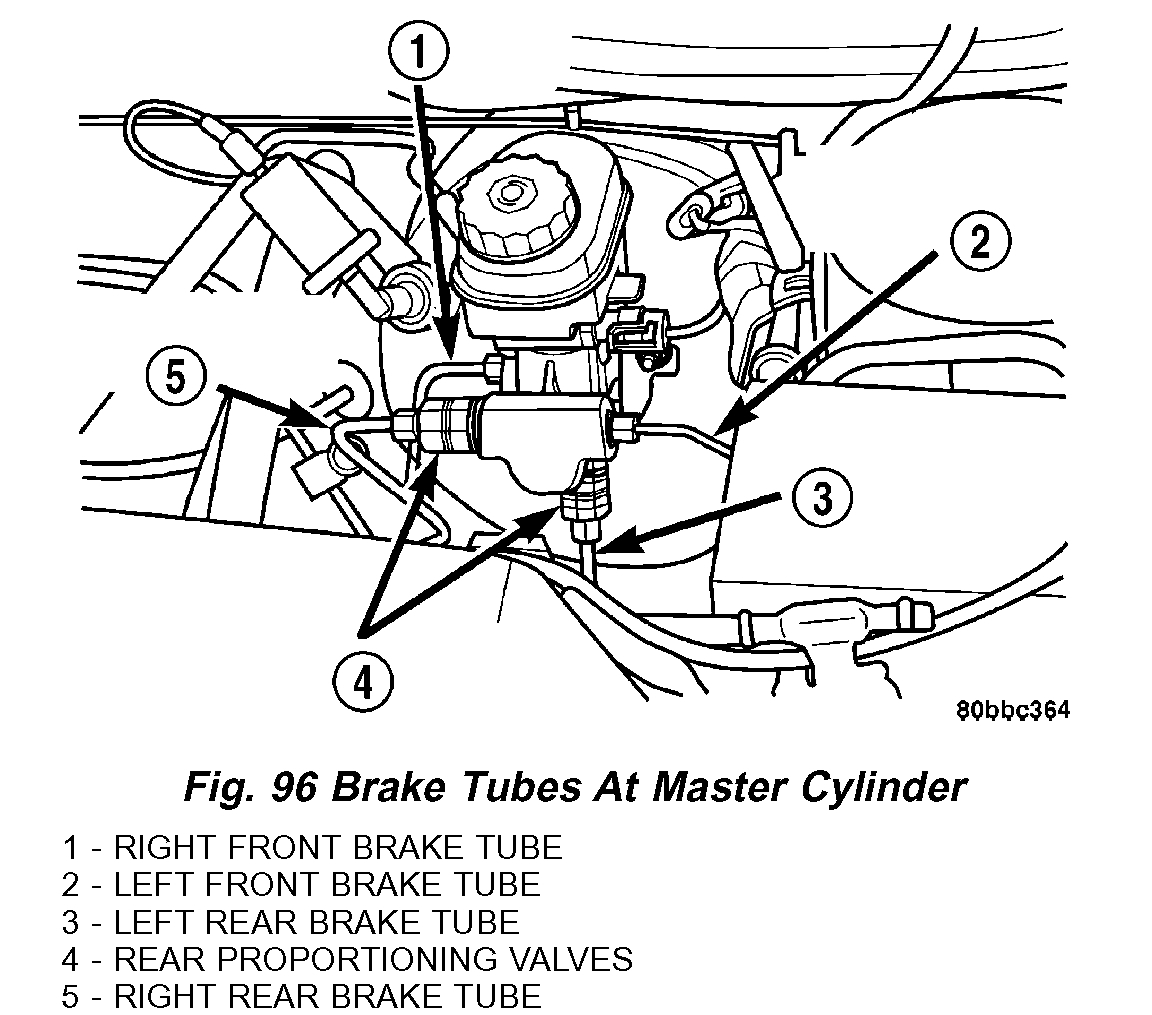
Most Fords and GMs have four steel lines connected to the master cylinder so this trick won't work. There must be only two lines on the same side, like most Chrysler products. Most people just unbolt everything, then pull the old master cylinder out. Fluid dribbles out of the lines, and later, air is pushed down the lines resulting in the need to bleed at all four wheels. Some air can get trapped in a high curve in a steel line and won't completely bleed out. That will cause a brake pedal that is always low and mushy. That's what my method avoids.

To prevent this from happening, loosen the two line nuts just a little, THEN unbolt the master cylinder from the power booster. Pay very close attention to the steel lines as you turn the nuts to be sure they're not twisting. If the nuts don't spin freely, the lines will twist and snap off. Then you have another repair to do that involves new fittings and making double flares. Double flares are hard enough for a professional. They're harder to do in the confines of the engine compartment. Pull it off the mounting bolts, then twist it up so the two lines bend upward just enough so those first two inches are not parallel to the ground. Then you can remove the lines. This will prevent the brake fluid from running out of them. Be careful to not drip brake fluid on the car's paint.

After bench bleeding the new master cylinder, leave the reservoir at least half full of fluid. When you install it, you will have to tilt it to line up the ports with the line nuts. Remove one plastic bench-bleeding fitting, then install the steel line nut hand tight. While you do this, fluid will be dripping out, keeping the line and port full. If the nut doesn't thread in easily by hand, it's cross-threaded. Start over and try again until the nut goes in by hand, typically four or five revolutions. If you damage the threads in the aluminum ports, there will be no warranty and you will have to buy another master cylinder.

Once the first line is connected hand tight, do the same thing with the second line. When both fittings are hand tight, twist the master cylinder and lines back down to their normal position, and bolt it to the booster. You'll need a helper for the next step. There will be a little air in the ports and tops of the lines. Tighten the front nut, then loosen the REAR nut about a quarter turn, then have your helper push the brake pedal down very slowly. It should take them about 15 seconds to push it half way to the floor. Any faster, and the air might still get forced down the lines. While the pedal is moving down, you will see air bubbles coming out around the nut's threads. When the bubbles stop appearing, tighten the nut. Tell your helper to not allow the pedal to move back up until you tell them the nut is tight. Raising the pedal too soon will allow air to be drawn back in through the nut's threads.

When the nut is tight, tell your helper to allow the pedal to come back up QUICKLY. The brake fluid rushing back to the reservoir will wash any air bubbles back too. Do this procedure a second or third time until you don't see any air bubbles, then do the same thing to the front brake line.

As long as the brake pedal is pushed down very slowly, no air will be pushed down the steel lines. The fluid will go down, and the air bubbles will float back up. When the pedal is released quickly, any air bubbles that stick to the lines will be drawn back up to the reservoir.

Tighten both nuts, then wash the area with brake parts cleaner. Once the area is dry, hold firm, steady pressure on the pedal for about a minute. If it sinks slowly, there's a leak. Whether it leaks or not, check the fittings. If they're dry, fill the reservoir. Since you just installed new front pads, all the fluid that was in the calipers got pushed back up to the reservoir. You can fill the reservoir almost full because the level can only go lower as the pads wear.

A few additional notes: All containers of brake fluid must remain closed except when pouring to prevent absorption of moisture from the air. The moisture promotes corrosion of metal parts, and it lowers the boiling point of the fluid. Brake components can easily get over 212 degrees and this heat will transfer into the fluid. When the moisture boils, it makes air bubbles which compress causing a mushy brake pedal. The caps should remain on the reservoir except when filling or checking the fluid.

Moisture has a way of finding its way into the hydraulic system through seals and porous rubber hoses. Some people change the fluid every few years to prevent corrosion of metal parts. The best way for a do-it-yourselfer to do this is to open a bleeder screw, then let it gravity bleed for a few minutes. To prevent the heartbreak of a mushy pedal, you must never allow the reservoir to run dry. Professionals will suck out most of the old fluid before refilling with new fluid. That reduces the diluting of the new fluid with old, and the need to run a lot more new fluid through the system. Old brake fluid normally turns dark brown from being hot. When you see clear fluid coming out of the bleeder screws, you know most of the old fluid is out of that line. If the fluid drips very slowly or stops flowing, vacuum has built up in the reservoir. You will need to loosen either one of the caps to relieve the vacuum. You will also find that the rubber bladder seals under the caps have pulled down. This normally happens as the fluid level goes down when the front pads wear. So this can happen normally, you should push those bladders back into the caps. Be sure your fingers are clean when you touch them. Oil and grease on your fingers is one of the most common ways brake fluid becomes contaminated with petroleum products. Oil, transmission fluid, and power steering fluid will all destroy rubber hoses and seals.

Use a flare nut wrench, also called a line wrench, on the soft metal nuts. A regular open end wrench will tend to round them off. If only one nut is corroded to the steel line, remove the other line, then rotate the master cylinder to unscrew it from the line. Heat the stuck nut a little with a propane torch, then try working it loose with the line wrench. Tapping on it with a small hammer might help to loosen it up. Do not use any kind of penetrating oil or lubricant because the residue will get inside the line and contaminate the fluid.

If both nuts are corroded tight, loosen only one about one eighth to one quarter turn, then try tapping the steel line into the port. This might free it enough to work loose with the wrench. You might have luck heating the line where it goes into the nut, then quickly cooling it with a little water to shrink it. Avoid heating the nut itself because it's usually soft brass and the master cylinder is aluminum. Both of these will melt at relatively low temperatures. Chances are the two nuts will come loose quite easily because not much water and salt sprays up there to cause the corrosion. Corroded nuts are much more common on the lower line fittings by the rubber hoses.

Although unlikely, any air left in the lines near the master cylinder will usually work its way out from repeatedly holding the brake pedal down at stop lights. Rear drum brakes need a lot of fluid flow to move the shoes. The returning fluid brings air bubbles with it to the reservoir. Front disc brake pistons don't move very far so the volume of fluid flow is small. If you have reason to suspect air in the front lines, a quick trick is to remove the wheels, then use a flat blade screwdriver as a pry bar to push the pistons back into the calipers. Doing so will move a great deal of fluid into the reservoir, and the air will go with it. Then, be sure to pump the brake pedal again until the pistons move out to the rotors and the pedal gets solid. This is a good time to practice only pushing the pedal half way to the floor.

When this is all done, if you still have a low pedal, try pumping it quickly three or four times, then holding it down. If it pumps up and stays high and firm, release pressure for five seconds, then press it again once. If it now goes down too far again, the rear drum shoes are out of adjustment. When you pump the pedal rapidly, the master cylinder pistons take a new bite of fluid before the shoes have fully retracted and the fluid has returned. If you can't pump up the pedal under any circumstances, there's still some air in the system. You might have no choice but to bleed at the wheels, but I've never had to resort to that when I bled the lines at the master cylinder with a helper.

Caradiodoc
Was this
answer
helpful?
Yes
No
+2
Thursday, March 11th, 2021 AT 1:57 PM (Merged)

Please login or register to post a reply.

Sponsored links