WATER PUMP REPLACEMENT
REMOVAL:
Disconnect the negative battery cable.
Raise and safely support the vehicle. Remove the right inner splash shield.
Remove the accessory drive belts and power steering pump.
Drain the cooling system into a suitable container.
Securely support the engine from the bottom, then remove the right engine mount.
Remove the power steering pump bracket bolts, then set the pump and bracket assembly aside, but the power steering lines do not need to be disconnected.
Remove the right engine mount bracket.
Remove the timing belt tensioner and timing belt, as outlined later in this section.
Remove the camshaft sprocket(s) and inner timing belt cover.
Unfasten the water pump-to-engine attaching screws, then remove the water pump from the engine.
Remove and discard the water pump O-ring, and thoroughly clean the mating surfaces.
INSTALLATION:
Install a new O-ring gasket in the water pump O-ring groove. Hold the O-ring in place with a few small dabs of suitable silicone sealant.
WARNING
Before proceeding, make sure the O-ring gasket is properly seated in the water pump groove before tightening the screws. A improperly installed O-ring could cause a coolant leak.
Position the water pump to the block and install the retainers. Tighten the retainers to 9 ft. lbs. (12 Nm). Use a pressure tester to pressurize the cooling system to 15 psi and check the water pump shaft seal and O-ring for leaks.
Rotate the pump by hand to check for freedom of movement.
Install the inner timing belt cover, timing belt and tensioner.
Install the right engine mount bracket and engine mount.
Refill the cooling system with the proper type and amount of coolant.
Install the power steering pump and accessory drive belts.
Connect the negative battery cable.
Use a DRB or equivalent scan tool to perform the camshaft and crankshaft timing relearn procedure, as follows:
Connect the scan tool to the Data Link Connector (located under the instrument panel, near the steering column).
Turn the ignition switch ON, and access the miscellaneous screen.
Select the re-learn cam/crank option, then follow the instructions on the scan tool screen.
TIMING BELT REPLACEMENT (with hydraulic tensioner):
REMOVAL:
Disconnect the negative battery cable.
Remove the timing belt cover.
Align the camshaft timing marks.

Loosen the hydraulic timing belt tensioner retainers, then remove the timing belt. Do NOT loosen, tighten or remove the tensioner pivot bolt.
INSTALLATION:
When the tensioner is removed from the engine, you must compression the plunger back into the tensioner body for installation, as follows:
Place the hydraulic tensioner in a vise, then slowly compress the plunger.
Index the tensioner in the vise the same way it is installed on the engine. This will ensure proper pin orientation when the tensioner is installed on the engine.
When the plunger is compressed into the tensioner body, install a 5/64 in. (9mm) hex pin through the body and plunger. This will keep the plunger in place until the tensioner is installed.
If removed, install the camshaft sprocket(s) and secure with the retaining bolts.
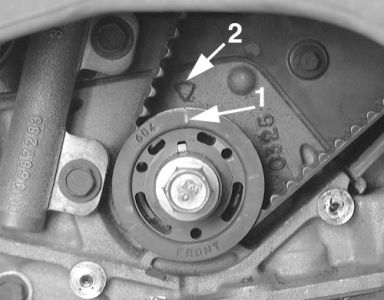
Set the crankshaft sprocket to TDC by aligning the sprocket with the arrow on the oil pump housing, then back off 3 notches before TDC.
Set the camshaft timing marks together by aligning the notches on the sprockets.

Rotate the crankshaft 1/2 tooth counterclockwise from TDC.
Install the timing belt in this direction. Starting at the crankshaft, go around the water pump sprocket, idler pulley, camshaft sprockets and then around the tensioner pulley.
Move the crankshaft sprocket to TDC to take up the belt slack. Install the tensioner to the block but do not tighten the fasteners yet.
Using a torque wrench on the tensioner pulley, apply 21 ft. lbs. (28 Nm). or torque to the tensioner.
With torque being applied to the tensioner pulley, move the tensioner up against the tensioner pulley bracket and tighten the fasteners to 23 ft. lbs. (31 Nm).
Pull the tensioner plunger pin. The pretension is correct when the pin can be removed and installed freely.
Rotate the crankshaft 2 revolutions and check the alignment of the timing marks.
Install the front timing belt cover.
If your vehicle has the mechanical tensioner please let me know so I can post proper procedures for timing belt replacement.
Thanks for using 2CarPros.com!
Saturday, February 28th, 2009 AT 3:17 PM


