Warning: Relieve the fuel system pressure before servicing fuel system components in order to reduce the risk of fire and personal injury. After relieving the system pressure, a small amount of fuel may be released when servicing the fuel lines or connections. In order to reduce the chance of personal injury, cover the regulator and the fuel line fittings with a shop towel before disconnecting. This will catch any fuel that may leak out. Place the towel in an approved container when the disconnection is complete.
Relieve the fuel system pressure. Refer to Fuel Pressure Relief Procedure. See: Fuel Pressure ReleaseService and Repair
Disconnect negative battery cable.
Remove the upper manifold assembly..
Remove the fuel return line retaining bracket screw assemblies.
Remove the fuel return line retaining bracket.
Move the return line away from the regulator.
Remove the pressure regulator assembly. Refer to Fuel Pressure Regulator. See: Fuel Pressure RegulatorService and Repair
CAUTION : In order to prevent damage to the fuel injector retaining bracket and fuel injectors, do not try to remove the fuel injectors by lifting up the fuel injector retaining bracket while the fuel injectors are still installed in the bracket slots. Do not attempt to remove the bracket without first removing the fuel pressure regulator.
Remove the injector retainer bracket attaching screws.
Carefully slide the bracket off in order to clear the injector slots and the regulator.
Remove the electrical injector connectors.
WARNING: In order to reduce the risk of fire and personal Injury, verify that the lower (small) O-ring of each Injector does not remain in the lower manifold. If the O-ring is not removed with the Injector the replacement Injector with new O-rings, will not seat properly in the Injector socket and could cause a fuel leak.
CAUTION : Cover the injector sockets in order to prevent dirt and other contaminants from entering the open fuel passages.
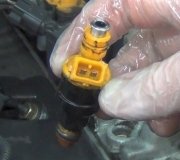
Remove the fuel injectors.
Discard the O-ring seals.
INSTALLATION PROCEDURE
WARNING: In order to reduce the risk of fire and personal injury, verify that the lower (small) O-ring of each injector does not remain in the lower manifold. If the O-ring Is not removed with the injector the replacement injector with new O-rings, will not seat properly in the injector socket and could cause a fuel leak.
After lubricating the new injector O-ring seals with clean engine oil, install on the injector assembly.
Install the bottom teed Sequential injector assembly into lower manifold injector socket with electrical connectors facing inward.
Carefully install the bracket so that the injector retaining slots and the regulator are aligned with bracket slots.
Install the electrical injector connectors.
Install the pressure regulator assembly. Refer to Fuel Pressure Regulator. See: Fuel Pressure RegulatorService and Repair
Install the injector retainer bracket attaching screws.
Tighten
Tighten the injector retainer bracket attaching screws to 3.5 Nm (31 lb. In.).
Install the upper manifold assembly. Refer to Intake Manifold.
Install the accelerator cable bracket with attaching bolts and nuts.
Tighten
Tighten the accelerator cable bracket nut to 30 Nm (22 lb. Ft.).
Tighten the accelerator cable bracket bolts to 25 Nm (18 lb. Ft.).
Tighten the fuel filler cap.
Connect the negative battery terminal.
Turn the ignition switch to the ON position for 2 seconds.
Turn the ignition switch to the OFF position for 10 seconds.
Turn the ignition switch to the ON position.
Check for fuel leaks.
Install the air intake duct.
Sunday, December 3rd, 2017 AT 1:49 PM


