Hi and thanks for using 2CarPros. Com. There is no need to remove the engine to access the pump. However, you should replace the timing belt at the same time since it will be removed to access the pump. First, I have attached directions for removal of the timing belt. Pictures 1 and 2 correlate with removal of the belt.
REMOVAL
REMOVAL - TIMING BELT
TIMING VERIFICATION
Remove the outer timing covers. Rotate the crankshaft until the pointer on the crankshaft sprocket aligns the TDC mark on the oil pump. Check to determine if the camshaft sprocket timing marks are aligned with the marks on the inner timing cover. It may take an additional full revolution of the crankshaft before the camshaft sprocket marks are aligned (Fig. 150).
CAUTION: The 3.5L is NOT a freewheeling engine. Therefore, loosen the valve train rocker assemblies before servicing the timing drive.
Perform fuel pressure release procedure.
Disconnect negative battery cable.
Remove both cylinder head covers and loosen the rocker arm assemblies.
Remove the front timing belt cover.
Mark belt running direction, if timing belt is to be reused.
CAUTION: When aligning timing marks, always rotate engine by turning the crankshaft. Failure to do so will result in valve and/or piston damage.
Rotate engine clockwise until crankshaft mark aligns with the TDC mark on oil pump housing and the camshaft sprocket timing marks are aligned with I the marks on the rear cover (Fig. 150)
Remove the timing belt tensioner (Fig. 150) and remove timing belt.
Inspect the tensioner for fluid leakage.
Inspect the pivot and bolt for free movement, bearing grease leakage, and smooth rotation. If not rotating freely, replace the arm and pulley assembly.
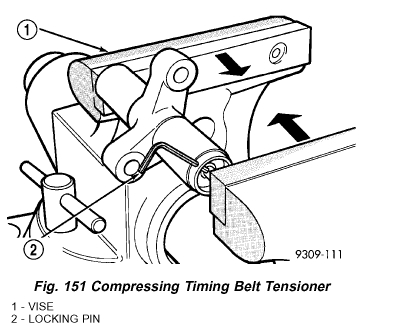
When tensioner is removed from the engine it is necessary to compress the plunger into the tensioner body.
CAUTION: Index the tensioner in the vise the same way it is installed on the engine. This ensures proper pin orientation when tensioner is installed on the engine.
Place the tensioner into a vise and SLOWLY compress the plunger (Fig. 151). Total bleed down of tensioner should take about 5 minutes.
When plunger is compressed into the tensioner body install a pin through the body and plunger to retain plunger in place until tensioner is installed.
The following procedure should be followed when reinstalling the belt. Picture 3 correlates with these directions.
INSTALLATION
INSTALLATION - TIMING BELT
CAUTION: If camshafts have moved from the timing marks, always rotate camshaft towards the direction nearest to the timing marks (DO NOT TURN CAMSHAFTS A FULL REVOLUTION OR DAMAGE to valves and/or pistons could result).
Align the crankshaft sprocket with the TDC mark on oil pump cover (Fig. 150).
Align the camshaft sprockets timing reference mark with the mark on the rear cover (Fig. 150).
Install the timing belt starting at the crankshaft sprocket going in a counterclockwise direction. Install the belt around the last sprocket. Maintain tension on the belt as it is positioned around the tensioner pulley.
NOTE: If the camshaft gears have been removed it is only necessary to have the camshaft gear retaining bolts installed to a snug torque at this time.
Holding the tensioner pulley against the belt, install the tensioner into the housing and tighten to 28 Nm (250 inch lbs.). Each camshaft sprocket mark should remain aligned the cover marks.
When tensioner is in place pull retaining pin to allow the tensioner to extend to the pulley bracket.
Rotate crankshaft sprocket 2 revolutions and check the timing marks on the camshafts and crankshaft. The marks should line up within their respective locations (Fig. 150). If marks do not line up, repeat procedure.
NOTE: If camshaft gears have been removed and timing is correct, counterhold and tighten the camshaft gears to final torque specification.
Install the front timing belt cover.
Tighten the rocker arm assemblies and install the cylinder head covers.
Connect battery
HERE are the directions for replacing the water pump. The remaining pictures are related to these directions.
2004 Chrysler Pacifica V6-3.5L VIN 4
Vehicle � Engine, Cooling and Exhaust � Cooling System � Water Pump � Service and Repair
SERVICE AND REPAIR
REMOVAL
The water pump on all models can be replaced without discharging the air conditioning system.
WARNING: DO NOT REMOVE PRESSURE CAP WITH THE SYSTEM HOT AND UNDER PRESSURE BECAUSE SERIOUS BURNS FROM COOLANT CAN OCCUR.
NOTE: It is normal for the water pump to weep a small amount of coolant from the weep hole (black stain on water pump body). Do not replace the water pump if this condition exists. Replace the water pump if a heavy deposit or a steady flow of engine coolant is evident on water pump body from the weep hole (shaft seal failure). Be sure to perform a thorough analysis before replacing water pump.
Drain cooling system.
NOTE: The water pump is driven by the timing belt.
Remove engine timing belt.
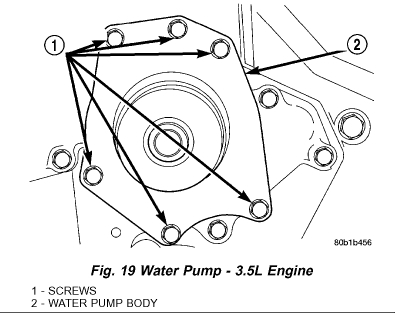
Remove water pump mounting bolts (Fig. 19). Note position of longer bolt for proper re-installation.
Remove water pump body from engine (Fig. 19).
INSPECTION
Inspect and replace the water pump if it has any of the following defects:
Damage or cracks on the pump body.
Coolant leaks; if the seal is leaking, this will be evident by traces of thick deposits of dried glycol running down the pump body and components below. A thin black stain below pump weep hole/passage is considered normal operation.
Impeller rubs inside of the rear timing belt cover.
Excessively loose or rough turning bearing.
NOTE: It is normal for the water pump to weep a small amount of coolant from the weep hole (black stain on water pump body). Do not replace the water pump if this condition exists. Replace the water pump if a heavy deposit or a steady flow of engine coolant is evident on water pump body. This indicates a shaft seal failure and pump must be replaced. Be sure to perform a thorough analysis before replacing water pump.
INSTALLATION
Clean all O-ring surfaces on pump and cover.
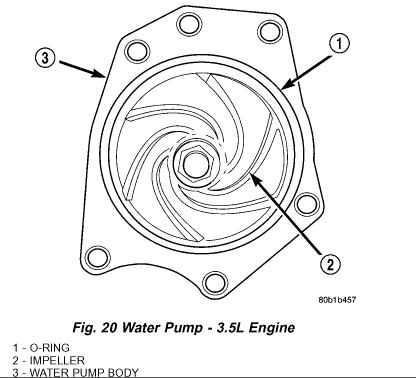
Apply Mopar Dielectric Grease or the equivalent silicone grease to the O-ring to facilitate assembly. Install new O-ring on water pump (Fig. 20).
Position water pump to engine.
Install mounting bolts and tighten to 12 Nm (105 inch lbs.).
Install timing belt.
Fill cooling system.
I hope this helps. Let me know if you have additional questions. Also, this engine is an interference engine. You must make sure the timing belt is installed correctly or internal engine damage will occur.
Take care,
Joe
Images (Click to make bigger)
Tuesday, May 29th, 2018 AT 8:24 PM